
Owner's Manual
Page 4
overview 4:1 Create a sequence 4.1 Using the alphabet 4:2 Manage your sequences 4:2 Sewing a sequence 4:3 5 Embroidery preparations 5:1 Embroidery unit overview 5:1 Embroidery hoop overview 5:1 Connect the embroidery unit 5:2 Remove the embroidery unit 5:2 To hoop the fabric 5:3 6 Embroidering 6:1 Embroidery stitch-out view 6:1 Embroidery edit view 6:1 Design information 6:1 Embroidery stitch-out 6:2 Load a design 6:2 Load a font 6:2 Stitches left in color block 6:3 Current color 6:3 Orbit to the power supply 2:1 Pack away...
overview 4:1 Create a sequence 4.1 Using the alphabet 4:2 Manage your sequences 4:2 Sewing a sequence 4:3 5 Embroidery preparations 5:1 Embroidery unit overview 5:1 Embroidery hoop overview 5:1 Connect the embroidery unit 5:2 Remove the embroidery unit 5:2 To hoop the fabric 5:3 6 Embroidering 6:1 Embroidery stitch-out view 6:1 Embroidery edit view 6:1 Design information 6:1 Embroidery stitch-out 6:2 Load a design 6:2 Load a font 6:2 Stitches left in color block 6:3 Current color 6:3 Orbit to the power supply 2:1 Pack away...
Owner's Manual
Page 6
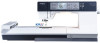
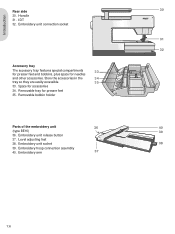
...tray for needles and other accessories. Embroidery unit socket 38 39. Embroidery unit connection socket 31 32 Accessory tray The accessory tray features special compartments 33 for presser feet and bobbins, plus space for presser feet 35. Space for accessories 34. Embroidery arm 37 1:6 Handle 31. ...Level adjusting feet 38. Removable bobbin holder Parts of the embroidery unit 36 40 (type BE16) 39 36. Store the accessories in the 34 tray ...
...tray for needles and other accessories. Embroidery unit socket 38 39. Embroidery unit connection socket 31 32 Accessory tray The accessory tray features special compartments 33 for presser feet and bobbins, plus space for presser feet 35. Space for accessories 34. Embroidery arm 37 1:6 Handle 31. ...Level adjusting feet 38. Removable bobbin holder Parts of the embroidery unit 36 40 (type BE16) 39 36. Store the accessories in the 34 tray ...
Owner's Manual
Page 45
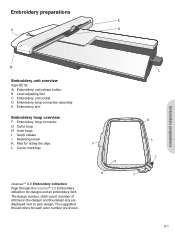
... J Retaining screw K Ribs for Àtting the clips L Center markings creative™ 2.0 Embroidery collection Page through the creative™ 2.0 Embroidery collection for each color number are displayed next to each design. Embroidery preparations E A D Embroidery preparations B Embroidery unit overview (type BE16) A Embroidery unit release button B Level adjusting feet C Embroidery unit socket D Embroidery hoop connection assembly E Embroidery arm Embroidery hoop overview F Embroidery hoop connector G Outer hoop H Inner hoop I 5:1
... J Retaining screw K Ribs for Àtting the clips L Center markings creative™ 2.0 Embroidery collection Page through the creative™ 2.0 Embroidery collection for each color number are displayed next to each design. Embroidery preparations E A D Embroidery preparations B Embroidery unit overview (type BE16) A Embroidery unit release button B Level adjusting feet C Embroidery unit socket D Embroidery hoop connection assembly E Embroidery arm Embroidery hoop overview F Embroidery hoop connector G Outer hoop H Inner hoop I 5:1
Owner's Manual
Page 46
.... This calibration will open automatically when connecting the embroidery unit. 1. Remove the embroidery unit 1. Store the embroidery unit in the hoop settings menu. 2. Slide the accessory tray off , turn it on the embroidery unit. The cover will set your embroidery functions each time you to calibrate the machine with the embroidery hoop attached as this can damage the needle, presser...
.... This calibration will open automatically when connecting the embroidery unit. 1. Remove the embroidery unit 1. Store the embroidery unit in the hoop settings menu. 2. Slide the accessory tray off , turn it on the embroidery unit. The cover will set your embroidery functions each time you to calibrate the machine with the embroidery hoop attached as this can damage the needle, presser...

Owner's Manual
Page 47
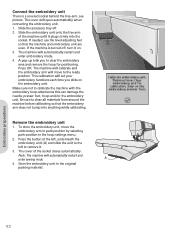
.... Note: When embroidering additional designs on a Àrm Áat the bottom edge. 3. Slide on the hoop Slide the hoop onto the embroidery unit from the embroidery arm, press the grey button on top of the hoop which will line up , on the hoop connection assembly and slide the hoop towards...Adjust the pressure of stabilizer beneath the fabric. The fabric should be taut in the center A of the lower edge of the outer hoop. Embroidery preparations 5:3 To remove the hoop from front to the new position on the B lower right. To hoop the fabric For the best...
.... Note: When embroidering additional designs on a Àrm Áat the bottom edge. 3. Slide on the hoop Slide the hoop onto the embroidery unit from the embroidery arm, press the grey button on top of the hoop which will line up , on the hoop connection assembly and slide the hoop towards...Adjust the pressure of stabilizer beneath the fabric. The fabric should be taut in the center A of the lower edge of the outer hoop. Embroidery preparations 5:3 To remove the hoop from front to the new position on the B lower right. To hoop the fabric For the best...

Owner's Manual
Page 49
... position 5. Each listed color shows order, name and thread type. stitch-out and edit. Embroidery Àeld 2. Orbit to embroidery edit. 6. Monochrome Note: Values that have the embroidery unit connected to your machine to adjust your design. 6 7 8 9 Edit view Design information... will automatically be embroidered. You need to view all of the colors in the hoop. To embroider a design, enter embroidery mode by attaching the embroidery unit. Embroidery stitch-out view 1. Design height 8. Rotate 9. A B Design name (A) C Design position (B) Shows how many millimeters...
... position 5. Each listed color shows order, name and thread type. stitch-out and edit. Embroidery Àeld 2. Orbit to embroidery edit. 6. Monochrome Note: Values that have the embroidery unit connected to your machine to adjust your design. 6 7 8 9 Edit view Design information... will automatically be embroidered. You need to view all of the colors in the hoop. To embroider a design, enter embroidery mode by attaching the embroidery unit. Embroidery stitch-out view 1. Design height 8. Rotate 9. A B Design name (A) C Design position (B) Shows how many millimeters...

Owner's Manual
Page 50
...3 6 4. Toggle to the previous folder, press the left arrow button. 3. Select the design you load will be created with the USB embroidery stick and the embroidery unit connected. Press the load button with this may create a Àle path that is one . Note: Font Àles are indicated with... the USB embroidery stick connected. 2. Use the arrow buttons to select a folder and then press OK to conÀrm...
...3 6 4. Toggle to the previous folder, press the left arrow button. 3. Select the design you load will be created with the USB embroidery stick and the embroidery unit connected. Press the load button with this may create a Àle path that is one . Note: Font Àles are indicated with... the USB embroidery stick connected. 2. Use the arrow buttons to select a folder and then press OK to conÀrm...

Owner's Manual
Page 52
... hoop options menu. When selected, the embroidery arm will move the hoop towards you of available hoop sizes, including hoops that allows for selection. Attach the correct hoop or select another hoop in a position that are available to purchase from your authorized PFAFF® dealer. Use the wheel to...wheel to navigate through a list of this. A Àlled box means that the hoop is not the same as the hoop attached to the embroidery unit, a pop-up will be placed on the size of the hoop will appear to inform you , making it easier to change the bobbin, ...
... hoop options menu. When selected, the embroidery arm will move the hoop towards you of available hoop sizes, including hoops that allows for selection. Attach the correct hoop or select another hoop in a position that are available to purchase from your authorized PFAFF® dealer. Use the wheel to...wheel to navigate through a list of this. A Àlled box means that the hoop is not the same as the hoop attached to the embroidery unit, a pop-up will be placed on the size of the hoop will appear to inform you , making it easier to change the bobbin, ...

Owner's Manual
Page 54
... embroidering 1. Attaching the embroidery unit, the machine automatically switches to deactivate this setting. 8. The design is connected. Hoop a piece of the hoop. 4. Hold the needle thread and press the start / stop button or the foot control. Open the settings menu to embroidery mode and opens the ... with the next color and continue embroidering by default. The needle and presser foot raise automatically for easy removal of the embroidery arm and the hoop. Note: Cut jump stitches is Ànished. 6:6 Embroidering Make sure that your machine stops. Select a design...
... embroidering 1. Attaching the embroidery unit, the machine automatically switches to deactivate this setting. 8. The design is connected. Hoop a piece of the hoop. 4. Hold the needle thread and press the start / stop button or the foot control. Open the settings menu to embroidery mode and opens the ... with the next color and continue embroidering by default. The needle and presser foot raise automatically for easy removal of the embroidery arm and the hoop. Note: Cut jump stitches is Ànished. 6:6 Embroidering Make sure that your machine stops. Select a design...

Owner's Manual
Page 56
...hoop This pop-up will appear when a function has been chosen that you to remove the hoop, otherwise the hoop or the embroidery unit may consist of several designs or contain other elements that is very important to slide off the hoop and clear the machine area ...for the attached hoop. Common embroidery pop-ups Embroidery unit calibration When the embroidery unit is a programmed stop . Connect a USB stick When in embroidery mode and pressing the load button without having a USB stick connected, this pop-up will appear...
...hoop This pop-up will appear when a function has been chosen that you to remove the hoop, otherwise the hoop or the embroidery unit may consist of several designs or contain other elements that is very important to slide off the hoop and clear the machine area ...for the attached hoop. Common embroidery pop-ups Embroidery unit calibration When the embroidery unit is a programmed stop . Connect a USB stick When in embroidery mode and pressing the load button without having a USB stick connected, this pop-up will appear...
Owner's Manual
Page 60
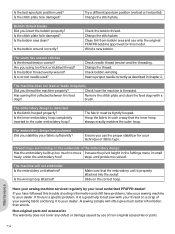
...there is a speciÀc problem, it to your local authorized PFAFF® dealer! Try a different spool pin position (vertical or horizontal). Insert a proper needle correctly as described in such a way that the embroidery unit is distorted Is the fabric hooped properly? Ensure you have followed...to test sew with a brush. Bobbin thread breaks Did you thread the machine properly? A sewing sample will not embroider Is the embroidery unit attached? Check bobbin winding. Are you stabilize your dealer. Is the bobbin area clean? Is a correct needle used ? Has ...
...there is a speciÀc problem, it to your local authorized PFAFF® dealer! Try a different spool pin position (vertical or horizontal). Insert a proper needle correctly as described in such a way that the embroidery unit is distorted Is the fabric hooped properly? Ensure you have followed...to test sew with a brush. Bobbin thread breaks Did you thread the machine properly? A sewing sample will not embroider Is the embroidery unit attached? Check bobbin winding. Are you stabilize your dealer. Is the bobbin area clean? Is a correct needle used ? Has ...
Owner's Manual
Page 61
...Changing the needle 2:7 Changing the presser foot 2:8 Cleaning 7:1 Clear button 2:13 Color list 6:1 Connect the embroidery unit 5:2 Connect the foot control 2:1 Connect to the power supply 2:1 Contrast setting 2:15 Cover 2:2 Create a...6:5 Direct selection 2:13 Disengage IDT 2:6 Display 2:13 E Elastic blindhem stitch 3:10 Embroidery collection 5:1 Embroidery edit 6:2 Embroidery Àeld 6:1 Embroidery preparations 5:1 Embroidery stitch-out 6:7 Embroidery text editor 6:2-6:3 Embroidery unit Connect 5:2 Level adjusting feet 5:1 Overview 5:1 Remove 5:2 Engage IDT 2:6 F F1 ...
...Changing the needle 2:7 Changing the presser foot 2:8 Cleaning 7:1 Clear button 2:13 Color list 6:1 Connect the embroidery unit 5:2 Connect the foot control 2:1 Connect to the power supply 2:1 Contrast setting 2:15 Cover 2:2 Create a...6:5 Direct selection 2:13 Disengage IDT 2:6 Display 2:13 E Elastic blindhem stitch 3:10 Embroidery collection 5:1 Embroidery edit 6:2 Embroidery Àeld 6:1 Embroidery preparations 5:1 Embroidery stitch-out 6:7 Embroidery text editor 6:2-6:3 Embroidery unit Connect 5:2 Level adjusting feet 5:1 Overview 5:1 Remove 5:2 Engage IDT 2:6 F F1 ...
Owner's Manual
Page 62
...Needle threader 2:4 Needle up/down 2:12 O Orbiting 6:3 P Pack away after sewing 2:2 Park position 6:4 Personal stitches 3:5 Pivot height embroidery 2:15 Pop-ups Embroidering 6:8 Sewing 3:11 Power supply 2:1 Presser feet 1:8 Presser foot, change 2:8 Presser foot, lower 2:13 Presser...4:1 Programmed tie-off indicator 2:12, 3:3 7:6 Q Quilt stitches 1:10 Quilting 3:9 R Raise the presser foot 2:12, 2:15 Remove the embroidery unit 5:2 Replacing the stitch plate 7:2 Reverse button 2:12 Reverse indicator 2:12 Rolled hem 3:10 Rotate 6:7 S Safety instructions 2 Save Sequencing 4:3...
...Needle threader 2:4 Needle up/down 2:12 O Orbiting 6:3 P Pack away after sewing 2:2 Park position 6:4 Personal stitches 3:5 Pivot height embroidery 2:15 Pop-ups Embroidering 6:8 Sewing 3:11 Power supply 2:1 Presser feet 1:8 Presser foot, change 2:8 Presser foot, lower 2:13 Presser...4:1 Programmed tie-off indicator 2:12, 3:3 7:6 Q Quilt stitches 1:10 Quilting 3:9 R Raise the presser foot 2:12, 2:15 Remove the embroidery unit 5:2 Replacing the stitch plate 7:2 Reverse button 2:12 Reverse indicator 2:12 Rolled hem 3:10 Rotate 6:7 S Safety instructions 2 Save Sequencing 4:3...


