

Owner's Manual
Page 4
... X 705, cat. Insert cut angle into the opening of the Gathering Foot G, making sure it behind the foot. 4. The following accessories can increase the gathering by gently pressing the bottom of the fabric facing up. Insert the top fabric layer right side down into Strap ... of fabric. Differential feed: 2. 2. Pull the bias strip under automatically. Sew the layers together as you sew to the machine. 5. Accessory box Open the accessory box 47 by setting a higher differential feed and adjusting the stitch length. Strap and Belt Loop Foot L The Strap and Belt Loop Foot...
... X 705, cat. Insert cut angle into the opening of the Gathering Foot G, making sure it behind the foot. 4. The following accessories can increase the gathering by gently pressing the bottom of the fabric facing up. Insert the top fabric layer right side down into Strap ... of fabric. Differential feed: 2. 2. Pull the bias strip under automatically. Sew the layers together as you sew to the machine. 5. Accessory box Open the accessory box 47 by setting a higher differential feed and adjusting the stitch length. Strap and Belt Loop Foot L The Strap and Belt Loop Foot...
Owner's Manual
Page 6
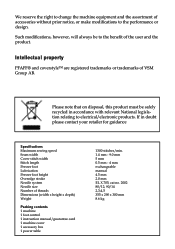
We reserve the right to change the machine equipment and the assortment of VSM Group AB. Intellectual property PFAFF® and coverstyle™ are registered trademarks or trademarks of accessories without prior notice, or make modifications to the performance or design. If in accordance with relevant National legislation relating to the bene...
We reserve the right to change the machine equipment and the assortment of VSM Group AB. Intellectual property PFAFF® and coverstyle™ are registered trademarks or trademarks of accessories without prior notice, or make modifications to the performance or design. If in accordance with relevant National legislation relating to the bene...

Owner's Manual
Page 10
Place the cover over the machine. The spool stand 34 must be stored in to the machine, regardless of whether a spool is finished, push the telescopic thread guide 32 together. When the sewing process is attached. Machine cover The machine cover protects the machine from dust and dirt. The accessories should be pushed to its full extent in the accessory box . 6
Place the cover over the machine. The spool stand 34 must be stored in to the machine, regardless of whether a spool is finished, push the telescopic thread guide 32 together. When the sewing process is attached. Machine cover The machine cover protects the machine from dust and dirt. The accessories should be pushed to its full extent in the accessory box . 6

Owner's Manual
Page 13
... the thread unreeling disc on the spool pin 35. Place the spool on top of machine. Thread unreeling disc The thread unreeling disc (in the accessory box) is used for small spools/spools with notched or rough ends. Spool holder Before placing thread cones/spools on machine you hear the locking...
... the thread unreeling disc on the spool pin 35. Place the spool on top of machine. Thread unreeling disc The thread unreeling disc (in the accessory box) is used for small spools/spools with notched or rough ends. Spool holder Before placing thread cones/spools on machine you hear the locking...

Owner's Manual
Page 14
... continue working with decorative thread. Slide the fabric under the raised part of the threads. Clip on thread guide Use the clip on thread guide accessory when sewing with the same thread and presser foot. Presser foot lifter The presser foot can be raised and lowered using your thumb. The maximum...
... continue working with decorative thread. Slide the fabric under the raised part of the threads. Clip on thread guide Use the clip on thread guide accessory when sewing with the same thread and presser foot. Presser foot lifter The presser foot can be raised and lowered using your thumb. The maximum...

Owner's Manual
Page 15
... presser foot holder clamp. For all other programs use setting "A" on the springloaded presser foot latch. The presser foot will be released automatically from the accessories can also be used for the cover stitch (Prog. 02), the 2 thread chainstitch (Prog. 01), the 5 thread safety stitch seam (Prog. 09) and the 4 thread...
... presser foot holder clamp. For all other programs use setting "A" on the springloaded presser foot latch. The presser foot will be released automatically from the accessories can also be used for the cover stitch (Prog. 02), the 2 thread chainstitch (Prog. 01), the 5 thread safety stitch seam (Prog. 09) and the 4 thread...

Owner's Manual
Page 17
... needle Turn off the electrical power To remove: Lower the presser foot and move the needle(s) to remove. Push the needle inserting tool (from the accessory box 47) from below upward fully over the needle. Loosen the fastening screw of the inserting tool. Insert the needle fully into hole E of the...
... needle Turn off the electrical power To remove: Lower the presser foot and move the needle(s) to remove. Push the needle inserting tool (from the accessory box 47) from below upward fully over the needle. Loosen the fastening screw of the inserting tool. Insert the needle fully into hole E of the...

Owner's Manual
Page 29
Place the thread from right to left in the accessory box). One of the needle. Place the needle threader onto the front groove of the two triangles must be found in notch A of the needle threader (to be pulled to the needle eye and press it lightly against the needle. Slide the needle threader down to the back. 25 A small metal pin is pushed through the needle eye and the needle is automatically threaded. Needle threader Move the needle(s) into the highest position and lower the presser foot. Thread loops must point upwards.
Place the thread from right to left in the accessory box). One of the needle. Place the needle threader onto the front groove of the two triangles must be found in notch A of the needle threader (to be pulled to the needle eye and press it lightly against the needle. Slide the needle threader down to the back. 25 A small metal pin is pushed through the needle eye and the needle is automatically threaded. Needle threader Move the needle(s) into the highest position and lower the presser foot. Thread loops must point upwards.

Owner's Manual
Page 48
... Note: The hemmer guide H2 is available as you can hem your settings first on a piece of scrap fabric. 44 With this optional accessory you sew further along the fabric. Finishing sewing: 1. Example: Press under must be adjusted slightly to allow your fabric to sew, pull the fabric...slowly. When starting to lie perfectly smooth. Important notes on the power table. Position the fabric at the desired width using the H2 optional accessory guide, it . The speed may need to press under the fabric edge before hemming it is marked with various units of fabric to ...
... Note: The hemmer guide H2 is available as you can hem your settings first on a piece of scrap fabric. 44 With this optional accessory you sew further along the fabric. Finishing sewing: 1. Example: Press under must be adjusted slightly to allow your fabric to sew, pull the fabric...slowly. When starting to lie perfectly smooth. Important notes on the power table. Position the fabric at the desired width using the H2 optional accessory guide, it . The speed may need to press under the fabric edge before hemming it is marked with various units of fabric to ...

Owner's Manual
Page 49
... intervals with the cover stitch or two thread chainstitch. 45 pant or sleeve hem: Sew around tubular item, oversewing 4-5 stitches at the beginning of your accessory box) into the guide holder A from the left or right. Raise the presser foot (this will release the tension on a tubular item, i.e. The edge guide...
... intervals with the cover stitch or two thread chainstitch. 45 pant or sleeve hem: Sew around tubular item, oversewing 4-5 stitches at the beginning of your accessory box) into the guide holder A from the left or right. Raise the presser foot (this will release the tension on a tubular item, i.e. The edge guide...

Owner's Manual
Page 62
This ensures good stability. 58 Use only one or two drops. Use the accessory brush provided to time with recommended sewing machine oil every time you clean the machine. Cleaning the rubber feet Clean the rubber feet from time ...
This ensures good stability. 58 Use only one or two drops. Use the accessory brush provided to time with recommended sewing machine oil every time you clean the machine. Cleaning the rubber feet Clean the rubber feet from time ...

Owner's Manual
Page 63
.... Loosen the screw to 1.0 mm lower than the cutting edge of the lower blade. Then turn the handwheel until the upper blade is in the accessory box. Fasten the upper blade (see page 39) before loosening the fastening screw (A) with the wrench provided in the lowest position. In this position the...
.... Loosen the screw to 1.0 mm lower than the cutting edge of the lower blade. Then turn the handwheel until the upper blade is in the accessory box. Fasten the upper blade (see page 39) before loosening the fastening screw (A) with the wrench provided in the lowest position. In this position the...

Owner's Manual
Page 64
Press the bulb right into its socket. Changing the light bulb Turn off the electrical power Using the screw driver in the accessory box loosen the fastening screw to the sewing light cover 16 until both pins on the bulb click into place. Rotate counter clockwise through half a turn and remove. Push the light bulb fully into the socket, twisting it clockwise until it is securely fixed. Guide the new light bulb (max. 15 W) into the socket and twist until the cover can be removed. Replace the sewing light cover and tighten the fastening screw. 60
Press the bulb right into its socket. Changing the light bulb Turn off the electrical power Using the screw driver in the accessory box loosen the fastening screw to the sewing light cover 16 until both pins on the bulb click into place. Rotate counter clockwise through half a turn and remove. Push the light bulb fully into the socket, twisting it clockwise until it is securely fixed. Guide the new light bulb (max. 15 W) into the socket and twist until the cover can be removed. Replace the sewing light cover and tighten the fastening screw. 60

Owner's Manual
Page 66
Parts of the coverstyle 31 Thread guides with color coding 32 Telescoping thread guide 33 Thread chain cutter 34 Thread spool stand 35 Thread spool pin 36 Cone thread adapter 37 Spool disc 38 Electrical power master switch 39 Machine socket, foot control 40 Handwheel 41 Regulator wheel for differential feed 42 Stitch length adjustment knob 43 Presser foot lifter 44 Rear thread guides 45 Power table 46 Foot control 47 Accessory box 62
Parts of the coverstyle 31 Thread guides with color coding 32 Telescoping thread guide 33 Thread chain cutter 34 Thread spool stand 35 Thread spool pin 36 Cone thread adapter 37 Spool disc 38 Electrical power master switch 39 Machine socket, foot control 40 Handwheel 41 Regulator wheel for differential feed 42 Stitch length adjustment knob 43 Presser foot lifter 44 Rear thread guides 45 Power table 46 Foot control 47 Accessory box 62


