
Owner's Manual
Page 3
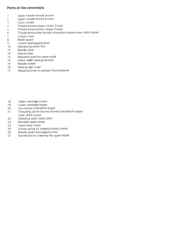
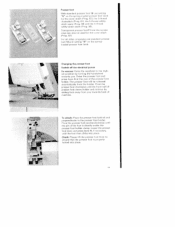
... for the two-thread chainstitch looper! Parts of the coverstyle Upper needle-thread tension 2 Upper needle-thread tension 3 Carry handle 4 Thread tension/upper looper thread 5 Thread tension/lower looper thread 6 Thread tension/two-thread chainstitch looper/cover stitch looper 7 Looper cover 8 Blade guard 9 Looper disengaging lever 10 Standard presser toot 11 Needle plate 12 Swivel plate 13 Adjusting knob for seam width 14 Seam width viewing window 15 Needle holder 16 Sewing light cover 17 Adjusting knob for presser foot pressure 18 Upper overedge looper 19...
... for the two-thread chainstitch looper! Parts of the coverstyle Upper needle-thread tension 2 Upper needle-thread tension 3 Carry handle 4 Thread tension/upper looper thread 5 Thread tension/lower looper thread 6 Thread tension/two-thread chainstitch looper/cover stitch looper 7 Looper cover 8 Blade guard 9 Looper disengaging lever 10 Standard presser toot 11 Needle plate 12 Swivel plate 13 Adjusting knob for seam width 14 Seam width viewing window 15 Needle holder 16 Sewing light cover 17 Adjusting knob for presser foot pressure 18 Upper overedge looper 19...

Owner's Manual
Page 5
... risk of Looper Cover and Swivel Plate. Never operate this sewing machine if it has a damaged cord or plug, if it is being used as contained in the instruction manual, • Never drop or insert any object into water. a Always unplug sewing machine from the electric outlet immediately after using and before cleaning. Do not pull or push fabric while stitching. This houshold sewing machine is designed to comply with...
... risk of Looper Cover and Swivel Plate. Never operate this sewing machine if it has a damaged cord or plug, if it is being used as contained in the instruction manual, • Never drop or insert any object into water. a Always unplug sewing machine from the electric outlet immediately after using and before cleaning. Do not pull or push fabric while stitching. This houshold sewing machine is designed to comply with...
Owner's Manual
Page 7
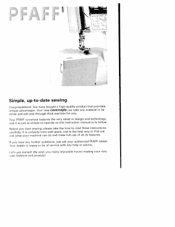
...make full use of service with any material in design and technology, and it is just as simple to operate as this instruction manual is to -date sewing Congratulations! Your dealer is the best way to find out just what your machine can take the time to be of all its stride and will sew... you . Lefs Ijet started! Before you many enjoyable hours creating your authorized PFAFF dealer. It is certainly time well spent, and is happy to read these instructions carefully. We wish you start sewing, please take any help or advice. Your PFAFF coverlock features the very latest in...
...make full use of service with any material in design and technology, and it is just as simple to operate as this instruction manual is to -date sewing Congratulations! Your dealer is the best way to find out just what your machine can take the time to be of all its stride and will sew... you . Lefs Ijet started! Before you many enjoyable hours creating your authorized PFAFF dealer. It is certainly time well spent, and is happy to read these instructions carefully. We wish you start sewing, please take any help or advice. Your PFAFF coverlock features the very latest in...
Owner's Manual
Page 9
thre iding pathS overview . . . . I . . setting . . . fencith, adjusting . . . . . . . 3:u.h .vidth latch, -v.rIeling Plescoping thread guide . . . . . 9 . hreaung the lower uv.redge looper yellowl Thr 'ading the needle(si T hr"adng the upper overedge looper (o kl .. - changing Ipper hlacle, disengaging 10 Upper blade securing . . .. 39 vVcste .ortainer . . . Threading the 2 thread rhamstitch looper cover stitch looper c1 . vcolet . . . lirading important r0e Threading Throad guides 4 1. 21 26 2 18 21 0, 7 '2 23 15 14...
thre iding pathS overview . . . . I . . setting . . . fencith, adjusting . . . . . . . 3:u.h .vidth latch, -v.rIeling Plescoping thread guide . . . . . 9 . hreaung the lower uv.redge looper yellowl Thr 'ading the needle(si T hr"adng the upper overedge looper (o kl .. - changing Ipper hlacle, disengaging 10 Upper blade securing . . .. 39 vVcste .ortainer . . . Threading the 2 thread rhamstitch looper cover stitch looper c1 . vcolet . . . lirading important r0e Threading Throad guides 4 1. 21 26 2 18 21 0, 7 '2 23 15 14...
Owner's Manual
Page 14
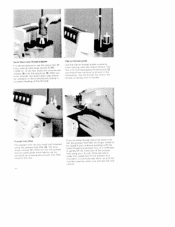
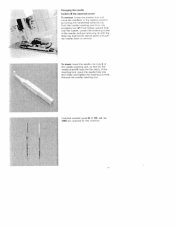
... ,ir,-i'n ruo ,'ert -i 'iJ trt'tit's,,Of I rpt Itt's to ut 3 0-i S I ' ro uttt 0 0 i0 rod 0t1'ip .ijpp rod' r' ri P 'fl '' ." Clip on thread qurde '.ti I ol") .ii PintO i;i(ie o..r ty 'vI.:ii 00 ((j oth it' n,' I pt I r,er1 it to SIt'- N th son Ite tIS rtttOI IfSC5 'nIp ptin.... nI ut ti it 0U )fltIflLitt e kit oh ud itl jsr's or 'p Ii , ',t0' -'sit ufy Or -'. ft 0 0 13 f(' [ 3t 1. I pool disc/cone thread adapter tO" .,oe fitS lct use he çoo st 37 P '5f q •s°0 uts 000 tO n I '- I -itt .t tO p ' tip tilt iy tO It 1 n; ri ;.p flttf fO ...
... ,ir,-i'n ruo ,'ert -i 'iJ trt'tit's,,Of I rpt Itt's to ut 3 0-i S I ' ro uttt 0 0 i0 rod 0t1'ip .ijpp rod' r' ri P 'fl '' ." Clip on thread qurde '.ti I ol") .ii PintO i;i(ie o..r ty 'vI.:ii 00 ((j oth it' n,' I pt I r,er1 it to SIt'- N th son Ite tIS rtttOI IfSC5 'nIp ptin.... nI ut ti it 0U )fltIflLitt e kit oh ud itl jsr's or 'p Ii , ',t0' -'sit ufy Or -'. ft 0 0 13 f(' [ 3t 1. I pool disc/cone thread adapter tO" .,oe fitS lct use he çoo st 37 P '5f q •s°0 uts 000 tO n I '- I -itt .t tO p ' tip tilt iy tO It 1 n; ri ;.p flttf fO ...
Owner's Manual
Page 15
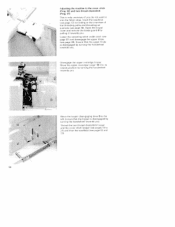
... holder, ihe ,i es-,,r 04,3 till ,e iOn rd I . itch eam ihroq 091 and I afetv stitch ran ii og 08) Ti inspi ant pr inca can P.o P oo 021 ci toil o ni I usod for rn ill -ole nuiahI 00 Oil .ii tout 10 ii otong 13" o ic ucled proast r foot -i0 0 Changing the presser foot Switch off the electrical power í...
... holder, ihe ,i es-,,r 04,3 till ,e iOn rd I . itch eam ihroq 091 and I afetv stitch ran ii og 08) Ti inspi ant pr inca can P.o P oo 021 ci toil o ni I usod for rn ill -ole nuiahI 00 Oil .ii tout 10 ii otong 13" o ic ucled proast r foot -i0 0 Changing the presser foot Switch off the electrical power í...
Owner's Manual
Page 17
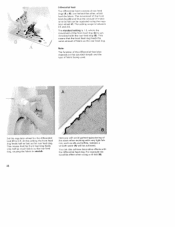
... for this machine, Remove the needle mserting tool. J I Overlock needles types EL X 705 cat no ) Ii accessory box 47) from below inward Fury over the needle. Loosen the latenr'q screw of the needle inserting tool, so that he llen key (hshnd the swivel pIrtul and or the needle down to the higlinsi p. Changing the needle Switch off the electrical power To remove: Lovvür the presser P ot...
... for this machine, Remove the needle mserting tool. J I Overlock needles types EL X 705 cat no ) Ii accessory box 47) from below inward Fury over the needle. Loosen the latenr'q screw of the needle inserting tool, so that he llen key (hshnd the swivel pIrtul and or the needle down to the higlinsi p. Changing the needle Switch off the electrical power To remove: Lovvür the presser P ot...
Owner's Manual
Page 28
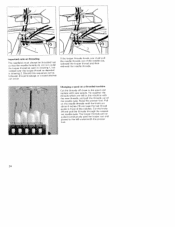
... thread guide in front of the needles. Pull p I on the needle threads until the knuts are still in (Ira Wi 119 1, hut nstead over the looper thread as depicted fl drawing 2. N lithe looper threads break, you must always be nllowed, thr@ad breakage or missed stitches an occur. Cut the frnots off close ro the spool and replace with new spools. Raise the presser...
... thread guide in front of the needles. Pull p I on the needle threads until the knuts are still in (Ira Wi 119 1, hut nstead over the looper thread as depicted fl drawing 2. N lithe looper threads break, you must always be nllowed, thr@ad breakage or missed stitches an occur. Cut the frnots off close ro the spool and replace with new spools. Raise the presser...
Owner's Manual
Page 33
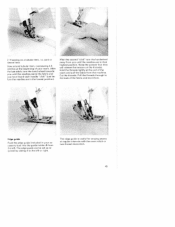
... and aisu the presser foot. Note: This feature cannot be used for char the 2 thread safety stitch seam, the 4 thread safety-stitch seam, the 2 thread hainstitch or for wards and clamp it into the inside of scissors. Thread chain cutter .tei f railing ihv -l:l W iii ..i 8" 15 20 cml lotij thi'ad chirn. Pull the thread chain for the rolled hem. 29 Butt the fabric up against the...
... and aisu the presser foot. Note: This feature cannot be used for char the 2 thread safety stitch seam, the 4 thread safety-stitch seam, the 2 thread hainstitch or for wards and clamp it into the inside of scissors. Thread chain cutter .tei f railing ihv -l:l W iii ..i 8" 15 20 cml lotij thi'ad chirn. Pull the thread chain for the rolled hem. 29 Butt the fabric up against the...
Owner's Manual
Page 38
...is disengaged ty turning the handwheel o yards you. I west position by turning the t1 n Iwhc ci tcward; Move the upper vr-u)ge looper 18 t :s I eserigage ne ppur . adjusting the machine to the cover -tttch :Prng. 02) and two-thread chainstitch (Prog 01) Lhis is only necessary f you do tot...' that the upper 1sie is disengaged by pulling it towards von. n ge 22 mc .3) \ 4-, 4 34 nsert the needle(s) we page t 3) aciording to tim the fabric odge. Open the looper 'over and remove the hlade guard 8 by turning the bandwh.wl towards you, I Lower the wive)tnq stitch width istch cc...
...is disengaged ty turning the handwheel o yards you. I west position by turning the t1 n Iwhc ci tcward; Move the upper vr-u)ge looper 18 t :s I eserigage ne ppur . adjusting the machine to the cover -tttch :Prng. 02) and two-thread chainstitch (Prog 01) Lhis is only necessary f you do tot...' that the upper 1sie is disengaged by pulling it towards von. n ge 22 mc .3) \ 4-, 4 34 nsert the needle(s) we page t 3) aciording to tim the fabric odge. Open the looper 'over and remove the hlade guard 8 by turning the bandwh.wl towards you, I Lower the wive)tnq stitch width istch cc...
Owner's Manual
Page 40
...: The function of the differential feed 3(50 depends on the set stitch length and the type of two feed dogs (A ÷ B), one behind the other, which fled the fabnc. This means that the front feed clog feeds the same amount of fabric as silk and taffeta, Instead, a smooth seam (A) will avoid gathering/puckering of the seam when working with very light fab des, such as...
...: The function of the differential feed 3(50 depends on the set stitch length and the type of two feed dogs (A ÷ B), one behind the other, which fled the fabnc. This means that the front feed clog feeds the same amount of fabric as silk and taffeta, Instead, a smooth seam (A) will avoid gathering/puckering of the seam when working with very light fab des, such as...

Owner's Manual
Page 42
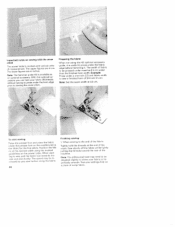
... highest position. inserting the needte plate Place the needle plate to he rear on the guide pm (A) and press down the needle plate disenqagnq lever 26, The needle plate 11 is a ed out of ta mount f h io die platc can set the desired stoch length he 3.0 or hgher, Removing the needle plate Rajse the presser foot end move the nesd ct d to 4.0 mm by turning the tch length adjustment knob...
... highest position. inserting the needte plate Place the needle plate to he rear on the guide pm (A) and press down the needle plate disenqagnq lever 26, The needle plate 11 is a ed out of ta mount f h io die platc can set the desired stoch length he 3.0 or hgher, Removing the needle plate Rajse the presser foot end move the nesd ct d to 4.0 mm by turning the tch length adjustment knob...
Owner's Manual
Page 48
...you can hem your settings fist en apicce to the and of 3i4 inch 12 cml. Preparing the fabric: When not using the H2 optional accessory guide, it optional accessory. Note: The hemmer guide H2 is available as it is marked with the cover stitch power table is useful to sewing the cover stitch. Nh so...stitch. Po'dtiun the tab a de ;tcd ,tdth j ia the iiari:cd pt 's en the a war 'able. Tho lower figures ate in cm. Sew slo.vly off the fabric .1 e v'n pitiy p iltmg the thr' ids tuwsird the roar of fabric to be pressed under the fabric edge before hemming it. Note: Set the seam...
...you can hem your settings fist en apicce to the and of 3i4 inch 12 cml. Preparing the fabric: When not using the H2 optional accessory guide, it optional accessory. Note: The hemmer guide H2 is available as it is marked with the cover stitch power table is useful to sewing the cover stitch. Nh so...stitch. Po'dtiun the tab a de ;tcd ,tdth j ia the iiari:cd pt 's en the a war 'able. Tho lower figures ate in cm. Sew slo.vly off the fabric .1 e v'n pitiy p iltmg the thr' ids tuwsird the roar of fabric to be pressed under the fabric edge before hemming it. Note: Set the seam...
Owner's Manual
Page 49
... sleeve hem: Sew around tubular item, oversewing 4 5 stitches at toe end of your ac cessory box) into the guide holder A from the machine. Hold the threads tightly at the beginning of the seam and pull the fabric from the left, The edge guide can be fore the needles are in your seam. If sewing on the threads). Raise the presser foot (this will release the tension on...
... sleeve hem: Sew around tubular item, oversewing 4 5 stitches at toe end of your ac cessory box) into the guide holder A from the machine. Hold the threads tightly at the beginning of the seam and pull the fabric from the left, The edge guide can be fore the needles are in your seam. If sewing on the threads). Raise the presser foot (this will release the tension on...
Owner's Manual
Page 50
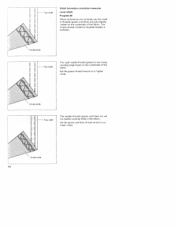
... underside of the fabric. Top side ,1 \' ; The ooper thread iviolet) is situated loosely in the fabric, Set the green and blue thread tension to a higher value. Set the green thread tension to a lower value. tJndersrd 46 Topside 1 The right needle thread (green) s too loose, causing large loops on the underside of the fabric. Stitch formation correction measures cover stitch Program 02 VVhen all tensions are correctly set, the need' l threads (green and...
... underside of the fabric. Top side ,1 \' ; The ooper thread iviolet) is situated loosely in the fabric, Set the green and blue thread tension to a higher value. Set the green thread tension to a lower value. tJndersrd 46 Topside 1 The right needle thread (green) s too loose, causing large loops on the underside of the fabric. Stitch formation correction measures cover stitch Program 02 VVhen all tensions are correctly set, the need' l threads (green and...
Owner's Manual
Page 51
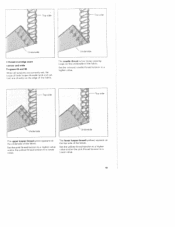
... too loose caus ng larger 9eedle thread loops on the under side of the fabric. Underside j 5-thread safety-stitch seam Program 09 Since the 5-thread safety stitch seam con sists of the 2-thread chainstitch and the 3-thread overedge seam, you can iefer to the -urrection possibilities of these seams below and on page 9. - - Note: Attach the converter (see page 32), when sewing a 4 thread safety stitch seam. the needle thread (blue...
... too loose caus ng larger 9eedle thread loops on the under side of the fabric. Underside j 5-thread safety-stitch seam Program 09 Since the 5-thread safety stitch seam con sists of the 2-thread chainstitch and the 3-thread overedge seam, you can iefer to the -urrection possibilities of these seams below and on page 9. - - Note: Attach the converter (see page 32), when sewing a 4 thread safety stitch seam. the needle thread (blue...
Owner's Manual
Page 52
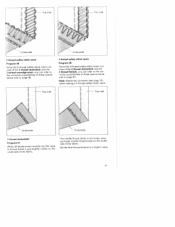
... yellow thread tension to a lower 'sine, rho lower looper thread iye(low) appeats on the underside of the fabric. Top sid- e Underside Underside 4-thread overedge seam Program 07 When all tensions are correctly set, the loops of both looper threads (pink and yel owl are directly on the edge of the fabric, The needle threads (blue and green( are too loose, causing larger loops of needle thread on...
... yellow thread tension to a lower 'sine, rho lower looper thread iye(low) appeats on the underside of the fabric. Top sid- e Underside Underside 4-thread overedge seam Program 07 When all tensions are correctly set, the loops of both looper threads (pink and yel owl are directly on the edge of the fabric, The needle threads (blue and green( are too loose, causing larger loops of needle thread on...
Owner's Manual
Page 53
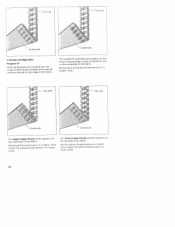
... tie eloe i he needle thread s too nose, rausi ]9 0] the unjersde °ie Isbc. T ,_ \\ rick reide f e upper looper thread (piok) peearb on 4 w jndnisde of the fabric, he pnk threod tenicri to higher value rnck r the yellow th cod tcnsion to a ower ialu e fhk' lower looper thread lyellol runedis on the top side of he fabtic, Set the 'ellnw thtead...
... tie eloe i he needle thread s too nose, rausi ]9 0] the unjersde °ie Isbc. T ,_ \\ rick reide f e upper looper thread (piok) peearb on 4 w jndnisde of the fabric, he pnk threod tenicri to higher value rnck r the yellow th cod tcnsion to a ower ialu e fhk' lower looper thread lyellol runedis on the top side of he fabtic, Set the 'ellnw thtead...

Owner's Manual
Page 68
x 300 mm 5.70 kg 64 Spec(fications 13/ n m se ç oecl S.earn width Dryer stitch width Stitch (ength Presser tPrst Lubrication Presser foot heiciht 0se 70 cm (cc e i/c Number of threads Dimensions (width x height x d.epth( Weight Packing contents 1 machine I foot control 1 instruction manual/guarantee card 1 mahine cover 1 accessory box 1 power table 200 r P n n t4 mm 700 mm 5• mm 070 mm 4 mm xch.sngeah;Ie mnanua( 470 mm 270 mm yL 4 705 it ro u0 012 CC 70.3. 4 5 355 x 294.
x 300 mm 5.70 kg 64 Spec(fications 13/ n m se ç oecl S.earn width Dryer stitch width Stitch (ength Presser tPrst Lubrication Presser foot heiciht 0se 70 cm (cc e i/c Number of threads Dimensions (width x height x d.epth( Weight Packing contents 1 machine I foot control 1 instruction manual/guarantee card 1 mahine cover 1 accessory box 1 power table 200 r P n n t4 mm 700 mm 5• mm 070 mm 4 mm xch.sngeah;Ie mnanua( 470 mm 270 mm yL 4 705 it ro u0 012 CC 70.3. 4 5 355 x 294.
Owner's Manual
Page 70
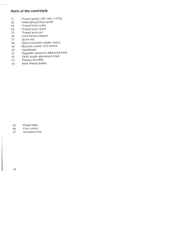
Parts of the coverstyle 31 Thread guides with color coding 32 Telescoping thread guide 33 Thread chain cutter 34 Thread spool stand 35 Thread spool pin 36 Cone thread adapter 37 Spool disc 38 Electrical power master switch 39 Machine socket. foot control 40 Handwheel 41 Regulator wheel for differential feed 42 Stitch length adjustment knob 43 Presser foot lifter 44 Rear thread guides 45 Power table 46 Foot control 47 Accessory box 66
Parts of the coverstyle 31 Thread guides with color coding 32 Telescoping thread guide 33 Thread chain cutter 34 Thread spool stand 35 Thread spool pin 36 Cone thread adapter 37 Spool disc 38 Electrical power master switch 39 Machine socket. foot control 40 Handwheel 41 Regulator wheel for differential feed 42 Stitch length adjustment knob 43 Presser foot lifter 44 Rear thread guides 45 Power table 46 Foot control 47 Accessory box 66


