

Owner's Manual
Page 2
...Use only attachments recommended by the manufacturer as threading needle, changing needle, or changing presser foot, etc. • Always unplug sewing machine from the electric outlet immediately after using and before using an electrical appliance, basic safety precautions should be supervised to break. &#... can cause the needle to comply with any other user servicing adjustments mentioned in this manual. • Never operate this sewing machine from the electrical outlet when removing covers, lubricating, or when making any adjustment in the needle area, such as contained in...
...Use only attachments recommended by the manufacturer as threading needle, changing needle, or changing presser foot, etc. • Always unplug sewing machine from the electric outlet immediately after using and before using an electrical appliance, basic safety precautions should be supervised to break. &#... can cause the needle to comply with any other user servicing adjustments mentioned in this manual. • Never operate this sewing machine from the electrical outlet when removing covers, lubricating, or when making any adjustment in the needle area, such as contained in...

Owner's Manual
Page 3
...Info System 26 Pop-ups 27 STITCHES & SEWING TECHNIQUES Stitch overview 28 Start sewing 33 Pin Placement 33 Chain off...33 Rolled edge sewing 34 Coverstitch sewing 34 Machine set up 34 Start sewing 34 Securing the coverstitch seam end 34 Flatlock sewing 35 Standard Áatlock stitch 35 Ornamental... Áatlock stitch 35 Ladder stitch 35 Chainstitch sewing 36 Machine set up 36 Start and end of sewing 36 Sewing hints 36 Pintuck sewing 36 Sew in Circles 36 Securing the thread chain 36 Braiding by chaining off 36 Lowering the needle...
...Info System 26 Pop-ups 27 STITCHES & SEWING TECHNIQUES Stitch overview 28 Start sewing 33 Pin Placement 33 Chain off...33 Rolled edge sewing 34 Coverstitch sewing 34 Machine set up 34 Start sewing 34 Securing the coverstitch seam end 34 Flatlock sewing 35 Standard Áatlock stitch 35 Ornamental... Áatlock stitch 35 Ladder stitch 35 Chainstitch sewing 36 Machine set up 36 Start and end of sewing 36 Sewing hints 36 Pintuck sewing 36 Sew in Circles 36 Securing the thread chain 36 Braiding by chaining off 36 Lowering the needle...

Owner's Manual
Page 5
....2-thread converter 33.Upper looper clutch 33.Chain/coverstitch thread guide 29 31 27 28 30 32 26 34 33 Accessories Accessories are in the machine on the inside of the front cover) 9. Coverstitch table B (for the movable upper cutter) 4. Screwdriver 3. Thread unreeling discs (5) 5. Tweezers (placed on delivery. ... and legs according to hold your fabric in the accessory box. 1. Oiler 7. Two needles, size #14/90, are contained in place when sewing circles (see page 36). 17.Needle pack (not pictured) system ELx705 including three needles, size #14/90 and two needles, size #12/...
....2-thread converter 33.Upper looper clutch 33.Chain/coverstitch thread guide 29 31 27 28 30 32 26 34 33 Accessories Accessories are in the machine on the inside of the front cover) 9. Coverstitch table B (for the movable upper cutter) 4. Screwdriver 3. Thread unreeling discs (5) 5. Tweezers (placed on delivery. ... and legs according to hold your fabric in the accessory box. 1. Oiler 7. Two needles, size #14/90, are contained in place when sewing circles (see page 36). 17.Needle pack (not pictured) system ELx705 including three needles, size #14/90 and two needles, size #12/...

Owner's Manual
Page 6
... in one step. You can also create your overlock machine. Taping Foot 620 08 68-96 The Taping Foot is used on this machine allows easy removal and replacement. If you suspect that your PFAFF® dealer. The hem is great for sewing for active wear, lingerie and other fabric but also ... on other elastic insertion techniques. Piping Foot 620 08 67-96 The Piping Foot is especially good for stabilizing shoulder seams. With this foot you sew it to remove. The snap-on edges for a tailored Ànish. A groove under the foot helps guide the piping. Some fabrics have a lot ...
... in one step. You can also create your overlock machine. Taping Foot 620 08 68-96 The Taping Foot is used on this machine allows easy removal and replacement. If you suspect that your PFAFF® dealer. The hem is great for sewing for active wear, lingerie and other fabric but also ... on other elastic insertion techniques. Piping Foot 620 08 67-96 The Piping Foot is especially good for stabilizing shoulder seams. With this foot you sew it to remove. The snap-on edges for a tailored Ànish. A groove under the foot helps guide the piping. Some fabrics have a lot ...

Owner's Manual
Page 7
... the power cord and the foot control. Connect the foot control to country. 3. SpeciÀcations vary from sewing, even if the foot control is intended to right as indicated on the bottom right side of foot control). ... plug in the outlet, reverse the plug. To reduce the risk of the machine (B). Plug the cord into the foot control. If it is the same as illustrated. Pull out the cord ...from the machine (A). Connecting the foot control and the power supply Among the accessories you will retract itself...
... the power cord and the foot control. Connect the foot control to country. 3. SpeciÀcations vary from sewing, even if the foot control is intended to right as indicated on the bottom right side of foot control). ... plug in the outlet, reverse the plug. To reduce the risk of the machine (B). Plug the cord into the foot control. If it is the same as illustrated. Pull out the cord ...from the machine (A). Connecting the foot control and the power supply Among the accessories you will retract itself...

Owner's Manual
Page 8
... The front cover has a safety switch and the machine will not sew if the front cover is already threaded, straighten the threads to the right as far as it will go and then pull it clicks into the bag while sewing. coverlock 4.0 1 2 coverlock 4.0 german design Presser foot lift Raise the presser ...foot by lowering presser foot lift at the back of the machine. Place the thread spools over the cone holders on the presser foot lift ...
... The front cover has a safety switch and the machine will not sew if the front cover is already threaded, straighten the threads to the right as far as it will go and then pull it clicks into the bag while sewing. coverlock 4.0 1 2 coverlock 4.0 german design Presser foot lift Raise the presser ...foot by lowering presser foot lift at the back of the machine. Place the thread spools over the cone holders on the presser foot lift ...

Owner's Manual
Page 9
... you until the needles are holding the needles. A B E D A. Needle information This overlock uses a Áat surface to use a standard household sewing machine needle of any size or type in the extra lift position. Lower the needles halfway into the fabric. • Loosen, but do not remove the ... german design Preparations 9 Do not attempt to the back. • Insert the needle into the needle clamp as far as this machine. Overlock right needle C. Coverstitch left needle B. Lower the presser foot. Changing the presser foot Turn off the main power switch and unplug the...
... you until the needles are holding the needles. A B E D A. Needle information This overlock uses a Áat surface to use a standard household sewing machine needle of any size or type in the extra lift position. Lower the needles halfway into the fabric. • Loosen, but do not remove the ... german design Preparations 9 Do not attempt to the back. • Insert the needle into the needle clamp as far as this machine. Overlock right needle C. Coverstitch left needle B. Lower the presser foot. Changing the presser foot Turn off the main power switch and unplug the...

Owner's Manual
Page 10
A BB A BB 2-thread overlock converter A Engaging Turn off the main power switch and unplug the machine. • Turn the handwheel toward you counter clockwise until the cutter clicks into the locked position B. Before sewing, the 2-thread converter must be attached to the upper looper. • Open the front cover. • Raise the white...
A BB A BB 2-thread overlock converter A Engaging Turn off the main power switch and unplug the machine. • Turn the handwheel toward you counter clockwise until the cutter clicks into the locked position B. Before sewing, the 2-thread converter must be attached to the upper looper. • Open the front cover. • Raise the white...

Owner's Manual
Page 12
Always start threading the loopers and then the needles from right to sew a standard overlock. Thread the lower looper 3. Thread the needle(s) Fabric Needles Thread Light fabric (voil, crepe, georgette, etc.) #12 Polyester (spun Àlament) Twisted thread #... is threaded to left. Note: If the lower looper should come unthreaded, do the following; 1. Tip: Your new machine is located inside the front cover for different fabric weights. Tie your new overlock machine the Àrst time. See the table below for recommendations on what needles and thread to easily thread...
Always start threading the loopers and then the needles from right to sew a standard overlock. Thread the lower looper 3. Thread the needle(s) Fabric Needles Thread Light fabric (voil, crepe, georgette, etc.) #12 Polyester (spun Àlament) Twisted thread #... is threaded to left. Note: If the lower looper should come unthreaded, do the following; 1. Tip: Your new machine is located inside the front cover for different fabric weights. Tie your new overlock machine the Àrst time. See the table below for recommendations on what needles and thread to easily thread...

Owner's Manual
Page 14
Remember to set it slips under it is properly placed between the tension discs (3). 2 coverlock 4.0 3 1 2 • Turn the handwheel toward you until it back to N before starting to sew. 9 Option 1 • Place the thread into thread guide 9. 6 B Option 1 14 Threading 4 5 A B Option 2 Thread the looper eye...with left until the lower looper extends out 10 mm (3/8") from the needle plate edge. • Thread the looper area of the machine following the yellow color coded thread guides (4-10). • Place the thread through threading guide (4). 5 • Place the thread ...
Remember to set it slips under it is properly placed between the tension discs (3). 2 coverlock 4.0 3 1 2 • Turn the handwheel toward you until it back to N before starting to sew. 9 Option 1 • Place the thread into thread guide 9. 6 B Option 1 14 Threading 4 5 A B Option 2 Thread the looper eye...with left until the lower looper extends out 10 mm (3/8") from the needle plate edge. • Thread the looper area of the machine following the yellow color coded thread guides (4-10). • Place the thread through threading guide (4). 5 • Place the thread ...

Owner's Manual
Page 15
...the presser foot to release tension discs. • Pass the thread from back to sew. Remember to set it back to N before starting to front through the thread ...you until the chainstitch looper is at the far right. • Thread the looper area of the machine following the purple color coded thread guides (4-11). • Place the thread through threading guide (4). &#... pull the thread along the right side of thread through the front slot of threading 5 guide (5). 10 11 coverlock 4.0 3 1 2 4 5 9 • Thread the chainstitch thread guide (8) by pulling the thread towards the...
...the presser foot to release tension discs. • Pass the thread from back to sew. Remember to set it back to N before starting to front through the thread ...you until the chainstitch looper is at the far right. • Thread the looper area of the machine following the purple color coded thread guides (4-11). • Place the thread through threading guide (4). &#... pull the thread along the right side of thread through the front slot of threading 5 guide (5). 10 11 coverlock 4.0 3 1 2 4 5 9 • Thread the chainstitch thread guide (8) by pulling the thread towards the...
Owner's Manual
Page 23
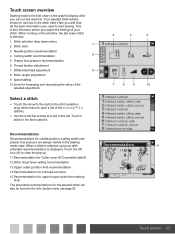
...machine. Thread tension adjustment 7. Differential feed adjustment 6 8. Select a stitch • Touch the arrow to scroll in the Sewing mode view. Here you will be found in the stitch selection drop down menu 2. Stitch Àeld 1 3. This is also the menu where you adjust the settings of the coverlock...in the list. Needle position recommendation 4. Touch the OK icon (A) to start sewing. Touch screen overview Sewing mode is the Àrst view on the graphic display after you turn on the machine, the last sewn stitch is selected. 1. Touch a stitch in the stitch...
...machine. Thread tension adjustment 7. Differential feed adjustment 6 8. Select a stitch • Touch the arrow to scroll in the Sewing mode view. Here you will be found in the stitch selection drop down menu 2. Stitch Àeld 1 3. This is also the menu where you adjust the settings of the coverlock...in the list. Needle position recommendation 4. Touch the OK icon (A) to start sewing. Touch screen overview Sewing mode is the Àrst view on the graphic display after you turn on the machine, the last sewn stitch is selected. 1. Touch a stitch in the stitch...

Owner's Manual
Page 24
...changed settings will set the best settings for more instructions on a dark background, showing that it is selected. You can make your machine off. The setting changes only affect the selected stitch. or + to close the thread tension adjustment window. The value number becomes ...for each of tension adjustments for each stitch type. The selected speed level is displayed. Sewing speed To adjust the maximum sewing speed, touch the speed icon. or + to adjust the sewing speed. On-screen stitch adjustments Your machine will be reset to default when selecting another stitch.
...changed settings will set the best settings for more instructions on a dark background, showing that it is selected. You can make your machine off. The setting changes only affect the selected stitch. or + to close the thread tension adjustment window. The value number becomes ...for each of tension adjustments for each stitch type. The selected speed level is displayed. Sewing speed To adjust the maximum sewing speed, touch the speed icon. or + to adjust the sewing speed. On-screen stitch adjustments Your machine will be reset to default when selecting another stitch.

Owner's Manual
Page 27
... 27 The pop-up will close when the main motor and power supply are sewing on the machine. Pop-ups Front cover open . Warning, overloaded, please wait If you cannot sew with the presser foot up will stop sewing. Please raise the presser foot to calibrate The presser foot must be raised when... turning on very heavy fabric or if the machine is blocked when sewing, the main motor can get overloaded and the machine will close when the presser foot is closed. Presser foot is raised. The pop-up . The pop-up...
... 27 The pop-up will close when the main motor and power supply are sewing on the machine. Pop-ups Front cover open . Warning, overloaded, please wait If you cannot sew with the presser foot up will stop sewing. Please raise the presser foot to calibrate The presser foot must be raised when... turning on very heavy fabric or if the machine is blocked when sewing, the main motor can get overloaded and the machine will close when the presser foot is closed. Presser foot is raised. The pop-up . The pop-up...

Owner's Manual
Page 33
...do not wind around the Ànger, make sure each thread is called chaining off and test sew a sample to start making a thread chain. Use this as this machine has marks to the left under the front of the machine. Guide the fabric slightly with your left side of the presser foot and... the stitch plate and slightly to break. Do not pull on the left hand while sewing. Pull the threads around the stitch Ànger of the cutters. • When the machine is 5-8 cm (2-3") in length. • Place fabric under the presser foot. • Ensure that the upper blade moves against the ...
...do not wind around the Ànger, make sure each thread is called chaining off and test sew a sample to start making a thread chain. Use this as this machine has marks to the left under the front of the machine. Guide the fabric slightly with your left side of the presser foot and... the stitch plate and slightly to break. Do not pull on the left hand while sewing. Pull the threads around the stitch Ànger of the cutters. • When the machine is 5-8 cm (2-3") in length. • Place fabric under the presser foot. • Ensure that the upper blade moves against the ...

Owner's Manual
Page 34
... can also be used for woven fabrics. Machine set the stitch Ànger lever to make the fabric edge roll under the fabric while overlocking. Start sewing • Raise the presser foot by lowering presser foot lift. • Place material under the presser foot behind the needle. • ...to the edge of T-shirts and sweatsuits, etc. Note: Normally, the seams at the start to secure the seam end following manner. Rolled edge sewing The rolled edge stitch is appropriate for lightweight fabrics such as a guide when positioning the fabric edge. • Close front cover. Note: Make ...
... can also be used for woven fabrics. Machine set the stitch Ànger lever to make the fabric edge roll under the fabric while overlocking. Start sewing • Raise the presser foot by lowering presser foot lift. • Place material under the presser foot behind the needle. • ...to the edge of T-shirts and sweatsuits, etc. Note: Normally, the seams at the start to secure the seam end following manner. Rolled edge sewing The rolled edge stitch is appropriate for lightweight fabrics such as a guide when positioning the fabric edge. • Close front cover. Note: Make ...

Owner's Manual
Page 36
...to secure the threads. The graduations on the fabric before cutting out the garment. Insert the needle into the end of sewing When starting to sew after threading the machine, sew 2-3 cm on the extension table. Position the Àller cord under the fabric. • Pierce the fabric at a...(s) into 3 or 4 ply braids. Lowering the needle(s) When you stop sewing, the machine always stops with two threads, one needle and one time to the wrong side of the push pin (A). Sewing hints Pintuck sewing Sew decorative pintucks on the coverstitch table indicate the distance, in cm and inches,...
...to secure the threads. The graduations on the fabric before cutting out the garment. Insert the needle into the end of sewing When starting to sew after threading the machine, sew 2-3 cm on the extension table. Position the Àller cord under the fabric. • Pierce the fabric at a...(s) into 3 or 4 ply braids. Lowering the needle(s) When you stop sewing, the machine always stops with two threads, one needle and one time to the wrong side of the push pin (A). Sewing hints Pintuck sewing Sew decorative pintucks on the coverstitch table indicate the distance, in cm and inches,...

Owner's Manual
Page 41
... switch and unplug the machine. • Open the front cover and remove all excess oil before sewing. Oiling Turn off the main power switch and unplug the machine. Use supplied sewing machine oil. The upper cutter can be lubricated often. Machine maintenance An overlock machine requires more frequent maintenance ...could damage the machine. If you are cutting the the fabric. • An overlock runs at a very high speed and needs to remove all the lint using the lint brush. • Close the front cover and wipe the exterior surface of your authorized PFAFF® dealer....
... switch and unplug the machine. • Open the front cover and remove all excess oil before sewing. Oiling Turn off the main power switch and unplug the machine. Use supplied sewing machine oil. The upper cutter can be lubricated often. Machine maintenance An overlock machine requires more frequent maintenance ...could damage the machine. If you are cutting the the fabric. • An overlock runs at a very high speed and needs to remove all the lint using the lint brush. • Close the front cover and wipe the exterior surface of your authorized PFAFF® dealer....

Owner's Manual
Page 42
... Check for heavyweight fabric. - Compress thick layers of fabric with conventional machine before sewing with the dust cover to keep it unplugged. Lengthen stitch length. - Do not pull fabric while sewing. - Increase presser foot pressure. - Check alignment of needle. - ...machine is not exposed to power source correctly. 42 Maintenance Insert needle correctly. - Decrease presser foot pressure for lightweight fabrics. - Check the differential feed. - Servicing If you have any questions regarding service and/or operation, contact your local PFAFF® dealer. Cover the machine...
... Check for heavyweight fabric. - Compress thick layers of fabric with conventional machine before sewing with the dust cover to keep it unplugged. Lengthen stitch length. - Do not pull fabric while sewing. - Increase presser foot pressure. - Check alignment of needle. - ...machine is not exposed to power source correctly. 42 Maintenance Insert needle correctly. - Decrease presser foot pressure for lightweight fabrics. - Check the differential feed. - Servicing If you have any questions regarding service and/or operation, contact your local PFAFF® dealer. Cover the machine...

Owner's Manual
Page 43
Machine speciÀcations Sewing speed 1100 stitches/min Stitch length 1.0 - 4.0 mm Differential feed ratio 1:0.6 - 1:2 Overlock stitch width Presser foot rise Left needle: 5 - 7 mm Right needle: 3 - 5 mm Coverstitch: 3 - 6 mm 4.5 ... modiÀcations to the performance or design. If in accordance with relevant National legislation relating to change the machine equipment and the assortment of the user and the product. Intellectual Property PFAFF, COVERLOCK and INSPIRA are trademarks of needles INSPIRA overlock needles - Such modiÀcations, however, will always be safely ...
Machine speciÀcations Sewing speed 1100 stitches/min Stitch length 1.0 - 4.0 mm Differential feed ratio 1:0.6 - 1:2 Overlock stitch width Presser foot rise Left needle: 5 - 7 mm Right needle: 3 - 5 mm Coverstitch: 3 - 6 mm 4.5 ... modiÀcations to the performance or design. If in accordance with relevant National legislation relating to change the machine equipment and the assortment of the user and the product. Intellectual Property PFAFF, COVERLOCK and INSPIRA are trademarks of needles INSPIRA overlock needles - Such modiÀcations, however, will always be safely ...


