
Owner's Manual
Page 22
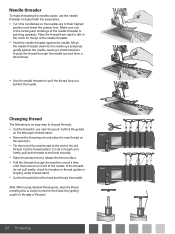
... spools, place the thread unreeling disc as shown to the end of the old thread. PFAFF coverlock 4.0 german design PFAFF coverlock 4.0 german design 22 Threading Cut the thread tails to 2-3 cm in length and Àrmly pull both threads to test knot security. • Raise the presser foot to release the tension discs. • Pull...
... spools, place the thread unreeling disc as shown to the end of the old thread. PFAFF coverlock 4.0 german design PFAFF coverlock 4.0 german design 22 Threading Cut the thread tails to 2-3 cm in length and Àrmly pull both threads to test knot security. • Raise the presser foot to release the tension discs. • Pull...

Owner's Manual
Page 28
... projects. A durable chainstitch seam with a reinforced stitch and overcasting in this table are our recommendations based on a sample of the 2-thread converter. Converter required. Always test sew on normal conditions. It may be done with a 4-thread overlock seam such as neck edges, side seams, sleeves, etc. Different stitches are using. For...
... projects. A durable chainstitch seam with a reinforced stitch and overcasting in this table are our recommendations based on a sample of the 2-thread converter. Converter required. Always test sew on normal conditions. It may be done with a 4-thread overlock seam such as neck edges, side seams, sleeves, etc. Different stitches are using. For...

Owner's Manual
Page 33
...the back, then toward you. It prevents the threads from coming undone and prepares for the next sewing task. • Cut off and test sew a sample to test thread tension. Tip: The presser foot on the left side of the fabric, continue sewing while drawing the Ànished fabric gently backwards and... to the left of the presser foot and sew a test sample. Guide the fabric slightly with your left under the front of the presser foot. If the threads do not wind around the Ànger...
...the back, then toward you. It prevents the threads from coming undone and prepares for the next sewing task. • Cut off and test sew a sample to test thread tension. Tip: The presser foot on the left side of the fabric, continue sewing while drawing the Ànished fabric gently backwards and... to the left of the presser foot and sew a test sample. Guide the fabric slightly with your left under the front of the presser foot. If the threads do not wind around the Ànger...

Owner's Manual
Page 34
... at the end of rolling. Hold the thread chain before sewing on a sample of the fabric. 34 Stitches & sewing techniques Note: Make a thread chain and test sew on your garment. It can be used for covering, binding or top-stitching necklines and for woven fabrics. Securing the coverstitch seam end Chaining...
... at the end of rolling. Hold the thread chain before sewing on a sample of the fabric. 34 Stitches & sewing techniques Note: Make a thread chain and test sew on your garment. It can be used for covering, binding or top-stitching necklines and for woven fabrics. Securing the coverstitch seam end Chaining...

Owner's Manual
Page 37
...is used the stitch width is 9 mm. Touch - or + to adjust the stitch length. • B) Right needle 4 mm C) Chainstitch needle 9 mm PFAFF Stitch adjustments 37 A) Left needle 6 mm Width adjustment by turning the adjustment dial in clockwise direction to a value between 2.5 and 1. More pressure: Increase the... range shown below. • When only the left needle, or when both needles are used the stitch width is selected. Always test sew on a sample of your fabric before sewing on normal conditions should be increased or decreased by changing the needle position or with...
...is used the stitch width is 9 mm. Touch - or + to adjust the stitch length. • B) Right needle 4 mm C) Chainstitch needle 9 mm PFAFF Stitch adjustments 37 A) Left needle 6 mm Width adjustment by turning the adjustment dial in clockwise direction to a value between 2.5 and 1. More pressure: Increase the... range shown below. • When only the left needle, or when both needles are used the stitch width is selected. Always test sew on a sample of your fabric before sewing on normal conditions should be increased or decreased by changing the needle position or with...

Owner's Manual
Page 38
...differential feed to adjust the differential feed. It becomes surrounded by the rear feed teeth it is selected. Test sew with different settings before sewing on your garment. Test sew with different settings before sewing on your garment. or + to prevent stretching of knit fabrics and ...Differential feed adjustment The differential feed system consists of two sets of feed teeth arranged one behind the other to 1.0 when any of the coverlock™ 4.0 stitches is selected. When sewing, apply gentle tension to the feed by a black frame, showing that it will "stretch" ...
...differential feed to adjust the differential feed. It becomes surrounded by the rear feed teeth it is selected. Test sew with different settings before sewing on your garment. Test sew with different settings before sewing on your garment. or + to prevent stretching of knit fabrics and ...Differential feed adjustment The differential feed system consists of two sets of feed teeth arranged one behind the other to 1.0 when any of the coverlock™ 4.0 stitches is selected. When sewing, apply gentle tension to the feed by a black frame, showing that it will "stretch" ...
