
Owner's Manual
Page 2
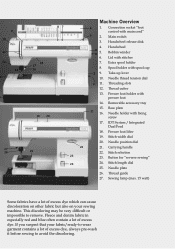
... before sewing to remove. Needle thread tension dial 1 11. Stitch width dial 20. Needle position dial 22 21. Carrying handle 22. Stitch selection 23. Needle plate 26. Handwheel Bobbin winder Lid with main cord" 5 2. Extra spool holder 8. Threading slots 12. Base plate 21 16. This discoloring may be very difÀcult or impossible to avoid the discoloring. Take-up lever 10. If you suspect that your sewing machine. Presser foot holder with presser foot 14. Removable accessory tray 15. Thread guide 27...
... before sewing to remove. Needle thread tension dial 1 11. Stitch width dial 20. Needle position dial 22 21. Carrying handle 22. Stitch selection 23. Needle plate 26. Handwheel Bobbin winder Lid with main cord" 5 2. Extra spool holder 8. Threading slots 12. Base plate 21 16. This discoloring may be very difÀcult or impossible to avoid the discoloring. Take-up lever 10. If you suspect that your sewing machine. Presser foot holder with presser foot 14. Removable accessory tray 15. Thread guide 27...

Owner's Manual
Page 5
... operate this sewing machine if it has a damaged cord or plug, if it is not working properly, if it to break. • Switch the sewing machine off ("0") position, then remove plug from the electrical outlet when removing covers, lubricating, or when making any other user servicing adjustments mentioned in the instruction manual. • Never drop or insert any object into water. SAVE THESE INSTRUCTIONS Always unplug this household sewing machine. The wrong plate can...
... operate this sewing machine if it has a damaged cord or plug, if it is not working properly, if it to break. • Switch the sewing machine off ("0") position, then remove plug from the electrical outlet when removing covers, lubricating, or when making any other user servicing adjustments mentioned in the instruction manual. • Never drop or insert any object into water. SAVE THESE INSTRUCTIONS Always unplug this household sewing machine. The wrong plate can...
Owner's Manual
Page 6
...Bobbin case 1:8 Buttonhole 2:12 Threading the needle 1:10 Button sewing 2:14 Needle threader 1:11 Hemming with the twin needle 2:15 Pulling up the bobbin thread 1:12 Smocking 2:15 Presser foot lifter 1:13 Gathering 2:16 Thread cutter 1:12 Darning 2:17 Changing the presser foot 1:13 Sewing on zippers 2:19 IDT System/Integrated Dual Feed 1:14 Stabilizing edges 2:22 Changing the needle 1:15 Sewing lace 2:23 Needle thread tension 1:15 Shell edging 2:24 Lowering the feed dog 1:15 Stitch width dial 1:16 Needle position dial 1:16 Reverse sewing 1:17 Stitch length...
...Bobbin case 1:8 Buttonhole 2:12 Threading the needle 1:10 Button sewing 2:14 Needle threader 1:11 Hemming with the twin needle 2:15 Pulling up the bobbin thread 1:12 Smocking 2:15 Presser foot lifter 1:13 Gathering 2:16 Thread cutter 1:12 Darning 2:17 Changing the presser foot 1:13 Sewing on zippers 2:19 IDT System/Integrated Dual Feed 1:14 Stabilizing edges 2:22 Changing the needle 1:15 Sewing lace 2:23 Needle thread tension 1:15 Shell edging 2:24 Lowering the feed dog 1:15 Stitch width dial 1:16 Needle position dial 1:16 Reverse sewing 1:17 Stitch length...
Owner's Manual
Page 10
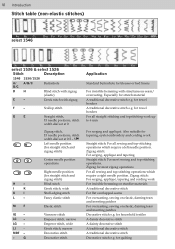
... hemming on elastic, darning tears and inserting patches Decorative stitch e.g. for towel borders For all straight stitching and topstitching work Straight stitch: For all sewing and top-stitching operations which require a left needle position. for quilting Also suitable for towel borders A traditional decorative stitch e.g. for tapering, eyelet embroidery and cording work up to 6 mm For serging and appliqué. Scallop stitch G E Straight stitch, 15 needle positions, stitch width dial set at 0 Zigzag stitch, 15 needle positions, stitch width dial set...
... hemming on elastic, darning tears and inserting patches Decorative stitch e.g. for towel borders For all straight stitching and topstitching work Straight stitch: For all sewing and top-stitching operations which require a left needle position. for quilting Also suitable for towel borders A traditional decorative stitch e.g. for tapering, eyelet embroidery and cording work up to 6 mm For serging and appliqué. Scallop stitch G E Straight stitch, 15 needle positions, stitch width dial set at 0 Zigzag stitch, 15 needle positions, stitch width dial set...
Owner's Manual
Page 11
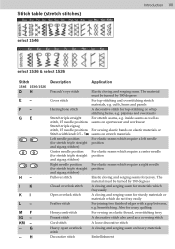
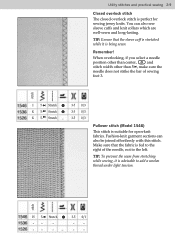
... - 5 Left needle position (for stretch triple straight and zigzag stitches) Center needle position (for stretch triple straight and zigzag stitches) Right needle position (for stretch triple straight and zigzag stitches) Pullover stitch Closed overlock stitch Open overlock stitch Feather stitch Honeycomb stitch Penant stitch Cord stitch Heavy open overlock stitch Decorative stitch Elastic closing and serging seam for top-stitching or whip stitching hems, e.g. KM - -- IK KI L- pajamas and sweatsuits For stretch seams, e.g. hemstitching. Stitch table (stretch stitches) select...
... - 5 Left needle position (for stretch triple straight and zigzag stitches) Center needle position (for stretch triple straight and zigzag stitches) Right needle position (for stretch triple straight and zigzag stitches) Pullover stitch Closed overlock stitch Open overlock stitch Feather stitch Honeycomb stitch Penant stitch Cord stitch Heavy open overlock stitch Decorative stitch Elastic closing and serging seam for top-stitching or whip stitching hems, e.g. KM - -- IK KI L- pajamas and sweatsuits For stretch seams, e.g. hemstitching. Stitch table (stretch stitches) select...
Owner's Manual
Page 15
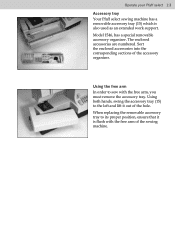
... hole. Using both hands, swing the accessory tray (15) to the left and lift it is also used as an extended work support. When replacing the removable accessory tray to sew with the free arm of the sewing machine. 1:3 Using the free arm In order to its proper position, ensure that it out of the accessory organizer. Model 1546, has a special removable accessory organizer. The enclosed accessories are numbered. Operate your Pfaff select 1:3 Accessory tray Your Pfaff select sewing machine...
... hole. Using both hands, swing the accessory tray (15) to the left and lift it is also used as an extended work support. When replacing the removable accessory tray to sew with the free arm of the sewing machine. 1:3 Using the free arm In order to its proper position, ensure that it out of the accessory organizer. Model 1546, has a special removable accessory organizer. The enclosed accessories are numbered. Operate your Pfaff select 1:3 Accessory tray Your Pfaff select sewing machine...
Owner's Manual
Page 27
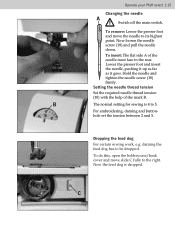
.... Dropping the feed dog For certain sewing work, e.g. Now the feed dog is 4 to the right. Lower the presser foot and insert the needle, pushing it up as far as it goes. To remove: Lower the presser foot and move slide C fully to 5. To insert: The Áat side A of the mark B. For embroidering, darning and buttonhole set the tension between 2 and 3. C 1:15 To do this, open the bobbin case/hook cover and move the needle to be dropped...
.... Dropping the feed dog For certain sewing work, e.g. Now the feed dog is 4 to the right. Lower the presser foot and insert the needle, pushing it up as far as it goes. To remove: Lower the presser foot and move slide C fully to 5. To insert: The Áat side A of the mark B. For embroidering, darning and buttonhole set the tension between 2 and 3. C 1:15 To do this, open the bobbin case/hook cover and move the needle to be dropped...
Owner's Manual
Page 29
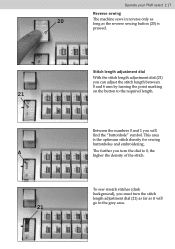
Operate your Pfaff select 1:17 Reverse sewing 20 The machine sews in the grey area. 1:17 Between the numbers 0 and 1 you must turn the dial to the required length. To sew stretch stitches (dark background), you will go in reverse only as long as the reverse sewing button (20) is the optimum stitch density for sewing buttonholes and embroidering. The further you can adjust the stitch length between 0 and 6 mm by turning the point...
Operate your Pfaff select 1:17 Reverse sewing 20 The machine sews in the grey area. 1:17 Between the numbers 0 and 1 you must turn the dial to the required length. To sew stretch stitches (dark background), you will go in reverse only as long as the reverse sewing button (20) is the optimum stitch density for sewing buttonholes and embroidering. The further you can adjust the stitch length between 0 and 6 mm by turning the point...
Owner's Manual
Page 35
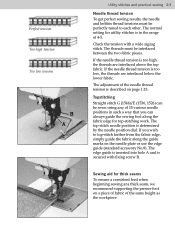
... fabric pieces. If the needle thread tension is secured with a wide zigzag stitch. Check the tension with Àxing screw B. Topstitching Straight stitch G (1546)/E (1536, 1526) can always guide the sewing foot along the guide marks on the needle plate or use the edge guide (standard accessory No.8). Sewing aid for utility stitches is determined by the needle position dial. The normal setting for thick seams To ensure a consistent feed when beginning sewing at a thick seam, we recommend supporting the presser foot...
... fabric pieces. If the needle thread tension is secured with a wide zigzag stitch. Check the tension with Àxing screw B. Topstitching Straight stitch G (1546)/E (1536, 1526) can always guide the sewing foot along the guide marks on the needle plate or use the edge guide (standard accessory No.8). Sewing aid for utility stitches is determined by the needle position dial. The normal setting for thick seams To ensure a consistent feed when beginning sewing at a thick seam, we recommend supporting the presser foot...

Owner's Manual
Page 36
... used for overcasting with adjusting screw A. The width for overcasting can select up to do not use any other needle position). You can adjust this way you can be reduced up to overlock stitching, zigzag stitch G, stitch width 5 , is the basic straight stitch. The stitch length can sew beautiful smooth seams. The raw edge must be positioned halfway under the sewing foot. When sewing, the thread lies over the edge alternately. In this case...
... used for overcasting with adjusting screw A. The width for overcasting can select up to do not use any other needle position). You can adjust this way you can be reduced up to overlock stitching, zigzag stitch G, stitch width 5 , is the basic straight stitch. The stitch length can sew beautiful smooth seams. The raw edge must be positioned halfway under the sewing foot. When sewing, the thread lies over the edge alternately. In this case...
Owner's Manual
Page 38
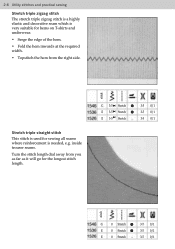
...3-5 Stretch E 3-5 Stretch E 3-5 Stretch 3-5 0/1 3-5 0/1 3-5 0/1 stitch G 0 Stretch E 0 Stretch E 0 Stretch 3-5 0/1 3-5 0/1 3-5 0/1 2:6 Utility stitches and practical sewing Stretch triple zigzag stitch The stretch triple zigzag stitch is a highly elastic and decorative seam which is needed, e.g. inside trouser seams. Turn the stitch length dial away from the right side. stitch Stretch triple straight stitch This stitch is used for sewing all seams where reinforcement is very suitable for hems on T-shirts and underwear. • Serge the edge of the hem. • Fold the hem...
...3-5 Stretch E 3-5 Stretch E 3-5 Stretch 3-5 0/1 3-5 0/1 3-5 0/1 stitch G 0 Stretch E 0 Stretch E 0 Stretch 3-5 0/1 3-5 0/1 3-5 0/1 2:6 Utility stitches and practical sewing Stretch triple zigzag stitch The stretch triple zigzag stitch is a highly elastic and decorative seam which is needed, e.g. inside trouser seams. Turn the stitch length dial away from the right side. stitch Stretch triple straight stitch This stitch is used for sewing all seams where reinforcement is very suitable for hems on T-shirts and underwear. • Serge the edge of the hem. • Fold the hem...
Owner's Manual
Page 41
... knits. TIP: To prevent the seam from stretching while sewing, it is being sewn. Stretch -- - -- - 3-5 0/1 - - - - TIP: Ensure that the fabric is fed to the right of sewing foot 3. When overlocking, if you select a needle position other than center, and stitch width other than 5 , make sure the needle does not strike the bar of the needle, not to add a woolen thread under light tension. Stretch K 5- Fashion-knit garment sections can...
... knits. TIP: To prevent the seam from stretching while sewing, it is being sewn. Stretch -- - -- - 3-5 0/1 - - - - TIP: Ensure that the fabric is fed to the right of sewing foot 3. When overlocking, if you select a needle position other than center, and stitch width other than 5 , make sure the needle does not strike the bar of the needle, not to add a woolen thread under light tension. Stretch K 5- Fashion-knit garment sections can...
Owner's Manual
Page 44
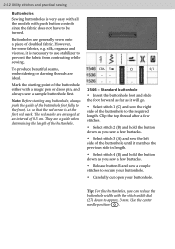
... be turned. Note: Before starting point of the buttonhole foot fully to secure your buttonhole. • Carefully cut open your buttonhole. 2:12 Utility stitches and practical sewing Buttonholes Sewing buttonholes is very easy with all the models with the stitch width dial (27) down as you sew a few bartacks. • Release button B and sew a couple stitches to the front, i.e. To produce beautiful seams, embroidering or darning threads are arranged at the À...
... be turned. Note: Before starting point of the buttonhole foot fully to secure your buttonhole. • Carefully cut open your buttonhole. 2:12 Utility stitches and practical sewing Buttonholes Sewing buttonholes is very easy with all the models with the stitch width dial (27) down as you sew a few bartacks. • Release button B and sew a couple stitches to the front, i.e. To produce beautiful seams, embroidering or darning threads are arranged at the À...
Owner's Manual
Page 47
... the bobbin thread tension, the more intense the gathering effect. • Sew a test seam to determine the level of gather. • Mark the Àrst line on the right side of how to thread the twin needle. Utility stitches and practical sewing 2:15 stitch stitch G03 E 03 E 03 3-5 0/1 3-5 0/1 3-5 0/1 G 0 3-4 E 0 3-4 E 0 3-4 3-5 0/1 3-5 0/1 3-5 0/1 Hemming with the elastic thread. Use only a stretch needle when sewing stretch fabric! As the elastic thread is 4 mm. To prevent the needle from striking the needle plate, you must make...
... the bobbin thread tension, the more intense the gathering effect. • Sew a test seam to determine the level of gather. • Mark the Àrst line on the right side of how to thread the twin needle. Utility stitches and practical sewing 2:15 stitch stitch G03 E 03 E 03 3-5 0/1 3-5 0/1 3-5 0/1 G 0 3-4 E 0 3-4 E 0 3-4 3-5 0/1 3-5 0/1 3-5 0/1 Hemming with the elastic thread. Use only a stretch needle when sewing stretch fabric! As the elastic thread is 4 mm. To prevent the needle from striking the needle plate, you must make...
Owner's Manual
Page 61
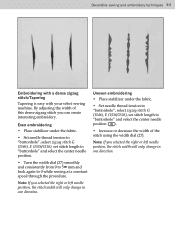
...or left needle position, the stitch width will only change in one direction. 3:5 By adjusting the width of the stitch using the width dial (27). Uneven embroidering • Place stabilizer under the fabric. • Set needle thread tension to "buttonhole", select zigzag stitch G (1546), E (1536/1526), set stitch length to 0 while sewing at a constant speed through the procedure. Even embroidering • Place stabilizer under the fabric. • Set needle thread tension to "buttonhole", select zigzag stitch G (1546), E (1536/1526), set stitch length to "buttonhole" and...
...or left needle position, the stitch width will only change in one direction. 3:5 By adjusting the width of the stitch using the width dial (27). Uneven embroidering • Place stabilizer under the fabric. • Set needle thread tension to "buttonhole", select zigzag stitch G (1546), E (1536/1526), set stitch length to 0 while sewing at a constant speed through the procedure. Even embroidering • Place stabilizer under the fabric. • Set needle thread tension to "buttonhole", select zigzag stitch G (1546), E (1536/1526), set stitch length to "buttonhole" and...
Owner's Manual
Page 64
... embroidery hoop. • Insert decorative embroidery foot number 1. • To lend more durability to turn the fabric slowly and evenly. Then push the plate down at the darning position (see page 2:17). • Place the eyelet plate on blouses, bed or table linen. For classic eyelet embroidery, use stitch G (1546), E (1536/1526), with the help of the needle plate. The fabric must not move. • Embroider the contours with a dense zigzag stitch...
... embroidery hoop. • Insert decorative embroidery foot number 1. • To lend more durability to turn the fabric slowly and evenly. Then push the plate down at the darning position (see page 2:17). • Place the eyelet plate on blouses, bed or table linen. For classic eyelet embroidery, use stitch G (1546), E (1536/1526), with the help of the needle plate. The fabric must not move. • Embroider the contours with a dense zigzag stitch...
Owner's Manual
Page 68
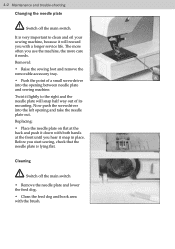
... into the opening and take the needle plate out. Twist it lightly to clean and oil your sewing machine, because it needs. 4:2 Maintenance and trouble-shooting Changing the needle plate Switch off the main switch • Remove the needle plate and lower the feed dog. • Clean the feed dog and hook area with both hands at the front until you hear it snap in place. The more often you with a longer service life. It...
... into the opening and take the needle plate out. Twist it lightly to clean and oil your sewing machine, because it needs. 4:2 Maintenance and trouble-shooting Changing the needle plate Switch off the main switch • Remove the needle plate and lower the feed dog. • Clean the feed dog and hook area with both hands at the front until you hear it snap in place. The more often you with a longer service life. It...
Owner's Manual
Page 70
... you insert the bobbin case, push it on through the winding tension. Only use perfect threads Do not wind thread free-hand, but run it fully into the stop. Insert new needle. Check needle and bobbin thread tensions 4:4 Machine is bent or blunt. Use a needle system 130/705 H. 4:4 Maintenance and trouble-shooting Trouble-shooting The machine skips stitches The needle is unevenly wound Thread bunching at side facing the back. Needle thread breaks See reasons above . Insert new needle. Seam is sewn unevenly The tension needs adjusting Thread...
... you insert the bobbin case, push it on through the winding tension. Only use perfect threads Do not wind thread free-hand, but run it fully into the stop. Insert new needle. Check needle and bobbin thread tensions 4:4 Machine is bent or blunt. Use a needle system 130/705 H. 4:4 Maintenance and trouble-shooting Trouble-shooting The machine skips stitches The needle is unevenly wound Thread bunching at side facing the back. Needle thread breaks See reasons above . Insert new needle. Seam is sewn unevenly The tension needs adjusting Thread...
Owner's Manual
Page 72
... Bobbin case Buttonholes 2:5 1:8-9 2:13, 3:7 C Changing the needle plate Changing the needle Cleaning Closed overlock stitch Covering stitch 4:2 1:15 4:2 2:9 2:10-11 D Darning with the elastic stitch 2:18 Darning with the straight stitch 2:17 Darning 2:17-18 Decorative sewing 3:3-10 Drawing up the bobbin thread 1:12 Dropping the feed dog 1:15 E Easy Select System Elastic stitch Elastic stitches Electrical connection Embroidering with a dense zigzag stitch Eyelet embroidery 1:18 2:7 2:6-9 1:2 3:4-7 3:8 4:6 F Feather stitch 2:10 Free arm 1:3 G Gathering with elastic...
... Bobbin case Buttonholes 2:5 1:8-9 2:13, 3:7 C Changing the needle plate Changing the needle Cleaning Closed overlock stitch Covering stitch 4:2 1:15 4:2 2:9 2:10-11 D Darning with the elastic stitch 2:18 Darning with the straight stitch 2:17 Darning 2:17-18 Decorative sewing 3:3-10 Drawing up the bobbin thread 1:12 Dropping the feed dog 1:15 E Easy Select System Elastic stitch Elastic stitches Electrical connection Embroidering with a dense zigzag stitch Eyelet embroidery 1:18 2:7 2:6-9 1:2 3:4-7 3:8 4:6 F Feather stitch 2:10 Free arm 1:3 G Gathering with elastic...
Owner's Manual
Page 73
Maintenance and trouble-shooting 4:7 P Patchwork quilt Pennant stitch Placing sewing thread on spool holder Practical sewing Presser foot lifter Pullover stitch Q Quilting R Removable accessory tray Removing the presser foot Repairing tears Reverse sewing Richelieu Right needle position RufÁer S Selecting needle position Selecting stitch width Serging with blindstitch and overlock stitch Serging with zigzag stitch Setting stretch stitches Setting utility stitches Sewing light Sewing on buttons Sewing on patches Sewing on zippers Shell-edging 3:9 2:11 1:5 2:1-24 1:13 2:9 3:9 1:3 1:13 2:...
Maintenance and trouble-shooting 4:7 P Patchwork quilt Pennant stitch Placing sewing thread on spool holder Practical sewing Presser foot lifter Pullover stitch Q Quilting R Removable accessory tray Removing the presser foot Repairing tears Reverse sewing Richelieu Right needle position RufÁer S Selecting needle position Selecting stitch width Serging with blindstitch and overlock stitch Serging with zigzag stitch Setting stretch stitches Setting utility stitches Sewing light Sewing on buttons Sewing on patches Sewing on zippers Shell-edging 3:9 2:11 1:5 2:1-24 1:13 2:9 3:9 1:3 1:13 2:...


