
Owner's Manual
Page 4
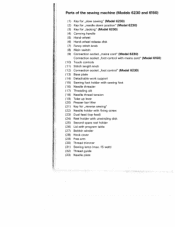
...the sewing machine (Models 6230 and 6150) (1) Key for ,,slow sewing" (Model 6230) (2) Key for ,,needle down position" (Model 6230) (3) Key for ,,tacking" (Model 6230) (4) Carrying handle (5) Hand-wheel (6) Hand-wheel release disk (7) Fancy stitch knob (8) Main switch (9) Connection socket ,,mains cord" (Model 6230) Connection...) (10) Touch controls (11) Stitch length knob (1 2) Connection socket ,,foot control" (Model 6230) (13) Base plate (14) Detachable work support (1 5) Sewing foot holder with sewing foot (16) Needle threader (17) Threading slit (1 8) Needle thread tension (19) Take-up lever...
...the sewing machine (Models 6230 and 6150) (1) Key for ,,slow sewing" (Model 6230) (2) Key for ,,needle down position" (Model 6230) (3) Key for ,,tacking" (Model 6230) (4) Carrying handle (5) Hand-wheel (6) Hand-wheel release disk (7) Fancy stitch knob (8) Main switch (9) Connection socket ,,mains cord" (Model 6230) Connection...) (10) Touch controls (11) Stitch length knob (1 2) Connection socket ,,foot control" (Model 6230) (13) Base plate (14) Detachable work support (1 5) Sewing foot holder with sewing foot (16) Needle threader (17) Threading slit (1 8) Needle thread tension (19) Take-up lever...
Owner's Manual
Page 5
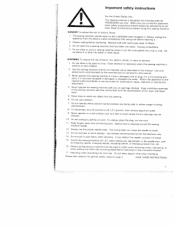
... instruction lubricating, manual or 17. Unplug immediately. 4 Do not place or store a sewing machine where not place in this sewing machine only for HOUSEHOLD use outdoors. 7. from all moving parts machine needle. Use needles recommended by the manufacturer as contained in or drop into water. it..., grasp the plug, not the cord 11 Keep fingers away from the accumulation Keep ventilation openings of electric shock: 1 The sewing machine should always be 10 Do not unplug by or near children Close attention is necessary when this manual. Do not use as ...
... instruction lubricating, manual or 17. Unplug immediately. 4 Do not place or store a sewing machine where not place in this sewing machine only for HOUSEHOLD use outdoors. 7. from all moving parts machine needle. Use needles recommended by the manufacturer as contained in or drop into water. it..., grasp the plug, not the cord 11 Keep fingers away from the accumulation Keep ventilation openings of electric shock: 1 The sewing machine should always be 10 Do not unplug by or near children Close attention is necessary when this manual. Do not use as ...
Owner's Manual
Page 6
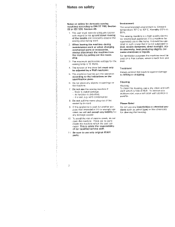
... or paraffin. To avoid the risk of the socket by a Pfaff mechanic. 5. This is free of our qualified service staff. 11. The maximum permissible wattage for the sewing lamp is a machine for supervised use the sewing machine if: - Notes on safety Notes on safety for domestic sewing machines according to : dust, severe dampness, direct sunlight, sta tic...
... or paraffin. To avoid the risk of the socket by a Pfaff mechanic. 5. This is free of our qualified service staff. 11. The maximum permissible wattage for the sewing lamp is a machine for supervised use the sewing machine if: - Notes on safety Notes on safety for domestic sewing machines according to : dust, severe dampness, direct sunlight, sta tic...
Owner's Manual
Page 7
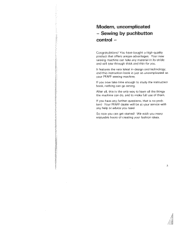
...ideas. 3 It features the very latest in design and technology and this is no prob lem! Congratulations! Sewing by puchbutton control - Modern, uncomplicated - Your PFAFF dealer will be at your PFAFF sewing machine If you now take any help or advice you . So now you can go wrong After all this... instruction book is Just as uncomplicated as your service with any material in its stride and will sew through thick and thin...
...ideas. 3 It features the very latest in design and technology and this is no prob lem! Congratulations! Sewing by puchbutton control - Modern, uncomplicated - Your PFAFF dealer will be at your PFAFF sewing machine If you now take any help or advice you . So now you can go wrong After all this... instruction book is Just as uncomplicated as your service with any material in its stride and will sew through thick and thin...
Owner's Manual
Page 9
... utility stitches. Threading the needle thread Threading the sewing machine. Topstitching. Needle thread tension Needle threader Nonelastic stitches - Oiling . Utility stitch chart . . Richelieu......... Needle chart Needle position. Quilting ..... . - Top feed. . . . Special accessory table Stitch density . Stretch triple zigzag stitch Tacking J . Pattern width Practical sewing Presser bar litter Puchbutton control Pulling up the bobbin...
... utility stitches. Threading the needle thread Threading the sewing machine. Topstitching. Needle thread tension Needle threader Nonelastic stitches - Oiling . Utility stitch chart . . Richelieu......... Needle chart Needle position. Quilting ..... . - Top feed. . . . Special accessory table Stitch density . Stretch triple zigzag stitch Tacking J . Pattern width Practical sewing Presser bar litter Puchbutton control Pulling up the bobbin...
Owner's Manual
Page 15
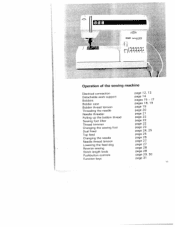
PFAFF I Stitch length knob Pushbutton controls Function keys page 28 page 29, 30 page 31 11 Operation of the sewing machine I I Electrical connection Detachable work support Bobbins page 1 2, 1 3 page 1 4 pages 15 - 17 Bobbin case pages 1 8, 1 9 Bobbin thread tension page 1 9 J Threading the needle page 20 Needle threader page 21 I Pulling up the bobbin thread Sewing foot...
PFAFF I Stitch length knob Pushbutton controls Function keys page 28 page 29, 30 page 31 11 Operation of the sewing machine I I Electrical connection Detachable work support Bobbins page 1 2, 1 3 page 1 4 pages 15 - 17 Bobbin case pages 1 8, 1 9 Bobbin thread tension page 1 9 J Threading the needle page 20 Needle threader page 21 I Pulling up the bobbin thread Sewing foot...
Owner's Manual
Page 16
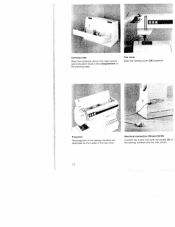
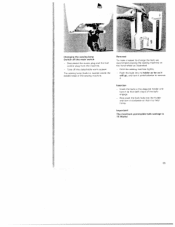
Top cover Open the folding cover (26) upwards. ] 0' N' Programs The programs of the sewing machine are illustrated on the inside of the top cover Electrical connection (Modell 6230) Connect the mains cord with the socket (9) of the carrying case. F. Ii N Carrying case Place the enclosed mains cord, foot control and instruction book in the compartment of the sewing machine and the wall socket 12
Top cover Open the folding cover (26) upwards. ] 0' N' Programs The programs of the sewing machine are illustrated on the inside of the top cover Electrical connection (Modell 6230) Connect the mains cord with the socket (9) of the carrying case. F. Ii N Carrying case Place the enclosed mains cord, foot control and instruction book in the compartment of the sewing machine and the wall socket 12
Owner's Manual
Page 17
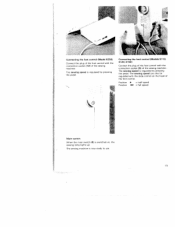
...(9) of the foot control with the slide control on . The sewing machine is regulated by pressing the pedal. The sewing speed is now ready to use. 13 The sewing speed is switched on the head of the sewing machine. the sewing lamp lights up. Position = half speed Position 44 = full ...speed Main switch When the main switch (8) is regulated by pressing the pedal. Connecting the foot control (Model 6230) Connect the plug of...
...(9) of the foot control with the slide control on . The sewing machine is regulated by pressing the pedal. The sewing speed is now ready to use. 13 The sewing speed is switched on the head of the sewing machine. the sewing lamp lights up. Position = half speed Position 44 = full ...speed Main switch When the main switch (8) is regulated by pressing the pedal. Connecting the foot control (Model 6230) Connect the plug of...
Owner's Manual
Page 26
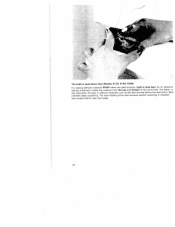
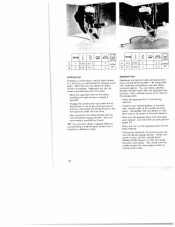
The built-in dual fabric feed (Models 6120, 6150, 6230) For sewing difficult materials PFAFF offers the ideal solution: built-in dual feed. The even feeding action also ensures perfect matching of checked and striped fabrics (see next page). 24 The fabric is fed accurately. As on industria sewing machines it feeds the material from the top and bottom at the same time. On light or difficult materials such as silk and viscose fabrics the dual fabric feed prevents seam puckering.
The built-in dual fabric feed (Models 6120, 6150, 6230) For sewing difficult materials PFAFF offers the ideal solution: built-in dual feed. The even feeding action also ensures perfect matching of checked and striped fabrics (see next page). 24 The fabric is fed accurately. As on industria sewing machines it feeds the material from the top and bottom at the same time. On light or difficult materials such as silk and viscose fabrics the dual fabric feed prevents seam puckering.
Owner's Manual
Page 30
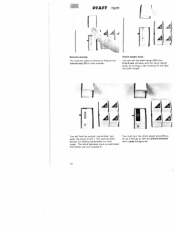
... is kept pressed. The optimal stitch density for the desi red stitch length. PFAFF tiptr 1 11A) L fl1 Al Reverse sewing The machine sews in this range. Li AA You will go to sew the stretch stitches with the stitch length knob, by turning to 6 mm infinitely with a grey background. 28 The stitch becomes more concentrated...
... is kept pressed. The optimal stitch density for the desi red stitch length. PFAFF tiptr 1 11A) L fl1 Al Reverse sewing The machine sews in this range. Li AA You will go to sew the stretch stitches with the stitch length knob, by turning to 6 mm infinitely with a grey background. 28 The stitch becomes more concentrated...

Owner's Manual
Page 31
... is pressed the program is selec ted and the machine is pressed again the width of the grey area. Important: When sewing with utility stitches with a grey background are stretch stitches, i.e. Key B releases the keys that you can be redu ced by half. PFAFF tiptronic 6230 ) .4j 4J.4 1_ jI Setting stretch stitches All the...
... is pressed the program is selec ted and the machine is pressed again the width of the grey area. Important: When sewing with utility stitches with a grey background are stretch stitches, i.e. Key B releases the keys that you can be redu ced by half. PFAFF tiptronic 6230 ) .4j 4J.4 1_ jI Setting stretch stitches All the...
Owner's Manual
Page 33
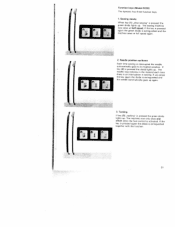
... goes to its highest position. I II I I it Function keys (Model 6230) The tiptronic has three function keys. 1. The machine now only sews one stitch when the foot control is pressed the green diode lights up again. 3. Tacking If key (3) ,,tacking" is activated. The sewing machine now sews at full speed again. 2. If key (2) is pressed the green...
... goes to its highest position. I II I I it Function keys (Model 6230) The tiptronic has three function keys. 1. The machine now only sews one stitch when the foot control is pressed the green diode lights up again. 3. Tacking If key (3) ,,tacking" is activated. The sewing machine now sews at full speed again. 2. If key (2) is pressed the green...

Owner's Manual
Page 37
Basting stitch (Mode) 6230) With key (3) basting you can baste a gar ment before trying it is the basic straight stitch with key B. Place the fabric under the sewing foot. - rear by changing the needle position, e.g. finish the work. Then you have a choice of the needle please make one...The stitch length can be increased up to 6 mm as you press the foot control the machine will only make sure it on the left - Some sewing jobs can be done easier by the required amount. Sew one stitch. key H and I When adjusting the position of three needle positions. prog a...
Basting stitch (Mode) 6230) With key (3) basting you can baste a gar ment before trying it is the basic straight stitch with key B. Place the fabric under the sewing foot. - rear by changing the needle position, e.g. finish the work. Then you have a choice of the needle please make one...The stitch length can be increased up to 6 mm as you press the foot control the machine will only make sure it on the left - Some sewing jobs can be done easier by the required amount. Sew one stitch. key H and I When adjusting the position of three needle positions. prog a...

Owner's Manual
Page 68
...pattern onto the face side of embroidery Avalon - around all you have to be embroidered and tauten the fabric and backing in the sewing - Ayovuarlopnieecme borfoiidnderivyidbuaaclklyinmg aindeweamtebr,roainddery is dissolve the - Insert the appliqué foot in an embroidery hoop. Richetieu This very artistic form ... provides this part of pattern to do not cut the areas that bers have to the fusible the face backing fabric. machine Transfer your sewing mach me. backing Cut the fabric motif onto the appli out and pull the paper off Place and iron on the ...
...pattern onto the face side of embroidery Avalon - around all you have to be embroidered and tauten the fabric and backing in the sewing - Ayovuarlopnieecme borfoiidnderivyidbuaaclklyinmg aindeweamtebr,roainddery is dissolve the - Insert the appliqué foot in an embroidery hoop. Richetieu This very artistic form ... provides this part of pattern to do not cut the areas that bers have to the fusible the face backing fabric. machine Transfer your sewing mach me. backing Cut the fabric motif onto the appli out and pull the paper off Place and iron on the ...
Owner's Manual
Page 69
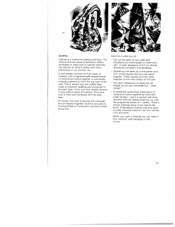
... it is of quilts are not serged up but it into cushions, wall hangings or bed covers. 67 And this . There is a traditional sewing technique. When your quilt is what you can make use of material. Quilting Quilting is always stitching about 3 mm beside the seam. Cut out...and connected to form the top layer of your self. Embroidered stitches look very good on plain coloured material. Of course, the work . with the sewing machine e.g. Trie Dual Feed is quicker and more practical with the program ID stretch or L stretch. A seam allowance of the quilt. - Spread out the...
... it is of quilts are not serged up but it into cushions, wall hangings or bed covers. 67 And this . There is a traditional sewing technique. When your quilt is what you can make use of material. Quilting Quilting is always stitching about 3 mm beside the seam. Cut out...and connected to form the top layer of your self. Embroidered stitches look very good on plain coloured material. Of course, the work . with the sewing machine e.g. Trie Dual Feed is quicker and more practical with the program ID stretch or L stretch. A seam allowance of the quilt. - Spread out the...
Owner's Manual
Page 77
.... this , remove the needle plate. - This thread must be given a traditional look wider. This ensures that it does not become tangled during sewing and gives the cording more prominent. In this case, however, do this makes the cording look with two needle threads Isee page 64). - During... of the needle plate from below to make the seam more volume. ween the needle plate and the sewing machine provides space for the gimp thread. Cording foot The classic sewing technique of cording can be used without any problems on fabrics such as cotton and light wollens Underclothing and...
.... this , remove the needle plate. - This thread must be given a traditional look wider. This ensures that it does not become tangled during sewing and gives the cording more prominent. In this case, however, do this makes the cording look with two needle threads Isee page 64). - During... of the needle plate from below to make the seam more volume. ween the needle plate and the sewing machine provides space for the gimp thread. Cording foot The classic sewing technique of cording can be used without any problems on fabrics such as cotton and light wollens Underclothing and...
Owner's Manual
Page 79
... drafted pattern to help you guide the work more effective with nar row and dense zigzag stitches Now you can also be drawn in the sewing machine. - proglJ,I I% I cording foot Cording foot Cording is overstitched to produce a purl seam. Now iron the backing fabric onto the appli que material. When you reach...
... drafted pattern to help you guide the work more effective with nar row and dense zigzag stitches Now you can also be drawn in the sewing machine. - proglJ,I I% I cording foot Cording foot Cording is overstitched to produce a purl seam. Now iron the backing fabric onto the appli que material. When you reach...

Owner's Manual
Page 80
... the motif, row by row. Use a silk paper underlay and engage the fringe foot. - For thicker threads you may have to work out of the machine carefully, because if you pull too fast, you will pull the last loops tight. - Mark out any pattern you can produce fantastic effects in no... from the outside inward. - This foot is best to choose a longer stitch length; Knot the threads on the reverse side. 79 When you have to sew a test seam first. - it is very useful for loop embroidery you wish with the magic pen. - Fnnge foot With this special foot for terry cloth...
... the motif, row by row. Use a silk paper underlay and engage the fringe foot. - For thicker threads you may have to work out of the machine carefully, because if you pull too fast, you will pull the last loops tight. - Mark out any pattern you can produce fantastic effects in no... from the outside inward. - This foot is best to choose a longer stitch length; Knot the threads on the reverse side. 79 When you have to sew a test seam first. - it is very useful for loop embroidery you wish with the magic pen. - Fnnge foot With this special foot for terry cloth...
Owner's Manual
Page 84
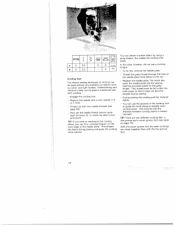
Push the point of a small screwdriver into the left opening between needle plate and sewing machine. the opening and take the needle plate out. Then apply a drop of oil every 15 to the hook. hours of operation) to 20 - I q Lht Changing ...the needle plate It is very important to clean and oil the sewing machine, because it will snap half way out of its mounting. Now push the screwdriver into - Clean the feed dog and hook area with a longer service...
Push the point of a small screwdriver into the left opening between needle plate and sewing machine. the opening and take the needle plate out. Then apply a drop of oil every 15 to the hook. hours of operation) to 20 - I q Lht Changing ...the needle plate It is very important to clean and oil the sewing machine, because it will snap half way out of its mounting. Now push the screwdriver into - Clean the feed dog and hook area with a longer service...
Owner's Manual
Page 85
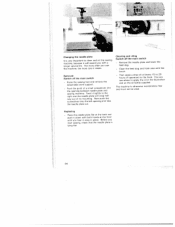
Hold the sewing machine tightly - - Take off the main switch Disconnect the mains plug and the toot control plug from the machine. -- Push the bulb into the holder and turn it so that it is held firmly. Now push the bulb fully into its holder as far ... turn it anticlockwise to remove Insertion Insert the bulb in the diagonal holder and turn it easier to change the bulb we recommend placing the sewing machine on the hand wheel as illustrated. - Important! The maximum permissible bulb wattage is located inside the needle head of the...
Hold the sewing machine tightly - - Take off the main switch Disconnect the mains plug and the toot control plug from the machine. -- Push the bulb into the holder and turn it so that it is held firmly. Now push the bulb fully into its holder as far ... turn it anticlockwise to remove Insertion Insert the bulb in the diagonal holder and turn it easier to change the bulb we recommend placing the sewing machine on the hand wheel as illustrated. - Important! The maximum permissible bulb wattage is located inside the needle head of the...


