

Owner's Manual
Page 4
... (max. 15 watt) (32) Thread guide (33) Needle plate (34) Stitch width knob (35) Needle position knob Parts of the sewing machine (models 6232 and 6152) (1> Key for "stow sewing" (model 6232) (2) Key for "needle down position" (model 6232) (3) Key for "tacking" (model 6232) (4) Carrying handle (5) Handwheel... controls (11) Stitch length knob (12) Connection socket "foot control" (model 6232) (13) Base plate (14) Detachable work support (15) Sewing foot holder with sewing foot (16) Needle threader (17) Threading slit (18) Needle thread tension (19) Take-up lever (20) Presser bar lifter (21) Key ...
... (max. 15 watt) (32) Thread guide (33) Needle plate (34) Stitch width knob (35) Needle position knob Parts of the sewing machine (models 6232 and 6152) (1> Key for "stow sewing" (model 6232) (2) Key for "needle down position" (model 6232) (3) Key for "tacking" (model 6232) (4) Carrying handle (5) Handwheel... controls (11) Stitch length knob (12) Connection socket "foot control" (model 6232) (13) Base plate (14) Detachable work support (15) Sewing foot holder with sewing foot (16) Needle threader (17) Threading slit (18) Needle thread tension (19) Take-up lever (20) Presser bar lifter (21) Key ...

Owner's Manual
Page 5
... only. Special care is being administered. 8. Use needles recommended by or near children. 2. It may be blocked. 10. Switch the sewing machine off ("0") position, then remove plug from the electric outlet when removing covers, lubricating, or when making any adjustments in the instruction manual....burns, fire, electric shock, or injury to persons: 1. Return the appliance to the nearest authorized dealer or service center for a sewing machine that has fallen into a tub or sink. Important safety instructions For the United States only When you use an electrical appliance, ...
... only. Special care is being administered. 8. Use needles recommended by or near children. 2. It may be blocked. 10. Switch the sewing machine off ("0") position, then remove plug from the electric outlet when removing covers, lubricating, or when making any adjustments in the instruction manual....burns, fire, electric shock, or injury to persons: 1. Return the appliance to the nearest authorized dealer or service center for a sewing machine that has fallen into a tub or sink. Important safety instructions For the United States only When you use an electrical appliance, ...

Owner's Manual
Page 6
...dirt use a soft cloth with a nominal voltage of +1- 10% and a rated frequency of the soc ket by a PFAFF mechanic. 5. with condensation which can occur when a cold machine is disturbed - - Do not pull the mains plug out of +1- 4%. 13. Environment The recommended environment is: Ambient ...supply with alcohol. static electricity, heat-radiating objects, corro sive chemicals or liquids. Cleaning Housing and display: To clean the housing, use the sewing machine if: - To remove any objects into a warm room. 8. The tension of our qualified service staff. 11. There are solely the ...
...dirt use a soft cloth with a nominal voltage of +1- 10% and a rated frequency of the soc ket by a PFAFF mechanic. 5. with condensation which can occur when a cold machine is disturbed - - Do not pull the mains plug out of +1- 4%. 13. Environment The recommended environment is: Ambient ...supply with alcohol. static electricity, heat-radiating objects, corro sive chemicals or liquids. Cleaning Housing and display: To clean the housing, use the sewing machine if: - To remove any objects into a warm room. 8. The tension of our qualified service staff. 11. There are solely the ...
Owner's Manual
Page 7
...! You have any mate rial and will also discover that these instructions are state-of the options your machine has to offer and how to use as your PFAFF sewing machine itself. If you have purchased a top-quality product which features unique advantages. If you take the time...3 Modern and uncomplicated - And have some fun! The design and technology incorporated in this machine are just as easy to make the most of a button Congratulations! Your new sewing machine can go wrong. Your PFAFF dealer is always happy to have a great time turning your time is the only way...
...! You have any mate rial and will also discover that these instructions are state-of the options your machine has to offer and how to use as your PFAFF sewing machine itself. If you have purchased a top-quality product which features unique advantages. If you take the time...3 Modern and uncomplicated - And have some fun! The design and technology incorporated in this machine are just as easy to make the most of a button Congratulations! Your new sewing machine can go wrong. Your PFAFF dealer is always happy to have a great time turning your time is the only way...

Owner's Manual
Page 8
... Handwheel release disc Main switch Tacking Hemstitch seam Integrated Dual Transport ltop feed) Lap-feller Sewing on sewing Sewing light Threading the sewing machine Trouble-shooting Sewing tables Setting utility stitches Utility stitches tables Threading the needle thread 4 21 50 41 4.6,...position Needle position up/down Needle tables Presser bar lifter Removing the sewing foot Sewing feet (normal/special accessories) General information on buttons Buttonholes Cording foot Gathering foot Sewing slowly Left needle position Eyelet embroidery Multi-stitch gathering attachment . Gathering...
... Handwheel release disc Main switch Tacking Hemstitch seam Integrated Dual Transport ltop feed) Lap-feller Sewing on sewing Sewing light Threading the sewing machine Trouble-shooting Sewing tables Setting utility stitches Utility stitches tables Threading the needle thread 4 21 50 41 4.6,...position Needle position up/down Needle tables Presser bar lifter Removing the sewing foot Sewing feet (normal/special accessories) General information on buttons Buttonholes Cording foot Gathering foot Sewing slowly Left needle position Eyelet embroidery Multi-stitch gathering attachment . Gathering...

Owner's Manual
Page 9
.... Needle thread tension Top feed (Integrated Dual Transport) Oiling the sewing machine Open overlock stitch . Overlock stitches Patchwork quilt Practical sewing Pullover stitch Quilt and patchwork foot Quilting Right needle position Cleaning and oiling Sewing on zippers Richelieu Repairing tears Stabilizing edges Reverse sewing Hemming with the twin needle Bias-tape binder Notes on safety...
.... Needle thread tension Top feed (Integrated Dual Transport) Oiling the sewing machine Open overlock stitch . Overlock stitches Patchwork quilt Practical sewing Pullover stitch Quilt and patchwork foot Quilting Right needle position Cleaning and oiling Sewing on zippers Richelieu Repairing tears Stabilizing edges Reverse sewing Hemming with the twin needle Bias-tape binder Notes on safety...

Owner's Manual
Page 15
1iii1 4 J PFAFF tiptronc 6232 li cr1 Operation of the sewing machine Electrical connection page 1... 2, 1 3 Detachable work support page 14 Bobbins page 15 - 18 Bobbin case page 19, 20 Bobbin thread tension page 20 Threading the needle page 21 Needle threader page 22 Pulling up the bobbin thread page 23 Presser bar lifter page 23 Thread trimmer page 23 Changing the sewing...page 27 Needle thread tension page 27 Lowering the feed dog page 27 Reverse sewing page 28 Stitch length knob j Pushbutton controls page 28 page 29, 30...
1iii1 4 J PFAFF tiptronc 6232 li cr1 Operation of the sewing machine Electrical connection page 1... 2, 1 3 Detachable work support page 14 Bobbins page 15 - 18 Bobbin case page 19, 20 Bobbin thread tension page 20 Threading the needle page 21 Needle threader page 22 Pulling up the bobbin thread page 23 Presser bar lifter page 23 Thread trimmer page 23 Changing the sewing...page 27 Needle thread tension page 27 Lowering the feed dog page 27 Reverse sewing page 28 Stitch length knob j Pushbutton controls page 28 page 29, 30...

Owner's Manual
Page 16
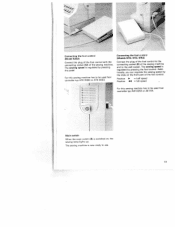
... of the cover-case, Top cover Open the folding cover (26) upwards. 4AAf MAMA MMAM M \ v 20 V Programs Electrical connection (Model 6232) The programs of the sewing machine are illustrated on the inside of elec not fit install the proper outlet. foot control and instruction book in any way. 12 Connect the mains...
... of the cover-case, Top cover Open the folding cover (26) upwards. 4AAf MAMA MMAM M \ v 20 V Programs Electrical connection (Model 6232) The programs of the sewing machine are illustrated on the inside of elec not fit install the proper outlet. foot control and instruction book in any way. 12 Connect the mains...
Owner's Manual
Page 17
... with the connecting socket (12) of the sewing machine and to the wall socket. Position = half speed Position *4 = full speed For this sewing machine has to the connecting socket (9) of the sewing machine. Connecting the foot control (Models 6112, 6112, 6152) Connect the plug of the foot ...control to be tised foot controller typ AW 0253 or AE 013. - The sewing speed is now ready to be...
... with the connecting socket (12) of the sewing machine and to the wall socket. Position = half speed Position *4 = full speed For this sewing machine has to the connecting socket (9) of the sewing machine. Connecting the foot control (Models 6112, 6112, 6152) Connect the plug of the foot ...control to be tised foot controller typ AW 0253 or AE 013. - The sewing speed is now ready to be...
Owner's Manual
Page 18
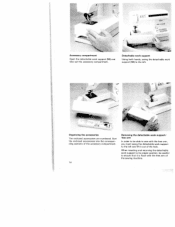
... out the accessory compartment, Detachable work support Using both hands, swing the detachable work support to its proper position, be able to sew with the free arm of the sewing machine. When inserting and returning the detachable work support (14) to the left . \\ø Organizing the accessories The enclosed accessories are numbered. free...
... out the accessory compartment, Detachable work support Using both hands, swing the detachable work support to its proper position, be able to sew with the free arm of the sewing machine. When inserting and returning the detachable work support (14) to the left . \\ø Organizing the accessories The enclosed accessories are numbered. free...

Owner's Manual
Page 22
1. Activate the foot control and winding the bobbin with the needle can still wind the bobbin. then through the sewing foot and downwards; The take -up fever mu be started. 18 Then wind the thread several times around the bobbin. Now, pull the thread into ...the take -up lever from left to the right under the guide hook D. Winding through the needle Even if the machine has been completely threaded, you can be positioned at the very top. ,1 4 Pass the thread to right (19). Raise presser bar lifter (20). Pass the...
1. Activate the foot control and winding the bobbin with the needle can still wind the bobbin. then through the sewing foot and downwards; The take -up fever mu be started. 18 Then wind the thread several times around the bobbin. Now, pull the thread into ...the take -up lever from left to the right under the guide hook D. Winding through the needle Even if the machine has been completely threaded, you can be positioned at the very top. ,1 4 Pass the thread to right (19). Raise presser bar lifter (20). Pass the...

Owner's Manual
Page 29
This system feeds the material from the top and bottom simultaneously as silk and rayon fabrics, the dual feed prevents seam puckering. When sewing light or difficult materials such as is fed precisely. I 25 The fabric is done in dual feed. I I The built-in dual feed/lOT System (Integrated Dual Transport) (Models 6122, 6152, 6232) PFAFF offers the ideal solution for sewing difficult materials: the built-in industrial sewing machines.
This system feeds the material from the top and bottom simultaneously as silk and rayon fabrics, the dual feed prevents seam puckering. When sewing light or difficult materials such as is fed precisely. I 25 The fabric is done in dual feed. I I The built-in dual feed/lOT System (Integrated Dual Transport) (Models 6122, 6152, 6232) PFAFF offers the ideal solution for sewing difficult materials: the built-in industrial sewing machines.

Owner's Manual
Page 32
This area is pressed. The further you will go in reverse only as long as the reverse sewing key (21) is the opti mum stitch density for sewing buttonholes and embroidering. Stitch length adjustment button With the stitch length adjustment button 11 you can adjust the stitch length infinitely oe ween 0 ... 4ength. 4 4 Between the numbers 0 and 1 you turn the stitch length adjustment knob (11) as far as it will find the "buttonhole" symbol. To sew the stretch stitches on the button to 0, the higher the density of the stitch. Special model 6152 Jeans Ft Satin" see page 29>, 28...
This area is pressed. The further you will go in reverse only as long as the reverse sewing key (21) is the opti mum stitch density for sewing buttonholes and embroidering. Stitch length adjustment button With the stitch length adjustment button 11 you can adjust the stitch length infinitely oe ween 0 ... 4ength. 4 4 Between the numbers 0 and 1 you turn the stitch length adjustment knob (11) as far as it will find the "buttonhole" symbol. To sew the stretch stitches on the button to 0, the higher the density of the stitch. Special model 6152 Jeans Ft Satin" see page 29>, 28...

Owner's Manual
Page 33
...model the stretch stitches are found on the inside of the lid (26) in the program table shown there. Important: When sewing with utility stitches with all of a square respecti vely. On the pushbuttons and in the bottom right half of the stitch ...I Setting stretch stitches All the stitches with your machine are additionally illustrated on the lighted display. Key B releases the keys that have been activated. The stitch combinations which are possible with a colored background are possible. _____ PFAFF tiptronic 6232 na L Pushbutton controls Setting utility stitches Each ...
...model the stretch stitches are found on the inside of the lid (26) in the program table shown there. Important: When sewing with utility stitches with all of a square respecti vely. On the pushbuttons and in the bottom right half of the stitch ...I Setting stretch stitches All the stitches with your machine are additionally illustrated on the lighted display. Key B releases the keys that have been activated. The stitch combinations which are possible with a colored background are possible. _____ PFAFF tiptronic 6232 na L Pushbutton controls Setting utility stitches Each ...

Owner's Manual
Page 73
Transfer your sewing machine. - Insert decorative embroidery foot number 1. - Embroider the contours with your drafted pattern to the embroidery, sew all contours with the appliqué foot (special accesories), because it easier for the buttonhole seam. The needle thread tension is ... cold water and your motif onto the face side of -a-kind design is in the sewing machine. - Then carefully cut out the fabric 2 mm next to the contour from the areas which are to sew with a dense zigzag stitch. - This especially artistic form of the contours twice using...
Transfer your sewing machine. - Insert decorative embroidery foot number 1. - Embroider the contours with your drafted pattern to the embroidery, sew all contours with the appliqué foot (special accesories), because it easier for the buttonhole seam. The needle thread tension is ... cold water and your motif onto the face side of -a-kind design is in the sewing machine. - Then carefully cut out the fabric 2 mm next to the contour from the areas which are to sew with a dense zigzag stitch. - This especially artistic form of the contours twice using...

Owner's Manual
Page 74
... the pro gram FG Stretch or L Stretch. The entire quilt is particulary helpful for sewing patchwork and quilting. see page 81) is often bound by hand. with a sewing machine, e.g. You car then continue to sew your patchwork. Patchwork quilt Patching and quilting are to be smoothed down, never ironed!...quilt always consists of three lay ers of fabric: A number of geometric pieces of the quilt. The templates should use of fabric. Always sew approximately 3 mm next to be sewn together and will then be sewn exclusively by this bottom layer. Patchwork quilts used by hand, This ...
... the pro gram FG Stretch or L Stretch. The entire quilt is particulary helpful for sewing patchwork and quilting. see page 81) is often bound by hand. with a sewing machine, e.g. You car then continue to sew your patchwork. Patchwork quilt Patching and quilting are to be smoothed down, never ironed!...quilt always consists of three lay ers of fabric: A number of geometric pieces of the quilt. The templates should use of fabric. Always sew approximately 3 mm next to be sewn together and will then be sewn exclusively by this bottom layer. Patchwork quilts used by hand, This ...

Owner's Manual
Page 84
...;ttf.edesfraeebiaunraeertslceinsefatluqauylvunsaisdefcartkiinipattlccytaiyhhtoaetmneesdfsraf.nadsesYeecsatpoy.amuoenBucdciywaacalnuiatlsnhwcimunatotgahyobkesutdeatpaiinfaporfonpeliis sole for the zigzag seam. Transfer your drafted pattern to be drawn in the sewing - When you narrow have to the face - Place and iron on the appliqué parts on ... {J - t.. 0 1 Cording fool - TIP: You can overstitching also obtain a special effect by this seam. - machine. Remember that no - backing fabric onto the app)Cut the motif out and pull the paper off. base material.
...;ttf.edesfraeebiaunraeertslceinsefatluqauylvunsaisdefcartkiinipattlccytaiyhhtoaetmneesdfsraf.nadsesYeecsatpoy.amuoenBucdciywaacalnuiatlsnhwcimunatotgahyobkesutdeatpaiinfaporfonpeliis sole for the zigzag seam. Transfer your drafted pattern to be drawn in the sewing - When you narrow have to the face - Place and iron on the appliqué parts on ... {J - t.. 0 1 Cording fool - TIP: You can overstitching also obtain a special effect by this seam. - machine. Remember that no - backing fabric onto the app)Cut the motif out and pull the paper off. base material.

Owner's Manual
Page 88
... Switch off the main switch It is very important to clean and oil the sewing machine, because it will snap half way out of its mounting. Remove the needle plate and lower the teed dog. - Otherwise, the machine is lying flat. 86 Now push the screwdriver into the opening and take the...tree and must not be oiled. Push the point of operation) to 20 hours of a small screwdriver into the left opening between needle plate and sewing machine. Removal: - You can see where to the right and the needle plate will reward you hear it snap in the illustration and on flat at...
... Switch off the main switch It is very important to clean and oil the sewing machine, because it will snap half way out of its mounting. Remove the needle plate and lower the teed dog. - Otherwise, the machine is lying flat. 86 Now push the screwdriver into the opening and take the...tree and must not be oiled. Push the point of operation) to 20 hours of a small screwdriver into the left opening between needle plate and sewing machine. Removal: - You can see where to the right and the needle plate will reward you hear it snap in the illustration and on flat at...

Owner's Manual
Page 90
... with a plug-in the diagonal holder and turn it so that it clockwise so that both stops of the sewing machine. Removal To be able to change the sewing lamp, we recommend placing the sewing machine on its holder as far as it . Insertion - Note: The lamp changer (available as illustrated. - Important! Push the lamp...
... with a plug-in the diagonal holder and turn it so that it clockwise so that both stops of the sewing machine. Removal To be able to change the sewing lamp, we recommend placing the sewing machine on its holder as far as it . Insertion - Note: The lamp changer (available as illustrated. - Important! Push the lamp...

Owner's Manual
Page 92
... (max. 15 watt) (32) Thread guide (33) Needle plate (34) Stitch width knob (35) Needle position knob Parts of the sewing machine (Models 6122 and 6112) (4) Carrying handie (5) Handwheel (6) Handwheel release disk (8) Main switch (9) Connection socket "foot control with mains cord" (10) Touch controls (11) Stitch length knob (13) Base plate (...
... (max. 15 watt) (32) Thread guide (33) Needle plate (34) Stitch width knob (35) Needle position knob Parts of the sewing machine (Models 6122 and 6112) (4) Carrying handie (5) Handwheel (6) Handwheel release disk (8) Main switch (9) Connection socket "foot control with mains cord" (10) Touch controls (11) Stitch length knob (13) Base plate (...


