
Owner's Manual
Page 4
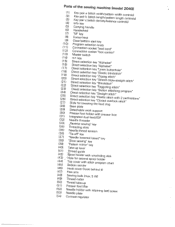
Parts of the sewing machine (model 2040) (1) (2> (3) (4) Key Key Key Info pair pair pair key a b c (stitch (stitch (stitch width/pattern width controls) length/pattern length controls) density/balance controls) (5) Carrying handle (6) Handwheel (7) "M" ..." (29) (30) (31) Detachable work support Presser foot holder with Integrated dual feed/IDF presser foot (32) Needle threader (33) ,,Reverse sewing" key (34) Threading slots (35) Needle thread tension (36) 'Tie-off" key (37) (38) "Needle lowered/raised" key "Slow sewing" key (39) "Pattern mirror" key (40) Take-up lever (41...
Parts of the sewing machine (model 2040) (1) (2> (3) (4) Key Key Key Info pair pair pair key a b c (stitch (stitch (stitch width/pattern width controls) length/pattern length controls) density/balance controls) (5) Carrying handle (6) Handwheel (7) "M" ..." (29) (30) (31) Detachable work support Presser foot holder with Integrated dual feed/IDF presser foot (32) Needle threader (33) ,,Reverse sewing" key (34) Threading slots (35) Needle thread tension (36) 'Tie-off" key (37) (38) "Needle lowered/raised" key "Slow sewing" key (39) "Pattern mirror" key (40) Take-up lever (41...
Owner's Manual
Page 5
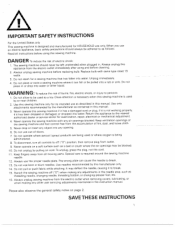
... by the manufacturer as contained in the needle area, such as follows: Read all instructions before replacing bulb. repair, Return the appliance to as threading needle, changing needle, threading bobbin, or changing presser foot, etc. 1 6. To disconnect, turn all moving parts. Always unplug sewing machine from the accumulation of burns, fire, electric...
... by the manufacturer as contained in the needle area, such as follows: Read all instructions before replacing bulb. repair, Return the appliance to as threading needle, changing needle, threading bobbin, or changing presser foot, etc. 1 6. To disconnect, turn all moving parts. Always unplug sewing machine from the accumulation of burns, fire, electric...
Owner's Manual
Page 8
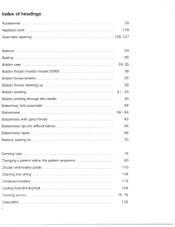
index of headings Accessories Appliqué work Automatic tapering Balance Basting Bobbin case Bobbin thread monitor (model 2040) Bobbin thread tension Bobbin thread, drawing up Bobbin winding Bobbin winding through the needle Buttonhole, fully-automatic Buttonholes Buttonholes with gimp thread Buttonholes, tips for difficult fabrics Buttonholes, types Buttons, sewing on Carrying case Changing a pattern within the...
index of headings Accessories Appliqué work Automatic tapering Balance Basting Bobbin case Bobbin thread monitor (model 2040) Bobbin thread tension Bobbin thread, drawing up Bobbin winding Bobbin winding through the needle Buttonhole, fully-automatic Buttonholes Buttonholes with gimp thread Buttonholes, tips for difficult fabrics Buttonholes, types Buttons, sewing on Carrying case Changing a pattern within the...
Owner's Manual
Page 10
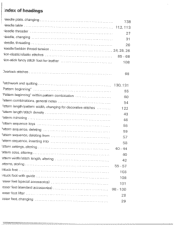
ndex of headings Jeedle plate, changing '.Jeedle table 'Jeedle threader 'Jeedle, changing \Jeedle, threading "Jeedle/bobbin thread tension "Jon-elastic/elastic stitches \ion-stick fancy stitch foot for leather Dverlock stitches 3 atchwork and quilting 'Pattern beginning" 'Pattern beginning" within pattern combination attern ...
ndex of headings Jeedle plate, changing '.Jeedle table 'Jeedle threader 'Jeedle, changing \Jeedle, threading "Jeedle/bobbin thread tension "Jon-elastic/elastic stitches \ion-stick fancy stitch foot for leather Dverlock stitches 3 atchwork and quilting 'Pattern beginning" 'Pattern beginning" within pattern combination attern ...

Owner's Manual
Page 11
...-off Tips for a perfect buttonhole Top cover with table of programs Top feed (integrated dual feed) Twin needle Twin needle, threading Utility stitch programs, tiptronic 2040 Utility stitch programs, tiptronic 2030 Voltage switchover Zippers, sewing in 7/9 hole foot/braiding foot 1 /4 inch quilt and patchwork foot 45 1 29 79 46 1 39 1 40 39 82 78...
...-off Tips for a perfect buttonhole Top cover with table of programs Top feed (integrated dual feed) Twin needle Twin needle, threading Utility stitch programs, tiptronic 2040 Utility stitch programs, tiptronic 2030 Voltage switchover Zippers, sewing in 7/9 hole foot/braiding foot 1 /4 inch quilt and patchwork foot 45 1 29 79 46 1 39 1 40 39 82 78...
Owner's Manual
Page 12
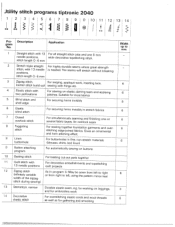
... patches. stitch length 0- 6 mm 3 Zigzag stitch, (center stitch build-up) For serging, appliqué work For overstitching elastic cords and wool threads as well as for gathering and smocking Width upto mm - - 6 6 6 6 6 6 6 3 6 An overlock seam For sewing together ...pattern mirror key) stitch during sewing) 1 3 Stemstitch, narrow 1 4 Decorative elastic stitch Durable elastic seam, e.g. Jtility stitch programs tiptronic 2040 1 ID Ill "i. The seams will stretch without breaking. Description Application 1 Straight stitch with 13 For all straight stitch jobs and one...
... patches. stitch length 0- 6 mm 3 Zigzag stitch, (center stitch build-up) For serging, appliqué work For overstitching elastic cords and wool threads as well as for gathering and smocking Width upto mm - - 6 6 6 6 6 6 6 3 6 An overlock seam For sewing together ...pattern mirror key) stitch during sewing) 1 3 Stemstitch, narrow 1 4 Decorative elastic stitch Durable elastic seam, e.g. Jtility stitch programs tiptronic 2040 1 ID Ill "i. The seams will stretch without breaking. Description Application 1 Straight stitch with 13 For all straight stitch jobs and one...
Owner's Manual
Page 13
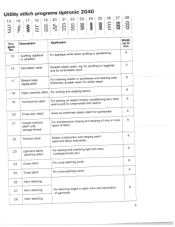
Utility stitch programs tiptronic 2040 15 16 17 21 22 23 24 I 25 Hir i 171 26 27 f 28 I C II Program No. 15 Description Quilting, appliqué or pinstitch 1 6 Stemstitch, wide ... overlock stitch For closing and serging seams 6 19 Honeycomb stitch For sewing seams and on for elastic thread, overstitching ornamental hem seams terry cloth 6 20 Cross hem stitch 21 Closed overlock stitch with selvage thread 22 Pullover stitch Gives an extremely elastic seam for embroidery work Width upto mm 6 3 1 7 Stretch triple zigzag...
Utility stitch programs tiptronic 2040 15 16 17 21 22 23 24 I 25 Hir i 171 26 27 f 28 I C II Program No. 15 Description Quilting, appliqué or pinstitch 1 6 Stemstitch, wide ... overlock stitch For closing and serging seams 6 19 Honeycomb stitch For sewing seams and on for elastic thread, overstitching ornamental hem seams terry cloth 6 20 Cross hem stitch 21 Closed overlock stitch with selvage thread 22 Pullover stitch Gives an extremely elastic seam for embroidery work Width upto mm 6 3 1 7 Stretch triple zigzag...

Owner's Manual
Page 15
... and for embroidery work when quitting or pinstitching or pinstitch 1 6 Stemstitch, wide Durable elastic seam, e.g. Utility stitch programs tiptronic 2030 14 15 16 22 23 24 25 26 Pro- Description gram No. 1 4 Decorative elastic stitch 1 Application For ...Hem stitching For securing edges in table linen and decoration of fabric Elastic assembly and serging seam for gathering cords and wool and smocking threads 15 Quilting, appliqué For appliqué work Width upto mm 6 6 3 1 7 Stretch triple zigzag stitch F(Eoxr ...
... and for embroidery work when quitting or pinstitching or pinstitch 1 6 Stemstitch, wide Durable elastic seam, e.g. Utility stitch programs tiptronic 2030 14 15 16 22 23 24 25 26 Pro- Description gram No. 1 4 Decorative elastic stitch 1 Application For ...Hem stitching For securing edges in table linen and decoration of fabric Elastic assembly and serging seam for gathering cords and wool and smocking threads 15 Quilting, appliqué For appliqué work Width upto mm 6 6 3 1 7 Stretch triple zigzag stitch F(Eoxr ...
Owner's Manual
Page 19
... connection Voltage switchover Accessories Detachable work support Bobbin winding Bobbin case Needle/bobbin thread tension Threading the needle thread Needle threader Pulling up the bobbin thread Presser foot lifter Thread cutter Changing the presser feet Winding a bobbin through the needle Changing needles Threading twin needle Dual Feed/IDF Lowering feed dog Page 1 8 Page 1 8 Page 1 9 Page 1 9 Page...
... connection Voltage switchover Accessories Detachable work support Bobbin winding Bobbin case Needle/bobbin thread tension Threading the needle thread Needle threader Pulling up the bobbin thread Presser foot lifter Thread cutter Changing the presser feet Winding a bobbin through the needle Changing needles Threading twin needle Dual Feed/IDF Lowering feed dog Page 1 8 Page 1 8 Page 1 9 Page 1 9 Page...
Owner's Manual
Page 24
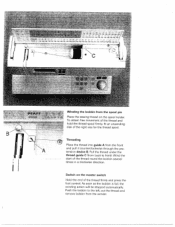
... remove bobbin from the winder. Wind the start of the right size for the thread spool. To obtain free movement of the thread and hold the thread spool firmly, fit an unwinding disk of the thread round the bobbin several I times in a clockwise direction. Ô3: Winding the bobbin from the spool ...pin Place the sewing thread on the master switch Hold the end of the thread firmly and press the foot control. Push the bobbin to front). Switch on the spool holder. As soon as the...
... remove bobbin from the winder. Wind the start of the right size for the thread spool. To obtain free movement of the thread and hold the thread spool firmly, fit an unwinding disk of the thread round the bobbin several I times in a clockwise direction. Ô3: Winding the bobbin from the spool ...pin Place the sewing thread on the master switch Hold the end of the thread firmly and press the foot control. Push the bobbin to front). Switch on the spool holder. As soon as the...
Owner's Manual
Page 25
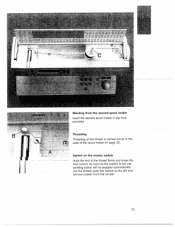
Cut the thread, push the bobbin to the left and remove bobbin from the second spool holder Insert the second spool holder in the case of the thread firmly and press the I foot control. B - - .-. % Winding from the winder. 23 Threading Threading of the thread is carried out as the bobbin is full, the winding action will be stopped automatically. As soon as in the hole provided. Switch on the master switch Hold the end of the spool holder on page 22. -- 5 - -- .2040 . -
Cut the thread, push the bobbin to the left and remove bobbin from the second spool holder Insert the second spool holder in the case of the thread firmly and press the I foot control. B - - .-. % Winding from the winder. 23 Threading Threading of the thread is carried out as the bobbin is full, the winding action will be stopped automatically. As soon as in the hole provided. Switch on the master switch Hold the end of the spool holder on page 22. -- 5 - -- .2040 . -
Owner's Manual
Page 26
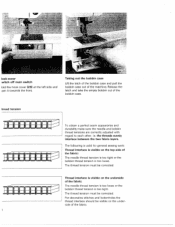
...bobbin out of the machine. The thread tension must be corrected. For decorative stitches and buttonholes the thread interlace should be corrected. Thread interlace is visible on the under side of the fabric: The needle thread tension is too loose or the bobbin thread tension is too loose. hread ...fabric layers. The following is valid for general sewing work: Thread interlace is visible on the top side of the fabric: The needle thread tension is too tight or the bobbin thread tension is too tight The thread tension must be visible on the underside of the fabric. look...
...bobbin out of the machine. The thread tension must be corrected. For decorative stitches and buttonholes the thread interlace should be corrected. Thread interlace is visible on the under side of the fabric: The needle thread tension is too loose or the bobbin thread tension is too loose. hread ...fabric layers. The following is valid for general sewing work: Thread interlace is visible on the top side of the fabric: The needle thread tension is too tight or the bobbin thread tension is too tight The thread tension must be visible on the underside of the fabric. look...
Owner's Manual
Page 27
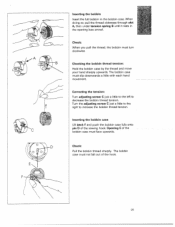
... bobbin case must turn clockwise. Inserting the bobbin Insert the full bobbin in the opening (see arrow). Checking the bobbin thread tension: Hold the bobbin case by the thread and move your hand sharply upwards. Inserting the bobbin case Lift latch F and push the bobbin case fully onto pin ...D of the sewing hook Opening E of the hook F 25 Check: Pull the bobbin thread sharply. Turn the adjusting screw C just a little to the right to decrease the bobbin thread tension. The bobbin case must slip downwards a little with each hand movement Correcting the tension: Turn adjusting...
... bobbin case must turn clockwise. Inserting the bobbin Insert the full bobbin in the opening (see arrow). Checking the bobbin thread tension: Hold the bobbin case by the thread and move your hand sharply upwards. Inserting the bobbin case Lift latch F and push the bobbin case fully onto pin ...D of the sewing hook Opening E of the hook F 25 Check: Pull the bobbin thread sharply. Turn the adjusting screw C just a little to the right to decrease the bobbin thread tension. The bobbin case must slip downwards a little with each hand movement Correcting the tension: Turn adjusting...
Owner's Manual
Page 28
... the spool holder and fit an unwin ding disk of the two thread guides D. Now pass it through the left into thread guide A from the front Place the thread from the side behind one of the right size. The thread must be pulled into the take -up lever from left to the ...next page. To thread the needle, please refer to right Pass the thread downwards in the right-hand threading slot and upwards to left hand-threading slot downwards. Pull the thread around the stop C in the right-hand threading slot Pull the thread from right to the take -up lever (40...
... the spool holder and fit an unwin ding disk of the two thread guides D. Now pass it through the left into thread guide A from the front Place the thread from the side behind one of the right size. The thread must be pulled into the take -up lever from left to the ...next page. To thread the needle, please refer to right Pass the thread downwards in the right-hand threading slot and upwards to left hand-threading slot downwards. Pull the thread around the stop C in the right-hand threading slot Pull the thread from right to the take -up lever (40...
Owner's Manual
Page 29
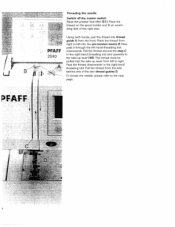
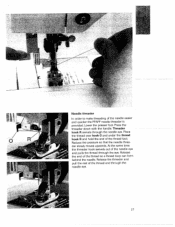
...In order to make threading of the thread end through the needle eye. 27 Release the threader and pull the rest of the needle easier and quicker the PFAFF needle threader is provided. : '' 'L • - Lower the presser foot Press the threader down with the handle. Place the thread over hook 0 ...and under the thread hook R and hold the end of the needle eye and pulls ...
...In order to make threading of the thread end through the needle eye. 27 Release the threader and pull the rest of the needle easier and quicker the PFAFF needle threader is provided. : '' 'L • - Lower the presser foot Press the threader down with the handle. Place the thread over hook 0 ...and under the thread hook R and hold the end of the needle eye and pulls ...
Owner's Manual
Page 30
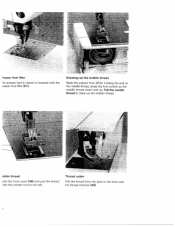
Pull the needle thread to the left. obbin thread lose the hook cover (46) and pull the thread ider the presser foot to draw up . Thread cutter Pull the thread from the back to the front over the thread trimmer (49). Drawing-up the bobbin thread Raise the presser foot While holding the end of the needle thread, press the foot control so the needle moves down and up the bobbin thread. resser foot lifter The presser foot is raised or lowered with the )resser foot lifter (51).
Pull the needle thread to the left. obbin thread lose the hook cover (46) and pull the thread ider the presser foot to draw up . Thread cutter Pull the thread from the back to the front over the thread trimmer (49). Drawing-up the bobbin thread Raise the presser foot While holding the end of the needle thread, press the foot control so the needle moves down and up the bobbin thread. resser foot lifter The presser foot is raised or lowered with the )resser foot lifter (51).
Owner's Manual
Page 31
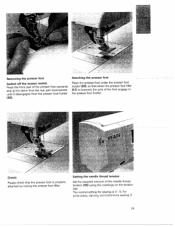
Setting the needle thread tension Set the required amount of the presser foot upwards and at the same time the rear part downwards until it disengages from the presser ... that when the presser foot lifter (51) is 3 - 5. •[ Removing the presser foot Switch off the master switch Press the front part of the needle thread tension (35) using the markings on the tension dial.
Setting the needle thread tension Set the required amount of the presser foot upwards and at the same time the rear part downwards until it disengages from the presser ... that when the presser foot lifter (51) is 3 - 5. •[ Removing the presser foot Switch off the master switch Press the front part of the needle thread tension (35) using the markings on the tension dial.
Owner's Manual
Page 32
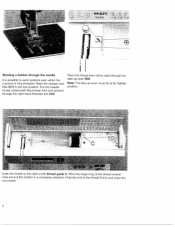
...top position. Wind the beginning of the thread firmly and press the cot control. Note: The take -up lever must be at its highest position. Hold the end of the thread several imes around the bobbin in a clockwise direction. "FE PFFF 2040 I Winding a bobbin through the needle It... is fully threaded. Raise the presser foot lifter (51) to right through the right-hand threader slot ...
...top position. Wind the beginning of the thread firmly and press the cot control. Note: The take -up lever must be at its highest position. Hold the end of the thread several imes around the bobbin in a clockwise direction. "FE PFFF 2040 I Winding a bobbin through the needle It... is fully threaded. Raise the presser foot lifter (51) to right through the right-hand threader slot ...
Owner's Manual
Page 33
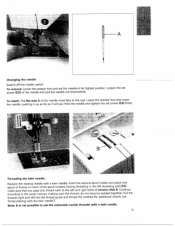
... insert the needle, pushing it up as far as it will go. Insert the second spool holder and place one thread each of the spool holders. Pull the threads right and left threading slot (34), make sure that you pass one spool of tension disk B. Loosen the set screw (52) firmly... become twisted together. Note: It is not possible to the left and right sides of thread on each to use the automatic needle threader with a twin needle. Continue threading in the left into the thread guide and thread the needles (for additional details, see "Embroidering with the twin needle"). To insert The...
... insert the needle, pushing it up as far as it will go. Insert the second spool holder and place one thread each of the spool holders. Pull the threads right and left threading slot (34), make sure that you pass one spool of tension disk B. Loosen the set screw (52) firmly... become twisted together. Note: It is not possible to the left and right sides of thread on each to use the automatic needle threader with a twin needle. Continue threading in the left into the thread guide and thread the needles (for additional details, see "Embroidering with the twin needle"). To insert The...
Owner's Manual
Page 38
Contents Adjusting the contrast on the display Bobbin thread monitor (model 2040) Selecting the sewing programs Altering pattern sizes Altering the stitch width/needle position Altering the pattern width/stitch length Altering the pattern length/stitch density Balance lnfo key/reverse sewing key Sewing function keys Twin needle Formation of the stitch patterns Page 38 Page 38 Page 39 Page 40 Page 41 Page 42 Page 43 Page 44 Page 45 Page 46 Page 47 Page 48/49 37
Contents Adjusting the contrast on the display Bobbin thread monitor (model 2040) Selecting the sewing programs Altering pattern sizes Altering the stitch width/needle position Altering the pattern width/stitch length Altering the pattern length/stitch density Balance lnfo key/reverse sewing key Sewing function keys Twin needle Formation of the stitch patterns Page 38 Page 38 Page 39 Page 40 Page 41 Page 42 Page 43 Page 44 Page 45 Page 46 Page 47 Page 48/49 37


