
Owner's Manual
Page 2
...-tip stitch Foot control buttons, buttons, buttons, buttons, Models 1014 Model 1019 Model 1035 Model 1037 and 1015 Light bulb Machine feed Needle Needle position Oiling Presser bar lifter Reverse sewing Sewing feet Sewing mechanism Slot-threading Special accessories Special sewing feet Spool of thread Stitch length Stitch program chart Straight-stitch needle Stretch stitches position...
...-tip stitch Foot control buttons, buttons, buttons, buttons, Models 1014 Model 1019 Model 1035 Model 1037 and 1015 Light bulb Machine feed Needle Needle position Oiling Presser bar lifter Reverse sewing Sewing feet Sewing mechanism Slot-threading Special accessories Special sewing feet Spool of thread Stitch length Stitch program chart Straight-stitch needle Stretch stitches position...
Owner's Manual
Page 4
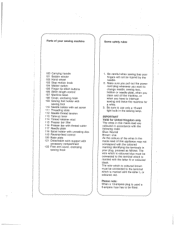
... are coloured in accordance with the following code: Blue: Neutral Brown: Live As the colours of the wires in the mains lead of your sewing machine 4 Some safety rules 100 Carrying handle 101 Bobbin winder 102 Hand wheel 103 Stop motion knob 104 Master switch 105 Finger tip stitch buttons 106... Stitch length control 107 Machine base 108 Cover, enclosing hook 109 Sewing foot holder with sewing foot 110 Needle holder with set screw 111 Threading slots 112 Needle thread tension 113 Take-up lever 114 Thread...
... are coloured in accordance with the following code: Blue: Neutral Brown: Live As the colours of the wires in the mains lead of your sewing machine 4 Some safety rules 100 Carrying handle 101 Bobbin winder 102 Hand wheel 103 Stop motion knob 104 Master switch 105 Finger tip stitch buttons 106... Stitch length control 107 Machine base 108 Cover, enclosing hook 109 Sewing foot holder with sewing foot 110 Needle holder with set screw 111 Threading slots 112 Needle thread tension 113 Take-up lever 114 Thread...
Owner's Manual
Page 5
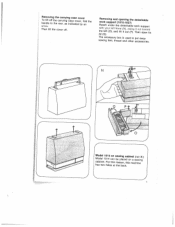
...cabinet. Removing the carrying case cover To lift off . work support (1015-1037) detachable Reach under the detachable with your left hand (N), swing the left (0), and lift it out toward Then open its The accessory box sewing feet, thread is used to arrow. the the carrying rear, as case ...cover, fold indicated by an the Then lift the cover off handle to and other put away accessories. lid (Q). For this machine the back. ) 1 Removing and opening the...
...cabinet. Removing the carrying case cover To lift off . work support (1015-1037) detachable Reach under the detachable with your left hand (N), swing the left (0), and lift it out toward Then open its The accessory box sewing feet, thread is used to arrow. the the carrying rear, as case ...cover, fold indicated by an the Then lift the cover off handle to and other put away accessories. lid (Q). For this machine the back. ) 1 Removing and opening the...
Owner's Manual
Page 10
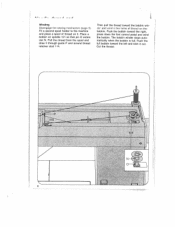
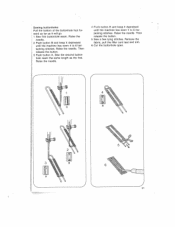
LI_.._1 __.J Winding Disengage the sewing mechanism (page 5). Push the full bobbin toward the left and take it through guide P and around thread retainer stud 114. Pull the thread from the ... and wind the bobbin. The bobbin winder stops auto matically when the bobbin is full. Cut the thread. 4 N 6 RI__II... Fit a second spool holder to the machine and place a spool of thread on spindle 101 so that pin 0 enters slot N. Place a bobbin on the bobbin.
LI_.._1 __.J Winding Disengage the sewing mechanism (page 5). Push the full bobbin toward the left and take it through guide P and around thread retainer stud 114. Pull the thread from the ... and wind the bobbin. The bobbin winder stops auto matically when the bobbin is full. Cut the thread. 4 N 6 RI__II... Fit a second spool holder to the machine and place a spool of thread on spindle 101 so that pin 0 enters slot N. Place a bobbin on the bobbin.
Owner's Manual
Page 15
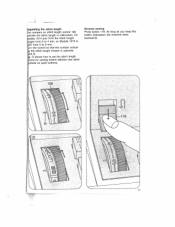
Reverse sewing Press button 119. As tong as you keep this button depressed, the machine sews backwards. 11 jegulating the stitch length he numbers on stitch length control 106 dicate the stitch length in millimeters On todets 1014 and 1015 the stitch length jes from 0 to 4 mm, on Models 1019 to 7 from 0 to 6 mm. , the control so that the number indicat the stitch lenght chosen is opposite k N. . 0 shows how to set the stitch length trol for sewing stretch stitches (red stitch ibols on push buttons).
Reverse sewing Press button 119. As tong as you keep this button depressed, the machine sews backwards. 11 jegulating the stitch length he numbers on stitch length control 106 dicate the stitch length in millimeters On todets 1014 and 1015 the stitch length jes from 0 to 4 mm, on Models 1019 to 7 from 0 to 6 mm. , the control so that the number indicat the stitch lenght chosen is opposite k N. . 0 shows how to set the stitch length trol for sewing stretch stitches (red stitch ibols on push buttons).
Owner's Manual
Page 22
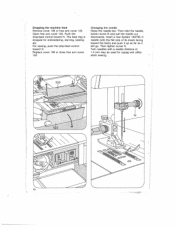
...122. Push the drop-feed control toward 0. The feed dog is dropped for zigzag and utility stitch sewing. 18 Twin needles with the flat side of 1.4 mm may be used for embroidering, darning, ... loosen screw N and pull the needle out downwards. Then tighten screw N. Changing the needle Raise the needle bar. For sewing, push the drop-feed control toward N. Insert a new System 130/705 H needle (with a needle distance of its ... and push it up as far as it will go. Dropping the machine feed Remove cover 108 or free arm cover 122. Replace cover 108 or close free arm cover. 122.
...122. Push the drop-feed control toward 0. The feed dog is dropped for zigzag and utility stitch sewing. 18 Twin needles with the flat side of 1.4 mm may be used for embroidering, darning, ... loosen screw N and pull the needle out downwards. Then tighten screw N. Changing the needle Raise the needle bar. For sewing, push the drop-feed control toward N. Insert a new System 130/705 H needle (with a needle distance of its ... and push it up as far as it will go. Dropping the machine feed Remove cover 108 or free arm cover 122. Replace cover 108 or close free arm cover. 122.
Owner's Manual
Page 25
... second button hole seam the same length as it will go. 1 Sew first buttonhole seam. Raise the needle. Then release the button. 5 Sew a few tying stitches. Sewing buttonholes Pull the bottom of the buttonhole foot for ward as far as the first. Remove the fabric, pull the filler ...cord taut and trim. 6 Cut the buttonhole open. 21 Raise the needle. 4 Push button B and keep it depressed until the machine has sewn...
... second button hole seam the same length as it will go. 1 Sew first buttonhole seam. Raise the needle. Then release the button. 5 Sew a few tying stitches. Sewing buttonholes Pull the bottom of the buttonhole foot for ward as far as the first. Remove the fabric, pull the filler ...cord taut and trim. 6 Cut the buttonhole open. 21 Raise the needle. 4 Push button B and keep it depressed until the machine has sewn...
Owner's Manual
Page 29
...-feed control to switch off the master switch. Remove thread ends and put a drop of fabric under the sewing foot. This is not uniform Tension out of adjustment. Thread machine properly and check both tensions. 5. During bobbin winding, do not hold thread in hook raceway. Use first-...class thread only. Thread too thick, knotty or hard. Fundamental rules Never run a threaded machine unless there is at all Lint has accumulated between tooth rows of material, Check upper and lower tensions. Seam is particularly important when children...
...-feed control to switch off the master switch. Remove thread ends and put a drop of fabric under the sewing foot. This is not uniform Tension out of adjustment. Thread machine properly and check both tensions. 5. During bobbin winding, do not hold thread in hook raceway. Use first-...class thread only. Thread too thick, knotty or hard. Fundamental rules Never run a threaded machine unless there is at all Lint has accumulated between tooth rows of material, Check upper and lower tensions. Seam is particularly important when children...
Owner's Manual
Page 32
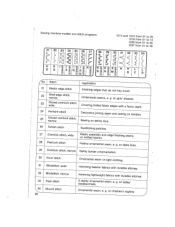
Sewing machine models and stitch programs: 1014 and 1015 from 01 to 05 1019 from 01 to 15 1035 from 01 to 30 1037 from 01 to 48 21 22 23 24 25 26 27
Sewing machine models and stitch programs: 1014 and 1015 from 01 to 05 1019 from 01 to 15 1035 from 01 to 30 1037 from 01 to 48 21 22 23 24 25 26 27


