
Owner's Manual
Page 2
... the top cover Removing and opening the swing-out arm Accessory box and accessory compartment Electrical connection Foot control Placing spool of thread on pin Upper threading Threading the needle Disengaging the sewing mechanism Bobbin ...lifter Thread cutter Thread tensions Regulating the stitch length Reverse sewing Finger-tip controls 1027 Finger-tip controls 1025 Selecting utility stitches Selecting stretch stitches Utility- and stretch-stitch combinations 1027 Selecting the needle position for straight stitching Droppingthemachinefeed Changing the needle Changingthesewingfoot Special ...
... the top cover Removing and opening the swing-out arm Accessory box and accessory compartment Electrical connection Foot control Placing spool of thread on pin Upper threading Threading the needle Disengaging the sewing mechanism Bobbin ...lifter Thread cutter Thread tensions Regulating the stitch length Reverse sewing Finger-tip controls 1027 Finger-tip controls 1025 Selecting utility stitches Selecting stretch stitches Utility- and stretch-stitch combinations 1027 Selecting the needle position for straight stitching Droppingthemachinefeed Changing the needle Changingthesewingfoot Special ...
Owner's Manual
Page 4
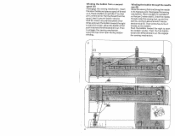
...Master switch 35 Finger-tip controls 36 Stitch length control 37 Swing-out sewing arm with accessory compartment 38 Needle plate 39 Sewing foot holder with sewing foot 40 Needle holder with screw 41 Needle thread tension 42 Presser bar lifter 43 Presser bar with thread cutter 44 Reverse-feed ...control 45 Stitch chart (Model 1027) 46 Accessory box with accessory compartment underneath 47 Bobbin winder 48 Free arm cover (enclosing sewing hook and drop-...
...Master switch 35 Finger-tip controls 36 Stitch length control 37 Swing-out sewing arm with accessory compartment 38 Needle plate 39 Sewing foot holder with sewing foot 40 Needle holder with screw 41 Needle thread tension 42 Presser bar lifter 43 Presser bar with thread cutter 44 Reverse-feed ...control 45 Stitch chart (Model 1027) 46 Accessory box with accessory compartment underneath 47 Bobbin winder 48 Free arm cover (enclosing sewing hook and drop-...
Owner's Manual
Page 7
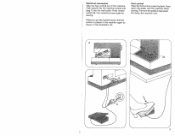
Press master switch 34. Foot control Place the foot control under the table. Press down the pedal, and the machine starts sewing. Push plug B into the machine socket and plug C into the wall outlet. Your machine is depressed, the faster the machine runs. 3 The more the pedal is now readyfor sewing. When you put the machine away, the foot control is placed in the machine again as shown in the illustration (A). Electrical connection Take the foot control out of the machine.
Press master switch 34. Foot control Place the foot control under the table. Press down the pedal, and the machine starts sewing. Push plug B into the machine socket and plug C into the wall outlet. Your machine is depressed, the faster the machine runs. 3 The more the pedal is now readyfor sewing. When you put the machine away, the foot control is placed in the machine again as shown in the illustration (A). Electrical connection Take the foot control out of the machine.
Owner's Manual
Page 8
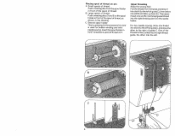
... into slot Ato the left of guide C, and draw the other into the right thread guide Don the needle holder. Upper threading Raise the sewing foot. B Large spools of thread: Push unreeling discs D and Eon the spool holder in front of the spool of thread, as shown in front of the...
... into slot Ato the left of guide C, and draw the other into the right thread guide Don the needle holder. Upper threading Raise the sewing foot. B Large spools of thread: Push unreeling discs D and Eon the spool holder in front of the spool of thread, as shown in front of the...
Owner's Manual
Page 10
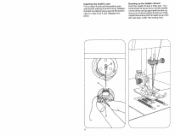
... on it around bobbin tension stud 55. Winding the bobbin through the needle eye (B) Raise the sewing foot and bring the needle to start the winder. Draw the needle thread under the sewing foot, up and into slot 54, and from above around the bobbin a few turns of thread on spindle 47...
... on it around bobbin tension stud 55. Winding the bobbin through the needle eye (B) Raise the sewing foot and bring the needle to start the winder. Draw the needle thread under the sewing foot, up and into slot 54, and from above around the bobbin a few turns of thread on spindle 47...
Owner's Manual
Page 12
Inserting the bobbin case Pull out latch K and push the bobbin case onto stud B, making sure slot A is up. Pull the bobbin thread out of the needle hole and lay both threads toward you until the needle movesdownand upagainandthetake-up lever is up the bobbin thread Hold the needle thread a little taut. Drawing up . Release the latch and lightly press against the bobbin case to make sure it has snapped into place. Turn hand wheel 32 toward the left and back under the sewing foot. 8
Inserting the bobbin case Pull out latch K and push the bobbin case onto stud B, making sure slot A is up. Pull the bobbin thread out of the needle hole and lay both threads toward you until the needle movesdownand upagainandthetake-up lever is up the bobbin thread Hold the needle thread a little taut. Drawing up . Release the latch and lightly press against the bobbin case to make sure it has snapped into place. Turn hand wheel 32 toward the left and back under the sewing foot. 8

Owner's Manual
Page 13
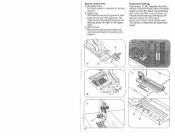
Pull the work out of the presser bar. Presser bar lifter Lever 42 has three positions: A = The sewing foot is raised. (Before you to cut them. 9 Thread cutter The thread cutter is raised further for sewing. Raise the sewing foot. C The sewing foot is lowered for inserting extra-thick materials. Draw the threads into the cutter slot and pulithem downwards to raise the needle and take-up lever 52.) B = The sewing foot is an oblique slot located at the back of the machine toward you remove the work, turn the hand wheel toward the back.
Pull the work out of the presser bar. Presser bar lifter Lever 42 has three positions: A = The sewing foot is raised. (Before you to cut them. 9 Thread cutter The thread cutter is raised further for sewing. Raise the sewing foot. C The sewing foot is lowered for inserting extra-thick materials. Draw the threads into the cutter slot and pulithem downwards to raise the needle and take-up lever 52.) B = The sewing foot is an oblique slot located at the back of the machine toward you remove the work, turn the hand wheel toward the back.

Owner's Manual
Page 21
Hole E and screw Dare used for attaching an edge guide. When attaching a sewing foot make sure stud B enters slot C. Place the sewing foot under the sewing foot holder and hold it in slot C. Lower presser bar lifter 42 and at the same time reposition the sewing foot so that stud B fits in place with your left hand. Changing the sewing foot To release the sewing foot push the red button A. Screw F serves to secure the sewing foot holder on the presser bar. 17
Hole E and screw Dare used for attaching an edge guide. When attaching a sewing foot make sure stud B enters slot C. Place the sewing foot under the sewing foot holder and hold it in slot C. Lower presser bar lifter 42 and at the same time reposition the sewing foot so that stud B fits in place with your left hand. Changing the sewing foot To release the sewing foot push the red button A. Screw F serves to secure the sewing foot holder on the presser bar. 17
Owner's Manual
Page 22
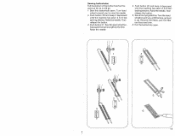
... insert its rear pin into groove F, then push its front pin into groove G. C Darning foot Remove the sewing foot holder and secure the darning foot in the buttonhole range of the foot, pull it taut and clamp it in front lug D. As you sew, arrow E moves along the right or ...left zipper chain. Regulate the stitch density in position with screw H. This serves to determine the buttonhole length. Attach the buttonhole foot. Special sewing feet A Blindstitch foot Blindstich guide E is adjusted by turning screw D. Insert the filler cord as follows (C): Place it over the rear lug of the...
... insert its rear pin into groove F, then push its front pin into groove G. C Darning foot Remove the sewing foot holder and secure the darning foot in the buttonhole range of the foot, pull it taut and clamp it in front lug D. As you sew, arrow E moves along the right or ...left zipper chain. Regulate the stitch density in position with screw H. This serves to determine the buttonhole length. Attach the buttonhole foot. Special sewing feet A Blindstitch foot Blindstich guide E is adjusted by turning screw D. Insert the filler cord as follows (C): Place it over the rear lug of the...
Owner's Manual
Page 23
... seam. Then release the button. 3 Push button 21 . Turn the hand wheel toward you to 6 bartacking stitches. Sewing buttonholes Pull the bottom of the buttonhole foot for ward as far as the first. Turn hand wheel torward you until the take-up lever is up.
... seam. Then release the button. 3 Push button 21 . Turn the hand wheel toward you to 6 bartacking stitches. Sewing buttonholes Pull the bottom of the buttonhole foot for ward as far as the first. Turn hand wheel torward you until the take-up lever is up.


