

Owner's Manual
Page 3
... have to do is tightened before you have completed a seam. Failure to observe this rule may cause the thread to slip out of Machine Operation • Whenever you have to remove the work . • Always bring take -up lever up lever to its highest position before...begin and after you have fabric under the sewing foot. • Place both threads back under the sewing foot before you begin sewing. • Never run a threaded machine unless you put fabric into the machine. • The machine will feed the material under the sewing foot automatically. DR 050 Fundamentals of the needle...
... have to do is tightened before you have completed a seam. Failure to observe this rule may cause the thread to slip out of Machine Operation • Whenever you have to remove the work . • Always bring take -up lever up lever to its highest position before...begin and after you have fabric under the sewing foot. • Place both threads back under the sewing foot before you begin sewing. • Never run a threaded machine unless you put fabric into the machine. • The machine will feed the material under the sewing foot automatically. DR 050 Fundamentals of the needle...
Owner's Manual
Page 4
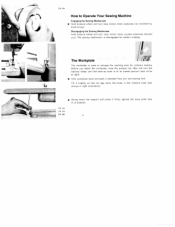
Tilt it slightly so that its lowest position (see arrow at bottom). The Workplate The workplate is used to Operate Your Sewing Machine Engaging the Sewing Mechanism 4 Hold balance wheel and turn stop motion knob counter-clockwse (toward you attach the workpiate, raise the presser bar lifter and ...(as indicated by Dlack arrow). at right). 4 Hold workplate level and push it firmly against the base plate (see arrows in the machine base (see Il. Disengaging the Sewing Mechanism Hold balance wheel and turn the balance wheel until the take-up lever is disengaged for ordinary...
Tilt it slightly so that its lowest position (see arrow at bottom). The Workplate The workplate is used to Operate Your Sewing Machine Engaging the Sewing Mechanism 4 Hold balance wheel and turn stop motion knob counter-clockwse (toward you attach the workpiate, raise the presser bar lifter and ...(as indicated by Dlack arrow). at right). 4 Hold workplate level and push it firmly against the base plate (see arrows in the machine base (see Il. Disengaging the Sewing Mechanism Hold balance wheel and turn the balance wheel until the take-up lever is disengaged for ordinary...

Owner's Manual
Page 5
...driven by foot power. Cord 4 leads to the foot control which serves to swing the motor to regi. -te the machine sceed. The harder you have completed sewing, flick the lever to its operative position. OP 510 Electrical Information Push plug 1 into receptacle 2 and plug 3 at ...other end of your foot. DR 558 Motor Disengaging Mechanism Power-driven machines feature a lever underneath the balance wheel which serves to...
...driven by foot power. Cord 4 leads to the foot control which serves to swing the motor to regi. -te the machine sceed. The harder you have completed sewing, flick the lever to its operative position. OP 510 Electrical Information Push plug 1 into receptacle 2 and plug 3 at ...other end of your foot. DR 558 Motor Disengaging Mechanism Power-driven machines feature a lever underneath the balance wheel which serves to...

Owner's Manual
Page 6
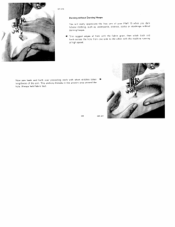
To backtack the end of a seam, simply depress the finger-tip control. DR 009A 6 For detailed instructions please refer to page 20. DR 489 B Straight Stitching 4 For straight-stitch sewing set Lever A = 0 Lever B = Center i (For straight stitching, too, a fashion disc should be inserted in the machine Control G regulates the stitch length.
To backtack the end of a seam, simply depress the finger-tip control. DR 009A 6 For detailed instructions please refer to page 20. DR 489 B Straight Stitching 4 For straight-stitch sewing set Lever A = 0 Lever B = Center i (For straight stitching, too, a fashion disc should be inserted in the machine Control G regulates the stitch length.
Owner's Manual
Page 7
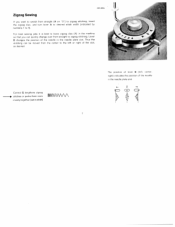
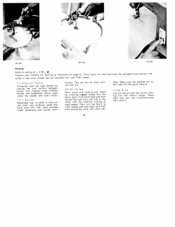
DR 4894 Zigzag Sewing If you can be moved from straight (A on '0") to zigzag stitching, insert the zigzag disc, and turn lever A to desired stitch width (indicated by numbers 1 to the left , center, nght) ndicates the position of the needle in the machine so that you want to switch from the center to...\J\/\J\ The position of lever B (left or right of the slot. Thus the st tching can quickly change over from straight to zigzag stitching. For most sewing jobs it is best to leave zigzag disc (A) in the needle plate slot.
DR 4894 Zigzag Sewing If you can be moved from straight (A on '0") to zigzag stitching, insert the zigzag disc, and turn lever A to desired stitch width (indicated by numbers 1 to the left , center, nght) ndicates the position of the needle in the machine so that you want to switch from the center to...\J\/\J\ The position of lever B (left or right of the slot. Thus the st tching can quickly change over from straight to zigzag stitching. For most sewing jobs it is best to leave zigzag disc (A) in the needle plate slot.
Owner's Manual
Page 11
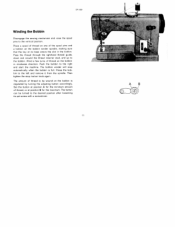
... thread retainer stud, and up to the bobbin. Set the button at position A for the minimum amount of thread to the right and start the machine. The bobbin winder will stop motion knob again. The amount of thread, or at its set screw with a screwdriver. 11 AB \, ./ 0 (7 i Press the bob ...bin to the vertical position. DR 8S9 Winding the Bobbin Disengage the sewing mechanism and rase the spool pins to the left and remove it from the spindle. Place a spool of thread on one of thread on the...
... thread retainer stud, and up to the bobbin. Set the button at position A for the minimum amount of thread to the right and start the machine. The bobbin winder will stop motion knob again. The amount of thread, or at its set screw with a screwdriver. 11 AB \, ./ 0 (7 i Press the bob ...bin to the vertical position. DR 8S9 Winding the Bobbin Disengage the sewing mechanism and rase the spool pins to the left and remove it from the spindle. Place a spool of thread on one of thread on the...
Owner's Manual
Page 15
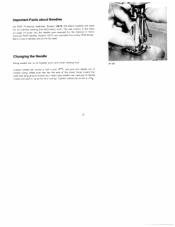
... long groove toward you the needle size required for all ordinary sewing and embroidery work. are used . Make sure that the flat side of needle clamp and push it up as far as it will go. Important Facts about Needles On Pfaff 75 sewing machines, System 130 R, flat-shank needles are available from every... Pfaff dealer. Changing the Needle Bring needle bar to its highest point and lower...
... long groove toward you the needle size required for all ordinary sewing and embroidery work. are used . Make sure that the flat side of needle clamp and push it up as far as it will go. Important Facts about Needles On Pfaff 75 sewing machines, System 130 R, flat-shank needles are available from every... Pfaff dealer. Changing the Needle Bring needle bar to its highest point and lower...

Owner's Manual
Page 20
... an arrow in the illustration). When the control is ideal for backtacking the beginning or end of the mark is released, the machine resumes forward sewing. The numbers on O the machine ceases feeding. DR 008 Stitch Length Regulation The stitch length control serves to regulate the stitch length and to limit it in...
... an arrow in the illustration). When the control is ideal for backtacking the beginning or end of the mark is released, the machine resumes forward sewing. The numbers on O the machine ceases feeding. DR 008 Stitch Length Regulation The stitch length control serves to regulate the stitch length and to limit it in...

Owner's Manual
Page 22
darning and button sewing. Hold spring clip c so that it snap into place. To raise the machine feed, turn the drop feed control under the free arm toward you as far as it will cease feeding. You should hear it is particularly important for hoop embroidery. Darning and Embroidery Foot Remove the sewing foot. OR 855 Dropping the Machine Feed This is behind the needle set screw, and tighten screw b. 22 DR 854 Attach darning foot No, 93-102 826-91 from the rear. The fabric will go. To drop the machine feed, turn the drop feed control back to its initial position.
darning and button sewing. Hold spring clip c so that it snap into place. To raise the machine feed, turn the drop feed control under the free arm toward you as far as it will cease feeding. You should hear it is particularly important for hoop embroidery. Darning and Embroidery Foot Remove the sewing foot. OR 855 Dropping the Machine Feed This is behind the needle set screw, and tighten screw b. 22 DR 854 Attach darning foot No, 93-102 826-91 from the rear. The fabric will go. To drop the machine feed, turn the drop feed control back to its initial position.
Owner's Manual
Page 24
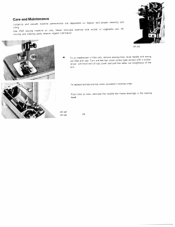
... the top cover screw (see arrow) with animal or vegetable oils. Never lubricate machine with a screw driver. From time to time, lubricate the needle bar frame bearings in the sewing head. Use Pfaff sewing machine oil only. DR 605 DR 606 24 Care and Maintenance Longevity and smooth... machine performance are dependent on regular and proper cleaning and oilng. Lift front end of top...
... the top cover screw (see arrow) with animal or vegetable oils. Never lubricate machine with a screw driver. From time to time, lubricate the needle bar frame bearings in the sewing head. Use Pfaff sewing machine oil only. DR 605 DR 606 24 Care and Maintenance Longevity and smooth... machine performance are dependent on regular and proper cleaning and oilng. Lift front end of top...
Owner's Manual
Page 25
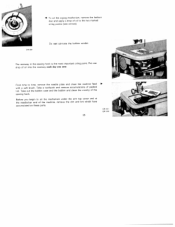
... and the bobbin and clean the vicinity of packed lint. Take a toothpick and remove accumulations of the sewing hook. I To oil the zigzag mechanism, remove the fashion disc and apply a drop of the machine, remove the dirt and lint which have accumulated on these parts. 25 DR 611 DR 610 Before you... sew. Put one drop of oil into the raceway each day you begin to oil the mechanism under the...
... and the bobbin and clean the vicinity of packed lint. Take a toothpick and remove accumulations of the sewing hook. I To oil the zigzag mechanism, remove the fashion disc and apply a drop of the machine, remove the dirt and lint which have accumulated on these parts. 25 DR 611 DR 610 Before you... sew. Put one drop of oil into the raceway each day you begin to oil the mechanism under the...

Owner's Manual
Page 27
.... Clean and oil hook raceway. Polish needle plate slot with thread or needs oiling. Burrs or sharp edges on page 14. (For ordinary sewing, jse System 130 R needles.) Insert new needle. Rook raceway is jammed with fine emery cloth. 27 Needle Thread Breaks Cause: The above .... Trouble Shooting 1. Machine Skips Stitches Cause: Needle incorrectly inseted. Poor, knotty or rotten thread used. Needle bent, Machine threaded improperly. Remedy: Push needle up as far as it will go and be sure that the ...
.... Clean and oil hook raceway. Polish needle plate slot with thread or needs oiling. Burrs or sharp edges on page 14. (For ordinary sewing, jse System 130 R needles.) Insert new needle. Rook raceway is jammed with fine emery cloth. 27 Needle Thread Breaks Cause: The above .... Trouble Shooting 1. Machine Skips Stitches Cause: Needle incorrectly inseted. Poor, knotty or rotten thread used. Needle bent, Machine threaded improperly. Remedy: Push needle up as far as it will go and be sure that the ...
Owner's Manual
Page 28
..., Pieces of sewing hook. Remedy: Replace needle at once to prevent further damage. Remedy: Adjust tensions as desired. Push bobbin case until you hear it bends and strikes needle plate. Don't run thread over finger when winding the bobbin. (For threading the machine see page 22... off needle plate and remove lint with a stiff brush. 28 Don't force the feeding motion. Faulty Stitch Formation Cause: Improper tension. Machine Feeds Improperly Cause: Feed dog dropped. Raise presser bar lifter and remove thread. Bobbin case inserted incorrectly. 4. Thread too heavy, knotty or...
..., Pieces of sewing hook. Remedy: Replace needle at once to prevent further damage. Remedy: Adjust tensions as desired. Push bobbin case until you hear it bends and strikes needle plate. Don't run thread over finger when winding the bobbin. (For threading the machine see page 22... off needle plate and remove lint with a stiff brush. 28 Don't force the feeding motion. Faulty Stitch Formation Cause: Improper tension. Machine Feeds Improperly Cause: Feed dog dropped. Raise presser bar lifter and remove thread. Bobbin case inserted incorrectly. 4. Thread too heavy, knotty or...

Owner's Manual
Page 29
...hook raceway, the power jam, even if of thread. Machine Fails to "O and insert proper fashion disc. Use only Pfaff sewing machine oil Stop bobbin winder. Mechanism clogged by pieces of the motor the machine should be sufficient to jam in rotary hook will be... handled improperly. If thread in the machine (see page 5). Remedy: Flick lever down (see ...
...hook raceway, the power jam, even if of thread. Machine Fails to "O and insert proper fashion disc. Use only Pfaff sewing machine oil Stop bobbin winder. Mechanism clogged by pieces of the motor the machine should be sufficient to jam in rotary hook will be... handled improperly. If thread in the machine (see page 5). Remedy: Flick lever down (see ...

Owner's Manual
Page 30
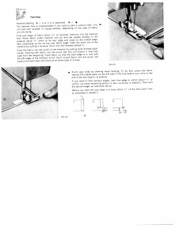
Edge stitcher No. 847 600 used with the quilting gauge sews parallel rows of stitching over the entire surface of stitches. OR 002 / /7/ Quilting Machine Setting: A = 0 B = . DROO3A 30 Position of zipper depends on wrong side of fabric. Always guide the gauge finger along the preceding row... of the fabric. Attractive tea cosies, slippers, seat pads and covers can be quilted. Using Sewing Feet and Attachments (setting see page 6) 847 Zipper Insertion Machine Setting: A - 0 B= Pin or baste closed zipper on whether or not you want the edge of the fabric...
Edge stitcher No. 847 600 used with the quilting gauge sews parallel rows of stitching over the entire surface of stitches. OR 002 / /7/ Quilting Machine Setting: A = 0 B = . DROO3A 30 Position of zipper depends on wrong side of fabric. Always guide the gauge finger along the preceding row... of the fabric. Attractive tea cosies, slippers, seat pads and covers can be quilted. Using Sewing Feet and Attachments (setting see page 6) 847 Zipper Insertion Machine Setting: A - 0 B= Pin or baste closed zipper on whether or not you want the edge of the fabric...
Owner's Manual
Page 32
To do this, needle plate on uniform hem. Place fabric material about 1/2" Sew backwards as machine by slowing down feeding. Don't trim the threads (sketch 1). Before you are... the short of its rear edge and close to the end of the hem (see ill, at bottom). 887 551 Hemming Machine Setting: A = 0 or 2 to 3 (optional) B The hemmer foot is indispensable if you want to hem several ...edges, hem first corner, cut away about 1/4" of the hem sewn first, as edge to sew a can hem with straight or zigzag stitches, depending on the left side of the foot before press ...
To do this, needle plate on uniform hem. Place fabric material about 1/2" Sew backwards as machine by slowing down feeding. Don't trim the threads (sketch 1). Before you are... the short of its rear edge and close to the end of the hem (see ill, at bottom). 887 551 Hemming Machine Setting: A = 0 or 2 to 3 (optional) B The hemmer foot is indispensable if you want to hem several ...edges, hem first corner, cut away about 1/4" of the hem sewn first, as edge to sew a can hem with straight or zigzag stitches, depending on the left side of the foot before press ...

Owner's Manual
Page 33
... do not ravel easily may be mended worn center strip. Hem raw edges of the sheet under the sewing foot so that the abutted edges are joined DR 081 838 958 Butt Seaming Machine Setting: A = 3 or 4, B = Two similar pieces together and joined this way. Join them with the needle ...taking one stitch into the fabric and over its edge. Use a long, wide zigzag sew edge with close, wide zigzag stitches. Place the selvaged...
... do not ravel easily may be mended worn center strip. Hem raw edges of the sheet under the sewing foot so that the abutted edges are joined DR 081 838 958 Butt Seaming Machine Setting: A = 3 or 4, B = Two similar pieces together and joined this way. Join them with the needle ...taking one stitch into the fabric and over its edge. Use a long, wide zigzag sew edge with close, wide zigzag stitches. Place the selvaged...
Owner's Manual
Page 34
DR 076 Darning without Darning Hoops You will really appreciate the free arm of your Pfaff 75 when you darn tubular clothing, such as underpants, sleeves, socks or stockings without darn ng hoops. 4 Trim ragged edges of the arm. This anchors threads n the unworn area around the hole Always hold fabric taut. 34 DR 077 Now sew back and forth over preceding work with short stitches taken I lengthwise of hole with the fabric gra n, then stitch back and forth across the hole from one sde to the other with the machine running at high speed.
DR 076 Darning without Darning Hoops You will really appreciate the free arm of your Pfaff 75 when you darn tubular clothing, such as underpants, sleeves, socks or stockings without darn ng hoops. 4 Trim ragged edges of the arm. This anchors threads n the unworn area around the hole Always hold fabric taut. 34 DR 077 Now sew back and forth over preceding work with short stitches taken I lengthwise of hole with the fabric gra n, then stitch back and forth across the hole from one sde to the other with the machine running at high speed.
Owner's Manual
Page 35
... into darning hoop, the damaged area being in time sa ves nine" and reinforce spots that have worn thin with the machine running at right angles and sew back and forth over preceding work under the needle with the fabric grain. First stitch back and forth across the hole from... your machine for darning as instructed on page 22. Then turn the fabric at high speed. Hoops may be done with out foot too Small Holes Darn small and medium-size holes by placing the torn section between hoops and making close stitches across worn section. A - 0, B . Prepare your Pfaff dealer....
... into darning hoop, the damaged area being in time sa ves nine" and reinforce spots that have worn thin with the machine running at right angles and sew back and forth over preceding work under the needle with the fabric grain. First stitch back and forth across the hole from... your machine for darning as instructed on page 22. Then turn the fabric at high speed. Hoops may be done with out foot too Small Holes Darn small and medium-size holes by placing the torn section between hoops and making close stitches across worn section. A - 0, B . Prepare your Pfaff dealer....
Owner's Manual
Page 52
Essential Parts of Machine Fundamentals of Machine Operation Operation of Your Sewing Machine Workplate 4 Motor Disengaging Mechanism 5 Electrical Information 5 Foot Control 5 Straight Stitching 6 Zigzag Sewing 7 Fashion Discs 8 Changing the Fashion Discs 9 Removing the Bobbin Case 10 Winding the Bobbin 11 inserting a Full Bobbin into the Bobbin Case . 12 Inserting the ...
Essential Parts of Machine Fundamentals of Machine Operation Operation of Your Sewing Machine Workplate 4 Motor Disengaging Mechanism 5 Electrical Information 5 Foot Control 5 Straight Stitching 6 Zigzag Sewing 7 Fashion Discs 8 Changing the Fashion Discs 9 Removing the Bobbin Case 10 Winding the Bobbin 11 inserting a Full Bobbin into the Bobbin Case . 12 Inserting the ...


