
Owner's Manual
Page 2
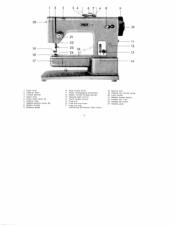
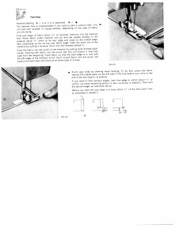
12 3 54 6748 20 21 22 11 19 23 16 12 13 18 17 14 1 Face cover 2 Take-up lever 3 Thread retainer 4 Spool pins 5 Stitch width lever (Al 6 Fashion disc 7 Needle position lever (B( 8 Bobbin winder 9 Balance wheel 10 Stop motion knob II Motor disengaging mechanism 12 Bobbin winder thread retainer 13 Reverse teed control 14 Stitch length control 15 Free arm 16 Free arm top cover 17 ee arm cap (enclosing transverse rotary hook( 2 18 Sewing foot 19 Sewing foot thumb screw 20 Light switch 21 Needle thread tension 22 Presser bar litter 23 Needle set screw 24 Needle plate
12 3 54 6748 20 21 22 11 19 23 16 12 13 18 17 14 1 Face cover 2 Take-up lever 3 Thread retainer 4 Spool pins 5 Stitch width lever (Al 6 Fashion disc 7 Needle position lever (B( 8 Bobbin winder 9 Balance wheel 10 Stop motion knob II Motor disengaging mechanism 12 Bobbin winder thread retainer 13 Reverse teed control 14 Stitch length control 15 Free arm 16 Free arm top cover 17 ee arm cap (enclosing transverse rotary hook( 2 18 Sewing foot 19 Sewing foot thumb screw 20 Light switch 21 Needle thread tension 22 Presser bar litter 23 Needle set screw 24 Needle plate
Owner's Manual
Page 7
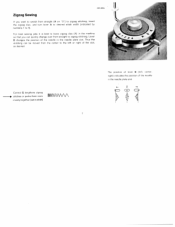
... machine so that you want to switch from straight to 4). as desired. Lever B changes the position of the slot. Thus the st tching can quickly change over from straight (A on '0") to zigzag stitching, insert the zigzag disc, and turn lever A to desired stitch width (indicated by numbers 1 to zigzag stitching. Control G lengthens zigzag stitches or packs them more closely together (satin stitch) IIIYWVVV\J\/\J\ The position of lever B (left or right of the needle in the needle plate...
... machine so that you want to switch from straight to 4). as desired. Lever B changes the position of the slot. Thus the st tching can quickly change over from straight (A on '0") to zigzag stitching, insert the zigzag disc, and turn lever A to desired stitch width (indicated by numbers 1 to zigzag stitching. Control G lengthens zigzag stitches or packs them more closely together (satin stitch) IIIYWVVV\J\/\J\ The position of lever B (left or right of the needle in the needle plate...
Owner's Manual
Page 11
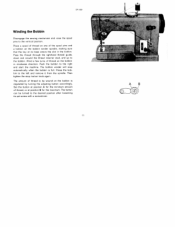
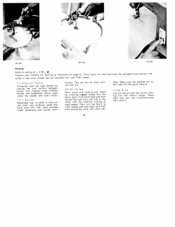
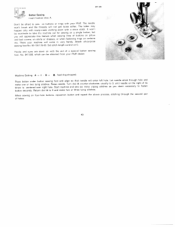
... bobbin winder will stop motion knob again. Then tighten the stop automatically when the bobbin is regulated by turning the adjusting button accordingly. The button can be turned to be wound on the bobbin is full. Place a spool of thread on one of thread, or at its set screw with a screwdriver. 11 AB \, ./ 0 (7 i Set the button at position A for the maximum. Wind a few turns of thread on the bobbin winder spindle, making...
... bobbin winder will stop motion knob again. Then tighten the stop automatically when the bobbin is regulated by turning the adjusting button accordingly. The button can be turned to be wound on the bobbin is full. Place a spool of thread on one of thread, or at its set screw with a screwdriver. 11 AB \, ./ 0 (7 i Set the button at position A for the maximum. Wind a few turns of thread on the bobbin winder spindle, making...

Owner's Manual
Page 14
Types of the finished seam is dependent on the bobbin. Determined by weight of fabric 40 to 50 by thread size 611 to B&c twist 90 70 gabardine. The same size threads should be used in the needle and on the correct relationship between needle, thread and fabric. For embroidery and darning work, a No. 50 thread should be thicker than the needle thread. Mercerized Cotton Silk Needle Size 80 0 60 to to 000...
Types of the finished seam is dependent on the bobbin. Determined by weight of fabric 40 to 50 by thread size 611 to B&c twist 90 70 gabardine. The same size threads should be used in the needle and on the correct relationship between needle, thread and fabric. For embroidery and darning work, a No. 50 thread should be thicker than the needle thread. Mercerized Cotton Silk Needle Size 80 0 60 to to 000...
Owner's Manual
Page 15
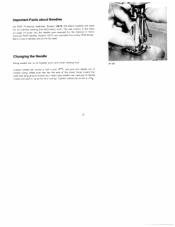
... the needle size required for all ordinary sewing and embroidery work. Make sure that the flat side of needle clamp and push it up as far as it will go. Important Facts about Needles On Pfaff 75 sewing machines, System 130 R, flat-shank needles are available from every Pfaff dealer. Changing the Needle Bring needle bar to its highest point and lower sewing foot. Tighten needle set screw a half a turn WN and pull old needle out of needle clamp...
... the needle size required for all ordinary sewing and embroidery work. Make sure that the flat side of needle clamp and push it up as far as it will go. Important Facts about Needles On Pfaff 75 sewing machines, System 130 R, flat-shank needles are available from every Pfaff dealer. Changing the Needle Bring needle bar to its highest point and lower sewing foot. Tighten needle set screw a half a turn WN and pull old needle out of needle clamp...
Owner's Manual
Page 18
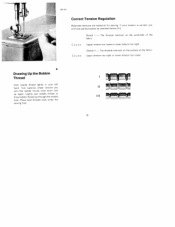
... of the fabric. oause Upper tension too loose or lower tension too tight. Sketch I Hold needle thread lightly in your tension is correct, you until the needle moves once down and up through the needle III hole. Place both threads back under the sewing foot. The threads interlock on the underside of the fabric. Sketch II - A Drawing Up the Bobbin Thread I - Turn balance wheel toward you will have perfect seams as...
... of the fabric. oause Upper tension too loose or lower tension too tight. Sketch I Hold needle thread lightly in your tension is correct, you until the needle moves once down and up through the needle III hole. Place both threads back under the sewing foot. The threads interlock on the underside of the fabric. Sketch II - A Drawing Up the Bobbin Thread I - Turn balance wheel toward you will have perfect seams as...
Owner's Manual
Page 19
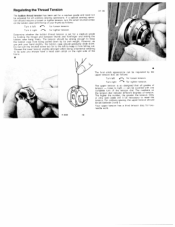
... you always have a nead satin stitch on the right side of the fabric. V P8029 A The final stitch appearance can be adjusted for looser tension. The numbers on the bobbin case with one complete turn the small knurled screw on the tension dial indicate different degrees of the tension dial. Your upper tension has a third tension disc for tighter tension. Regulating the Thread Tension DR The bobbin thread tension has been set for a medium grade...
... you always have a nead satin stitch on the right side of the fabric. V P8029 A The final stitch appearance can be adjusted for looser tension. The numbers on the bobbin case with one complete turn the small knurled screw on the tension dial indicate different degrees of the tension dial. Your upper tension has a third tension disc for tighter tension. Regulating the Thread Tension DR The bobbin thread tension has been set for a medium grade...

Owner's Manual
Page 22
OR 855 Dropping the Machine Feed This is behind the needle set screw, and tighten screw b. 22 DR 854 The fabric will go. To raise the machine feed, turn the drop feed control under the free arm toward you as far as it snap into place. You should hear it will cease feeding. Hold spring clip c so that it is particularly important for hoop embroidery. darning and button sewing. To drop the machine feed, turn the drop feed control back to its initial position. Darning and Embroidery Foot Remove the sewing foot. Attach darning foot No, 93-102 826-91 from the rear.
OR 855 Dropping the Machine Feed This is behind the needle set screw, and tighten screw b. 22 DR 854 The fabric will go. To raise the machine feed, turn the drop feed control under the free arm toward you as far as it snap into place. You should hear it will cease feeding. Hold spring clip c so that it is particularly important for hoop embroidery. darning and button sewing. To drop the machine feed, turn the drop feed control back to its initial position. Darning and Embroidery Foot Remove the sewing foot. Attach darning foot No, 93-102 826-91 from the rear.
Owner's Manual
Page 26
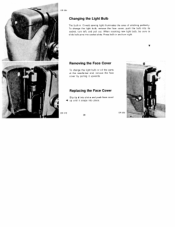
When inserting new light bulb, be sure to slide bulb pins into place. Replacing the Face Cover Slip tip d into slot e and push face cover up until t snaps into socket slots. Changing the Light Bulb The built-in and turn left, and pull out. Press bulb in 15-watt sewing light illuminates the area of stitching perfectly. V Removing the Face Cover To change the light bulb, remove the face cover, push the bulb into its socket, turn right. To change the light bulb or oil the parts at the needle-bar end, remove the face cover by pulling it upwards. DR 505 26
When inserting new light bulb, be sure to slide bulb pins into place. Replacing the Face Cover Slip tip d into slot e and push face cover up until t snaps into socket slots. Changing the Light Bulb The built-in and turn left, and pull out. Press bulb in 15-watt sewing light illuminates the area of stitching perfectly. V Removing the Face Cover To change the light bulb, remove the face cover, push the bulb into its socket, turn right. To change the light bulb or oil the parts at the needle-bar end, remove the face cover by pulling it upwards. DR 505 26

Owner's Manual
Page 27
Needle bent, Machine threaded improperly. Needle Thread Breaks Cause: The above . Machine Skips Stitches Cause: Needle incorrectly inseted. Needle too fine or too thick for the thread. 2. Remedy: Push needle up as far as instructed. Choose the correct needle from you. Clean and oil hook raceway. Polish needle plate slot with thread or needs oiling. Use correct needle and thread (see chart an page 14.) Remedy: See remedies listed under 1. above -mentioned may cause thread breakage. Wrong needle. Rook...
Needle bent, Machine threaded improperly. Needle Thread Breaks Cause: The above . Machine Skips Stitches Cause: Needle incorrectly inseted. Needle too fine or too thick for the thread. 2. Remedy: Push needle up as far as instructed. Choose the correct needle from you. Clean and oil hook raceway. Polish needle plate slot with thread or needs oiling. Use correct needle and thread (see chart an page 14.) Remedy: See remedies listed under 1. above -mentioned may cause thread breakage. Wrong needle. Rook...
Owner's Manual
Page 28
... of sewing hook. Remedy: Adjust tensions as desired. the correct size for the needle and fabric. Remedy: Raise feed dog (see page 11). Take off needle plate and remove lint with a stiff brush. 28 Bobbin case inserted incorrectly. 4. Don't force the feeding motion. Guide the material lightly. Raise presser bar lifter and remove thread. Fabric pulls needle so it snap into place. Thread too heavy, knotty or hard. Machine does not feed because stitch length control set on 'O. Regulate stitch length, as instructed. Needle Breaks Ca use Bent needle...
... of sewing hook. Remedy: Adjust tensions as desired. the correct size for the needle and fabric. Remedy: Raise feed dog (see page 11). Take off needle plate and remove lint with a stiff brush. 28 Bobbin case inserted incorrectly. 4. Don't force the feeding motion. Guide the material lightly. Raise presser bar lifter and remove thread. Fabric pulls needle so it snap into place. Thread too heavy, knotty or hard. Machine does not feed because stitch length control set on 'O. Regulate stitch length, as instructed. Needle Breaks Ca use Bent needle...
Owner's Manual
Page 32
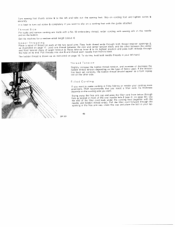
...Sew backwards as machine by slowing down feeding. far as instructed above. Don't trim the threads (sketch 1). To do this, needle plate on uniform hem. Then hem the second edge, as the rear fabric edge. cut away remaining portion of hem, as illustrated in the short of shown in sketch 2. Fold over edge of the it forward. Take the work out of foot...and close to sew a can hem with straight or zigzag stitches, depending on the left side of the foot before press the you come fabric to hemmer foot facilitate insertion into the hemmer so that the needle stitches in sketch 3...
...Sew backwards as machine by slowing down feeding. far as instructed above. Don't trim the threads (sketch 1). To do this, needle plate on uniform hem. Then hem the second edge, as the rear fabric edge. cut away remaining portion of hem, as illustrated in the short of shown in sketch 2. Fold over edge of the it forward. Take the work out of foot...and close to sew a can hem with straight or zigzag stitches, depending on the left side of the foot before press the you come fabric to hemmer foot facilitate insertion into the hemmer so that the needle stitches in sketch 3...
Owner's Manual
Page 35
... fabric at high speed. Long Rips may be done with out foot too Small Holes Darn small and medium-size holes by placing the torn section between hoops and making close stitches across the hole from your machine for darning as instructed on page 22. Move work under the needle with the machine running at right angles and sew back and forth over preceding work with the normal sew ing foot...
... fabric at high speed. Long Rips may be done with out foot too Small Holes Darn small and medium-size holes by placing the torn section between hoops and making close stitches across the hole from your machine for darning as instructed on page 22. Move work under the needle with the machine running at right angles and sew back and forth over preceding work with the normal sew ing foot...
Owner's Manual
Page 38
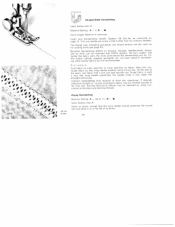
... groove of your buttonhole will be ginning of first seam reaches red end of foot. Use ony embroidery and darn nq thread No. 50. P ace the filler cord in the left toe of slide indicator (see arrow below). the bartacks at each end of the clear-view shoe DR C35 38 To get the correct stitch length. sew on the onposite...
... groove of your buttonhole will be ginning of first seam reaches red end of foot. Use ony embroidery and darn nq thread No. 50. P ace the filler cord in the left toe of slide indicator (see arrow below). the bartacks at each end of the clear-view shoe DR C35 38 To get the correct stitch length. sew on the onposite...
Owner's Manual
Page 39
... stitches, slightly closing together button hole end to reduce length of bar. 4 Change dial A to injure the bartacks. 39 Open the buttonhole with your seam ripper. Pull filler cord around clockwise, using needle as instructed above. 6 Turn dial A to the left and lay it is caught in fabric on buttonhole gauge, it parallel to second notch position (or 4'). IS J 0© 0©© nstructi o ns for Butto nhol n g I Sew first...
... stitches, slightly closing together button hole end to reduce length of bar. 4 Change dial A to injure the bartacks. 39 Open the buttonhole with your seam ripper. Pull filler cord around clockwise, using needle as instructed above. 6 Turn dial A to the left and lay it is caught in fabric on buttonhole gauge, it parallel to second notch position (or 4'). IS J 0© 0©© nstructi o ns for Butto nhol n g I Sew first...
Owner's Manual
Page 40
... button sewing foot, No. 847 608, which can be obtained from your machine will come in very handy. Attach all-purpose sewing foot No. 93-100 1 79-00. Start machine and sew needle will not get loose either. When sewing on 0. Raise needle. There your Pfaff dealer. •, Machine Setting: A - 0 B = feed dog dropped. Set stitch length control on four hole buttons, reposition button and repeat the above process, stitching through hole and counter-clockwise, usually to sew on with a chain stitch. Turn dial...
... button sewing foot, No. 847 608, which can be obtained from your machine will come in very handy. Attach all-purpose sewing foot No. 93-100 1 79-00. Start machine and sew needle will not get loose either. When sewing on 0. Raise needle. There your Pfaff dealer. •, Machine Setting: A - 0 B = feed dog dropped. Set stitch length control on four hole buttons, reposition button and repeat the above process, stitching through hole and counter-clockwise, usually to sew on with a chain stitch. Turn dial...

Owner's Manual
Page 43
... of monogram, Set needle plate sewing foot and making sure that feed dog Feeds the material. The fabric should be held taut in the hoops and the presser bar lifter lowered. Hold both thread ends and sew over outline, moving hoops slowly and evenly. Be sure stitches are best for monogram embroidery without a sewing foot. Feed dog drooped. Script letters are closely spaced. 838 954 3 OO79 Machine Sethng:A= 2h/2to3,B The procedure below is primarily used for satin stitch...
... of monogram, Set needle plate sewing foot and making sure that feed dog Feeds the material. The fabric should be held taut in the hoops and the presser bar lifter lowered. Hold both thread ends and sew over outline, moving hoops slowly and evenly. Be sure stitches are best for monogram embroidery without a sewing foot. Feed dog drooped. Script letters are closely spaced. 838 954 3 OO79 Machine Sethng:A= 2h/2to3,B The procedure below is primarily used for satin stitch...
Owner's Manual
Page 44
..., can be obtained with Pfaff's System 130 twin needle The harder the fabric yarn, the more pronounced the hemstitching will be obtained by using van colored embroidery and darning threads. At the end of its throw. 44 Machine Sethng: A 0 B • St tch length: Medium to maximum Insert twin hemstitching needle, System 130 Zw Ho, as for ordinary needles The thread size, threading procedure and thread tension are not recommended...
..., can be obtained with Pfaff's System 130 twin needle The harder the fabric yarn, the more pronounced the hemstitching will be obtained by using van colored embroidery and darning threads. At the end of its throw. 44 Machine Sethng: A 0 B • St tch length: Medium to maximum Insert twin hemstitching needle, System 130 Zw Ho, as for ordinary needles The thread size, threading procedure and thread tension are not recommended...
Owner's Manual
Page 46
... a cording foot with sewing silk in the needle end on page 18. Set the machine for a medium stitch length (about 4). Lead one thread and front tension discs of thread on each needle from front to back. Pull threads into slot 5 spool pins. Slip on the other between the rear and Raise take out the sewing foot. it is drawn up lever 4 thread ends through and thread each of fabric used, has been set...
... a cording foot with sewing silk in the needle end on page 18. Set the machine for a medium stitch length (about 4). Lead one thread and front tension discs of thread on each needle from front to back. Pull threads into slot 5 spool pins. Slip on the other between the rear and Raise take out the sewing foot. it is drawn up lever 4 thread ends through and thread each of fabric used, has been set...
Owner's Manual
Page 52
... about Needles 15 Changing the Needle 15 Upper Threading 16 Correct Tension Regulation 18 Drawing Up the Bobbin Thread 18 Regulating the Thread Tension 19 Stitch Length Regulation 20 Reverse Sewing 20 Changing the Sewing Foot 21 Preparing Your Machine for Darning 22 Darning and Embroidery Foot 23 All-Purpose Sewing Foot (with Blindstitch Disc Applique Work Monogram Embroidery Sewing Monograms . . Straight-Stitch Hemstitching Zigzag Hemstitching . CONTENTS Page Foreword . Hemming Overcasting Edges . Blindstitching Sewing Buttonholes Button Sewing Attaching...
... about Needles 15 Changing the Needle 15 Upper Threading 16 Correct Tension Regulation 18 Drawing Up the Bobbin Thread 18 Regulating the Thread Tension 19 Stitch Length Regulation 20 Reverse Sewing 20 Changing the Sewing Foot 21 Preparing Your Machine for Darning 22 Darning and Embroidery Foot 23 All-Purpose Sewing Foot (with Blindstitch Disc Applique Work Monogram Embroidery Sewing Monograms . . Straight-Stitch Hemstitching Zigzag Hemstitching . CONTENTS Page Foreword . Hemming Overcasting Edges . Blindstitching Sewing Buttonholes Button Sewing Attaching...


