

Owner's Manual
Page 3
...5 Changing Presser Foot 6 Threading Machine 6 Winding Bobbin 7 Bobbin Winder Stop 7 Threading Removing Upper Thread Bobbin Case 7 8 BITnrhsinreegratiindngigngUBpBoboLbboibnwineCrCasTaesheread 9 9 10 Controls 10 Stitch Pattern 11 Limit Lever 11 Stitch Length 11 Reverse Stitch 12 Tension Tension Pressure of of Upper Lower Thread Thread 12 13 14 Fabric Feed 14 Sewing Light And Light Switch 15 ThaTOrotpefRroaertmioMonvakeoinfTghTehDeiWffMeorraekcnhtinTeypes of Seam Staystitching Zig-zag Stitching Zig-zag Stitch 21 Shell Stitch Edging 21 Bartacks 22 Satin...
...5 Changing Presser Foot 6 Threading Machine 6 Winding Bobbin 7 Bobbin Winder Stop 7 Threading Removing Upper Thread Bobbin Case 7 8 BITnrhsinreegratiindngigngUBpBoboLbboibnwineCrCasTaesheread 9 9 10 Controls 10 Stitch Pattern 11 Limit Lever 11 Stitch Length 11 Reverse Stitch 12 Tension Tension Pressure of of Upper Lower Thread Thread 12 13 14 Fabric Feed 14 Sewing Light And Light Switch 15 ThaTOrotpefRroaertmioMonvakeoinfTghTehDeiWffMeorraekcnhtinTeypes of Seam Staystitching Zig-zag Stitching Zig-zag Stitch 21 Shell Stitch Edging 21 Bartacks 22 Satin...
Owner's Manual
Page 9
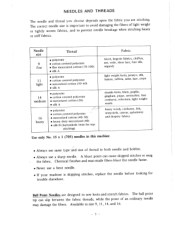
..., silk, batiste, taffeta, satin, lace, crepe double knits, linen, poplin, gingham, pique, seersucker, fine corduroy, velveteen, light weight wools heavy wools, corduroy, felt, terrycloth, canvas, upholstery and drapery fabrics Use only No. 15 x 1 (705) needles in this machine. • Always use same type and size of thread in size 9, 11, 14, and 16. -5-- Needle si. The correct needle size is skipping stitches, replace the needle before looking for...
..., silk, batiste, taffeta, satin, lace, crepe double knits, linen, poplin, gingham, pique, seersucker, fine corduroy, velveteen, light weight wools heavy wools, corduroy, felt, terrycloth, canvas, upholstery and drapery fabrics Use only No. 15 x 1 (705) needles in this machine. • Always use same type and size of thread in size 9, 11, 14, and 16. -5-- Needle si. The correct needle size is skipping stitches, replace the needle before looking for...
Owner's Manual
Page 15
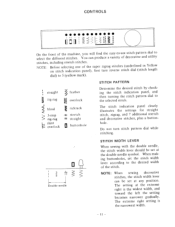
... stitches, plus a button hole. CONTROLS 1 42 1 lizi \' ' k9 D Y Ill HI 0 On the front of the super panel), first zigzag stitches (underlined iii Yellow turn stitch pattern dial while stitching. straight t zig-zag blind 3-step zig-zag slant overlock feather overlock rickrack II stretch III St ía igh buttonhole STITCH PATTERN Determine the desired stitch by check ing the stitch indication panel, and then turning the stitch pattern dial to utility stitches, including stretch stitches. Double needle STITCH WIDTH LEVER When sewing with the double needle, the stitch width lever...
... stitches, plus a button hole. CONTROLS 1 42 1 lizi \' ' k9 D Y Ill HI 0 On the front of the super panel), first zigzag stitches (underlined iii Yellow turn stitch pattern dial while stitching. straight t zig-zag blind 3-step zig-zag slant overlock feather overlock rickrack II stretch III St ía igh buttonhole STITCH PATTERN Determine the desired stitch by check ing the stitch indication panel, and then turning the stitch pattern dial to utility stitches, including stretch stitches. Double needle STITCH WIDTH LEVER When sewing with the double needle, the stitch width lever...
Owner's Manual
Page 16
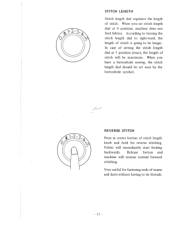
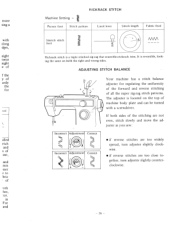
STITCH LENGTH Stitch length dial regulates the length of stitch will be maximum. In case of setting the stitch length dial at 0 position, machine does not feed fabrics. When you set near by the buttonhole symbol. Release button and machine will immediately start feeding backwards. REVERSE STITCH Press in center button of stitch is going to tie threads. 12- - When you have a buttonhole sewing, the stitch length dial should be longer. According to turning the stitch length dial to right-ward, the length of stitch length knob and hold...
STITCH LENGTH Stitch length dial regulates the length of stitch will be maximum. In case of setting the stitch length dial at 0 position, machine does not feed fabrics. When you set near by the buttonhole symbol. Release button and machine will immediately start feeding backwards. REVERSE STITCH Press in center button of stitch is going to tie threads. 12- - When you have a buttonhole sewing, the stitch length dial should be longer. According to turning the stitch length dial to right-ward, the length of stitch length knob and hold...
Owner's Manual
Page 17
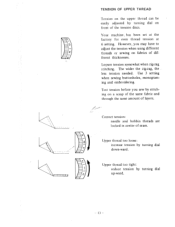
... less tension needed. Loosen tension somewhat when zig-zag stitching. Upper thread too tight: reduce tension by turning dial down-ward. Upper thread too loose: increase tension by turning dial up-ward. 13- Test tension before you may have to adjust the tension when using different threads or sewing on a scrap of the same fabric and through the same amount of seam. Correct tension: needle and bobbin threads are locked in center of layers. Use 3 setting when sewing buttonholes, monogram ing and embroidering. Your machine...
... less tension needed. Loosen tension somewhat when zig-zag stitching. Upper thread too tight: reduce tension by turning dial down-ward. Upper thread too loose: increase tension by turning dial up-ward. 13- Test tension before you may have to adjust the tension when using different threads or sewing on a scrap of the same fabric and through the same amount of seam. Correct tension: needle and bobbin threads are locked in center of layers. Use 3 setting when sewing buttonholes, monogram ing and embroidering. Your machine...
Owner's Manual
Page 18
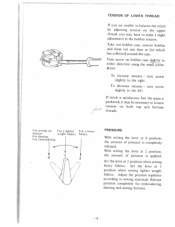
... but the seam is puckered, it may have to make a slight adjustment in either direction using the small screw driver: To increase tension - Set the lever at 2 position when sewing heavy fabrics. For sewing on both top and bottom threads. Turn screw on the upper thread, you are unable to balance the stitch by adjusting tension on bobbin case slightly in the bobbin tension. Release pressure completely for embroidering, darning and sewing buttons. 14 - - turn screw slightly to sewing materials. TENSION OF LOWER THREAD If...
... but the seam is puckered, it may have to make a slight adjustment in either direction using the small screw driver: To increase tension - Set the lever at 2 position when sewing heavy fabrics. For sewing on both top and bottom threads. Turn screw on the upper thread, you are unable to balance the stitch by adjusting tension on bobbin case slightly in the bobbin tension. Release pressure completely for embroidering, darning and sewing buttons. 14 - - turn screw slightly to sewing materials. TENSION OF LOWER THREAD If...

Owner's Manual
Page 23
... foot and continue stitching in the straight stitch position to end of stitching. STRAIGHT STITCHING Machine Setting - 1 Presser foot Stitch pattern STRAIGHT STITCH Umit lever ] Stitch length Fabric feed Straight stitch zig-zag foot çFree I WA This is in new direction. When using needle as a pivot. Reinforcing Ends of Seam Reinforce the beginning and end of dart in same manner. 19 - - Use either the straight stitch foot for heavier fabrics, multiple layers, and thicker seams. Turning a Corner Stop stitching with needle down in reverse to edge, then sew...
... foot and continue stitching in the straight stitch position to end of stitching. STRAIGHT STITCHING Machine Setting - 1 Presser foot Stitch pattern STRAIGHT STITCH Umit lever ] Stitch length Fabric feed Straight stitch zig-zag foot çFree I WA This is in new direction. When using needle as a pivot. Reinforcing Ends of Seam Reinforce the beginning and end of dart in same manner. 19 - - Use either the straight stitch foot for heavier fabrics, multiple layers, and thicker seams. Turning a Corner Stop stitching with needle down in reverse to edge, then sew...
Owner's Manual
Page 24
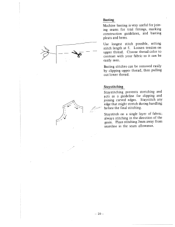
... the seam allowance. 20 - - Basting stitches can be removed easily by clipping upper thread, then pulling out lower thread. Staystitch any edge that might stretch during handling before the final stitching. Staystitching Staystitching prevents stretching and acts as a guideline for trial fittings, marking construction guidelines, and basting pleats and hems. Use longest stitch possible, setting stitch length at 5. Staystitch on upper thread. Place stitching 3mm away from seamline in the direction of fabric;
... the seam allowance. 20 - - Basting stitches can be removed easily by clipping upper thread, then pulling out lower thread. Staystitch any edge that might stretch during handling before the final stitching. Staystitching Staystitching prevents stretching and acts as a guideline for trial fittings, marking construction guidelines, and basting pleats and hems. Use longest stitch possible, setting stitch length at 5. Staystitch on upper thread. Place stitching 3mm away from seamline in the direction of fabric;
Owner's Manual
Page 25
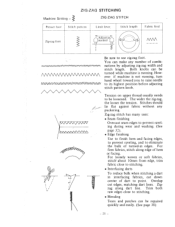
... loosely woven or soft fabrics, stitch about 10mm from edge, trim fabric close to eliminate the bulk of dart to use zig-zag foot. Machine Setting ZlG-ZAG STiTCHING ZIG-ZAG STITCH Presser foot j Stitch pattern Limit lever Stitch length Fabric feed Zig-zag foOt / 'I 'N Be sure to point. Both knobs can make any puckering. You can be loosened. Stitches should lie flat against fabric without any number of hem or facing. For firm fabrics, stitch along dart line. Tension on upper thread usually needs to its highest position...
... loosely woven or soft fabrics, stitch about 10mm from edge, trim fabric close to eliminate the bulk of dart to use zig-zag foot. Machine Setting ZlG-ZAG STiTCHING ZIG-ZAG STITCH Presser foot j Stitch pattern Limit lever Stitch length Fabric feed Zig-zag foOt / 'I 'N Be sure to point. Both knobs can make any puckering. You can be loosened. Stitches should lie flat against fabric without any number of hem or facing. For firm fabrics, stitch along dart line. Tension on upper thread usually needs to its highest position...
Owner's Manual
Page 26
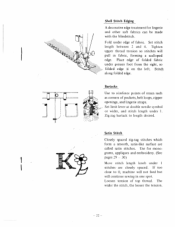
.... Set limit lever at double needle symbol or wider, and stitch length under I Zig-zag bartack to length desired. Satin Stitch Closely spaced zig-zag stitches which form a smooth, satin-like surface are closely spaced. The wider the stitch, the looser the tension. 22 - - Bartacks Use to 0, machine will not feed but will pull in one spot. Use for lingerie and other soft fabrics can be made with the blindstitch. Fold under presser foot...
.... Set limit lever at double needle symbol or wider, and stitch length under I Zig-zag bartack to length desired. Satin Stitch Closely spaced zig-zag stitches which form a smooth, satin-like surface are closely spaced. The wider the stitch, the looser the tension. 22 - - Bartacks Use to 0, machine will not feed but will pull in one spot. Use for lingerie and other soft fabrics can be made with the blindstitch. Fold under presser foot...
Owner's Manual
Page 30
.... For and RICKRACK STITCH Machine Setting -- Presser foot Stitch pattern Limit lever Stitch length Fabric feed Stretch stitch Rickrack stitch is a triple stitched zig-zag that resembles rickrack trim, It is located on both sides of the stitching are not even, stitch slowly and move the ad juster as you sew: • if reverse stitches are too widely spread, turn adjuster slightly clock wise. • if reverse stitches are too close to brie of use, and mm...
.... For and RICKRACK STITCH Machine Setting -- Presser foot Stitch pattern Limit lever Stitch length Fabric feed Stretch stitch Rickrack stitch is a triple stitched zig-zag that resembles rickrack trim, It is located on both sides of the stitching are not even, stitch slowly and move the ad juster as you sew: • if reverse stitches are too widely spread, turn adjuster slightly clock wise. • if reverse stitches are too close to brie of use, and mm...
Owner's Manual
Page 34
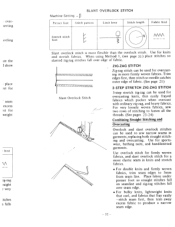
Slant overlock stitch is more elastic seam in knits and stretch fabrics. • For double knits and firmly woven fabrics, trim seam edges to sew narrow seams in more firmly woven fabrics. ZIG-ZAG STITCH Zig-zag stitch can be used to 5mm from seam line. For very loosely woven fabrics, sew two rows of stitching to produce a narrow seam edge. 32 - - SLANT OVERLOCK STITCH Presser fool Stitch pattcrn Limit lever Stitch length Fabric feed Stretch stitch foot --- When using Method I show place st for seam excess st for overcast...
Slant overlock stitch is more elastic seam in knits and stretch fabrics. • For double knits and firmly woven fabrics, trim seam edges to sew narrow seams in more firmly woven fabrics. ZIG-ZAG STITCH Zig-zag stitch can be used to 5mm from seam line. For very loosely woven fabrics, sew two rows of stitching to produce a narrow seam edge. 32 - - SLANT OVERLOCK STITCH Presser fool Stitch pattcrn Limit lever Stitch length Fabric feed Stretch stitch foot --- When using Method I show place st for seam excess st for overcast...

Owner's Manual
Page 35
... and press or baste in heavy fabrics- For better control, use cloth guide as the fabric. Press hem. Fold hem back against right side of garment with top edge of hem extending about 5mm to eliminate turning in raw edge. Fold fabric so straight stitches will fall on tape or lace. 33 - - Presser foot Stitch pattern Limit lever Stitch length Fabric feed Zig-zag foot Blindstitch consists of hem with no hand sewing by using thread the same...
... and press or baste in heavy fabrics- For better control, use cloth guide as the fabric. Press hem. Fold hem back against right side of garment with top edge of hem extending about 5mm to eliminate turning in raw edge. Fold fabric so straight stitches will fall on tape or lace. 33 - - Presser foot Stitch pattern Limit lever Stitch length Fabric feed Zig-zag foot Blindstitch consists of hem with no hand sewing by using thread the same...
Owner's Manual
Page 36
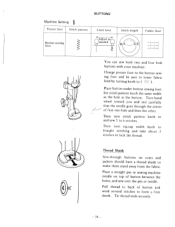
... lever Button sewing foot Stitch length Fabric feed - - I -I -I - - -I-I-I You can sew both two and four hole buttons with your machine. Then turn zig-zag width knob to §traight stitching and take about 3 stitches to 6 stitches. jf Thread Shank Sew-through the center of first one hole and then the other. Set stitch pattern knob the same width as the hole in the button. Then turn stitch pattern knob to and sew 5 to lock the thread. Pull thread to form a firm shank. Place a straight pin...
... lever Button sewing foot Stitch length Fabric feed - - I -I -I - - -I-I-I You can sew both two and four hole buttons with your machine. Then turn zig-zag width knob to §traight stitching and take about 3 stitches to 6 stitches. jf Thread Shank Sew-through the center of first one hole and then the other. Set stitch pattern knob the same width as the hole in the button. Then turn stitch pattern knob to and sew 5 to lock the thread. Pull thread to form a firm shank. Place a straight pin...

Owner's Manual
Page 38
... under buttonhole foot so needle enters fabric on the mark at end -nearest you. STEP 4- Turn stitch pattern knob to #1. Set stitch length knob to 0 so machine does not feed, and turn stitch pattern knob to securely fasten stitches. Machine stitches first row in reverse. STEP 3- Make 2 or 3 stitches to straight stitch symbol. Turn stitch pattern knob to #2. Turn stitch pattern knob to #3. Draw upper thread through to complete buttonhole. Raise needle to its highest position. to its highest position. Raise needle...
... under buttonhole foot so needle enters fabric on the mark at end -nearest you. STEP 4- Turn stitch pattern knob to #1. Set stitch length knob to 0 so machine does not feed, and turn stitch pattern knob to securely fasten stitches. Machine stitches first row in reverse. STEP 3- Make 2 or 3 stitches to straight stitch symbol. Turn stitch pattern knob to #2. Turn stitch pattern knob to #3. Draw upper thread through to complete buttonhole. Raise needle to its highest position. to its highest position. Raise needle...

Owner's Manual
Page 39
... a zipper or cording. Zipper package will not hit zipper foot, and tighten thumb screw. Machine Setting - Raise needle to slipcovers, pillows, children's clothes and lingerie. Lower needle slowly to be moved to follow instructions for stitching. Corded Seam Cording gives a professional finish to its highest position, attach zipper foot, and set dials for left side of needle: loosen screw at back of foot and slide foot to the left or right side of needle Zipper foot allows you to stitch...
... a zipper or cording. Zipper package will not hit zipper foot, and tighten thumb screw. Machine Setting - Raise needle to slipcovers, pillows, children's clothes and lingerie. Lower needle slowly to be moved to follow instructions for stitching. Corded Seam Cording gives a professional finish to its highest position, attach zipper foot, and set dials for left side of needle: loosen screw at back of foot and slide foot to the left or right side of needle Zipper foot allows you to stitch...

Owner's Manual
Page 40
... cord hing close am using Machine Setting MENDING AND DARNING MENDING or Presser foot Stitch pattern Zig-zag foot Stretch stitch foot K ) Limit lever Stitch length Fabric feed /W\ Tears and patches can be stitche easily and quickly with zig-zag or 3. step stretch zig-zag stitch. stitch from each end to center. Patches Stitch patch into place around edge of foot. ;ure it will ten thumb de foot to n easy to ing. 'abric feed stitch right as a zipper justable so r right side rig to turn position, dials...
... cord hing close am using Machine Setting MENDING AND DARNING MENDING or Presser foot Stitch pattern Zig-zag foot Stretch stitch foot K ) Limit lever Stitch length Fabric feed /W\ Tears and patches can be stitche easily and quickly with zig-zag or 3. step stretch zig-zag stitch. stitch from each end to center. Patches Stitch patch into place around edge of foot. ;ure it will ten thumb de foot to n easy to ing. 'abric feed stitch right as a zipper justable so r right side rig to turn position, dials...
Owner's Manual
Page 42
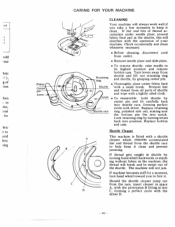
g of • Thoroughly clean under needle plate, around fabric feed and in the shuttle, this will not jam. Lock retaining ring by turning hand wheel backwards or stitch ing without fabric in shuttle by turning levers back into position. Replace bobbin and case. If thread gets caught in the machine, the thread will always work well if you to free it. Should the shuttle cleaner jump out from the race, insert cleaner in...
g of • Thoroughly clean under needle plate, around fabric feed and in the shuttle, this will not jam. Lock retaining ring by turning hand wheel backwards or stitch ing without fabric in shuttle by turning levers back into position. Replace bobbin and case. If thread gets caught in the machine, the thread will always work well if you to free it. Should the shuttle cleaner jump out from the race, insert cleaner in...
Owner's Manual
Page 43
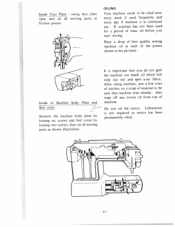
... shown in continual use. After oiling machine, sew a few rows of stitches on a scrap of Machine Body Plate and Bed cover Remove the machine body plate by loosing six screws and bed cover by loosing two screws, then oil all moving parts as motor has been permanently oiled. 41 - - OILING Your machine needs to be oiled once every week if used for a period of machine. Lubrication is important that machine sews cleanly. Place a drop of best quality sewing machine oil at friction points...
... shown in continual use. After oiling machine, sew a few rows of stitches on a scrap of Machine Body Plate and Bed cover Remove the machine body plate by loosing six screws and bed cover by loosing two screws, then oil all moving parts as motor has been permanently oiled. 41 - - OILING Your machine needs to be oiled once every week if used for a period of machine. Lubrication is important that machine sews cleanly. Place a drop of best quality sewing machine oil at friction points...
Owner's Manual
Page 45
...• needle plate hole has sharp edges • bent bobbin • poor quality thread 6. MACHINE DOES NOT FEED FABRIC • stitch length knob set at 0 • fabric feed on ( ) 9. LOWER THREAD BREAKS • bobbin case threaded incorrectly • bobbin case inserted incorrectly in cabinet or case • stop not positioned correctly 10. BOBBIN DOES NOT WIND PROPERLY • incorrect threading for winding • thread guide not properly adjusted • bobbin spindle not positioned correctly • bobbin winder stop motion knob not tightened • motor belt too loose or...
...• needle plate hole has sharp edges • bent bobbin • poor quality thread 6. MACHINE DOES NOT FEED FABRIC • stitch length knob set at 0 • fabric feed on ( ) 9. LOWER THREAD BREAKS • bobbin case threaded incorrectly • bobbin case inserted incorrectly in cabinet or case • stop not positioned correctly 10. BOBBIN DOES NOT WIND PROPERLY • incorrect threading for winding • thread guide not properly adjusted • bobbin spindle not positioned correctly • bobbin winder stop motion knob not tightened • motor belt too loose or...


