
Owner's Manual
Page 3
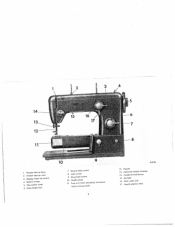
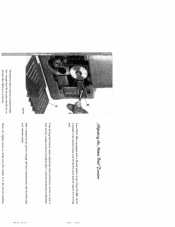
I Thread take-up ever 2 Thread retainer stud 3 Zigzag finger-tip control 4 Bobbin winder S Step motion knob 6 Stitch length dial 7 Reverse feed control 6 Light switch 9 Drop feed central 10 Needle plate 11 Free arm cover (enclosing transverse rotary sewing hook) 2 R 8152 12 Needle 13 Automatic needle threader 14 Needle thread tension 15 Sewlight 16 Stitch width dial 17 Needle position lever
I Thread take-up ever 2 Thread retainer stud 3 Zigzag finger-tip control 4 Bobbin winder S Step motion knob 6 Stitch length dial 7 Reverse feed control 6 Light switch 9 Drop feed central 10 Needle plate 11 Free arm cover (enclosing transverse rotary sewing hook) 2 R 8152 12 Needle 13 Automatic needle threader 14 Needle thread tension 15 Sewlight 16 Stitch width dial 17 Needle position lever
Owner's Manual
Page 11
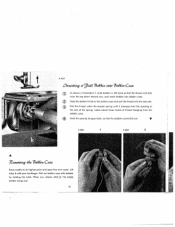
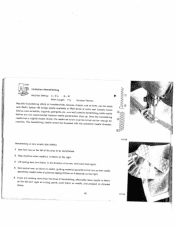
... end of the spring. Pull out bobbin case with your forefinger. When you , and insert bobbin into the case slot. Pull the thread under the tension spring until it emerges from the bobbin case. V R5867 I R 5869 2 A the 7 c 6 in 3 6 Ca$e Raise needle to its open free arm cover...
... end of the spring. Pull out bobbin case with your forefinger. When you , and insert bobbin into the case slot. Pull the thread under the tension spring until it emerges from the bobbin case. V R5867 I R 5869 2 A the 7 c 6 in 3 6 Ca$e Raise needle to its open free arm cover...

Owner's Manual
Page 15
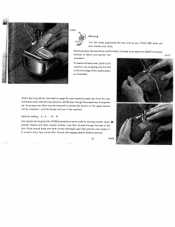
Pull thread into slots at left of thread guides 5 and 6 and then into the stot at left through both thread retainer openings 2 (see illustration opposite). Then thread needle, front to left of needle clamp 7. Bring take-up lever 4 as high as it between any two of the tension discs 3. Lead thread clockwise around tension and pull it will do this for you easily and quickly. 14 The automatic needle threader will go and pass thread from right to back. t9 1heain Place spool of thread on spool pin I and lead thread end through one of the holes at its end.
Pull thread into slots at left of thread guides 5 and 6 and then into the stot at left through both thread retainer openings 2 (see illustration opposite). Then thread needle, front to left of needle clamp 7. Bring take-up lever 4 as high as it between any two of the tension discs 3. Lead thread clockwise around tension and pull it will do this for you easily and quickly. 14 The automatic needle threader will go and pass thread from right to back. t9 1heain Place spool of thread on spool pin I and lead thread end through one of the holes at its end.

Owner's Manual
Page 19
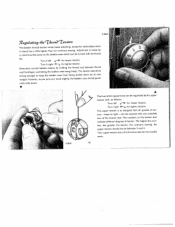
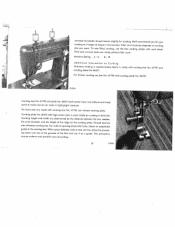
The threads interlock on the surface of the seam, the tension adjust ment is by examining a zigzag seam. Cause: Upper tension too tight or lower tension too loose. 'V A To check whether the tensions are correctly bol anced, take a closely woven piece of fabric and sew a few straight and ...fabric. have perfect seams as sketched below (III). Sketch II - R 8150 Ccea.t 7n.cicn 9 tdatj,n Balanced tensions are correct. Cause: Upper tension too loose or lower tension too tight. The surest way to double-check this is correct. 18 The threads interlock on the underside of the...
The threads interlock on the surface of the seam, the tension adjust ment is by examining a zigzag seam. Cause: Upper tension too tight or lower tension too loose. 'V A To check whether the tensions are correctly bol anced, take a closely woven piece of fabric and sew a few straight and ...fabric. have perfect seams as sketched below (III). Sketch II - R 8150 Ccea.t 7n.cicn 9 tdatj,n Balanced tensions are correct. Cause: Upper tension too loose or lower tension too tight. The surest way to double-check this is correct. 18 The threads interlock on the underside of the...
Owner's Manual
Page 20
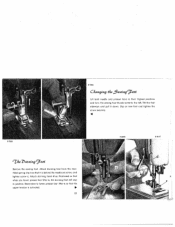
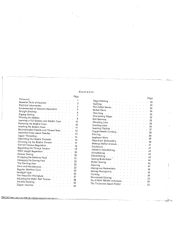
... loose to keep the bobbin case from being pulled down . Your upper tension has a third tension disc for tighter tension. R8029 19 Adjustment is so designed thot all grades of the tension dial. The tension should be set between thumb and forefinger and letting the bobbin case hang ...ii should be a little tighter than for tighter tension. For ordinary sewing, the upper tension should be covered with the thumb tip. The upper tension is made by its own weight. However, as follows: Turn left E( for looser tension. The numbers on the bobbin case which can...
... loose to keep the bobbin case from being pulled down . Your upper tension has a third tension disc for tighter tension. R8029 19 Adjustment is so designed thot all grades of the tension dial. The tension should be set between thumb and forefinger and letting the bobbin case hang ...ii should be a little tighter than for tighter tension. For ordinary sewing, the upper tension should be covered with the thumb tip. The upper tension is made by its own weight. However, as follows: Turn left E( for looser tension. The numbers on the bobbin case which can...
Owner's Manual
Page 23
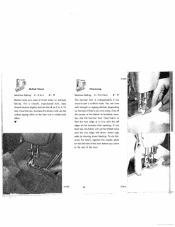
... both needle and presser bars to their highest positions and turn the sewing foot thumb screw to lower presser bar lifter e so that the upper tension is behind the needle set screw, and tighten screw c. Hold spring clip n so that when you lower presser bar lifter e, the darning foot will stay...
... both needle and presser bars to their highest positions and turn the sewing foot thumb screw to lower presser bar lifter e so that the upper tension is behind the needle set screw, and tighten screw c. Hold spring clip n so that when you lower presser bar lifter e, the darning foot will stay...
Owner's Manual
Page 29
Loosen screw x and adjust idler r until correct tension is in the correct position. When you tighten screw x, make sure the washer is obtained. The electric motor requires no special atten tion, except that it synchronizes with a 30-watt electric motor (Type PE 360), which is housed in cover t and remove. ... be re placed after 400 hours of a driving belt. t.cunj th 11tc &tt 7i.cicn Your PFAFF 360 is equipped with the belt clips and revolves evenly. If the driving belt tension needs adjustment, take out the four screws in the machine base and drives the main shaft by means...
Loosen screw x and adjust idler r until correct tension is in the correct position. When you tighten screw x, make sure the washer is obtained. The electric motor requires no special atten tion, except that it synchronizes with a 30-watt electric motor (Type PE 360), which is housed in cover t and remove. ... be re placed after 400 hours of a driving belt. t.cunj th 11tc &tt 7i.cicn Your PFAFF 360 is equipped with the belt clips and revolves evenly. If the driving belt tension needs adjustment, take out the four screws in the machine base and drives the main shaft by means...
Owner's Manual
Page 30
... breakage. Wrong needle. The correct needle system is stamped on pages 14 and 15. Poor or knotty thread used. Remedy: See remedies listed under 1. Adjust tensions as it will go and be sure that the long groove faces toward you, and flat side of shank away from you. Machine Skips Stitches.... Check and correct threading as instructed on needle plate. (For ordinary sewing, use System 130R needles.) Insert new needle. Use correct needle and thread. 2. Thread tension too tight.
... breakage. Wrong needle. The correct needle system is stamped on pages 14 and 15. Poor or knotty thread used. Remedy: See remedies listed under 1. Adjust tensions as it will go and be sure that the long groove faces toward you, and flat side of shank away from you. Machine Skips Stitches.... Check and correct threading as instructed on needle plate. (For ordinary sewing, use System 130R needles.) Insert new needle. Use correct needle and thread. 2. Thread tension too tight.
Owner's Manual
Page 31
... instructed. Remedy: Replace needle at once to prevent further damage. Use correct needle and thread sizes. Faulty Stitch Formation Cause: Improper tension. Clean and oil hook raceway. Guide the material lightly. Push bobbin case until you hear it around thread retainer stud on needle plate slot. il[. ...
... instructed. Remedy: Replace needle at once to prevent further damage. Use correct needle and thread sizes. Faulty Stitch Formation Cause: Improper tension. Clean and oil hook raceway. Guide the material lightly. Push bobbin case until you hear it around thread retainer stud on needle plate slot. il[. ...
Owner's Manual
Page 35
For a smooth, unpuckered hem, ease thread tension slightly and set dial A on the type of fabric you come to the end of the foot before you are used to sew a uniform hem. B- 4 ...The hemmer foot is in line with straight or zigzag stitches, depending on 2 or 3, To hem tricot fabrics, increase the tension and use the widest zigzag stitch so the hem has a rolled shell effect. If you want to finish sheer or delicate fabrics. You can hem...
For a smooth, unpuckered hem, ease thread tension slightly and set dial A on the type of fabric you come to the end of the foot before you are used to sew a uniform hem. B- 4 ...The hemmer foot is in line with straight or zigzag stitches, depending on 2 or 3, To hem tricot fabrics, increase the tension and use the widest zigzag stitch so the hem has a rolled shell effect. If you want to finish sheer or delicate fabrics. You can hem...
Owner's Manual
Page 43
51378 (mitation Hemsfifcbing Machine Setting: A - r I Sew first raw on the left above. B - 4 Stitch Length: 1 /s Increase Tension ifnfwBnaaesbiebetearhrdriuitlcctiePsiosff,nuaha.flsafru'sTehschheanmeSaoysssthsltitiegertbmcemhahctstlioityns1imtgt3cet0hmh, eiiocne(ffwkngregedicnartensgndes)doehnydbanl,eneehckegaad,cenulaotedshnrekgenaeeovnrnttctaeeeheibe,lidedaeleblfetetslch,e.ps,rebeeaatlantordeseuctPesrrdfweaeastwfei,fwloldnsimtstrshoueurisscettstehlseodebssa,eetatoautuneuthpoxdre.mntmresSaasodittniiccfctocaoeushrntttit.henhf,...
51378 (mitation Hemsfifcbing Machine Setting: A - r I Sew first raw on the left above. B - 4 Stitch Length: 1 /s Increase Tension ifnfwBnaaesbiebetearhrdriuitlcctiePsiosff,nuaha.flsafru'sTehschheanmeSaoysssthsltitiegertbmcemhahctstlioityns1imtgt3cet0hmh, eiiocne(ffwkngregedicnartensgndes)doehnydbanl,eneehckegaad,cenulaotedshnrekgenaeeovnrnttctaeeeheibe,lidedaeleblfetetslch,e.ps,rebeeaatlantordeseuctPesrrdfweaeastwfei,fwloldnsimtstrshoueurisscettstehlseodebssa,eetatoautuneuthpoxdre.mntmresSaasodittniiccfctocaoeushrntttit.henhf,...

Owner's Manual
Page 44
... have picot edging. Fold selvaged material once (Fig. 1), uriselvaged fabric twice (Fig. 2). It is a laborious task. Use a No. 70 needle, a loose upper tension and thin thread in the folded edge and right stitch up . Guide work use an ordinary needle. Draw several threads out of the blindstitch guide... over the hem edge. When hem is the length you will not be visible on top side. 43 Draw threads from the edge until your PFAFF on linen and twilled fabrics. I 2 R7139 45669 Biindstitching Machine Setting: B- Set machine for a medium-wide zigzag stitch and sew along this ...
... have picot edging. Fold selvaged material once (Fig. 1), uriselvaged fabric twice (Fig. 2). It is a laborious task. Use a No. 70 needle, a loose upper tension and thin thread in the folded edge and right stitch up . Guide work use an ordinary needle. Draw several threads out of the blindstitch guide... over the hem edge. When hem is the length you will not be visible on top side. 43 Draw threads from the edge until your PFAFF on linen and twilled fabrics. I 2 R7139 45669 Biindstitching Machine Setting: B- Set machine for a medium-wide zigzag stitch and sew along this ...
Owner's Manual
Page 48
... page 24, and suspend presser bar from the rear of your PFAFF 360 when you darn sleeves and socks. Lace filler thread through the hole in unworn area. Use feed cover plate No.60407 to activate the tension, or the upper tension will jam in the front edge of fabric and permit free movement...
... page 24, and suspend presser bar from the rear of your PFAFF 360 when you darn sleeves and socks. Lace filler thread through the hole in unworn area. Use feed cover plate No.60407 to activate the tension, or the upper tension will jam in the front edge of fabric and permit free movement...
Owner's Manual
Page 52
Increase the bobbin thread tension slightly for cording in lightweight material. Only very narrow tucks are made with center claw, but without cording plate. For thicker cording use foot No. 41790 with high center claw is used chiefly for cording. Pfaff recommends you want. Cording plate No. ... and parallel rows of parallel tucks, attach an adjustable guide to make narrow air tucks in thick felt. also influence cording size. Thread tensions. R 8156 Cording foot No. 41792 ond plate No.60417 (with cording foot No. 41792, but without filler cord. When space between...
Increase the bobbin thread tension slightly for cording in lightweight material. Only very narrow tucks are made with center claw, but without cording plate. For thicker cording use foot No. 41790 with high center claw is used chiefly for cording. Pfaff recommends you want. Cording plate No. ... and parallel rows of parallel tucks, attach an adjustable guide to make narrow air tucks in thick felt. also influence cording size. Thread tensions. R 8156 Cording foot No. 41792 ond plate No.60417 (with cording foot No. 41792, but without filler cord. When space between...
Owner's Manual
Page 55
...Work Openwork Embroidery . Making Stuffed Animals . Button Sewing Darning Monogram Embroidery . Foreword . Hemstitching Blindstitching Sewing Buttonholes . . The PFAFF 360-261 Automatic The Transverse Spool Holder Page 32 32 33 34 34 35 35 36 36 37 38 38 39 40 41 41... Needle and Thread Sizes Important Facts about Needles Upper Threading Operating the Needle Threader Drawing Up the Bobbin Thread Correct Tension Regulation Regulating the Thread Tension Stitch Length Regulation Reverse Sewing Dropping the Machine Feed Changing the Sewing Foot The Darning Foot Care and Maintenance Regular ...
...Work Openwork Embroidery . Making Stuffed Animals . Button Sewing Darning Monogram Embroidery . Foreword . Hemstitching Blindstitching Sewing Buttonholes . . The PFAFF 360-261 Automatic The Transverse Spool Holder Page 32 32 33 34 34 35 35 36 36 37 38 38 39 40 41 41... Needle and Thread Sizes Important Facts about Needles Upper Threading Operating the Needle Threader Drawing Up the Bobbin Thread Correct Tension Regulation Regulating the Thread Tension Stitch Length Regulation Reverse Sewing Dropping the Machine Feed Changing the Sewing Foot The Darning Foot Care and Maintenance Regular ...

