
Owner's Manual
Page 2
... have any time. G.M. Even if you will find this book a valuable guide to -operate PFAFF 360. with countless creative possibilities. the sewing machine with the exclusive automatic features of a PFAFF 360 - Follow these simple instructions and familiarize yourself sewing exciting on your machine. You are an experienced seamstress, you are now the proud owner of your easy-to...
... have any time. G.M. Even if you will find this book a valuable guide to -operate PFAFF 360. with countless creative possibilities. the sewing machine with the exclusive automatic features of a PFAFF 360 - Follow these simple instructions and familiarize yourself sewing exciting on your machine. You are an experienced seamstress, you are now the proud owner of your easy-to...
Owner's Manual
Page 6
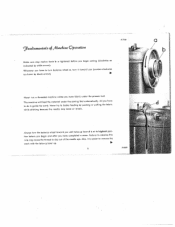
...its highest posi tion before you until take-up . 5 R 6609 Always turn it is tightened before you begin sewing (clockwise as shown by white arrow). The machine will feed the material under the presser foot. Whenever you hove to turn balance wheel a, turn the balance wheel ...toward you have completed a seam. Never run o threaded machine unless you (counter-clockwise as indicated by black orrow). Failure to observe this rule may bend or break. •1 - R 7506 9un'auntaLc...
...its highest posi tion before you until take-up . 5 R 6609 Always turn it is tightened before you begin sewing (clockwise as shown by white arrow). The machine will feed the material under the presser foot. Whenever you hove to turn balance wheel a, turn the balance wheel ...toward you have completed a seam. Never run o threaded machine unless you (counter-clockwise as indicated by black orrow). Failure to observe this rule may bend or break. •1 - R 7506 9un'auntaLc...
Owner's Manual
Page 8
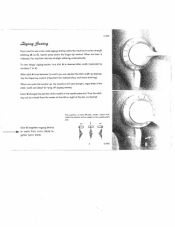
...desired stitch width (indicated by depress ing the finger-tip control (important for buttonholing and fancy stitching). When you push the control up, the machine will sew straight, regardless of the slot, as desired. The position of lever B (left or right of the stitch width set (ideal for straight ...stitching (A on 0), merely press down the finger-tip control. R 7999 If you want to sew a few wide zigzag stitches while the machine is set for tying off zigzag seams). Thus the stitch ing can double the stitch width by numbers I to gether (...
...desired stitch width (indicated by depress ing the finger-tip control (important for buttonholing and fancy stitching). When you push the control up, the machine will sew straight, regardless of the slot, as desired. The position of lever B (left or right of the stitch width set (ideal for straight ...stitching (A on 0), merely press down the finger-tip control. R 7999 If you want to sew a few wide zigzag stitches while the machine is set for tying off zigzag seams). Thus the stitch ing can double the stitch width by numbers I to gether (...
Owner's Manual
Page 10
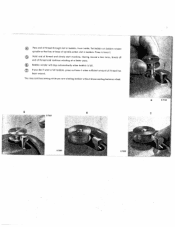
Hold end of thread through slot in bobbin, from inside. Bobbin winder will stop automatically when bobbin is full. You may continue sewing while you don't want a full bobbin, press out lever I when sufficient amount of spindle enters slot in lever i. If you are winding bobbin without disconnecting ... base of thread has been wound. Set bobbin on bobbin winder spindle so that key at a faster pace. Pass end of thread and slowly start machine.
Hold end of thread through slot in bobbin, from inside. Bobbin winder will stop automatically when bobbin is full. You may continue sewing while you don't want a full bobbin, press out lever I when sufficient amount of spindle enters slot in lever i. If you are winding bobbin without disconnecting ... base of thread has been wound. Set bobbin on bobbin winder spindle so that key at a faster pace. Pass end of thread and slowly start machine.
Owner's Manual
Page 14
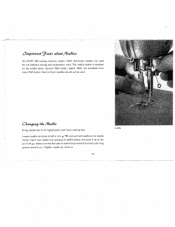
...should not be used for as it will go. Make sure that flat side of needle clamp and push it up as for all ordinary sewing and embroidery work. The needle system is stamped on the needle plate. Loosen needle set screw o. 13 R6798 Tighten needle set screw oholfa ... opening of shank faces toward the back and long groove toward you. Genuine Pfaff nedles, System 130R, are used . Cnjtnj the /Vee?te Bring needle bor to its highest point and lower sewing foot. Lmi,tant 9atts a 6 ,ut /Vee?1e5 On PFAFF 360 sewing machine, System 130 R, flat-shank needles are available from every...
...should not be used for as it will go. Make sure that flat side of needle clamp and push it up as for all ordinary sewing and embroidery work. The needle system is stamped on the needle plate. Loosen needle set screw o. 13 R6798 Tighten needle set screw oholfa ... opening of shank faces toward the back and long groove toward you. Genuine Pfaff nedles, System 130R, are used . Cnjtnj the /Vee?te Bring needle bor to its highest point and lower sewing foot. Lmi,tant 9atts a 6 ,ut /Vee?1e5 On PFAFF 360 sewing machine, System 130 R, flat-shank needles are available from every...
Owner's Manual
Page 18
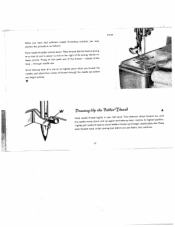
through when you thread the the needle eye before you put fabric into machine. 17 A tHLhioeglhdntleyneedpeluedlllemnoetvheerdseleaddothwlrinegahdatlnytdoinudpryaoawugrabilonefbtbahninadntdtha.rkeTea-duurpnuplbetvahelraronurcegeahcwhnehesee&ditlsetohpwilgaahtreedsst lyopoto.usPitulianoctniel. Prong w now pulls end of the toop - Since ...pull about 1/ inch to the right of thread through needle eye. Slowly re teose control. both threads back under sewing foot before you may shorten the procedure as follows: Push needle threader control down. When you have had sufficient needle ...
through when you thread the the needle eye before you put fabric into machine. 17 A tHLhioeglhdntleyneedpeluedlllemnoetvheerdseleaddothwlrinegahdatlnytdoinudpryaoawugrabilonefbtbahninadntdtha.rkeTea-duurpnuplbetvahelraronurcegeahcwhnehesee&ditlsetohpwilgaahtreedsst lyopoto.usPitulianoctniel. Prong w now pulls end of the toop - Since ...pull about 1/ inch to the right of thread through needle eye. Slowly re teose control. both threads back under sewing foot before you may shorten the procedure as follows: Push needle threader control down. When you have had sufficient needle ...

Owner's Manual
Page 21
... the desired stitch length is placed neatly beside the other. In this , operate the control in rhythm and move the fabric slightly sideways. Or sew a few stitches and regulate stitch length as forward stitches. This feature is just as large as the 1-4 section. To backtack the beginning or ...For normal satin stitching, set dial on the type of a seam, simply press the finger-tip control down. When the control is released, the machine resumes forward sewing automatically. R 7998 20 The setting depends on 0.2. The reverse stitches will be about the same length as required.
... the desired stitch length is placed neatly beside the other. In this , operate the control in rhythm and move the fabric slightly sideways. Or sew a few stitches and regulate stitch length as forward stitches. This feature is just as large as the 1-4 section. To backtack the beginning or ...For normal satin stitching, set dial on the type of a seam, simply press the finger-tip control down. When the control is released, the machine resumes forward sewing automatically. R 7998 20 The setting depends on 0.2. The reverse stitches will be about the same length as required.

Owner's Manual
Page 22
'711mn9 £1 2h /i1.uhuw 9e? When the control is dropped for darning hoop embroidery and button sewing. The machine feed is turned to the right as far as it will cease feeding. To lower feed below the needle plate, turn drop feed control clockwise, Fabric will go feeding of the fabric resumes automatically when you start sewing. 21
'711mn9 £1 2h /i1.uhuw 9e? When the control is dropped for darning hoop embroidery and button sewing. The machine feed is turned to the right as far as it will cease feeding. To lower feed below the needle plate, turn drop feed control clockwise, Fabric will go feeding of the fabric resumes automatically when you start sewing. 21
Owner's Manual
Page 24
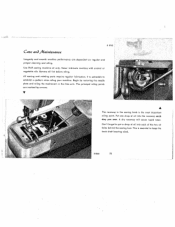
... points are dependent on regular and proper cleaning and oiling. R 8261 23 Begin by arrows. Don't forget to keep the hook shaft bearing oiled. Use Pfaff sewing machine oil only. Ca 4,,? /biainEenasue R 8143 Longevity and smooth machine performance are marked by removing the needle plate and oiling the mechanism in the...
... points are dependent on regular and proper cleaning and oiling. R 8261 23 Begin by arrows. Don't forget to keep the hook shaft bearing oiled. Use Pfaff sewing machine oil only. Ca 4,,? /biainEenasue R 8143 Longevity and smooth machine performance are marked by removing the needle plate and oiling the mechanism in the...
Owner's Manual
Page 26
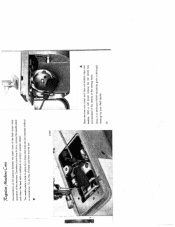
... the free arm cover and take out bobbin case and bobbin. With a soft brush remove the lint which has accumulated in place by your PFAFF should be given a thorough checkup by a press stud and can be removed without a screwdriver. The needle plate is held in the vicinity of the... machine. Once in a while your Pfatf dealer. 25 Zyuta /ilathine Care Accumulations of lint packed between the tooth rows of the feed cause noisy operation of the sewing hook.
... the free arm cover and take out bobbin case and bobbin. With a soft brush remove the lint which has accumulated in place by your PFAFF should be given a thorough checkup by a press stud and can be removed without a screwdriver. The needle plate is held in the vicinity of the... machine. Once in a while your Pfatf dealer. 25 Zyuta /ilathine Care Accumulations of lint packed between the tooth rows of the feed cause noisy operation of the sewing hook.
Owner's Manual
Page 30
...correct needle system is stamped on pages 14 and 15. Thread tension too tight. Machine threaded improperly. Check and correct threading as instructed. above mentioned may cause thread breakage. Machine Skips Stitches Cause: Needle incorrectly inserted. Needle bent. Use correct needle and thread.... 2. Poor or knotty thread used. Use good quality threads only. 29 Adjust tensions as instructed on needle plate. (For ordinary sewing, use System 130R ...
...correct needle system is stamped on pages 14 and 15. Thread tension too tight. Machine threaded improperly. Check and correct threading as instructed. above mentioned may cause thread breakage. Machine Skips Stitches Cause: Needle incorrectly inserted. Needle bent. Use correct needle and thread.... 2. Poor or knotty thread used. Use good quality threads only. 29 Adjust tensions as instructed on needle plate. (For ordinary sewing, use System 130R ...
Owner's Manual
Page 32
... oil or glycerine. Thread jamming can be avoided, however, by pieces of the jam in the raceway mechanisiii. Bobbin winder working of thread. Use only Pfaff sewing machine oil - Accumulations of the following the instructions on bearings. motor will not normally If thread should be sufficient to come hard working while...
... oil or glycerine. Thread jamming can be avoided, however, by pieces of the jam in the raceway mechanisiii. Bobbin winder working of thread. Use only Pfaff sewing machine oil - Accumulations of the following the instructions on bearings. motor will not normally If thread should be sufficient to come hard working while...
Owner's Manual
Page 33
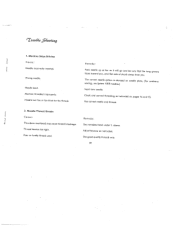
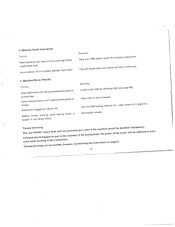
... by using adlustable seam guide No. 53077 and the edge stitcher (without quilting gauge). Run a straight seam close to the machine bed with the quilting gauge sews parallel rows of stitching over the entire surface of foot as a guide. Position of zipper depends on wrong side of the ...stitching, turn edge guide half a turn and use low end as a guide. R8033 32 R 8032 Turn fabric to overlap the zipper. Zipper Insertion Machine Setting: A-0 . Pin or baste closed zipper on whether or not you want the edge of fabric. For other side in your zipper packoge. ...
... by using adlustable seam guide No. 53077 and the edge stitcher (without quilting gauge). Run a straight seam close to the machine bed with the quilting gauge sews parallel rows of stitching over the entire surface of foot as a guide. Position of zipper depends on wrong side of the ...stitching, turn edge guide half a turn and use low end as a guide. R8033 32 R 8032 Turn fabric to overlap the zipper. Zipper Insertion Machine Setting: A-0 . Pin or baste closed zipper on whether or not you want the edge of fabric. For other side in your zipper packoge. ...
Owner's Manual
Page 35
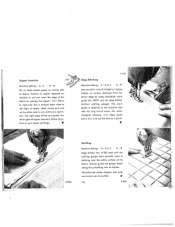
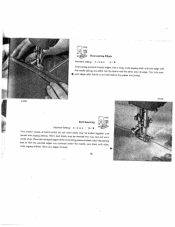
h46267 Rolled Hems Machine Setting: A-2 to finish sheer or delicate fabrics. B- 4 The hemmer foot is in line with straight or zigzag stitches, depending on the type of the hemmer ... a smooth, unpuckered hem, ease thread tension slightly and set dial A on the left edge of fabric you come to the end of the fabric to sew a uniform hem. Avoid ugly ends by slowing down feeding. V 1248 Hemming Machine Setting: A-Oor2to4 .
h46267 Rolled Hems Machine Setting: A-2 to finish sheer or delicate fabrics. B- 4 The hemmer foot is in line with straight or zigzag stitches, depending on the type of the hemmer ... a smooth, unpuckered hem, ease thread tension slightly and set dial A on the left edge of fabric you come to the end of the fabric to sew a uniform hem. Avoid ugly ends by slowing down feeding. V 1248 Hemming Machine Setting: A-Oor2to4 .
Owner's Manual
Page 36
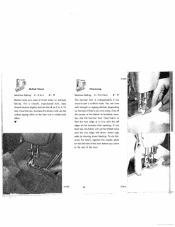
...mended this way. Worn bed sheets may over its cast edges after fabric is cut and before the pieces are centered under the sewing foot so that the abutted edges are loined. Cut out worn center strip. You may be butted together and loined with closes ...wide zigzag stitches. Join them with zigzag stitches. edge. 57378 Overcasting Edges Machine Setting: A- 2 to 4 B- 4 Overcasting prevents frayed edges. Use a long, wide zigzag stitch and sew edge with .4 the needle taking one stitch into the fabric and the other over - 51378 Butt Seaming...
...mended this way. Worn bed sheets may over its cast edges after fabric is cut and before the pieces are centered under the sewing foot so that the abutted edges are loined. Cut out worn center strip. You may be butted together and loined with closes ...wide zigzag stitches. Join them with zigzag stitches. edge. 57378 Overcasting Edges Machine Setting: A- 2 to 4 B- 4 Overcasting prevents frayed edges. Use a long, wide zigzag stitch and sew edge with .4 the needle taking one stitch into the fabric and the other over - 51378 Butt Seaming...
Owner's Manual
Page 37
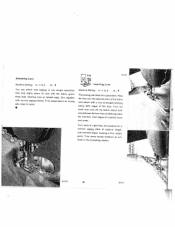
... away excess material as out lined in one simple operation. Overlap lace on wrong side close to right side, set machine for a narrow zigzag stitch of stitching under the insertion. Trim excess fobric on folded edge. Place the lace over and... Ito 3 B- 4 Inserting Lace You con attach lace edging in the preceding section. Sew together with the fabric groin. R7170 36 R7177 First fold fabric down /e inch with narrow zigzog stitches. Machine Setting: A - V Machine Setting: A-I to 3 B- 4 This sewing job takes two operations. Attaching Lace 51378 R7161 -
... away excess material as out lined in one simple operation. Overlap lace on wrong side close to right side, set machine for a narrow zigzag stitch of stitching under the insertion. Trim excess fobric on folded edge. Place the lace over and... Ito 3 B- 4 Inserting Lace You con attach lace edging in the preceding section. Sew together with the fabric groin. R7170 36 R7177 First fold fabric down /e inch with narrow zigzog stitches. Machine Setting: A - V Machine Setting: A-I to 3 B- 4 This sewing job takes two operations. Attaching Lace 51378 R7161 -
Owner's Manual
Page 38
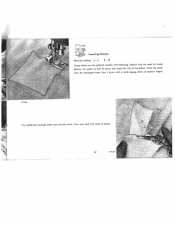
Large holes can be used for jersey fabrics. Sew it down with a wide zigzag stitch of the fabric. Turn over the damaged area. Cut patch so that its grain will match the rest of medium length. Place the patch over and trim close to seams. 'CS "I 37 R7157 - 5137 tnserting Patches Machine Setting A-4 B- The following method may be patched quickly. For additional strength stitch over corners twice.
Large holes can be used for jersey fabrics. Sew it down with a wide zigzag stitch of the fabric. Turn over the damaged area. Cut patch so that its grain will match the rest of medium length. Place the patch over and trim close to seams. 'CS "I 37 R7157 - 5137 tnserting Patches Machine Setting A-4 B- The following method may be patched quickly. For additional strength stitch over corners twice.
Owner's Manual
Page 39
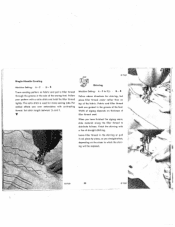
... of the foot. SingIeNeedIe Cording Machine Setting: A -2 B- 4 Trace cording pattern on fabric and pull a filler thread through the groove in the sole of straight stitching. The satin stitch is used . Finish the shirring with a line of the sewing foot. B - 4 Follow above directions for many sewing lobs, For added effects sew over embroidery with a satin..., but place filler thread under rather than on top of the fabric. Width of zigzag depends on the stress to 2hz . R 7159 38 V 46121 Shirring Machine Setting: A -2 to which the shirr ing will be exposed.
... of the foot. SingIeNeedIe Cording Machine Setting: A -2 B- 4 Trace cording pattern on fabric and pull a filler thread through the groove in the sole of straight stitching. The satin stitch is used . Finish the shirring with a line of the sewing foot. B - 4 Follow above directions for many sewing lobs, For added effects sew over embroidery with a satin..., but place filler thread under rather than on top of the fabric. Width of zigzag depends on the stress to 2hz . R 7159 38 V 46121 Shirring Machine Setting: A -2 to which the shirr ing will be exposed.

Owner's Manual
Page 40
V R7167 39 R7220 R 7163 6121 Applique Work Machine Setting: A - 1 Jz to the seam and sew over a filler thread. Appliqusing is easy and modern, Trace design on buster suits, pinafores, bibs, frocks, covers, wall hang ings, or wherever a gay note is ...
V R7167 39 R7220 R 7163 6121 Applique Work Machine Setting: A - 1 Jz to the seam and sew over a filler thread. Appliqusing is easy and modern, Trace design on buster suits, pinafores, bibs, frocks, covers, wall hang ings, or wherever a gay note is ...
Owner's Manual
Page 41
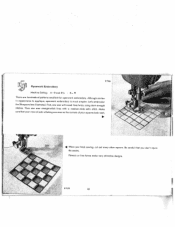
Then sew over all traced lines twice, using short straight stitches. I 9 9 -' V 7 R7179 Let's embroider the 2 -squ5 are even so the corners of your rows of satin stitching ... squares look neat. 4 When you don't injure the seams. Flowers or free forms make very attractive designs. Make sure that you finish sewing, cut out every other square. First, sew over straight-stitch lines with a medium-wide satin stitch. Although similar in appearance to applique, openwork embroidery is much simpler. 46121 R 7166...
Then sew over all traced lines twice, using short straight stitches. I 9 9 -' V 7 R7179 Let's embroider the 2 -squ5 are even so the corners of your rows of satin stitching ... squares look neat. 4 When you don't injure the seams. Flowers or free forms make very attractive designs. Make sure that you finish sewing, cut out every other square. First, sew over straight-stitch lines with a medium-wide satin stitch. Although similar in appearance to applique, openwork embroidery is much simpler. 46121 R 7166...


