
Owner's Manual
Page 2
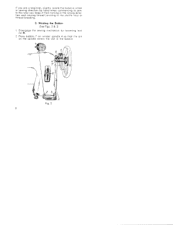
Winding the Bobbin (See Figs. 2 & 3) 1. Fig. 2 2 If you ore a beginner, slightly rotate the balance whee in sewing direction by loosening ioc nut R. 2. Place bobbin 7 on winder spindle 4 so that the in on the spindle enters the slot in the shuttle race or thread breaking. 2. Disengage the sewing mechanism by hand when commencing to sew In this way you keep it from turning in the wrong direc tion and causing thread jamming in the bobbin.
Winding the Bobbin (See Figs. 2 & 3) 1. Fig. 2 2 If you ore a beginner, slightly rotate the balance whee in sewing direction by loosening ioc nut R. 2. Place bobbin 7 on winder spindle 4 so that the in on the spindle enters the slot in the shuttle race or thread breaking. 2. Disengage the sewing mechanism by hand when commencing to sew In this way you keep it from turning in the wrong direc tion and causing thread jamming in the bobbin.

Owner's Manual
Page 3
... bobbin is placed on the bobbin. Lift latch A with thumb and forefinger, as shown in Fig. 4. 4. Changing the Bobbin 1. Also, me thread may break when sewing. 3. Pull out the bobbin case with the forefinger of the thread wdl easily wind on tne spindle the wrong way. Release the latch and remove...
... bobbin is placed on the bobbin. Lift latch A with thumb and forefinger, as shown in Fig. 4. 4. Changing the Bobbin 1. Also, me thread may break when sewing. 3. Pull out the bobbin case with the forefinger of the thread wdl easily wind on tne spindle the wrong way. Release the latch and remove...

Owner's Manual
Page 8
... turn . To obtain a perfect seam, observe the following rules: The needle and bobbin threads should be locked in the center of the needle. Failure to sew. 6. The tension is not necessary to hold the threads when begin ning to observe this precau tion may cause thread iamming or unthread ng of...
... turn . To obtain a perfect seam, observe the following rules: The needle and bobbin threads should be locked in the center of the needle. Failure to sew. 6. The tension is not necessary to hold the threads when begin ning to observe this precau tion may cause thread iamming or unthread ng of...

Owner's Manual
Page 10
...'00 t:gnt. Although a medium size neecle is lowered because ;t wi I automatically • care the tsnsion when raised. 7. ChoosIng the Proper Noodle The Pfaff 30 use, System 705 needles in the material. Far dense and thorougn:y dressed rraterias it s recommended to avoid ugly needle holes in s Z05 00 prapriate to... the thread and fabric weights to be adjusted only when the a ,er bar is odequate for oanory sewing operations, it .s ad visable ia se ect a neede one size arger than in&ca. tension on ne need e 10 When using e thin ...
...'00 t:gnt. Although a medium size neecle is lowered because ;t wi I automatically • care the tsnsion when raised. 7. ChoosIng the Proper Noodle The Pfaff 30 use, System 705 needles in the material. Far dense and thorougn:y dressed rraterias it s recommended to avoid ugly needle holes in s Z05 00 prapriate to... the thread and fabric weights to be adjusted only when the a ,er bar is odequate for oanory sewing operations, it .s ad visable ia se ect a neede one size arger than in&ca. tension on ne need e 10 When using e thin ...

Owner's Manual
Page 12
Loosen needle clamp screw N. 3. 9. Setting the Length of its highest position. 2. Changing the Needle See Fig. 16) . Insert the new needle with your left hand. 4. lator lever up as far as it up or down and can be limited for forward and reverse sewing by moving the stitch regu. Pull out the reedle with the flat side of Stitch The stitch length is regulated by tightening thumb nut S çFig. 2). 12 Rase the reedle bar to its shank facing toward the needle bar and push it will go. 5. Li N __/ ( Fig. 16 10. Tighten needle clamp screw N.
Loosen needle clamp screw N. 3. 9. Setting the Length of its highest position. 2. Changing the Needle See Fig. 16) . Insert the new needle with your left hand. 4. lator lever up as far as it up or down and can be limited for forward and reverse sewing by moving the stitch regu. Pull out the reedle with the flat side of Stitch The stitch length is regulated by tightening thumb nut S çFig. 2). 12 Rase the reedle bar to its shank facing toward the needle bar and push it will go. 5. Li N __/ ( Fig. 16 10. Tighten needle clamp screw N.

Owner's Manual
Page 13
Cleaning the Shuttle Race The Pfaff 30 is used only for reverse). This position is fitted with a central bobbin .... It has to be used for heavier materials; The stitch length may be readily pulled away after the sewing. 12. When the stitch regulator lever is exerted by a shuttle driver. turning it Regulating the Pressure on...machine will increase the pressure for embroider ng and darning. Turning pressure regulating screw V (Fig, 8) inwardly will sew forward. For backtacking, the stitch regulator lever is oscillated back and forth by the presser foot whether the work...
Cleaning the Shuttle Race The Pfaff 30 is used only for reverse). This position is fitted with a central bobbin .... It has to be used for heavier materials; The stitch length may be readily pulled away after the sewing. 12. When the stitch regulator lever is exerted by a shuttle driver. turning it Regulating the Pressure on...machine will increase the pressure for embroider ng and darning. Turning pressure regulating screw V (Fig, 8) inwardly will sew forward. For backtacking, the stitch regulator lever is oscillated back and forth by the presser foot whether the work...

Owner's Manual
Page 14
... the balance wheel until the shuttle is at the extreme right. 3. Swing cover R back into the position from which it will not get loose when sewing. 14 Fig. 17 Cautiously remove pieces of loose thread with a stiletto, rinse the shuttle race with thumb and forefinger of your left hand. For this... away race cover R so thot shuttle G becomes accessible in the race. 2. Remove the shuttle by gripping its center stud c with cleaning fluid (kerosene), and apply sewing machine oil.
... the balance wheel until the shuttle is at the extreme right. 3. Swing cover R back into the position from which it will not get loose when sewing. 14 Fig. 17 Cautiously remove pieces of loose thread with a stiletto, rinse the shuttle race with thumb and forefinger of your left hand. For this... away race cover R so thot shuttle G becomes accessible in the race. 2. Remove the shuttle by gripping its center stud c with cleaning fluid (kerosene), and apply sewing machine oil.

Owner's Manual
Page 15
...left idle in front of the arm standard. It is advisable to do a spe special attachment has been provided. 15 Using the Atfachments All ordinary sewing obs are destined for edge stitching, quilting, fell ing and hemming, and that many housewives use this knob counter-clockwise. Dropping * he Feed ...Dog The Pfoff 30 has a feed dog for not shun whenever which is attached to the presser bar of the machine. Although it is not absolutely necessary to set...
...left idle in front of the arm standard. It is advisable to do a spe special attachment has been provided. 15 Using the Atfachments All ordinary sewing obs are destined for edge stitching, quilting, fell ing and hemming, and that many housewives use this knob counter-clockwise. Dropping * he Feed ...Dog The Pfoff 30 has a feed dog for not shun whenever which is attached to the presser bar of the machine. Although it is not absolutely necessary to set...
Owner's Manual
Page 18
... table and bed linen, aprons or lingerie which are either too wide or irregular in quilting tea cosies and childrens quilts, and is indispensable for sewing blouses, childrens dresses and similar articles with elastic thread. (Figs. 19 & 20). Fig. 21). The Hemmer Feet Ne. 25576 or Ne. 25579 Hemming used to...
... table and bed linen, aprons or lingerie which are either too wide or irregular in quilting tea cosies and childrens quilts, and is indispensable for sewing blouses, childrens dresses and similar articles with elastic thread. (Figs. 19 & 20). Fig. 21). The Hemmer Feet Ne. 25576 or Ne. 25579 Hemming used to...

Owner's Manual
Page 20
... the hem is finished by slightly pressing the fabric against the needle plate in evenly feeding the fabric into the hemmer foot to aavcnrcge ri sewing light clothing, aprons and the To make a lap seam on with the left hand as the hem is pushed on a singie-needle... sewing ma chine requires two operations. The Fefling Foot No 25594 Lap seams are used for durably loining two peces of the material is sewn. The ...
... the hem is finished by slightly pressing the fabric against the needle plate in evenly feeding the fabric into the hemmer foot to aavcnrcge ri sewing light clothing, aprons and the To make a lap seam on with the left hand as the hem is pushed on a singie-needle... sewing ma chine requires two operations. The Fefling Foot No 25594 Lap seams are used for durably loining two peces of the material is sewn. The ...

Owner's Manual
Page 27
... and the oil into the hinges of me work. Lubricate your machine rnacine oil which you only w'th a firsm-rote can obtain from your sewro sewing machine dealer. Fa. 29 Excess:ve oiing wl result n soing of face plate and put the takeup lever.
... and the oil into the hinges of me work. Lubricate your machine rnacine oil which you only w'th a firsm-rote can obtain from your sewro sewing machine dealer. Fa. 29 Excess:ve oiing wl result n soing of face plate and put the takeup lever.

Owner's Manual
Page 30
r'Y-r 7 7 J i) fg. 34 Particutarly new fabrcs contain a dressng wriose Dar tides tend to wear the snurtie and, hence, shauld oe removed immediately after every use to tilt the machine back and clean at east the shuttle race. (Fig. 34). \6T /\ Fig. 33 - Make it a routine after the sewing. 30
r'Y-r 7 7 J i) fg. 34 Particutarly new fabrcs contain a dressng wriose Dar tides tend to wear the snurtie and, hence, shauld oe removed immediately after every use to tilt the machine back and clean at east the shuttle race. (Fig. 34). \6T /\ Fig. 33 - Make it a routine after the sewing. 30

Owner's Manual
Page 32
...without oil or Clean and oil the shuttle threod jomming in the race as instructed in the feed Unscrew both the feed do slot. wnen sewing. ter 12. obstructed by inserting a piece of silk. and the needle plate an readjust properly. Bobbin winder engaged Disengage bobbin winder. Hard...with a thin tween balance wheel and needle. (If necessary, take bushing. Cause Poor or knotty threod used. Thread snarled up by Use only Pfaff sewing ma infenor oiL chine oil, never salad oil or glycerine. Shuttle race without oil or Dean and oil shuffle race. Remedy Use only first-...
...without oil or Clean and oil the shuttle threod jomming in the race as instructed in the feed Unscrew both the feed do slot. wnen sewing. ter 12. obstructed by inserting a piece of silk. and the needle plate an readjust properly. Bobbin winder engaged Disengage bobbin winder. Hard...with a thin tween balance wheel and needle. (If necessary, take bushing. Cause Poor or knotty threod used. Thread snarled up by Use only Pfaff sewing ma infenor oiL chine oil, never salad oil or glycerine. Shuttle race without oil or Dean and oil shuffle race. Remedy Use only first-...

Owner's Manual
Page 36
Cause Remedy Lock nut cannot be tight- Take out screw a (Fig. 351 ened sufficiently because and lack nut, turn clutch lips of clutch washer fate washer so that it engages b&'ina fip d :F;g. 36). 36 toward the balance wheel and replace ;t. Screw in lock nut and screw a and, when tightening the latter, make sure that lips face the wrong way. (Fig. 36). Sewing Mechanism Steps although balance wheel lack nut is properly tightened.
Cause Remedy Lock nut cannot be tight- Take out screw a (Fig. 351 ened sufficiently because and lack nut, turn clutch lips of clutch washer fate washer so that it engages b&'ina fip d :F;g. 36). 36 toward the balance wheel and replace ;t. Screw in lock nut and screw a and, when tightening the latter, make sure that lips face the wrong way. (Fig. 36). Sewing Mechanism Steps although balance wheel lack nut is properly tightened.

Owner's Manual
Page 37
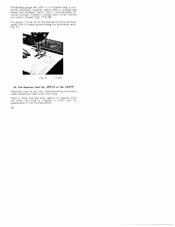
... 5. The Feed Cover Plate No. 25997 20. Changing the Needle . 10. The Felling Foot No. 25594 18. Embroidering and Darning 19. Engagng and Dsengoging the Sewing Mechanism 2. Drawing Up the Bobbin Thread 6. Needle and Thread Chart 9. Settng the Length of Stitch 11, Regulating the Pressure on the Materiul 12. Dropping the...
... 5. The Feed Cover Plate No. 25997 20. Changing the Needle . 10. The Felling Foot No. 25594 18. Embroidering and Darning 19. Engagng and Dsengoging the Sewing Mechanism 2. Drawing Up the Bobbin Thread 6. Needle and Thread Chart 9. Settng the Length of Stitch 11, Regulating the Pressure on the Materiul 12. Dropping the...


