

Owner's Manual
Page 2
imniij lIne machine iced Basic rules Safely rules Sir Omillit sliP Ii aiol iigiaq Smwtriq un buttons Sewing buttonholes Blnndst itching hems loser log zippers LnTihrOideriiiq aod damning Removing the work Changing btie light Patti C) lung Clemnnmnq the Shut tie race 1 ri ...utile sliouhi ug s1win(i1 Coot en Is Page POllS of inodOl 212 2 Paris of model 213 4 I lEO trii:il ( OnnE(cfiuo (5 Work support of model 213 7 tternovirrg tile bobbin case B Diserigiiginq the sewing rnecharicri B .iioifig he tiobhirr 10 breading the bobbin case 11 loser 1mg the bohhmo case 12 Jhr ...
imniij lIne machine iced Basic rules Safely rules Sir Omillit sliP Ii aiol iigiaq Smwtriq un buttons Sewing buttonholes Blnndst itching hems loser log zippers LnTihrOideriiiq aod damning Removing the work Changing btie light Patti C) lung Clemnnmnq the Shut tie race 1 ri ...utile sliouhi ug s1win(i1 Coot en Is Page POllS of inodOl 212 2 Paris of model 213 4 I lEO trii:il ( OnnE(cfiuo (5 Work support of model 213 7 tternovirrg tile bobbin case B Diserigiiginq the sewing rnecharicri B .iioifig he tiobhirr 10 breading the bobbin case 11 loser 1mg the bohhmo case 12 Jhr ...

Owner's Manual
Page 5
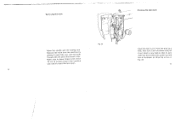
Place foot control 3 within easy reach of model 213 fo enlarge the sewing area for ordinary sewing operations, push the work sup port onto the free arm as tar as it will go As you do this, the position pin enters the hole provided for this remove the work support, free arm toward the cIt purpose pull it oft To the FIg. 2 6 / Electrical connections Push plug 1 into the machine socket and plug 2 into the wall outlet. The more the pedal is depressed, the faster the machine runs Work support of your foot.
Place foot control 3 within easy reach of model 213 fo enlarge the sewing area for ordinary sewing operations, push the work sup port onto the free arm as tar as it will go As you do this, the position pin enters the hole provided for this remove the work support, free arm toward the cIt purpose pull it oft To the FIg. 2 6 / Electrical connections Push plug 1 into the machine socket and plug 2 into the wall outlet. The more the pedal is depressed, the faster the machine runs Work support of your foot.

Owner's Manual
Page 7
Winding the bobbin Select the thread from the chart on the inside front cover Disengage the sewing mechanism and place a spool of thread on pin 1 (Fig 0) Push a bobbin onto spindle 4 (Fig 7) and press against stop 5 Pull the thread under tension disc 2 (see ...arrow) Wind a few turns of thread on bobbin 3 in the direction indicated by an arrow Run the machine, iIhen the bubbin is lull, the bobbin winder will stop automatically Remove the bobbin If you do not need a full bobbin, push it away troni...
Winding the bobbin Select the thread from the chart on the inside front cover Disengage the sewing mechanism and place a spool of thread on pin 1 (Fig 0) Push a bobbin onto spindle 4 (Fig 7) and press against stop 5 Pull the thread under tension disc 2 (see ...arrow) Wind a few turns of thread on bobbin 3 in the direction indicated by an arrow Run the machine, iIhen the bubbin is lull, the bobbin winder will stop automatically Remove the bobbin If you do not need a full bobbin, push it away troni...

Owner's Manual
Page 9
... A until the needle moves down and up again and the take-up lever has reached Is highest point Pull the needle thread tight to 4 3 Sewing backwards To sew backwards anii backtack a seam. Drawing UP the bobbin thread - - '-* - - -- - The numbers indicate the stitch length ri millimeters 2 Red utility stitches... thread nut of the needle thread in your left hand Turn the balance wheel toward you release the control, the machine will sew forwards again ii Regulating the stitch length and sewing backwards Fig. 13 Hold the end of the needle hole Lay both thread ends (abt 10 cm or 4 inches...
... A until the needle moves down and up again and the take-up lever has reached Is highest point Pull the needle thread tight to 4 3 Sewing backwards To sew backwards anii backtack a seam. Drawing UP the bobbin thread - - '-* - - -- - The numbers indicate the stitch length ri millimeters 2 Red utility stitches... thread nut of the needle thread in your left hand Turn the balance wheel toward you release the control, the machine will sew forwards again ii Regulating the stitch length and sewing backwards Fig. 13 Hold the end of the needle hole Lay both thread ends (abt 10 cm or 4 inches...

Owner's Manual
Page 13
... under the sewing toot and towards the hack before and after sewing The machine is now ready for sewing. Be sure to avoid finger injuries b the needle when sewing. 2. 0 Fig 22 22 ----rc - Safety rules 1. darning and button sewing Machine teed raised for sewing Basic rules ...Always turn the balance wheel towards you want to change th needle, sewing foot, bobbin or needl plate, when you never allow a threaded machine to interrupt sew,n and leave the machine for ernhroi dering. Be careful...
... under the sewing toot and towards the hack before and after sewing The machine is now ready for sewing. Be sure to avoid finger injuries b the needle when sewing. 2. 0 Fig 22 22 ----rc - Safety rules 1. darning and button sewing Machine teed raised for sewing Basic rules ...Always turn the balance wheel towards you want to change th needle, sewing foot, bobbin or needl plate, when you never allow a threaded machine to interrupt sew,n and leave the machine for ernhroi dering. Be careful...

Owner's Manual
Page 14
...top. 24 The maximum stitch width is 5mm It Is important that its mark Is at the top. Sewing Make sure the disengaging knob on the balance wheel is tight Straight-stitch sewing The machine sews straight stitches when the utitity stitch selector is set at the desired stitch width in Fig.. 23. ...the utility stitch selec tor to 7. Four-hole buttons are two straight-stitch settings: 5 - Fig. 23 Bring the needle bar to 7 again and sew a low tying stitches. Fig. 24 25 I / drop the machine teed and attach the clear-vlew loot. There are sewn on the colour range selec tor is up...
...top. 24 The maximum stitch width is 5mm It Is important that its mark Is at the top. Sewing Make sure the disengaging knob on the balance wheel is tight Straight-stitch sewing The machine sews straight stitches when the utitity stitch selector is set at the desired stitch width in Fig.. 23. ...the utility stitch selec tor to 7. Four-hole buttons are two straight-stitch settings: 5 - Fig. 23 Bring the needle bar to 7 again and sew a low tying stitches. Fig. 24 25 I / drop the machine teed and attach the clear-vlew loot. There are sewn on the colour range selec tor is up...
Owner's Manual
Page 18
Insert a new bulb so that its pins slide into the socket slots, push 1 up a little, then turn it out. Removing the work Raise the needle and the sewing (oot Remove the work trorn the machine by pulling it toward the rear, and trim both threads with the aid of the thread cutter Make sure to leave thread ends about 10 cm (4 inches) long in the machine with which to start the next seam 32 / Chaning the light bulb Open the face cover Push the bulb up and turn it anti-clockwise and pull it clockwise, as shown by arrows in Fig 34. 33
Insert a new bulb so that its pins slide into the socket slots, push 1 up a little, then turn it out. Removing the work Raise the needle and the sewing (oot Remove the work trorn the machine by pulling it toward the rear, and trim both threads with the aid of the thread cutter Make sure to leave thread ends about 10 cm (4 inches) long in the machine with which to start the next seam 32 / Chaning the light bulb Open the face cover Push the bulb up and turn it anti-clockwise and pull it clockwise, as shown by arrows in Fig 34. 33

Owner's Manual
Page 19
Machine care Cleaning the shuttle race Oiling All bearings behind shuttle race ring Replace and lock them in order to time The shuttle race must also be oiled from time to get rid of waste ma terial in position with latches D. Model 212 A B C C Model 213 A B Co D ... To do this, remove the bobbin case Always use high-grade (resin -free) sewing machine oil After oiling, run for a short time on a piece the machine of excess oil 34 Raise the needle and take out bobbin coCauastrewetauFrldtyws iatphnudllbrosebhmbuiotntvleeEsAhSuwotutilntegoraflcaiettcsrhineragscBe0..
Machine care Cleaning the shuttle race Oiling All bearings behind shuttle race ring Replace and lock them in order to time The shuttle race must also be oiled from time to get rid of waste ma terial in position with latches D. Model 212 A B C C Model 213 A B Co D ... To do this, remove the bobbin case Always use high-grade (resin -free) sewing machine oil After oiling, run for a short time on a piece the machine of excess oil 34 Raise the needle and take out bobbin coCauastrewetauFrldtyws iatphnudllbrosebhmbuiotntvleeEsAhSuwotutilntegoraflcaiettcsrhineragscBe0..


