

Owner's Manual
Page 2
...light bulb 65 Trouble shooting 65 Carrying case 66 V&id for United Kingdom ony! ontentS Page :oreword 1 'arts ofthePfaff 1213 2 arts of Ptaff machines 214 and 1222-E 3 viachine drive 4 3 reparations for bobbin winding 5 Removing the bobbin case 6 Bobbin winding 7 Disengaging the sewing mechanism 7 ...13 Ultra-Matic stitch selector 14/15 Straight stitching 15 Zigzag stitching 15 Foot control 15 Reverse sewing 16 Dropping the machine feed 16 Presser bar lifter 17 Stopmatic control 17 Dual feed 18/19 Sewing over cross seams Electronic control Changing ...
...light bulb 65 Trouble shooting 65 Carrying case 66 V&id for United Kingdom ony! ontentS Page :oreword 1 'arts ofthePfaff 1213 2 arts of Ptaff machines 214 and 1222-E 3 viachine drive 4 3 reparations for bobbin winding 5 Removing the bobbin case 6 Bobbin winding 7 Disengaging the sewing mechanism 7 ...13 Ultra-Matic stitch selector 14/15 Straight stitching 15 Zigzag stitching 15 Foot control 15 Reverse sewing 16 Dropping the machine feed 16 Presser bar lifter 17 Stopmatic control 17 Dual feed 18/19 Sewing over cross seams Electronic control Changing ...

Owner's Manual
Page 3
... the booklet first and then open it at pages 2 and 3, where the most essential parts of the Pfaff sewing machine. Uz1I® Instruction Book for the Push-Button Pfaff 1213, 1214 and 1222-E 194 Dear (new) Pfaff Customer: Welcome to read this instruction booklet. By identifying these sewing instructions carefully, and hope that you will...
... the booklet first and then open it at pages 2 and 3, where the most essential parts of the Pfaff sewing machine. Uz1I® Instruction Book for the Push-Button Pfaff 1213, 1214 and 1222-E 194 Dear (new) Pfaff Customer: Welcome to read this instruction booklet. By identifying these sewing instructions carefully, and hope that you will...
Owner's Manual
Page 4
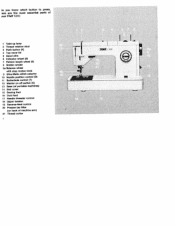
o you know which button to press, ere are the most essential parts of tour Pfaff 1213: 1 Take-up lever 2 Thread retainer stud 3 Push button (K) 4 Top cover lid 5 Spool pins 6 Indicator wheel (S) 7 Pattern length wheel (E) 8 Bobbin winder Ba Balance wheel with ...stop motion knob 9 Ultra-Matic stitch selector 10 Needle position control (D) 11 Buttonhole control () 12 Master on-off switch (C) 13 Base (of portable machInes) 14 Bed cover 15 Sewing foot 16 Dualfeed 17 Needle threader control 18 Upper tension 19 Reverse-teed control 20 Presser bar lifter (on back...
o you know which button to press, ere are the most essential parts of tour Pfaff 1213: 1 Take-up lever 2 Thread retainer stud 3 Push button (K) 4 Top cover lid 5 Spool pins 6 Indicator wheel (S) 7 Pattern length wheel (E) 8 Bobbin winder Ba Balance wheel with ...stop motion knob 9 Ultra-Matic stitch selector 10 Needle position control (D) 11 Buttonhole control () 12 Master on-off switch (C) 13 Base (of portable machInes) 14 Bed cover 15 Sewing foot 16 Dualfeed 17 Needle threader control 18 Upper tension 19 Reverse-teed control 20 Presser bar lifter (on back...

Owner's Manual
Page 5
...: 1 Take-up lever 2 Thread retainer stud 3 Push button (K) 4 Topcoverlid 5 Spool pins 6 7 Indicator wheel (S) Pattern length wheel (E) 8 Bobbin winder 8a Balance wheel with stop motion knob (Pfaff 1214) 9 Ultra-Matic stitch selector 10 Needle position control (D) 11 Buttonhole control (1) 12 Master on-off switch (C) 13 Free arm 14 Free arm cover (enclosing the... sewing hook) 15 Sewing foot 16 Dualfeed 17 Needle threader control 18 Upper tension 19 Reverse-feed control 20 Presser bar lifter (on back of machine arm) 21 Thread cutter
...: 1 Take-up lever 2 Thread retainer stud 3 Push button (K) 4 Topcoverlid 5 Spool pins 6 7 Indicator wheel (S) Pattern length wheel (E) 8 Bobbin winder 8a Balance wheel with stop motion knob (Pfaff 1214) 9 Ultra-Matic stitch selector 10 Needle position control (D) 11 Buttonhole control (1) 12 Master on-off switch (C) 13 Free arm 14 Free arm cover (enclosing the... sewing hook) 15 Sewing foot 16 Dualfeed 17 Needle threader control 18 Upper tension 19 Reverse-feed control 20 Presser bar lifter (on back of machine arm) 21 Thread cutter

Owner's Manual
Page 6
Place the foot control under the table in the machine, wind the bobbin and thread the needle. only a few simple steps are necessary. Just plug in a convenient position. o start sewing right away. Push the master plug into socket A in the machine base, and plug B into the wall socket. All you have to do now is push button C which is the on-off control of your machine This button also switches on the glare-free sewing light. 4 Th.
Place the foot control under the table in the machine, wind the bobbin and thread the needle. only a few simple steps are necessary. Just plug in a convenient position. o start sewing right away. Push the master plug into socket A in the machine base, and plug B into the wall socket. All you have to do now is push button C which is the on-off control of your machine This button also switches on the glare-free sewing light. 4 Th.

Owner's Manual
Page 7
Before you start winding the bobbin remember that you need two threads to form a lock stitch. If your seam doesn't look like the illustration, turn the machine on by -step bobbin winding instructions please refer to page 21. These two threads are locked together in this way is illustrated below. To wind the bobbin, turn to page 7. The sewing mechanism must be disengaged (see page 7). The seam produced in the middle of the fabric to sew a seam: an upper and a lower thread. For step-by pushing button C (page 4).
Before you start winding the bobbin remember that you need two threads to form a lock stitch. If your seam doesn't look like the illustration, turn the machine on by -step bobbin winding instructions please refer to page 21. These two threads are locked together in this way is illustrated below. To wind the bobbin, turn to page 7. The sewing mechanism must be disengaged (see page 7). The seam produced in the middle of the fabric to sew a seam: an upper and a lower thread. For step-by pushing button C (page 4).

Owner's Manual
Page 8
Lift latch K (see ill.) and pull out the bobbin case with the Pfaff 1213 - On Ptaff machines 1214 and 1222E open latch. The bobbin cannot faH out as long as you release the latch, the empty bobbin drops out. just like with the bobbin. Then - On the Pfaff 1213 remove the bed cover. lift latch K and pull out the bobbin case with the bobbin. When you hold the bobbin case by its open the free-arm cover and swing it toward the left. ro remove the bobbin case. \ Make sure the needle is posiboned above the need'e plato.
Lift latch K (see ill.) and pull out the bobbin case with the Pfaff 1213 - On Ptaff machines 1214 and 1222E open latch. The bobbin cannot faH out as long as you release the latch, the empty bobbin drops out. just like with the bobbin. Then - On the Pfaff 1213 remove the bed cover. lift latch K and pull out the bobbin case with the bobbin. When you hold the bobbin case by its open the free-arm cover and swing it toward the left. ro remove the bobbin case. \ Make sure the needle is posiboned above the need'e plato.

Owner's Manual
Page 9
.... Simply place the bobbin on the foot control. Pass the thread from you . The sewing mechanism is re-engaged automatically on starting the machine, On the Pfaff 1222-E, the sewing mechanism is engaged or disengaged by pressing down on bobbin winder disc S where it is full, To re-engage the ...away from the spool to page 17. Push lever E against the bobbin, hold the balance wheel, and turn the stop motion knob of Pfaft machines 1213 and 1214 (8a on one of thread on page 2> toward you . The bobbin winder stops automatically when the bobbin is held in the above illustration,...
.... Simply place the bobbin on the foot control. Pass the thread from you . The sewing mechanism is re-engaged automatically on starting the machine, On the Pfaff 1222-E, the sewing mechanism is engaged or disengaged by pressing down on bobbin winder disc S where it is full, To re-engage the ...away from the spool to page 17. Push lever E against the bobbin, hold the balance wheel, and turn the stop motion knob of Pfaft machines 1213 and 1214 (8a on one of thread on page 2> toward you . The bobbin winder stops automatically when the bobbin is held in the above illustration,...

Owner's Manual
Page 11
Release the latch and press against the bobbin case until you hear it snap into place. • and to replace the bobbin case in the machine Lift latch K and push the bobbin case onto center stud S, making sure its slot (see arrow) points upwards.
Release the latch and press against the bobbin case until you hear it snap into place. • and to replace the bobbin case in the machine Lift latch K and push the bobbin case onto center stud S, making sure its slot (see arrow) points upwards.

Owner's Manual
Page 12
ulf the thread to the right and down as ndicated by an arrow in the illustration below. [hen continue threading as shown in the Ilustration at right. [he built-in the top cover. By this notion, the thread is drawn into the slot n the top cover of your machine ull the thread from the spool into the upper ension which is enclosed in Pfaff needle threader will then thread the needle for you quickly and easily. '1 ow "slot-thread" your machine.
ulf the thread to the right and down as ndicated by an arrow in the illustration below. [hen continue threading as shown in the Ilustration at right. [he built-in the top cover. By this notion, the thread is drawn into the slot n the top cover of your machine ull the thread from the spool into the upper ension which is enclosed in Pfaff needle threader will then thread the needle for you quickly and easily. '1 ow "slot-thread" your machine.

Owner's Manual
Page 13
On Pfaff machines 1213 and 1214, turn the balance wheel to bring the take-up lever is in the position shown in the illustration. Fully release the control, take -up lever to its highest point (Fig page 10) On the Pfaff 1222-E, return the presser bar lifter to its highest point, i. Release... in its highest point and the take hold of the thread loop and pull the thread through the needle eye (Fig. 3). On Pfaff machines 1213 and 1214, turn the balance wheel until the prong reverses and pulls the thread through the needle eye completely. Push the needle threader control down ...
On Pfaff machines 1213 and 1214, turn the balance wheel to bring the take-up lever is in the position shown in the illustration. Fully release the control, take -up lever to its highest point (Fig page 10) On the Pfaff 1222-E, return the presser bar lifter to its highest point, i. Release... in its highest point and the take hold of the thread loop and pull the thread through the needle eye (Fig. 3). On Pfaff machines 1213 and 1214, turn the balance wheel until the prong reverses and pulls the thread through the needle eye completely. Push the needle threader control down ...

Owner's Manual
Page 15
..., the range from 0 to 4 comprises straight stitches of the stitch desired is set for every sewing operation discussed. Then let your machine. This simplifies the operation of the stitch selector is shown set for straight and zigzag stitching. In the illustration on this page the stitch...in stitch range 8. -U. Start by numbers. The zigzag stitch desired is dialed just as easily as a straight stitch The setting of your Pfaff run . The different stitch ranges are shown on the left, the stitch selector is opposite the white mark. In the illustration on the Ultra...
..., the range from 0 to 4 comprises straight stitches of the stitch desired is set for every sewing operation discussed. Then let your machine. This simplifies the operation of the stitch selector is shown set for straight and zigzag stitching. In the illustration on this page the stitch...in stitch range 8. -U. Start by numbers. The zigzag stitch desired is dialed just as easily as a straight stitch The setting of your Pfaff run . The different stitch ranges are shown on the left, the stitch selector is opposite the white mark. In the illustration on the Ultra...
Owner's Manual
Page 16
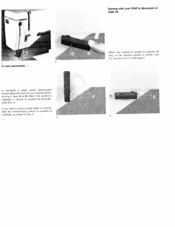
ro sew backwards or backtack a seam, press reverse-feed control 19 on page 26. When this control is turned to position 0 (Fig. 4), the darning symbol is visible, and the machine teed is disengaged .2 ; ' 4 If you wish to sew a longer seam in reverse, flick the reverse-feed control to position C (vertical), as shown in Fig. 3. 3 When this control is released, it from A to position A automati cally (Fig. 2). Darning with your Pfaff is discussed on the front of your machine down, moving it returns to B.
ro sew backwards or backtack a seam, press reverse-feed control 19 on page 26. When this control is turned to position 0 (Fig. 4), the darning symbol is visible, and the machine teed is disengaged .2 ; ' 4 If you wish to sew a longer seam in reverse, flick the reverse-feed control to position C (vertical), as shown in Fig. 3. 3 When this control is released, it from A to position A automati cally (Fig. 2). Darning with your Pfaff is discussed on the front of your machine down, moving it returns to B.

Owner's Manual
Page 18
To disengage this foot, push it down in the slot of fabric wiH match erfectly, no matter how long the seam iay be. wo pieces of the raised sewing foot until it snaps into place (see arrow in the sewing foot. our Ptaff is also used for sewing long seams and for sewing over thick cross seams. To engage the dual feed, simply push it down slightly, then pull it up out of the slot in illustra tion at bottom left). This foot is used for perfectly matching plaids, striped and patterned fabrics. The dual feed is the only home sewing machine the world featuring a dual feed.
To disengage this foot, push it down in the slot of fabric wiH match erfectly, no matter how long the seam iay be. wo pieces of the raised sewing foot until it snaps into place (see arrow in the sewing foot. our Ptaff is also used for sewing long seams and for sewing over thick cross seams. To engage the dual feed, simply push it down slightly, then pull it up out of the slot in illustra tion at bottom left). This foot is used for perfectly matching plaids, striped and patterned fabrics. The dual feed is the only home sewing machine the world featuring a dual feed.

Owner's Manual
Page 19
... felling foot. Just relieve the pressure on the foot control . . . Other feet which operates' behind the scenes" comes to your machine to slow stitchbystitch sewing for the dectronic Control of the Pfaff 1222-E. The electronic control which can be used with the aid of the dual feed the squares or stripes will...
... felling foot. Just relieve the pressure on the foot control . . . Other feet which operates' behind the scenes" comes to your machine to slow stitchbystitch sewing for the dectronic Control of the Pfaff 1222-E. The electronic control which can be used with the aid of the dual feed the squares or stripes will...

Owner's Manual
Page 20
This causes the Stopmatic mechanism to bring the needle to position D (see ill, below) and pull the old needle out of your machine contains several special sewing feet (hemmer foot, buttonhole foot, etc.) which are used for a specific sewing job is just as it sideways or backwards. Loosen ...
This causes the Stopmatic mechanism to bring the needle to position D (see ill, below) and pull the old needle out of your machine contains several special sewing feet (hemmer foot, buttonhole foot, etc.) which are used for a specific sewing job is just as it sideways or backwards. Loosen ...

Owner's Manual
Page 21
The upper tension is located under the top cover of your machine', as was already explained on page 10. 'The tension dial is regulated by arrows. In this screw to the right (with numbers 0 to see whether ...
The upper tension is located under the top cover of your machine', as was already explained on page 10. 'The tension dial is regulated by arrows. In this screw to the right (with numbers 0 to see whether ...

Owner's Manual
Page 22
I To increase the sewing area of your vorking surface... detachab'e workplate increases your Pfaff 1213 Portable, attach the bedplate extension illustrated below. Straightstitch and zigzag sewing work Pwipplfliuinutashssfhtfaremadetdainoecotntehvariecnbrheetatlshhboeew1le2.f1awr4epToepharrinkasopdrpmlwra1ito2aeu2rt,nek2tapi-lsElhaisttoaheslroeetwsiwssnuoipsniigpnmultiptihehdldeyee machine.
I To increase the sewing area of your vorking surface... detachab'e workplate increases your Pfaff 1213 Portable, attach the bedplate extension illustrated below. Straightstitch and zigzag sewing work Pwipplfliuinutashssfhtfaremadetdainoecotntehvariecnbrheetatlshhboeew1le2.f1awr4epToepharrinkasopdrpmlwra1ito2aeu2rt,nek2tapi-lsElhaisttoaheslroeetwsiwssnuoipsniigpnmultiptihehdldeyee machine.

Owner's Manual
Page 23
... edge of the top piece, but the top edge must not be obtained from your Pfaff can be folded. Open the two pieces. Now see for yourself what your Pfaff dealer) . lake advantage of the many possibilities this machine offers you in two opera tions: First seam: Lay the two pieces of fabric...
... edge of the top piece, but the top edge must not be obtained from your Pfaff can be folded. Open the two pieces. Now see for yourself what your Pfaff dealer) . lake advantage of the many possibilities this machine offers you in two opera tions: First seam: Lay the two pieces of fabric...

Owner's Manual
Page 26
... side. This motion is dropped. Darning Ultra-Matic stitch selector: straight stitch Stitch length: 1-4 Attach darning foot No. 93-040 960-91. 3 For darning, the machine feed is controlled by hand. The darning foot moves up and down while darn ing. When the needle enters the fabric, the darning foot presses...
... side. This motion is dropped. Darning Ultra-Matic stitch selector: straight stitch Stitch length: 1-4 Attach darning foot No. 93-040 960-91. 3 For darning, the machine feed is controlled by hand. The darning foot moves up and down while darn ing. When the needle enters the fabric, the darning foot presses...


