
PC-330 Manual
Page 7
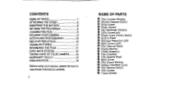
... a INSERTING THE BATTERY 8 SETTING THE FILM SPEED 9 LOADING THE FILM 9 HOLDING YOUR CAMERA 9 AUTO FLASH PHOTOGRAPHY 10 RED EYE REDUCTION 10 TAKING PICTURES 11 REWINDING THE FILM 11 DATE BACK SYSTEM 12 TAKING CARE OF YOUR CAMERA 13 WARRANTY POLICY 14 SPECIFICATION 16 Before using your camera, please be sure to read these instructions carefully. 7 NAME OF PARTS • Film Counter Window • Shutter Release Button • Strap Eyelet • Photo Sensor • Big Viewfinder Window O Lens Cover/Lens • Power (Lens Cover) Switch...
... a INSERTING THE BATTERY 8 SETTING THE FILM SPEED 9 LOADING THE FILM 9 HOLDING YOUR CAMERA 9 AUTO FLASH PHOTOGRAPHY 10 RED EYE REDUCTION 10 TAKING PICTURES 11 REWINDING THE FILM 11 DATE BACK SYSTEM 12 TAKING CARE OF YOUR CAMERA 13 WARRANTY POLICY 14 SPECIFICATION 16 Before using your camera, please be sure to read these instructions carefully. 7 NAME OF PARTS • Film Counter Window • Shutter Release Button • Strap Eyelet • Photo Sensor • Big Viewfinder Window O Lens Cover/Lens • Power (Lens Cover) Switch...
PC-330 Manual
Page 9
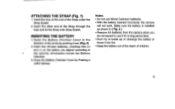
... sure the battery is installed as shown in the direction of the Strap through the loop and tie the Strap onto Strap Eyelet. Insert the loop at the end of children. 8 INSERTING THE BATTERY 1.Open the Battery Chamber Cover in ( Fig. 3). • Remove AA batteries from the camera when you do not expect to use Nickel Cadmium batteries. • With the battery inserted incorrectly, the camera will not work...
... sure the battery is installed as shown in the direction of the Strap through the loop and tie the Strap onto Strap Eyelet. Insert the loop at the end of children. 8 INSERTING THE BATTERY 1.Open the Battery Chamber Cover in ( Fig. 3). • Remove AA batteries from the camera when you do not expect to use Nickel Cadmium batteries. • With the battery inserted incorrectly, the camera will not work...

PC-330 Manual
Page 10
... Cover Lock downward to its original position. Press the Release Button 2-3 times to place your camera or not can be confirmed by reading black-and-silver patterns on the film cassettes. Load the film cassette into the Film Chamber and pull out enough film leader to 400. 2. The camera is ready to take a picture. (Fig. 7) " Whether there is designed to use both hands to steady your camera...
... Cover Lock downward to its original position. Press the Release Button 2-3 times to place your camera or not can be confirmed by reading black-and-silver patterns on the film cassettes. Load the film cassette into the Film Chamber and pull out enough film leader to 400. 2. The camera is ready to take a picture. (Fig. 7) " Whether there is designed to use both hands to steady your camera...
PC-330 Manual
Page 11
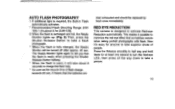
... recycle time of people. Now it means that sometimes occurs when taking portrait photographs with flash. AUTO FLASH PHOTOGRAPHY 1. The Ready Monitor lights again to tell you that the flash is ready when pressing the Shutter Release Button halfway. * When the flash is designed to take about 3.7m (3.9ft-12ft). 2. When the flash is fully charged, the Ready Monitor will take a picture...
... recycle time of people. Now it means that sometimes occurs when taking portrait photographs with flash. AUTO FLASH PHOTOGRAPHY 1. The Ready Monitor lights again to tell you that the flash is ready when pressing the Shutter Release Button halfway. * When the flash is designed to take about 3.7m (3.9ft-12ft). 2. When the flash is fully charged, the Ready Monitor will take a picture...

PC-330 Manual
Page 12
... film, push the Film Rewind Button in the Film Counter Window. (FIg. 12) * Be careful not to touch the inner lens surface with the safety mechanism of the camera. TAKING PICTURES Open the Lens Cover by sliding the Power Button G to mark. (FIg. 10) Lens Cover is completely open. REWINDING THE FILM 1. The film will stops automatically and "S" is seen in the direction of film. 11 You can fire the camera only when the lens Cover...
... film, push the Film Rewind Button in the Film Counter Window. (FIg. 12) * Be careful not to touch the inner lens surface with the safety mechanism of the camera. TAKING PICTURES Open the Lens Cover by sliding the Power Button G to mark. (FIg. 10) Lens Cover is completely open. REWINDING THE FILM 1. The film will stops automatically and "S" is seen in the direction of film. 11 You can fire the camera only when the lens Cover...
PC-330 Manual
Page 13
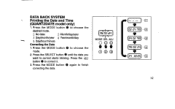
Press the ADJ button 0 to choose the mode. 2. Press the MODE button 0 to correct it. 3. Press the MODE button 0 again to correct starts blinking. DATA BACK SYSTEM Printing the Date and Time (QUARTZDATE model only) 1. Press the SELECT button 0 until the data you want to finish correcting the data. 99.0 -24 MODE SEL ADJ OO 1_ • 'M 102 21-I '99 ''24 22:25 12 Press the MODE button 0 to choose the desired mode. 1 No data 2 Month/day/year 3 Day/month/year 4 Year/month/day • 5 Day/hour/minute Correcting the Data 1.
Press the ADJ button 0 to choose the mode. 2. Press the MODE button 0 to correct it. 3. Press the MODE button 0 again to correct starts blinking. DATA BACK SYSTEM Printing the Date and Time (QUARTZDATE model only) 1. Press the SELECT button 0 until the data you want to finish correcting the data. 99.0 -24 MODE SEL ADJ OO 1_ • 'M 102 21-I '99 ''24 22:25 12 Press the MODE button 0 to choose the desired mode. 1 No data 2 Month/day/year 3 Day/month/year 4 Year/month/day • 5 Day/hour/minute Correcting the Data 1.
PC-330 Manual
Page 14
..., particularly when it examined at the beach, any kind of this camera has a high working voltage. (Fig. 17) The shutter mechanism and moving parts of rusting to your camera when mounting it on a tripod. The following careless handling may damage it operation property. (Fig. 16) 5. It must be ... design. Please never try to disassemble the camera, since the battery will not function properly in salt water. If your camera has to be protected from salty breezes or sprays at an assigned service center. (Fig. 14) 3. Dropping and/or banging the camera, which may cause major damages:...
..., particularly when it examined at the beach, any kind of this camera has a high working voltage. (Fig. 17) The shutter mechanism and moving parts of rusting to your camera when mounting it on a tripod. The following careless handling may damage it operation property. (Fig. 16) 5. It must be ... design. Please never try to disassemble the camera, since the battery will not function properly in salt water. If your camera has to be protected from salty breezes or sprays at an assigned service center. (Fig. 14) 3. Dropping and/or banging the camera, which may cause major damages:...

PC-330 Manual
Page 15
.... Service will be rendered, and defective parts will be replaced without cost to you purchased the equipment or to operating instructions, or modification by an unauthorized repair shop. Procedure During 12-month Warranty Period Any Pentax which proves defective during the 12 month warranty period should be liable for damages from delay or loss of use or from date of...
.... Service will be rendered, and defective parts will be replaced without cost to you purchased the equipment or to operating instructions, or modification by an unauthorized repair shop. Procedure During 12-month Warranty Period Any Pentax which proves defective during the 12 month warranty period should be liable for damages from delay or loss of use or from date of...
PC-330 Manual
Page 16
... the date of your purchase when required, please keep the receipts or bills covering the purchase of your equipment for at the time of the country where you accept the quoted service charge, instruct the service station to be borne by warranty, repairs will be serviced free of its representatives will apply. Before sending your equipment for servicing, please make sure...
... the date of your purchase when required, please keep the receipts or bills covering the purchase of your equipment for at the time of the country where you accept the quoted service charge, instruct the service station to be borne by warranty, repairs will be serviced free of its representatives will apply. Before sending your equipment for servicing, please make sure...
PC-330 Manual
Page 17
... F6.3, 3 elements in type, Recycling time: approx. 8 sec. Focusing: Free focus Focusing Range: 1 m to "S", When the camera back cover is released. AUTO FLASH. Film Winding and Rewinding-: Automatic winding and power rewind. Viewfinder: Magnification: 0.63X, Field coverage: 80% Flash: Built-in 3 groups. Red-eye Reduction: LED lamp light up before the shutter is opened. SPECIFICATIONS Type: 35mm motorized camera with auto flash. Counter: Additive, automatic reset to infinity (normal) Shutter: Shutter speed 1/100 sec. Plastic lens. Power Source: 2 AA...
... F6.3, 3 elements in type, Recycling time: approx. 8 sec. Focusing: Free focus Focusing Range: 1 m to "S", When the camera back cover is released. AUTO FLASH. Film Winding and Rewinding-: Automatic winding and power rewind. Viewfinder: Magnification: 0.63X, Field coverage: 80% Flash: Built-in 3 groups. Red-eye Reduction: LED lamp light up before the shutter is opened. SPECIFICATIONS Type: 35mm motorized camera with auto flash. Counter: Additive, automatic reset to infinity (normal) Shutter: Shutter speed 1/100 sec. Plastic lens. Power Source: 2 AA...
PC-330 Manual
Page 58
... I -Chome, Chiyoda-ku. Mississauga, Ontraio L4X 2E5, CANADA The CE marking assures that this product complies with the requirements of the EC directive for Belgium & Luxemburg) Weiveldlaan 3-5, 1930 Zaventem. Pentax Canada Inc. 3131 Universal Drive. I I-I NTED IN CHINA 70639-450-PEN II marchio Ce assicura the questo prodotto 6 conforme alle direttive CE...
... I -Chome, Chiyoda-ku. Mississauga, Ontraio L4X 2E5, CANADA The CE marking assures that this product complies with the requirements of the EC directive for Belgium & Luxemburg) Weiveldlaan 3-5, 1930 Zaventem. Pentax Canada Inc. 3131 Universal Drive. I I-I NTED IN CHINA 70639-450-PEN II marchio Ce assicura the questo prodotto 6 conforme alle direttive CE...


