
Optio H90 Orange Optio H90
Page 14
... operation. In this manual, the method for operating the four-way controller is shown in illustrations, such as in the ones below . 1 indicates the reference page number for an explanation of the symbols used in this manual, the mode for taking still pictures is referred to as the "still picture capture...
... operation. In this manual, the method for operating the four-way controller is shown in illustrations, such as in the ones below . 1 indicates the reference page number for an explanation of the symbols used in this manual, the mode for taking still pictures is referred to as the "still picture capture...

Optio H90 Orange Optio H90
Page 45
... the Display Language 1 Use the four-way controller (2345) to set the language, and in "Changing the Date and Time" (1p.184). Refer to the pages below to set the current date and time. Four-way controller 4 button 3 button English Dansk Deutsch Svenska Suomi Polski Italiano Nederlands Magyar MENU Cancel OK...
... the Display Language 1 Use the four-way controller (2345) to set the language, and in "Changing the Date and Time" (1p.184). Refer to the pages below to set the current date and time. Four-way controller 4 button 3 button English Dansk Deutsch Svenska Suomi Polski Italiano Nederlands Magyar MENU Cancel OK...

Optio H90 Orange Optio H90
Page 47
... language. The [W Setting] menu appears in the Wrong Language 1 Press the 3 button. 2 Press the four-way controller (5). 3 Use the four-way controller (32) to the pages below for instructions. • To change [Hometown], follow the steps in "Setting the World Time" (1p.187). • To change the [Date] and [Time], follow...
... language. The [W Setting] menu appears in the Wrong Language 1 Press the 3 button. 2 Press the four-way controller (5). 3 Use the four-way controller (32) to the pages below for instructions. • To change [Hometown], follow the steps in "Setting the World Time" (1p.187). • To change the [Date] and [Time], follow...

Optio H90 Orange Optio H90
Page 51
[Language/ ], [Date], [Time], [Hometown], and [DST] can be changed. Getting Started 49 Refer to the pages below for instructions. • To change the language, follow the steps in "Changing the Display Language" (1p.189). • To change the date and time, follow the steps in "Changing the Date and 1 Time" (1p.184). • To change the city or turn DST on and off, follow the steps in "Setting the World Time" (1p.187).
[Language/ ], [Date], [Time], [Hometown], and [DST] can be changed. Getting Started 49 Refer to the pages below for instructions. • To change the language, follow the steps in "Changing the Display Language" (1p.189). • To change the date and time, follow the steps in "Changing the Date and 1 Time" (1p.184). • To change the city or turn DST on and off, follow the steps in "Setting the World Time" (1p.187).

Optio H90 Orange Optio H90
Page 63
... related to check whether the settings are saved when the camera is reset. 2 [A Rec. Common Operations Item Description Page Recorded Pixels For choosing the number of recorded pixels of still pictures p.104 White Balance For adjusting the color balance according to the lighting conditions p.108 Focusing Area For changing the area of...
... related to check whether the settings are saved when the camera is reset. 2 [A Rec. Common Operations Item Description Page Recorded Pixels For choosing the number of recorded pixels of still pictures p.104 White Balance For adjusting the color balance according to the lighting conditions p.108 Focusing Area For changing the area of...

Optio H90 Orange Optio H90
Page 64
...Green button enables you to go straight to the desired function (p.119). [W Setting] Menu Item Sound Date Adjustment World Time Language/ Folder Name Description Page For adjusting the operation volume and playback volume, and setting the start-up sound, shutter sound, p.183 key operation sound and self-timer sound For... p.189 For choosing how names are assigned to enjoy easy picture-taking still pictures p.118 [A Rec. Mode] Menu 2 Rec. Mode 1/3 Recorded Pixels 12M White Balance AWB 2 Focusing Area AE Metering Sensitivity Auto EV Compensation 0.0 MENU Exit Rec.
...Green button enables you to go straight to the desired function (p.119). [W Setting] Menu Item Sound Date Adjustment World Time Language/ Folder Name Description Page For adjusting the operation volume and playback volume, and setting the start-up sound, shutter sound, p.183 key operation sound and self-timer sound For... p.189 For choosing how names are assigned to enjoy easy picture-taking still pictures p.118 [A Rec. Mode] Menu 2 Rec. Mode 1/3 Recorded Pixels 12M White Balance AWB 2 Focusing Area AE Metering Sensitivity Auto EV Compensation 0.0 MENU Exit Rec.

Optio H90 Orange Optio H90
Page 65
... Off 3min. Common Operations Item USB Connection Video Out Eye-Fi Brightness Level Power Saving Auto Power Off Reset Delete All Pixel Mapping Format Description Page For setting the USB connection mode (MSC or PTP) when connected to a computer via the USB cable p.205 For setting the output format to AV...
... Off 3min. Common Operations Item USB Connection Video Out Eye-Fi Brightness Level Power Saving Auto Power Off Reset Delete All Pixel Mapping Format Description Page For setting the USB connection mode (MSC or PTP) when connected to a computer via the USB cable p.205 For setting the output format to AV...

Optio H90 Orange Optio H90
Page 72
Page p.74 R Program Used for bright scenes. p.80 B Night Scene Portrait For images of a tripod or other support is advised. Use of people at night. p.80 C ...
Page p.74 R Program Used for bright scenes. p.80 B Night Scene Portrait For images of a tripod or other support is advised. Use of people at night. p.80 C ...

Optio H90 Orange Optio H90
Page 73
... Increases ISO and clarity. are also available. • In shooting modes other than R, A, C, c, N, X and F, saturation, contrast, sharpness, white balance, etc. p.94 F Digital Panorama Stitches images taken with a frame. p.80 c Text Captures text in candlelight. p.82 U Candlelight For capturing ... Pictures 71 Shooting Mode Description N Frame Composite For capturing images with the camera to the optimal settings for blogs or email. Page p.89 B Party For capturing images at m (640×480). - 3 Stitches two pictures together to read manner. Text...
... Increases ISO and clarity. are also available. • In shooting modes other than R, A, C, c, N, X and F, saturation, contrast, sharpness, white balance, etc. p.94 F Digital Panorama Stitches images taken with a frame. p.80 c Text Captures text in candlelight. p.82 U Candlelight For capturing ... Pictures 71 Shooting Mode Description N Frame Composite For capturing images with the camera to the optimal settings for blogs or email. Page p.89 B Party For capturing images at m (640×480). - 3 Stitches two pictures together to read manner. Text...
Optio H90 Orange Optio H90
Page 127
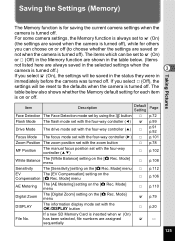
... table below also shows whether the Memory default setting for each item is on or off. sequentially 125 Taking Pictures Item Description Default Setting Page Face Detection The Face Detection mode set by using the I button P p.72 Flash Mode The flash mode set with the four-way controller... the 4/W button P p.20 File No. Mode] menu P p.110 O p.79 DISPLAY The information display mode set with the four-way controller (23) White Balance The [White Balance] setting on the [A Rec. Saving the Settings (Memory) The Memory function is for others you can be set to O (On) or P (...
... table below also shows whether the Memory default setting for each item is on or off. sequentially 125 Taking Pictures Item Description Default Setting Page Face Detection The Face Detection mode set by using the I button P p.72 Flash Mode The flash mode set with the four-way controller... the 4/W button P p.20 File No. Mode] menu P p.110 O p.79 DISPLAY The information display mode set with the four-way controller (23) White Balance The [White Balance] setting on the [A Rec. Saving the Settings (Memory) The Memory function is for others you can be set to O (On) or P (...

Optio H90 Orange Optio H90
Page 132
...four-way controller (2345) to nine-image display. Similarly, if you choose image 2 and press the four-way controller (35), the next page appears. 1 2 Select & Delete 100-0010 Nine-Image Display 130 Playing Back and Deleting Images Multi-Image Display Zoom button Q button Four-way...Image Display 4 You can display four or nine thumbnails of captured images at a time page by page. The four-image display appears showing a page consisting of four or nine thumbnail 2 images appears. A page consisting of four thumbnail images. 1 Press the zoom button towards the left (f) again to...
...four-way controller (2345) to nine-image display. Similarly, if you choose image 2 and press the four-way controller (35), the next page appears. 1 2 Select & Delete 100-0010 Nine-Image Display 130 Playing Back and Deleting Images Multi-Image Display Zoom button Q button Four-way...Image Display 4 You can display four or nine thumbnails of captured images at a time page by page. The four-image display appears showing a page consisting of four or nine thumbnail 2 images appears. A page consisting of four thumbnail images. 1 Press the zoom button towards the left (f) again to...

Optio H90 Orange Optio H90
Page 136
Playing Back and Deleting Images Playback Mode Palette Playback Mode Description Page u Slideshow For continuously playing back images. p.156 N Frame Composite For composing an image with a Color filter or Soft filter. Divide Movies For dividing a movie into ...
Playing Back and Deleting Images Playback Mode Palette Playback Mode Description Page u Slideshow For continuously playing back images. p.156 N Frame Composite For composing an image with a Color filter or Soft filter. Divide Movies For dividing a movie into ...
Optio H90 Orange Optio H90
Page 208
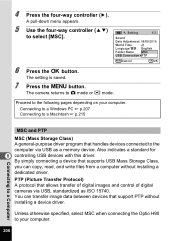
... ISO 15740. Proceed to your computer. Also indicates a standard for 8 controlling USB devices with this driver. Unless otherwise specified, select MSC when connecting the Optio H90 to the following pages depending on your computer. 206 The setting is saved. 7 Press the 3 button. PTP (Picture Transfer Protocol) A protocol that handles devices connected to the...
... ISO 15740. Proceed to your computer. Also indicates a standard for 8 controlling USB devices with this driver. Unless otherwise specified, select MSC when connecting the Optio H90 to the following pages depending on your computer. 206 The setting is saved. 7 Press the 3 button. PTP (Picture Transfer Protocol) A protocol that handles devices connected to the...

Optio H90 Orange Optio H90
Page 214
...The first time you view, edit, manage, search for, share, and print images. 1 Double-click the [MediaImpression 2.0 for PENTAX] icon on the desktop. The Folders view displays your files based on their location on the left side of Media Browser, and ... and options for you to a Computer 8 C * The screen shown is the primary view. The [Media Browser] screen appears. Starting "MediaImpression 2.0 for PENTAX" "MediaImpression 2.0 for PENTAX" lets you use the program, "Folders" is an example with the default settings. A Views pane The Views pane appears on your media files. "MediaImpression...
...The first time you view, edit, manage, search for, share, and print images. 1 Double-click the [MediaImpression 2.0 for PENTAX] icon on the desktop. The Folders view displays your files based on their location on the left side of Media Browser, and ... and options for you to a Computer 8 C * The screen shown is the primary view. The [Media Browser] screen appears. Starting "MediaImpression 2.0 for PENTAX" "MediaImpression 2.0 for PENTAX" lets you use the program, "Folders" is an example with the default settings. A Views pane The Views pane appears on your media files. "MediaImpression...

Optio H90 Orange Optio H90
Page 216
The help pages. 1 Select [Help] from the [Extras] menu at the top right of the screen. The explanation is displayed. 8 214 Connecting to use "MediaImpression 2.0 for PENTAX" You can find more information on how to a Computer Details on How to Use "MediaImpression 2.0 for PENTAX" by using the help screen appears. 2 Click the desired topic.
The help pages. 1 Select [Help] from the [Extras] menu at the top right of the screen. The explanation is displayed. 8 214 Connecting to use "MediaImpression 2.0 for PENTAX" You can find more information on how to a Computer Details on How to Use "MediaImpression 2.0 for PENTAX" by using the help screen appears. 2 Click the desired topic.

Optio H90 Orange Optio H90
Page 218
Transferring Images Transfer the images captured with the camera to your Macintosh. 5 Select [Applications] from ]. The [Applications] folder appears. 6 Double-click the [MediaImpression 2.0 for [Get Media from the [Go] menu. "MediaImpression 2.0 for PENTAX" starts and the [Start Page] appears. 7 Click [Import]. 8 8 Select the camera from the drop-down list for PENTAX] icon. If there is no SD Memory Card in the camera, the images stored in the built-in memory will be transferred to a Computer 216 Connecting to your Macintosh.
Transferring Images Transfer the images captured with the camera to your Macintosh. 5 Select [Applications] from ]. The [Applications] folder appears. 6 Double-click the [MediaImpression 2.0 for [Get Media from the [Go] menu. "MediaImpression 2.0 for PENTAX" starts and the [Start Page] appears. 7 Click [Import]. 8 8 Select the camera from the drop-down list for PENTAX] icon. If there is no SD Memory Card in the camera, the images stored in the built-in memory will be transferred to a Computer 216 Connecting to your Macintosh.

Optio H90 Orange Optio H90
Page 220
... you use the program, "Folders" is the primary view. "MediaImpression 2.0 for PENTAX] icon in the [Applications] folder. The [Media Browser] screen appears. The Folders view displays your files based on their location on the left side of ... to a Computer 8 C A Views pane The Views pane appears on your media files. The first time you display and manage images. 1 Double-click the [MediaImpression 2.0 for PENTAX" starts and the [Start Page] appears. 2 Click [All Media]. Media Browser Interface A B Connecting to search, examine, and organize your hard drive. 218
... you use the program, "Folders" is the primary view. "MediaImpression 2.0 for PENTAX] icon in the [Applications] folder. The [Media Browser] screen appears. The Folders view displays your files based on their location on the left side of ... to a Computer 8 C A Views pane The Views pane appears on your media files. The first time you display and manage images. 1 Double-click the [MediaImpression 2.0 for PENTAX" starts and the [Start Page] appears. 2 Click [All Media]. Media Browser Interface A B Connecting to search, examine, and organize your hard drive. 218

Optio H90 Orange Optio H90
Page 222
Details on How to Use "MediaImpression 2.0 for PENTAX" by using the help screen appears. 2 Click the desired topic. The explanation is displayed. 8 220 Connecting to use "MediaImpression 2.0 for PENTAX" You can find more information on the menu bar. The help pages. 1 Select [MediaImpression Help] from [Help] on how to a Computer
Details on How to Use "MediaImpression 2.0 for PENTAX" by using the help screen appears. 2 Click the desired topic. The explanation is displayed. 8 220 Connecting to use "MediaImpression 2.0 for PENTAX" You can find more information on the menu bar. The help pages. 1 Select [MediaImpression Help] from [Help] on how to a Computer

Optio H90 Orange Optio H90
Page 227
... \ (Manual Focus) z ×*9 z ×*7 ×*10 ×*11 × Recorded Pixels p.104 ×*12 z ×*12 z ×*12 z z White Balance p.108 z z ×*13 z*14 z z z Focusing Area p.103 ×*15 z ×*15 z ×*15 z z AE Metering p.110 z ×*... properly in any shooting mode except for Green Mode. z z z z z z z z g (Self-timer) Z (2 sec. H I Q Shooting Mode \YK c S N W X F B U c Page Function z z*2 z z z*3 × z Zoom operation Zoom button p.78 z z z z z z z Face Detection On Smile Capture I button p.72 z z z z z z z Face Detection Off ...
... \ (Manual Focus) z ×*9 z ×*7 ×*10 ×*11 × Recorded Pixels p.104 ×*12 z ×*12 z ×*12 z z White Balance p.108 z z ×*13 z*14 z z z Focusing Area p.103 ×*15 z ×*15 z ×*15 z z AE Metering p.110 z ×*... properly in any shooting mode except for Green Mode. z z z z z z z z g (Self-timer) Z (2 sec. H I Q Shooting Mode \YK c S N W X F B U c Page Function z z*2 z z z*3 × z Zoom operation Zoom button p.78 z z z z z z z Face Detection On Smile Capture I button p.72 z z z z z z z Face Detection Off ...

Optio H90 Orange Optio H90
Page 232
... the indications for menu items with the Reset function (p.198). Mode] Menu Items Item Default Setting Last Memory Setting Reset Setting Page Recorded Pixels E (4000×3000) Yes Yes p.104 White Balance F (Auto) * Yes p.108 Focusing Area J (Multiple) Yes Yes p.103 AE Metering L (Multi-segment) * Yes p.110 Sensitivity Auto * Yes p.112 EV...
... the indications for menu items with the Reset function (p.198). Mode] Menu Items Item Default Setting Last Memory Setting Reset Setting Page Recorded Pixels E (4000×3000) Yes Yes p.104 White Balance F (Auto) * Yes p.108 Focusing Area J (Multiple) Yes Yes p.103 AE Metering L (Multi-segment) * Yes p.110 Sensitivity Auto * Yes p.112 EV...