

MV Manual
Page 2
Asahi Pentax cannot assume any responsibility or liability for difficulties resulting from other brand of any other manufacturers are engineered and produced meticulously to precise Asahi Pentax specifications. Lenses and accessories from the use of lenses or accessories with - a Pentax camera. or actual damage to - IMPORTANT SMC Pentax lenses and Pentax accessories are not produced to these precise specifications and, therefore, may cause difficulties with an Asahi Pentax camera.
Asahi Pentax cannot assume any responsibility or liability for difficulties resulting from other brand of any other manufacturers are engineered and produced meticulously to precise Asahi Pentax specifications. Lenses and accessories from the use of lenses or accessories with - a Pentax camera. or actual damage to - IMPORTANT SMC Pentax lenses and Pentax accessories are not produced to these precise specifications and, therefore, may cause difficulties with an Asahi Pentax camera.
MV Manual
Page 3
... winding 10 Setting ASA film speed 11 Aperture setting 13 Shooting on AUTO 14 The "100X" and "B" settings 16 Focusing and composing 17 Holding the camera 18 Unloading film 19 Auto flash photography (AF 200S) 20 Other flash units 21 Shooting pointers 22 • Optimum apertures 22 • Stopping the action... 28 Infrared photography 29 Using screw-mount Takumar lenses 30 Open aperture and stop-down metering lenses 32 Resistance to temperature extremes and changes 33 Camera maintenance 34 Warranty policy 36 • 1
... winding 10 Setting ASA film speed 11 Aperture setting 13 Shooting on AUTO 14 The "100X" and "B" settings 16 Focusing and composing 17 Holding the camera 18 Unloading film 19 Auto flash photography (AF 200S) 20 Other flash units 21 Shooting pointers 22 • Optimum apertures 22 • Stopping the action... 28 Infrared photography 29 Using screw-mount Takumar lenses 30 Open aperture and stop-down metering lenses 32 Resistance to temperature extremes and changes 33 Camera maintenance 34 Warranty policy 36 • 1
MV Manual
Page 6
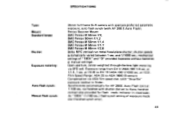
...between 1 sec. SPECIFICATIONS Type: Mount: Standard lenses: Shutter: Exposure metering: Auto flash synch: Manual flash synch: 35mm full-frame SLR camera with aperture-preferred automatic exposure, auto flash synch (with shutter dial set to Auto; At "100X" (1/100 sec.) flash-synch setting of... "100X" and "B" provided (operates without batteries at f/22). via SPD cell. Pentax Bayonet Mount SMC Pentax-M 50mm f/2, SMC Pentax 50mm f/1.2 SMC Pentax-M 50mm f/1.4 SMC Pentax-M 50mm f/1.7 SMC Pentax-M 40mm f/2.8 Seiko MFC vertical-run metal focal-plane shutter;
...between 1 sec. SPECIFICATIONS Type: Mount: Standard lenses: Shutter: Exposure metering: Auto flash synch: Manual flash synch: 35mm full-frame SLR camera with aperture-preferred automatic exposure, auto flash synch (with shutter dial set to Auto; At "100X" (1/100 sec.) flash-synch setting of... "100X" and "B" provided (operates without batteries at f/22). via SPD cell. Pentax Bayonet Mount SMC Pentax-M 50mm f/2, SMC Pentax 50mm f/1.2 SMC Pentax-M 50mm f/1.4 SMC Pentax-M 50mm f/1.7 SMC Pentax-M 40mm f/2.8 Seiko MFC vertical-run metal focal-plane shutter;

MV Manual
Page 7
... 200S flash ready indicator. Magic-needle quick/sure loading. Instant-return mirror and automatic diaphragm. Two 1.5V Alkaline (LR44) or Silver-oxide (G13) batteries; Standard camera back with 30°rest setting. Green: Adequate exposure for handheld shooting (1/1000 - 1/30 sec.) Yellow: Slow Exposure Warning (below 1/30 sec., inadequate for speed...
... 200S flash ready indicator. Magic-needle quick/sure loading. Instant-return mirror and automatic diaphragm. Two 1.5V Alkaline (LR44) or Silver-oxide (G13) batteries; Standard camera back with 30°rest setting. Green: Adequate exposure for handheld shooting (1/1000 - 1/30 sec.) Yellow: Slow Exposure Warning (below 1/30 sec., inadequate for speed...
MV Manual
Page 8
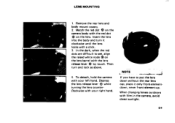
... put the lens down without the rear lens cap, place it clockwise until the lens locks with the red dot C) on the camera body with a click. 3. To detach, hold the camera with your left hand. NOTE If you have to see, align the raised white node 0 on the lens barrel with film... in the camera, avoid direct sunlight. 6• Then turn it only front-elementdown, never front-element-up. Match the red dot on the lens...
... put the lens down without the rear lens cap, place it clockwise until the lens locks with the red dot C) on the camera body with a click. 3. To detach, hold the camera with your left hand. NOTE If you have to see, align the raised white node 0 on the lens barrel with film... in the camera, avoid direct sunlight. 6• Then turn it only front-elementdown, never front-element-up. Match the red dot on the lens...
MV Manual
Page 9
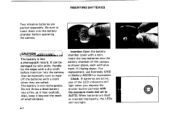
Insertion Open the battery chamber cover with plus mark (+) facing down. Insert the two batteries into the battery chamber of the camera as it beyond the reach of the LED indicators will not light. •7 Handle by skin acids. Also, keep it may explode.....batteries are packed separately. Be sure to wipe off the batteries with a dry cloth before operating the camera. • The battery is not rechargeable. Do not throw a dead battery into the camera. INSERTING BATTERIES Two Alkaline batteries are active, . It can be especially sure to insert them into ...
Insertion Open the battery chamber cover with plus mark (+) facing down. Insert the two batteries into the battery chamber of the camera as it beyond the reach of the LED indicators will not light. •7 Handle by skin acids. Also, keep it may explode.....batteries are packed separately. Be sure to wipe off the batteries with a dry cloth before operating the camera. • The battery is not rechargeable. Do not throw a dead battery into the camera. INSERTING BATTERIES Two Alkaline batteries are active, . It can be especially sure to insert them into ...
MV Manual
Page 10
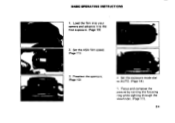
Preselect the aperture. (Page 13) 4 Set the exposure mode dial to the first exposure. (Page 10) 2. Load the film into your camera and advance it to AUTO. (Page 14). • 5. Set the ASA film speed. (Page 11) 3. Focus and compose the picture by turning the focusing ring while sighting through the viewfinder. (Page 17). 8• BASIC OPERATING INSTRUCTIONS 1.
Preselect the aperture. (Page 13) 4 Set the exposure mode dial to the first exposure. (Page 10) 2. Load the film into your camera and advance it to AUTO. (Page 14). • 5. Set the ASA film speed. (Page 11) 3. Focus and compose the picture by turning the focusing ring while sighting through the viewfinder. (Page 17). 8• BASIC OPERATING INSTRUCTIONS 1.
MV Manual
Page 11
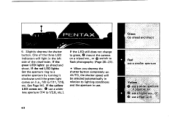
... a smaller aperture by turning it clockwise until the green light comes on (i.e., f/8 to f/2.8, etc.). If the LED still does not change to green, 0 mount the camera on a tripod etc., or Q switch to flash photography (Page 20-21). • When you depress the shutter button completely on : 0 use a fl.a.s. If the yellow...
... a smaller aperture by turning it clockwise until the green light comes on (i.e., f/8 to f/2.8, etc.). If the LED still does not change to green, 0 mount the camera on a tripod etc., or Q switch to flash photography (Page 20-21). • When you depress the shutter button completely on : 0 use a fl.a.s. If the yellow...
MV Manual
Page 12
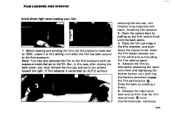
... AND WINDING Avoid direct light when loading your film. Leave it firmly. 5. But, in the film chamber, and push down the rewind knob. Open the camera back by pulling up spool. 4. Place the film cartridge in this setting until both top and bottom sprockets engage the film perforations 0. Note: You may... alternately advancing the rapidwind lever and depressing the shutter button until after closing the back cover, you must remove the lens cap and point the camera toward the light.
... AND WINDING Avoid direct light when loading your film. Leave it firmly. 5. But, in the film chamber, and push down the rewind knob. Open the camera back by pulling up spool. 4. Place the film cartridge in this setting until both top and bottom sprockets engage the film perforations 0. Note: You may... alternately advancing the rapidwind lever and depressing the shutter button until after closing the back cover, you must remove the lens cap and point the camera toward the light.

MV Manual
Page 16
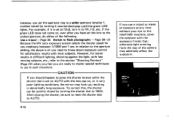
...by turning it clockwise until one of three LEDs in the viewfinder lights. To prevent this 14• This, does not necessarily indicate that the camera has selected a shutter speed below 1/30 sec. Usually, however, blur also can be overexposed. Otherwise, keep the shutter dial set the ASA film... 200S Auto Flash is designed for example, f/8 to check the exposure. Slow Exposure/Camera Shake Warning: If the Yellow LED lights, it need not be used . Or••n Fled Yellow SHOOTING ON AUTO Your Pentax MV is used for flash units other settings are ready to f/11 or f/16, etc...
...by turning it clockwise until one of three LEDs in the viewfinder lights. To prevent this 14• This, does not necessarily indicate that the camera has selected a shutter speed below 1/30 sec. Usually, however, blur also can be overexposed. Otherwise, keep the shutter dial set the ASA film... 200S Auto Flash is designed for example, f/8 to check the exposure. Slow Exposure/Camera Shake Warning: If the Yellow LED lights, it need not be used . Or••n Fled Yellow SHOOTING ON AUTO Your Pentax MV is used for flash units other settings are ready to f/11 or f/16, etc...
MV Manual
Page 17
... is all you have set on AUTO with most subjects. For example, if it counterclockwise until the green LED lights. Page 20-21 Because the MV auto exposure system selects the shutter speed for satisfactory results with the lens cap on , even after you need to 100X. in difficult lighting, shooting... to master special techniques to press the shutter button while the shutter dial is set the lens to the widest aperture, do either of the camera may lock up, resulting in such situations. If the green LED does not come on , or in very poor lighting conditions, the mirror may adversely...
... is all you have set on AUTO with most subjects. For example, if it counterclockwise until the green LED lights. Page 20-21 Because the MV auto exposure system selects the shutter speed for satisfactory results with the lens cap on , even after you need to 100X. in difficult lighting, shooting... to master special techniques to press the shutter button while the shutter dial is set the lens to the widest aperture, do either of the camera may lock up, resulting in such situations. If the green LED does not come on , or in very poor lighting conditions, the mirror may adversely...

MV Manual
Page 18
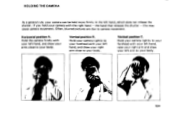
AUTO 100X• 100x THE "100X" AND "B" SETTINGS While the MV is designed almost totally for use , first mount the camera on a tripod, then, attach a cable release to the camera's shutter release button. "100X" This manual shutter speed setting really need not be used when desiring to the exposure ... (Bulb): This setting is provided for film wind on hand. The shutter will open as long as several minutes or hours, use the Pentax AF 200S Auto Flash and keep spare batteries on . For ultra long exposures such as pressure is also convenient for manual flash synchronization with a...
AUTO 100X• 100x THE "100X" AND "B" SETTINGS While the MV is designed almost totally for use , first mount the camera on a tripod, then, attach a cable release to the camera's shutter release button. "100X" This manual shutter speed setting really need not be used when desiring to the exposure ... (Bulb): This setting is provided for film wind on hand. The shutter will open as long as several minutes or hours, use the Pentax AF 200S Auto Flash and keep spare batteries on . For ultra long exposures such as pressure is also convenient for manual flash synchronization with a...
MV Manual
Page 20
...hand, and draw your arms close to your body. Hold your camera tightly to your forehead with your left hand, which does not release the shutter. the hand that releases the shutter - Hold the camera firmly with your left hand, raise your right arm and draw ...and draw your right arm close to your body. this may cause camera movement. If you hold your camera with your left arm to your body. / 18• Horizontal position A. Hold your camera tightly to camera movement. Vertical position B. HOLDING THE CAMERA As a general rule, your forehead with the right hand - ...
...hand, and draw your arms close to your body. Hold your camera tightly to your forehead with your left hand, which does not release the shutter. the hand that releases the shutter - Hold the camera firmly with your left hand, raise your right arm and draw ...and draw your right arm close to your body. this may cause camera movement. If you hold your camera with your left arm to your body. / 18• Horizontal position A. Hold your camera tightly to camera movement. Vertical position B. HOLDING THE CAMERA As a general rule, your forehead with the right hand - ...
MV Manual
Page 22
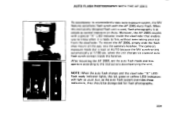
... the unit. AUTO FLASH PHOTOGRAPHY WITH THE AF 200 S 0 X To accompany its unprecedently easy auto exposure system, the MV features automatic flash synch with a special "X" LED indicator inside the hotshoe. The camera's exposure mode dial is as simple as the auto flash system overrides these indications, they should be disregarded for... fire, without even taking your eye from the viewfinder. To mount the AF 200S, simply slide the flashshoe mount all the way into the camera's hotshoe. When this exclusively designed flash unit is used, flash photography is kept at AUTO because the...
... the unit. AUTO FLASH PHOTOGRAPHY WITH THE AF 200 S 0 X To accompany its unprecedently easy auto exposure system, the MV features automatic flash synch with a special "X" LED indicator inside the hotshoe. The camera's exposure mode dial is as simple as the auto flash system overrides these indications, they should be disregarded for... fire, without even taking your eye from the viewfinder. To mount the AF 200S, simply slide the flashshoe mount all the way into the camera's hotshoe. When this exclusively designed flash unit is used, flash photography is kept at AUTO because the...
MV Manual
Page 23
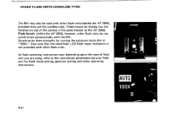
... the AF 200S, however, other operating instructions. As flash operating instructions vary depending upon the type of the camera in the same manner as the AF 200S. OTHER FLASH UNITS (CORDLESS TYPE) The MV may also be used with other flash units. These mount by turning the exposure mode dial to the... hotshoe on top of flash unit you are the cordless type. Also note that the viewfinder LED flash ready indication is not provided with the MV.
... the AF 200S, however, other operating instructions. As flash operating instructions vary depending upon the type of the camera in the same manner as the AF 200S. OTHER FLASH UNITS (CORDLESS TYPE) The MV may also be used with other flash units. These mount by turning the exposure mode dial to the... hotshoe on top of flash unit you are the cordless type. Also note that the viewfinder LED flash ready indication is not provided with the MV.
MV Manual
Page 24
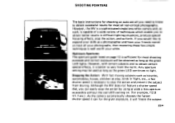
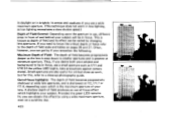
...The aperture guide listed on page 13 is sufficient for most shooting purposes and correct exposure will freeze the subject 22. As the camera automatically chooses the fastest shutter speed it can easily stop the action by using as wide a lens aperture as the green LED ...obtain better results in flight, etc., a fast shutter speed is better to stop the action, and so forth. However, the MV is a sophisticated single-lens-reflex camera and, as a photographer and have your friends marvel at play, birds in difficult lighting situations, produce special focusing effects, stop the...
...The aperture guide listed on page 13 is sufficient for most shooting purposes and correct exposure will freeze the subject 22. As the camera automatically chooses the fastest shutter speed it can easily stop the action by using as wide a lens aperture as the green LED ...obtain better results in flight, etc., a fast shutter speed is better to stop the action, and so forth. However, the MV is a sophisticated single-lens-reflex camera and, as a photographer and have your friends marvel at play, birds in difficult lighting situations, produce special focusing effects, stop the...
MV Manual
Page 25
... and behind your ,subject and background to be in focus, use a small aperture such as f/11 and f/16 the yellow LED Lights, take precautions against camera shake). in daylight or in brightly lit arenas and stadiums if you use a wide maximum aperture. (This technique does not work , but for this effect...
... and behind your ,subject and background to be in focus, use a small aperture such as f/11 and f/16 the yellow LED Lights, take precautions against camera shake). in daylight or in brightly lit arenas and stadiums if you use a wide maximum aperture. (This technique does not work , but for this effect...
MV Manual
Page 26
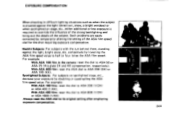
...) or when spotlighted on spotlighted stage, etc., decrease your exposure by doubling or quadrupling the ASA film speed value. EXPOSURE COMPENSATION When shooting in the camera: reset the dial to ASA 50 or ASA 25 (this gives 2X and 4X compensation, respectively). Spotlighted Subjects: For subjects on stage, etc., either additional...
...) or when spotlighted on spotlighted stage, etc., decrease your exposure by doubling or quadrupling the ASA film speed value. EXPOSURE COMPENSATION When shooting in the camera: reset the dial to ASA 50 or ASA 25 (this gives 2X and 4X compensation, respectively). Spotlighted Subjects: For subjects on stage, etc., either additional...
MV Manual
Page 27
... compensation: First dot on the indicator's plus side. BE SURE TO RESET THE ASA FILM SPEED DIAL TO AGREE WITH THE FILM LOADED IN THE CAMERA WHEN COMPENSATION IS NO LONGER REQUIRED. • 25 )09 - 0 N. 0 • X so For 2X compensation: To the first dot on the minus side. Exposure-Compensation-Indicator... ASA number of the film loaded in place and take the picture. After setting the compensation, push the film rewind crank shaft back in the camera (Illust.0).
... compensation: First dot on the indicator's plus side. BE SURE TO RESET THE ASA FILM SPEED DIAL TO AGREE WITH THE FILM LOADED IN THE CAMERA WHEN COMPENSATION IS NO LONGER REQUIRED. • 25 )09 - 0 N. 0 • X so For 2X compensation: To the first dot on the minus side. Exposure-Compensation-Indicator... ASA number of the film loaded in place and take the picture. After setting the compensation, push the film rewind crank shaft back in the camera (Illust.0).

MV Manual
Page 31
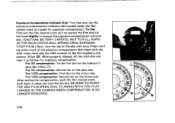
First, bring your subject-to-camera distance to use the infra-red mark indicated with infra-red color film. 22 16 11 21 / • CO1 5 A Ji l l 8 44 2 82 8 /)22 • •...-red mark. • NOTE: An infra-red focusing adjustment is in focus at infinity, turn the focusing ring and move the infinity (00 mark to -camera distance from the distance scale on the depth-of-field scale. For instance, if your subject is not required when working with an orange line...
First, bring your subject-to-camera distance to use the infra-red mark indicated with infra-red color film. 22 16 11 21 / • CO1 5 A Ji l l 8 44 2 82 8 /)22 • •...-red mark. • NOTE: An infra-red focusing adjustment is in focus at infinity, turn the focusing ring and move the infinity (00 mark to -camera distance from the distance scale on the depth-of-field scale. For instance, if your subject is not required when working with an orange line...


