
MV Manual
Page 3
... 6 Inserting batteries 7 Basic operating instructions 8 Film loading and winding 10 Setting ASA film speed 11 Aperture setting 13 Shooting on AUTO 14 The "100X" and "B" settings 16 Focusing and composing 17 Holding the camera 18 Unloading film 19 Auto flash photography (AF 200S) 20 Other flash units 21 Shooting pointers 22 • Optimum apertures 22 • Stopping the action 22 • Depth of field control 23 • Maximum depth of field 23 • Exposure...
... 6 Inserting batteries 7 Basic operating instructions 8 Film loading and winding 10 Setting ASA film speed 11 Aperture setting 13 Shooting on AUTO 14 The "100X" and "B" settings 16 Focusing and composing 17 Holding the camera 18 Unloading film 19 Auto flash photography (AF 200S) 20 Other flash units 21 Shooting pointers 22 • Optimum apertures 22 • Stopping the action 22 • Depth of field control 23 • Maximum depth of field 23 • Exposure...
MV Manual
Page 4
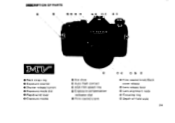
DESCRIPTION OF PARTS 00 0 (3 00 OC 2 0 Neck strap ring O Exposure counter 0 Shutter release button 0 Exposure mode dial 0 Rapid-wind lever 0 Exposure modes O Hot shoe 0 Auto flash contact O ASA film speed ring Exposure-compensationindicator dial 0 Film rewind crank 0 Film rewind knob/Back cover release CD Lens release lever O Lens alignment node 0 Focusing ring O Depth-of-field scale 2•
DESCRIPTION OF PARTS 00 0 (3 00 OC 2 0 Neck strap ring O Exposure counter 0 Shutter release button 0 Exposure mode dial 0 Rapid-wind lever 0 Exposure modes O Hot shoe 0 Auto flash contact O ASA film speed ring Exposure-compensationindicator dial 0 Film rewind crank 0 Film rewind knob/Back cover release CD Lens release lever O Lens alignment node 0 Focusing ring O Depth-of-field scale 2•
MV Manual
Page 6
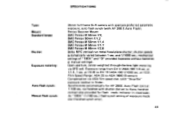
... settings of exposure mode dial (hotshoe synch only). 4• at manual settings). hotshoe contact also provided for AF 200S Auto Flash Unit at f/22). shutter speeds automatically varied between 1 sec. at f/2.8) to Auto; LED "Stop/Go" exposure readout in viewfinder. Film Speed Range: ASA 25 to ASA 1600 (Exposure Compensation via SPD cell. and 1/1000 sec.; SPECIFICATIONS Type: Mount: Standard lenses: Shutter: Exposure metering: Auto flash synch: Manual flash synch: 35mm full-frame SLR camera with aperture-preferred automatic exposure, auto flash...
... settings of exposure mode dial (hotshoe synch only). 4• at manual settings). hotshoe contact also provided for AF 200S Auto Flash Unit at f/22). shutter speeds automatically varied between 1 sec. at f/2.8) to Auto; LED "Stop/Go" exposure readout in viewfinder. Film Speed Range: ASA 25 to ASA 1600 (Exposure Compensation via SPD cell. and 1/1000 sec.; SPECIFICATIONS Type: Mount: Standard lenses: Shutter: Exposure metering: Auto flash synch: Manual flash synch: 35mm full-frame SLR camera with aperture-preferred automatic exposure, auto flash...

MV Manual
Page 7
.... shows 92% of the picture area, 0.85X magnification with 30°rest setting. Three LED Stop/Go indicator system. Green: Adequate exposure for handheld shooting (1/1000 - 1/30 sec.) Yellow: Slow Exposure Warning (below 1/30 sec., inadequate for speed film rewind. Standard camera back with split-image/ microprism focusing screen; Automatic reset, additive type. Viewfinder Viewfinder indications: Mirror and diaphragm: Film wind and rewind: Film loading: Exposure counter: Battery: Back cover: Body size: Body weight: Aluminum-coated pentaprism finder...
.... shows 92% of the picture area, 0.85X magnification with 30°rest setting. Three LED Stop/Go indicator system. Green: Adequate exposure for handheld shooting (1/1000 - 1/30 sec.) Yellow: Slow Exposure Warning (below 1/30 sec., inadequate for speed film rewind. Standard camera back with split-image/ microprism focusing screen; Automatic reset, additive type. Viewfinder Viewfinder indications: Mirror and diaphragm: Film wind and rewind: Film loading: Exposure counter: Battery: Back cover: Body size: Body weight: Aluminum-coated pentaprism finder...
MV Manual
Page 8
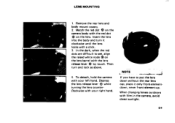
...-element-up. Insert the lens into the body and turn and lock as above. 4. When changing lenses outdoors with your left hand. NOTE If you have to see, align the raised white node 0 on the lens. To detach, hold the camera with a click. 3. Depress e the lens release lever while turning the lens counterClockwise with film in the camera, avoid direct sunlight. 6• Remove the rear lens and o body mount covers. 2.
...-element-up. Insert the lens into the body and turn and lock as above. 4. When changing lenses outdoors with your left hand. NOTE If you have to see, align the raised white node 0 on the lens. To detach, hold the camera with a click. 3. Depress e the lens release lever while turning the lens counterClockwise with film in the camera, avoid direct sunlight. 6• Remove the rear lens and o body mount covers. 2.
MV Manual
Page 9
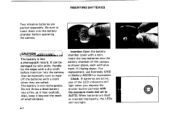
... insertion into the battery chamber of small children. The battery is like a phonograph record. Insertion Open the battery chamber cover with the exposure mode dial set to wipe off the batteries with a dry cloth before operating the camera. • The battery is not rechargeable. Insert the two batteries into the camera. When batteries are active, . Check If batteries are dead or inserted improperly, the LEDs will light when you depress the shutter button...
... insertion into the battery chamber of small children. The battery is like a phonograph record. Insertion Open the battery chamber cover with the exposure mode dial set to wipe off the batteries with a dry cloth before operating the camera. • The battery is not rechargeable. Insert the two batteries into the camera. When batteries are active, . Check If batteries are dead or inserted improperly, the LEDs will light when you depress the shutter button...
MV Manual
Page 10
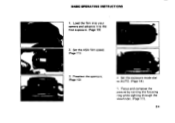
Load the film into your camera and advance it to AUTO. (Page 14). • 5. Set the ASA film speed. (Page 11) 3. BASIC OPERATING INSTRUCTIONS 1. Focus and compose the picture by turning the focusing ring while sighting through the viewfinder. (Page 17). 8• Preselect the aperture. (Page 13) 4 Set the exposure mode dial to the first exposure. (Page 10) 2.
Load the film into your camera and advance it to AUTO. (Page 14). • 5. Set the ASA film speed. (Page 11) 3. BASIC OPERATING INSTRUCTIONS 1. Focus and compose the picture by turning the focusing ring while sighting through the viewfinder. (Page 17). 8• Preselect the aperture. (Page 13) 4 Set the exposure mode dial to the first exposure. (Page 10) 2.
MV Manual
Page 11
... the shutter button completely on AUTO, the shutter speed will be selected automatically in relation to lighting conditions and the aperture in the left side of the three LED indicators will light in use. •9 Red use a smaller aperture Yellow , O use a wider aperture .,if p0seible;:er 6 use a tripod etc., or O use a wider lens aperture (f/4 to f/11, f/16, etc. If the red LED lights: Set the aperture ring to a smaller aperture by turning...
... the shutter button completely on AUTO, the shutter speed will be selected automatically in relation to lighting conditions and the aperture in the left side of the three LED indicators will light in use. •9 Red use a smaller aperture Yellow , O use a wider aperture .,if p0seible;:er 6 use a tripod etc., or O use a wider lens aperture (f/4 to f/11, f/16, etc. If the red LED lights: Set the aperture ring to a smaller aperture by turning...
MV Manual
Page 12
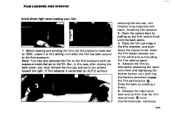
... film cartridge in this setting until after closing the back cover, you must remove the lens cap and point the camera toward the light. Before loading and winding the film, set to AUTO. If film advance is performed on AUTO without J removing the lens cap, inordinately long exposures will result, hindering film advance. 2. ARINI ti 1. Leave it firmly. 5. Note: You may also advance the film to the first exposure with the exposure mode dial set the exposure mode...
... film cartridge in this setting until after closing the back cover, you must remove the lens cap and point the camera toward the light. Before loading and winding the film, set to AUTO. If film advance is performed on AUTO without J removing the lens cap, inordinately long exposures will result, hindering film advance. 2. ARINI ti 1. Leave it firmly. 5. Note: You may also advance the film to the first exposure with the exposure mode dial set the exposure mode...
MV Manual
Page 13
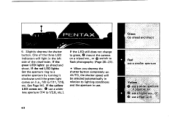
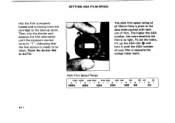
... sensitive the film is to AUTO. Then, trip the shutter and advance the film alternately until the ASA number of film. ASA Film Speed Range 1250 1000 840 500 320 250 160 125 80 50 40 25 *I 1600 800 400 200 100 64 32 • 11 P I I S O S I I • I t il l ! SETTING ASA FILM SPEED that the film is properly loaded and is moving from the cartridge to...
... sensitive the film is to AUTO. Then, trip the shutter and advance the film alternately until the ASA number of film. ASA Film Speed Range 1250 1000 840 500 320 250 160 125 80 50 40 25 *I 1600 800 400 200 100 64 32 • 11 P I I S O S I I • I t il l ! SETTING ASA FILM SPEED that the film is properly loaded and is moving from the cartridge to...

MV Manual
Page 16
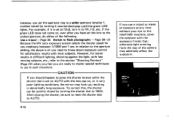
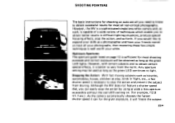
... "B" (Bulb) setting. The only occasions when you have to reset the aperture ring to your preset aperture. If the green LED lights, go ahead and shoot. Or••n Fled Yellow SHOOTING ON AUTO Your Pentax MV is designed for long exposures at "100X" for flash units other than the AF 200S, and for use on presseing the shutter button partway, the photo will have set to check the exposure.
... "B" (Bulb) setting. The only occasions when you have to reset the aperture ring to your preset aperture. If the green LED lights, go ahead and shoot. Or••n Fled Yellow SHOOTING ON AUTO Your Pentax MV is designed for long exposures at "100X" for flash units other than the AF 200S, and for use on presseing the shutter button partway, the photo will have set to check the exposure.
MV Manual
Page 17
... poor lighting conditions, the mirror may adversely affect the exposure. 1t lx in abnormally long exposure. After closing the shutter, be quickly closed by turning it counterclockwise until the green LED lights. Page 20-21 Because the MV auto exposure system selects the shutter speed for satisfactory results with most subjects. Use a tripod - instance, you set at any time without your eye to the vievvfinder eyepiece, cover...
... poor lighting conditions, the mirror may adversely affect the exposure. 1t lx in abnormally long exposure. After closing the shutter, be quickly closed by turning it counterclockwise until the green LED lights. Page 20-21 Because the MV auto exposure system selects the shutter speed for satisfactory results with most subjects. Use a tripod - instance, you set at any time without your eye to the vievvfinder eyepiece, cover...

MV Manual
Page 18
... for manual flash synchronization with a locking device. 16• The 100X setting is also convenient for film wind on hand. To use, first mount the camera on a tripod, then, attach a cable release to make "Time" exposures longer than the AF 200 S (see page 211. "100X" This manual shutter speed setting really need not be used when desiring to the camera's shutter release button. AUTO 100X• 100x THE "100X" AND "B" SETTINGS While the MV...
... for manual flash synchronization with a locking device. 16• The 100X setting is also convenient for film wind on hand. To use, first mount the camera on a tripod, then, attach a cable release to make "Time" exposures longer than the AF 200 S (see page 211. "100X" This manual shutter speed setting really need not be used when desiring to the camera's shutter release button. AUTO 100X• 100x THE "100X" AND "B" SETTINGS While the MV...
MV Manual
Page 22
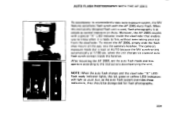
... MV features automatic flash synch with a special "X" LED indicator inside the hotshoe. After mounting the AF 200S, set the auto flash mode and lens aperture according to fire, without even taking your eye from the viewfinder. NOTE: When the auto flash charges and the viewfinder "X" LED flash ready indicator lights, the red, green or yellow LED indicators will light as usual, but, as normal exposure on Auto. The camera's exposure mode...
... MV features automatic flash synch with a special "X" LED indicator inside the hotshoe. After mounting the AF 200S, set the auto flash mode and lens aperture according to fire, without even taking your eye from the viewfinder. NOTE: When the auto flash charges and the viewfinder "X" LED flash ready indicator lights, the red, green or yellow LED indicators will light as usual, but, as normal exposure on Auto. The camera's exposure mode...
MV Manual
Page 23
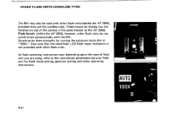
... X 1i • AUTO •21 Also note that the viewfinder LED flash ready indication is not provided with other flash units besides the AF 200S, provided they are using, refer to "100X." Flash Synch: Unlike the AF 200S, however, other operating instructions. These mount by turning the exposure mode dial to the instructions accompanying your flash unit for flash mode setting, aperture setting, and other flash units do not...
... X 1i • AUTO •21 Also note that the viewfinder LED flash ready indication is not provided with other flash units besides the AF 200S, provided they are using, refer to "100X." Flash Synch: Unlike the AF 200S, however, other operating instructions. These mount by turning the exposure mode dial to the instructions accompanying your flash unit for flash mode setting, aperture setting, and other flash units do not...
MV Manual
Page 24
... your while. SHOOTING POINTERS The basic instructions for shooting on auto are all you need to know to obtain successful results for most all your photographs, then mastering these few simple techniques is well worth your friends marvel at play, birds in difficult lighting situations, produce special focusing effects, stop the action, and so forth. Optimum Apertures The aperture guide listed on . (for...
... your while. SHOOTING POINTERS The basic instructions for shooting on auto are all you need to know to obtain successful results for most all your photographs, then mastering these few simple techniques is well worth your friends marvel at play, birds in difficult lighting situations, produce special focusing effects, stop the action, and so forth. Optimum Apertures The aperture guide listed on . (for...
MV Manual
Page 27
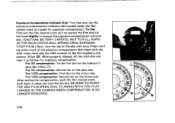
... the ASA index mark and the ASA number of the film loaded in place and take the picture. Exposure-Compensation-Indicator Dial: You may also use the exposure-compensation-indicator dial located under the film rewind crank as follows for exposure compensation. BE SURE TO RESET THE ASA FILM SPEED DIAL TO AGREE WITH THE FILM LOADED IN THE CAMERA WHEN COMPENSATION IS NO LONGER REQUIRED. •...
... the ASA index mark and the ASA number of the film loaded in place and take the picture. Exposure-Compensation-Indicator Dial: You may also use the exposure-compensation-indicator dial located under the film rewind crank as follows for exposure compensation. BE SURE TO RESET THE ASA FILM SPEED DIAL TO AGREE WITH THE FILM LOADED IN THE CAMERA WHEN COMPENSATION IS NO LONGER REQUIRED. •...

MV Manual
Page 31
... in focus at infinity, turn the focusing ring and move the infinity (00 mark to the infra-red mark. • NOTE: An infra-red focusing adjustment is not required when working with an orange line on the lens. INFRA-RED PHOTOGRAPHY If you intend to take infra-red photographs, remember to use the ...color film. 22 16 11 21 / • CO1 5 A Ji l l 8 44 2 82 8 /)22 • •29 c°1523 5'\ It IsI II4+4" 22 16 11' 2 82 Then determine the subject-to the infra-red mark by turning the focusing ring accordingly. Then match your subject-to-camera distance to -camera distance...
... in focus at infinity, turn the focusing ring and move the infinity (00 mark to the infra-red mark. • NOTE: An infra-red focusing adjustment is not required when working with an orange line on the lens. INFRA-RED PHOTOGRAPHY If you intend to take infra-red photographs, remember to use the ...color film. 22 16 11 21 / • CO1 5 A Ji l l 8 44 2 82 8 /)22 • •29 c°1523 5'\ It IsI II4+4" 22 16 11' 2 82 Then determine the subject-to the infra-red mark by turning the focusing ring accordingly. Then match your subject-to-camera distance to -camera distance...
MV Manual
Page 34
Use of the Auto-Extension Tube Set K permits open -aperture metering. 0 VRE AND STOP-DOWN METERING LENSES Open-aperture SMC Pentax lenses have a diaphragm coupler, so they must be used with the camera body to permit open -aperture metering. standard Extension Tube Set K, Helicoid Extension Tube K, Auto-Bellows M and Bellows Unit requires stop -down metering system must be used between the camera body and an SMC Pentax lens, the stop-down metering system. Whenever any one of other K Series accessories - Use of these...
Use of the Auto-Extension Tube Set K permits open -aperture metering. 0 VRE AND STOP-DOWN METERING LENSES Open-aperture SMC Pentax lenses have a diaphragm coupler, so they must be used with the camera body to permit open -aperture metering. standard Extension Tube Set K, Helicoid Extension Tube K, Auto-Bellows M and Bellows Unit requires stop -down metering system must be used between the camera body and an SMC Pentax lens, the stop-down metering system. Whenever any one of other K Series accessories - Use of these...

MV Manual
Page 38
...repair or alterations except those made and parts replaced free of charge, and the equipment will be replaced without cost to you within that the liability of the manufacturer or its representatives under all guarantees or warranties, whether expressed or implied, is strictly limited to the replacement of parts... not covered by the owner. WARRANTY POLICY All Asahi Pentax cameras purchased through authorized bona fide photographic distribution channels are guaranteed against defects of material or workmanship for damages from delay or loss of use or from other than Pentax lenses are ...
...repair or alterations except those made and parts replaced free of charge, and the equipment will be replaced without cost to you within that the liability of the manufacturer or its representatives under all guarantees or warranties, whether expressed or implied, is strictly limited to the replacement of parts... not covered by the owner. WARRANTY POLICY All Asahi Pentax cameras purchased through authorized bona fide photographic distribution channels are guaranteed against defects of material or workmanship for damages from delay or loss of use or from other than Pentax lenses are ...


