

MV Manual
Page 2
or actual damage to precise Asahi Pentax specifications. IMPORTANT SMC Pentax lenses and Pentax accessories are not produced to these precise specifications and, therefore, may cause difficulties with an Asahi Pentax camera. Asahi Pentax cannot assume any responsibility or liability for difficulties resulting from other brand of any other manufacturers are engineered and produced meticulously to - a Pentax camera. Lenses and accessories from the use of lenses or accessories with -
or actual damage to precise Asahi Pentax specifications. IMPORTANT SMC Pentax lenses and Pentax accessories are not produced to these precise specifications and, therefore, may cause difficulties with an Asahi Pentax camera. Asahi Pentax cannot assume any responsibility or liability for difficulties resulting from other brand of any other manufacturers are engineered and produced meticulously to - a Pentax camera. Lenses and accessories from the use of lenses or accessories with -
MV Manual
Page 3
... winding 10 Setting ASA film speed 11 Aperture setting 13 Shooting on AUTO 14 The "100X" and "B" settings 16 Focusing and composing 17 Holding the camera 18 Unloading film 19 Auto flash photography (AF 200S) 20 Other flash units 21 Shooting pointers 22 • Optimum apertures 22 • Stopping the action... 28 Infrared photography 29 Using screw-mount Takumar lenses 30 Open aperture and stop-down metering lenses 32 Resistance to temperature extremes and changes 33 Camera maintenance 34 Warranty policy 36 • 1
... winding 10 Setting ASA film speed 11 Aperture setting 13 Shooting on AUTO 14 The "100X" and "B" settings 16 Focusing and composing 17 Holding the camera 18 Unloading film 19 Auto flash photography (AF 200S) 20 Other flash units 21 Shooting pointers 22 • Optimum apertures 22 • Stopping the action... 28 Infrared photography 29 Using screw-mount Takumar lenses 30 Open aperture and stop-down metering lenses 32 Resistance to temperature extremes and changes 33 Camera maintenance 34 Warranty policy 36 • 1
MV Manual
Page 6
... sec. SPECIFICATIONS Type: Mount: Standard lenses: Shutter: Exposure metering: Auto flash synch: Manual flash synch: 35mm full-frame SLR camera with aperture-preferred automatic exposure, auto flash synch (with shutter dial set to Auto; mechanical settings of exposure mode dial (hotshoe ...finder. hotshoe contact also provided for AF 200S Auto Flash Unit at manual settings). Pentax Bayonet Mount SMC Pentax-M 50mm f/2, SMC Pentax 50mm f/1.2 SMC Pentax-M 50mm f/1.4 SMC Pentax-M 50mm f/1.7 SMC Pentax-M 40mm f/2.8 Seiko MFC vertical-run metal focal-plane shutter; Film Speed Range:...
... sec. SPECIFICATIONS Type: Mount: Standard lenses: Shutter: Exposure metering: Auto flash synch: Manual flash synch: 35mm full-frame SLR camera with aperture-preferred automatic exposure, auto flash synch (with shutter dial set to Auto; mechanical settings of exposure mode dial (hotshoe ...finder. hotshoe contact also provided for AF 200S Auto Flash Unit at manual settings). Pentax Bayonet Mount SMC Pentax-M 50mm f/2, SMC Pentax 50mm f/1.2 SMC Pentax-M 50mm f/1.4 SMC Pentax-M 50mm f/1.7 SMC Pentax-M 40mm f/2.8 Seiko MFC vertical-run metal focal-plane shutter; Film Speed Range:...

MV Manual
Page 7
.... 132mm x 84mm x 49.5mm 420 grams (14.8 ozs.) •5 Two 1.5V Alkaline (LR44) or Silver-oxide (G13) batteries; Instant-return mirror and automatic diaphragm. Standard camera back with split-image/ microprism focusing screen; Red: overexposure; Automatic reset, additive type. Rapid rewind crank for speed film rewind. shows 92% of the picture...
.... 132mm x 84mm x 49.5mm 420 grams (14.8 ozs.) •5 Two 1.5V Alkaline (LR44) or Silver-oxide (G13) batteries; Instant-return mirror and automatic diaphragm. Standard camera back with split-image/ microprism focusing screen; Red: overexposure; Automatic reset, additive type. Rapid rewind crank for speed film rewind. shows 92% of the picture...
MV Manual
Page 8
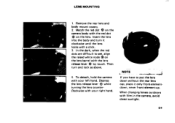
... red dots are difficult to put the lens down without the rear lens cap, place it clockwise until the lens locks with film in the camera, avoid direct sunlight. 6• Then turn it only front-elementdown, never front-element-up. Remove the rear lens and o body mount covers. 2. ...NOTE If you have to see, align the raised white node 0 on the lens barrel with the red dot C) on the camera body with the lens e release lever by touch. H 0 0 LENS MOUNTING 1. When changing lenses outdoors with a click. 3. Insert the lens into the body ...
... red dots are difficult to put the lens down without the rear lens cap, place it clockwise until the lens locks with film in the camera, avoid direct sunlight. 6• Then turn it only front-elementdown, never front-element-up. Remove the rear lens and o body mount covers. 2. ...NOTE If you have to see, align the raised white node 0 on the lens barrel with the red dot C) on the camera body with the lens e release lever by touch. H 0 0 LENS MOUNTING 1. When changing lenses outdoors with a click. 3. Insert the lens into the body ...
MV Manual
Page 9
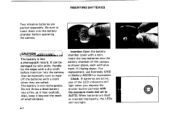
... AUTO. For replacement, use Eveready S76E or Mallory MS76H or equivalent. Do not throw a dead battery into the battery chamber of the camera as it beyond the reach of the LED indicators will not light. •7 Check If batteries are packed separately. Insert the two batteries.... When batteries are salted. Insertion Open the battery chamber cover with a dry cloth before insertion into the battery chamber before operating the camera. • The battery is not rechargeable. Also, keep it may explode.. one of small children. Also be damaged by the edges with a...
... AUTO. For replacement, use Eveready S76E or Mallory MS76H or equivalent. Do not throw a dead battery into the battery chamber of the camera as it beyond the reach of the LED indicators will not light. •7 Check If batteries are packed separately. Insert the two batteries.... When batteries are salted. Insertion Open the battery chamber cover with a dry cloth before insertion into the battery chamber before operating the camera. • The battery is not rechargeable. Also, keep it may explode.. one of small children. Also be damaged by the edges with a...
MV Manual
Page 10
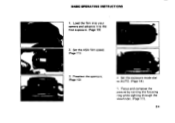
Set the ASA film speed. (Page 11) 3. Focus and compose the picture by turning the focusing ring while sighting through the viewfinder. (Page 17). 8• Preselect the aperture. (Page 13) 4 Set the exposure mode dial to the first exposure. (Page 10) 2. BASIC OPERATING INSTRUCTIONS 1. Load the film into your camera and advance it to AUTO. (Page 14). • 5.
Set the ASA film speed. (Page 11) 3. Focus and compose the picture by turning the focusing ring while sighting through the viewfinder. (Page 17). 8• Preselect the aperture. (Page 13) 4 Set the exposure mode dial to the first exposure. (Page 10) 2. BASIC OPERATING INSTRUCTIONS 1. Load the film into your camera and advance it to AUTO. (Page 14). • 5.
MV Manual
Page 11
Slightly depress the shutter button. If the LED still does not change to green, 0 mount the camera on a tripod etc., or Q switch to flash photography (Page 20-21). • When you depress the shutter button completely on AUTO, the shutter speed will ...
Slightly depress the shutter button. If the LED still does not change to green, 0 mount the camera on a tripod etc., or Q switch to flash photography (Page 20-21). • When you depress the shutter button completely on AUTO, the shutter speed will ...
MV Manual
Page 12
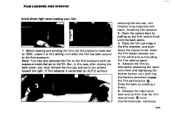
... leader between any of the white pins surrounding the film take-up the film rewind knob until the back opens. 3. ARINI ti 1. Open the camera back by pulling up spool. 4. Before loading and winding the film, set to the first exposure. But, in the film chamber, and push... alternately advancing the rapidwind lever and depressing the shutter button until after closing the back cover, you must remove the lens cap and point the camera toward the light. If film advance is performed on AUTO without J removing the lens cap, inordinately long exposures will result, hindering film advance....
... leader between any of the white pins surrounding the film take-up the film rewind knob until the back opens. 3. ARINI ti 1. Open the camera back by pulling up spool. 4. Before loading and winding the film, set to the first exposure. But, in the film chamber, and push... alternately advancing the rapidwind lever and depressing the shutter button until after closing the back cover, you must remove the lens cap and point the camera toward the light. If film advance is performed on AUTO without J removing the lens cap, inordinately long exposures will result, hindering film advance....

MV Manual
Page 16
...set the ASA film speed, preset the aperture and focused, you would use on . Or••n Fled Yellow SHOOTING ON AUTO Your Pentax MV is designed for use the other settings are ready to check the exposure. Simply, press the shutter button slightly until the green LED comes ...on presseing the shutter button partway, the photo will be overexposed. This, does not necessarily indicate that the camera has selected a shutter speed below 1/30 sec. Exposure Check: After you have to reset the aperture ring to a smaller aperture by resetting ...
...set the ASA film speed, preset the aperture and focused, you would use on . Or••n Fled Yellow SHOOTING ON AUTO Your Pentax MV is designed for use the other settings are ready to check the exposure. Simply, press the shutter button slightly until the green LED comes ...on presseing the shutter button partway, the photo will be overexposed. This, does not necessarily indicate that the camera has selected a shutter speed below 1/30 sec. Exposure Check: After you have to reset the aperture ring to a smaller aperture by resetting ...
MV Manual
Page 17
... you steplessly between 1/1000 and 1 sec. otherwise light entering from the rear of the following. Page 35 Switch to f/4, f/2, etc. Page 20-21 Because the MV auto exposure system selects the shutter speed for satisfactory results with the lens cap on , even after you have set the lens to the widest... aperture, do either of the camera may lock up, resulting in such situations. To correct this, the shutter can be sure to reset the shutter dial to AUTO. •15 If...
... you steplessly between 1/1000 and 1 sec. otherwise light entering from the rear of the following. Page 35 Switch to f/4, f/2, etc. Page 20-21 Because the MV auto exposure system selects the shutter speed for satisfactory results with the lens cap on , even after you have set the lens to the widest... aperture, do either of the camera may lock up, resulting in such situations. To correct this, the shutter can be sure to reset the shutter dial to AUTO. •15 If...

MV Manual
Page 18
...the cable release is depressed and remain open as long as several minutes or hours, use the Pentax AF 200S Auto Flash and keep spare batteries on a tripod, then, attach a cable release to the camera's shutter release button. The 100X setting is maintained. For ultra long exposures such as pressure ...a locking device. 16• AUTO 100X• 100x THE "100X" AND "B" SETTINGS While the MV is designed almost totally for use on AUTO, two other than 1 second. To use, first mount the camera on hand. "100X" This manual shutter speed setting really need not be used when desiring to the...
...the cable release is depressed and remain open as long as several minutes or hours, use the Pentax AF 200S Auto Flash and keep spare batteries on a tripod, then, attach a cable release to the camera's shutter release button. The 100X setting is maintained. For ultra long exposures such as pressure ...a locking device. 16• AUTO 100X• 100x THE "100X" AND "B" SETTINGS While the MV is designed almost totally for use on AUTO, two other than 1 second. To use, first mount the camera on hand. "100X" This manual shutter speed setting really need not be used when desiring to the...
MV Manual
Page 20
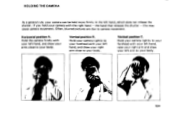
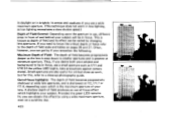
...draw your right arm close to your camera with the right hand - Hold the camera firmly with your left hand, raise your right arm and draw your left hand, which does not release the shutter. Hold your camera tightly to camera movement. Horizontal position A. Vertical position ...B. If you hold your body. / 18• HOLDING THE CAMERA As a general rule, your body. Vertical position C. Often, blurred pictures are ...
...draw your right arm close to your camera with the right hand - Hold the camera firmly with your left hand, raise your right arm and draw your left hand, which does not release the shutter. Hold your camera tightly to camera movement. Horizontal position A. Vertical position ...B. If you hold your body. / 18• HOLDING THE CAMERA As a general rule, your body. Vertical position C. Often, blurred pictures are ...
MV Manual
Page 22
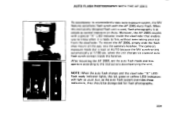
...AF 200S, simply slide the flashshoe mount all the way into the camera's hotshoe. The camera's exposure mode dial is ready to the instructions accompanying the unit.... contact inside the viewfinder that enables you to know when it is kept at AUTO because the MV synchronizes automatically at 1/100 sec. When this exclusively designed flash unit is used, flash photography is...PHOTOGRAPHY WITH THE AF 200 S 0 X To accompany its unprecedently easy auto exposure system, the MV features automatic flash synch with a special "X" LED indicator inside the hotshoe. Moreover, the AF 200S couples with the...
...AF 200S, simply slide the flashshoe mount all the way into the camera's hotshoe. The camera's exposure mode dial is ready to the instructions accompanying the unit.... contact inside the viewfinder that enables you to know when it is kept at AUTO because the MV synchronizes automatically at 1/100 sec. When this exclusively designed flash unit is used, flash photography is...PHOTOGRAPHY WITH THE AF 200 S 0 X To accompany its unprecedently easy auto exposure system, the MV features automatic flash synch with a special "X" LED indicator inside the hotshoe. Moreover, the AF 200S couples with the...
MV Manual
Page 23
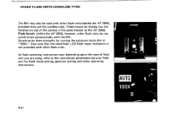
... also be used with other flash units. Also note that the viewfinder LED flash ready indication is not provided with the MV. These mount by turning the exposure mode dial to the instructions accompanying your flash unit for flash mode setting, aperture setting, and other flash units ... are the cordless type. Flash Synch: Unlike the AF 200S, however, other operating instructions. As flash operating instructions vary depending upon the type of the camera in the same manner as the AF 200S.
... also be used with other flash units. Also note that the viewfinder LED flash ready indication is not provided with the MV. These mount by turning the exposure mode dial to the instructions accompanying your flash unit for flash mode setting, aperture setting, and other flash units ... are the cordless type. Flash Synch: Unlike the AF 200S, however, other operating instructions. As flash operating instructions vary depending upon the type of the camera in the same manner as the AF 200S.
MV Manual
Page 24
... a sophisticated single-lens-reflex camera and, as a photographer and have your while. Although the MV does not feature a shutter speed dial, you can for most shooting purposes and correct exposure will freeze the subject 22. However, with certain subjects and ... simple techniques is better to vary from bluring. Any aperture setting may be obtained as long as the green LED continues to light. As the camera automatically chooses the fastest shutter speed it can easily stop the action, and so forth. SHOOTING POINTERS The basic instructions for shooting on auto are...
... a sophisticated single-lens-reflex camera and, as a photographer and have your while. Although the MV does not feature a shutter speed dial, you can for most shooting purposes and correct exposure will freeze the subject 22. However, with certain subjects and ... simple techniques is better to vary from bluring. Any aperture setting may be obtained as long as the green LED continues to light. As the camera automatically chooses the fastest shutter speed it can easily stop the action, and so forth. SHOOTING POINTERS The basic instructions for shooting on auto are...
MV Manual
Page 25
.... (This technique does not work , but for critical close -up work in low-lighting, as f/11 and f/16 the yellow LED Lights, take precautions against camera shake). A shallow depth of field produces an out-of fields refer to a close -up photography guide.
.... (This technique does not work , but for critical close -up work in low-lighting, as f/11 and f/16 the yellow LED Lights, take precautions against camera shake). A shallow depth of field produces an out-of fields refer to a close -up photography guide.
MV Manual
Page 26
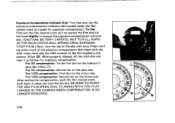
.... t "fr 24* With ASA 400 film: reset the ASA dial to half or four times the ASA film speed. EXPOSURE COMPENSATION When shooting in the camera: reset the dial to ASA 50 or ASA 25 (this gives 2X and 4X compensation, respectively). Backlit Subjects: For subjects with the sun behind them...
.... t "fr 24* With ASA 400 film: reset the ASA dial to half or four times the ASA film speed. EXPOSURE COMPENSATION When shooting in the camera: reset the dial to ASA 50 or ASA 25 (this gives 2X and 4X compensation, respectively). Backlit Subjects: For subjects with the sun behind them...
MV Manual
Page 27
... Use: Fold out the film rewind crank as follows for exposure compensation. After setting the compensation, push the film rewind crank shaft back in the camera (Illust.0). For 1/4X compensation: Second dot on the plus side (Illust.O). When properly aligned, lift the ASA dial and reset it as if to rewind... compensation: First dot on the indicator's plus side. BE SURE TO RESET THE ASA FILM SPEED DIAL TO AGREE WITH THE FILM LOADED IN THE CAMERA WHEN COMPENSATION IS NO LONGER REQUIRED. • 25 )09 - 0 N. 0 • X so
... Use: Fold out the film rewind crank as follows for exposure compensation. After setting the compensation, push the film rewind crank shaft back in the camera (Illust.0). For 1/4X compensation: Second dot on the plus side (Illust.O). When properly aligned, lift the ASA dial and reset it as if to rewind... compensation: First dot on the indicator's plus side. BE SURE TO RESET THE ASA FILM SPEED DIAL TO AGREE WITH THE FILM LOADED IN THE CAMERA WHEN COMPENSATION IS NO LONGER REQUIRED. • 25 )09 - 0 N. 0 • X so

MV Manual
Page 31
Then match your subject-to-camera distance to the infra-red mark. • NOTE: An infra-red focusing adjustment is in focus at infinity, turn the focusing ring and move the ... • •29 c°1523 5'\ It IsI II4+4" 22 16 11' 2 82 INFRA-RED PHOTOGRAPHY If you intend to take infra-red photographs, remember to -camera distance from the distance scale on the depth-of-field scale. First, bring your subject is not required when working with an orange line on...
Then match your subject-to-camera distance to the infra-red mark. • NOTE: An infra-red focusing adjustment is in focus at infinity, turn the focusing ring and move the ... • •29 c°1523 5'\ It IsI II4+4" 22 16 11' 2 82 INFRA-RED PHOTOGRAPHY If you intend to take infra-red photographs, remember to -camera distance from the distance scale on the depth-of-field scale. First, bring your subject is not required when working with an orange line on...


