
Operation Manual
Page 1
SLR Digital Camera Operating Manual For optimum camera performance, please read the Operating Manual before using the camera.
SLR Digital Camera Operating Manual For optimum camera performance, please read the Operating Manual before using the camera.
Operation Manual
Page 2
... image. • There is a trademark of their intentions. Thank you for setting custom functions. See page 113 for buying the PENTAX w Digital Camera. Images taken with this has no effect on taking pictures even for personal enjoyment during demonstrations, industrial enterprise or as items for anything...be used without permission according to the rights as laid out in helping you can use the custom function settings to set the camera to understand all the features and functions. To use any other lens or accessory, use In general, lenses that are for display...
... image. • There is a trademark of their intentions. Thank you for setting custom functions. See page 113 for buying the PENTAX w Digital Camera. Images taken with this has no effect on taking pictures even for personal enjoyment during demonstrations, industrial enterprise or as items for anything...be used without permission according to the rights as laid out in helping you can use the custom function settings to set the camera to understand all the features and functions. To use any other lens or accessory, use In general, lenses that are for display...

Operation Manual
Page 3
...small children do not hang the strap over their necks. • Do not look directly at the sun through the camera, as viewing the sun may damage your nearest PENTAX service center. Continued use immediately, remove the batteries or the AC adapter, and contact your eyes, and / or ...parts of the camera (e.g.: shutter curtains, etc.) • Be sure to smoke. The battery could explode or catch fire. • Do not...
...small children do not hang the strap over their necks. • Do not look directly at the sun through the camera, as viewing the sun may damage your nearest PENTAX service center. Continued use immediately, remove the batteries or the AC adapter, and contact your eyes, and / or ...parts of the camera (e.g.: shutter curtains, etc.) • Be sure to smoke. The battery could explode or catch fire. • Do not...

Operation Manual
Page 4
... vehicle, as leakage, overheating, explosion, etc. Wipe dry any rain or water drops on the camera. • Use a blower or lens brush to high temperatures or high humidity. PENTAX is not responsible for consequential damages (costs incurred for replacement convenience when shooting outdoors or while traveling.... • If the built-in flash is used in the rain or where the camera could get very high. • ...
... vehicle, as leakage, overheating, explosion, etc. Wipe dry any rain or water drops on the camera. • Use a blower or lens brush to high temperatures or high humidity. PENTAX is not responsible for consequential damages (costs incurred for replacement convenience when shooting outdoors or while traveling.... • If the built-in flash is used in the rain or where the camera could get very high. • ...

Operation Manual
Page 5
... Batteries 22 Battery level indicator 23 Backup battery 23 Number of Captures and Playback Time (new batteries 24 Using the AC Adapter 25 Turning the Camera On and Off 26 Initial Settings 27 Setting the Display Language 27 Setting the Home Town 28 Setting the D.S.T. Mode 28 Setting the Video Output...
... Batteries 22 Battery level indicator 23 Backup battery 23 Number of Captures and Playback Time (new batteries 24 Using the AC Adapter 25 Turning the Camera On and Off 26 Initial Settings 27 Setting the Display Language 27 Setting the Home Town 28 Setting the D.S.T. Mode 28 Setting the Video Output...

Operation Manual
Page 6
4 Basic Operation 37 Basic Operation (Shooting 38 Holding the Camera 38 Taking Pictures 39 Basic Operation (Playback 41 Playing Back Images 41 Selecting Previous or Next Images 42 Shooting Functions 43 Selecting the Drive Mode ...
4 Basic Operation 37 Basic Operation (Shooting 38 Holding the Camera 38 Taking Pictures 39 Basic Operation (Playback 41 Playing Back Images 41 Selecting Previous or Next Images 42 Shooting Functions 43 Selecting the Drive Mode ...

Operation Manual
Page 7
... Settings (DPOF 106 Single Image Settings 106 Settings for All Images 108 Settings 111 Setting Menu List 112 How to Operate the Settings Menu 113 Camera Settings 114 Formatting a CF card 114 Setting the Custom Functions 115 Setting the Color Saturation 117 Setting the Image Sharpness 117 Setting the Contrast 118...
... Settings (DPOF 106 Single Image Settings 106 Settings for All Images 108 Settings 111 Setting Menu List 112 How to Operate the Settings Menu 113 Camera Settings 114 Formatting a CF card 114 Setting the Custom Functions 115 Setting the Color Saturation 117 Setting the Image Sharpness 117 Setting the Contrast 118...
Operation Manual
Page 8
... WITH VARIOUS LENS COMBINATIONS 144 Optional Accessories 146 Battery grip D-BG1 146 AC adaptor D-AC10 146 Cable Switch 146 Flash Accessories 147 For Viewfinder 148 Camera Case 148 Others 148 Cleaning the CCD 149 Precautions Regarding Memory Cards 151 Error Messages 152 Troubleshooting 153 Main Specifications 154 Specification for Remote Control...
... WITH VARIOUS LENS COMBINATIONS 144 Optional Accessories 146 Battery grip D-BG1 146 AC adaptor D-AC10 146 Cable Switch 146 Flash Accessories 147 For Viewfinder 148 Camera Case 148 Others 148 Cleaning the CCD 149 Precautions Regarding Memory Cards 151 Error Messages 152 Troubleshooting 153 Main Specifications 154 Specification for Remote Control...

Operation Manual
Page 9
... pictures and play back images and how to delete. 6 Settings 7 Explains setting camera functions. 7 Connecting 8 Explains how to connect your first steps from purchasing the camera to taking pictures. The symbols used in this manual This operating manual contains the ...you want to get started right away. 4 Shooting Functions 5 Explains how to take when operating the camera. Shows precautions to take better pictures by using your camera 1 Explains camera characteristics, accessories and the names of this operating manual are explained below. 7 Contents of various parts...
... pictures and play back images and how to delete. 6 Settings 7 Explains setting camera functions. 7 Connecting 8 Explains how to connect your first steps from purchasing the camera to taking pictures. The symbols used in this manual This operating manual contains the ...you want to get started right away. 4 Shooting Functions 5 Explains how to take when operating the camera. Shows precautions to take better pictures by using your camera 1 Explains camera characteristics, accessories and the names of this operating manual are explained below. 7 Contents of various parts...
Operation Manual
Page 11
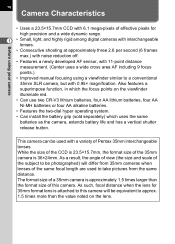
... the subject to be photographed) will be used to take pictures from 35mm cameras when lenses of the same focal length are used with a variety of Pentax 35mm interchangeable lenses. Before using your camera 10 Camera Characteristics • Uses a 23.5×15.7mm CCD with 6.1 mega-pixels...Improved manual focusing using a viewfinder similar to approx. 1.5 times more than the format size of this camera will differ from the same distance. This camera can be equivalent to a conventional 35mm SLR camera, but with 0.95× magnification. While the size of the CCD is 23.5×15.7mm, ...
... the subject to be photographed) will be used to take pictures from 35mm cameras when lenses of the same focal length are used with a variety of Pentax 35mm interchangeable lenses. Before using your camera 10 Camera Characteristics • Uses a 23.5×15.7mm CCD with 6.1 mega-pixels...Improved manual focusing using a viewfinder similar to approx. 1.5 times more than the format size of this camera will differ from the same distance. This camera can be equivalent to a conventional 35mm SLR camera, but with 0.95× magnification. While the size of the CCD is 23.5×15.7mm, ...
Operation Manual
Page 12
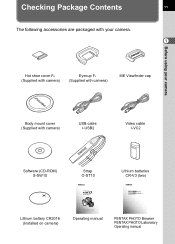
... mount cover (Supplied with camera) USB cable I-USB2 Video cable I-VC2 Software (CD-ROM) S-SW10 Strap O-ST10 SLR Digital Camera Operating Manual Lithium batteries CR-V3 (two) Operating manual Lithium battery CR2016 (Installed on camera) For optimum camera performance, please read the Operating Manual before using the camera. Operating manual PENTAX PHOTO Browser PENTAX PHOTO Laboratory Operating manual
... mount cover (Supplied with camera) USB cable I-USB2 Video cable I-VC2 Software (CD-ROM) S-SW10 Strap O-ST10 SLR Digital Camera Operating Manual Lithium batteries CR-V3 (two) Operating manual Lithium battery CR2016 (Installed on camera) For optimum camera performance, please read the Operating Manual before using the camera. Operating manual PENTAX PHOTO Browser PENTAX PHOTO Laboratory Operating manual

Operation Manual
Page 13
12 Names of Working Parts Before using your camera Camera 1 Main switch Shutter release button Flash mode button Drive mode button Green button Mode dial Self-timer lamp X-synch terminal Mirror Manual white balance button ...
12 Names of Working Parts Before using your camera Camera 1 Main switch Shutter release button Flash mode button Drive mode button Green button Mode dial Self-timer lamp X-synch terminal Mirror Manual white balance button ...

Operation Manual
Page 14
13 Before using your camera Built-in flash Hot shoe Diopter adjustment lever LCD panel Flash pop-up button Metering mode select lever Cable release socket Terminal cover Av dial 1 Nine-image display / Zoom display dial Card cover Card cover unlock lever Viewfinder LCD monitor Multiple exposure / Auto bracket button DPOF button PC / Video terminal DC input terminal
13 Before using your camera Built-in flash Hot shoe Diopter adjustment lever LCD panel Flash pop-up button Metering mode select lever Cable release socket Terminal cover Av dial 1 Nine-image display / Zoom display dial Card cover Card cover unlock lever Viewfinder LCD monitor Multiple exposure / Auto bracket button DPOF button PC / Video terminal DC input terminal

Operation Manual
Page 15
... on the AF360FGZ will light up when the AF360FGZ is used. The LCD panel will also light up for about 10 seconds. Before using your camera 14 LCD Panel Indications 1 23 4 1 5 10 6 11 12 13 7 14 8 15 1 Quality level (p.52) 2 Recorded Pixels (p.51) 3 Drive mode (p.44) 4 Flash mode (p.86) 5 Shutter speed...
... on the AF360FGZ will light up when the AF360FGZ is used. The LCD panel will also light up for about 10 seconds. Before using your camera 14 LCD Panel Indications 1 23 4 1 5 10 6 11 12 13 7 14 8 15 1 Quality level (p.52) 2 Recorded Pixels (p.51) 3 Drive mode (p.44) 4 Flash mode (p.86) 5 Shutter speed...

Operation Manual
Page 16
Information 5 16 AF.S 7 8 1 S 9 2 ISO 200 10 3 L sRGB 18mm 11 4 WB AWB 2003/10/01 12:00 12 1 Color space (p.128) 2 Sensitivity (p.54) 3 Quality level / Recorded pixels (p.51, 52) 4 White Balance (p.55, 142) 5 Custom Function (p.115) 6 Focus mode (p.70) 7 Focus points (p.74) 8 Saturation (p.117) 9 Sharpness (p.117) 10 Contrast (p.118) 11 Lens focal length 12 Date and Time Capture Mode Press the INFO button in capture mode to display the capture function 1 settings on the LCD monitor. 15 LCD Monitor Indications Before using your camera 1.
Information 5 16 AF.S 7 8 1 S 9 2 ISO 200 10 3 L sRGB 18mm 11 4 WB AWB 2003/10/01 12:00 12 1 Color space (p.128) 2 Sensitivity (p.54) 3 Quality level / Recorded pixels (p.51, 52) 4 White Balance (p.55, 142) 5 Custom Function (p.115) 6 Focus mode (p.70) 7 Focus points (p.74) 8 Saturation (p.117) 9 Sharpness (p.117) 10 Contrast (p.118) 11 Lens focal length 12 Date and Time Capture Mode Press the INFO button in capture mode to display the capture function 1 settings on the LCD monitor. 15 LCD Monitor Indications Before using your camera 1.

Operation Manual
Page 17
... Screen → Histogram Display → Detailed Information Display every time you press the INFO button during playback. 1 • Histogram • Detailed information Before using your camera 34 5 6 100-0120 2 100-0121 2 7 8 AF.S 16 9 P 1/2000 F2.8 +0.5Ev 17 10 S 18 11 ISO 800 19 1 12 L sRGB 100mm 20 13 WB N 2003/10...
... Screen → Histogram Display → Detailed Information Display every time you press the INFO button during playback. 1 • Histogram • Detailed information Before using your camera 34 5 6 100-0120 2 100-0121 2 7 8 AF.S 16 9 P 1/2000 F2.8 +0.5Ev 17 10 S 18 11 ISO 800 19 1 12 L sRGB 100mm 20 13 WB N 2003/10...

Operation Manual
Page 18
See page 115 for setting Custom Functions. 17 Viewfinder Indications 21 1 Before using the custom function. The superimpose function can be canceled using your camera 3 3 13 12 4 11 5 6 7 8 9 10 1 Focus points 2 Spot metering frame 3 Autofocus frame 4 Shutter speed 5 Flash status information 6 Focus points indication 7 Focus indicator 8 Tv dial enabled 9 Av dial enabled 10 AE Lock indicator 11 Aperture value 12 Number of recordable images Exposure compensation step 13 Bar graph The focus points are superimposed in red when the shutter release button is pressed halfway down.
See page 115 for setting Custom Functions. 17 Viewfinder Indications 21 1 Before using the custom function. The superimpose function can be canceled using your camera 3 3 13 12 4 11 5 6 7 8 9 10 1 Focus points 2 Spot metering frame 3 Autofocus frame 4 Shutter speed 5 Flash status information 6 Focus points indication 7 Focus indicator 8 Tv dial enabled 9 Av dial enabled 10 AE Lock indicator 11 Aperture value 12 Number of recordable images Exposure compensation step 13 Bar graph The focus points are superimposed in red when the shutter release button is pressed halfway down.

Operation Manual
Page 19
2 Getting Started Attaching the Strap 20 Powering the Camera 21 Turning the Camera On and Off 26 Initial Settings 27 Attaching the Lens 32 Installing / Removing the CF Card 34 Adjusting the Viewfinder Diopter 36
2 Getting Started Attaching the Strap 20 Powering the Camera 21 Turning the Camera On and Off 26 Initial Settings 27 Attaching the Lens 32 Installing / Removing the CF Card 34 Adjusting the Viewfinder Diopter 36

Operation Manual
Page 20
Getting Started 20 Attaching the Strap 1 Pass the end of the strap through the strap lug, then secure to the inside of the clasp. 2 2 Pass the other end of the strap through the other strap lug on the camera, then secure to the inside of the clasp.
Getting Started 20 Attaching the Strap 1 Pass the end of the strap through the strap lug, then secure to the inside of the clasp. 2 2 Pass the other end of the strap through the other strap lug on the camera, then secure to the inside of the clasp.

Operation Manual
Page 21
Powering the Camera 21 Getting Started Load batteries in the illustration and slide the battery cover toward the lens before flipping it open. 2 Insert the batteries according to ... the battery cover by pushing the battery cover 2 unlock lever as shown in the camera. Use two CR-V3, or use the AC adapter when using the camera for a prolonged period. (p.25) • Check the battery orientation if the camera will not operate properly after replacing the batteries. • The optional battery grip...
Powering the Camera 21 Getting Started Load batteries in the illustration and slide the battery cover toward the lens before flipping it open. 2 Insert the batteries according to ... the battery cover by pushing the battery cover 2 unlock lever as shown in the camera. Use two CR-V3, or use the AC adapter when using the camera for a prolonged period. (p.25) • Check the battery orientation if the camera will not operate properly after replacing the batteries. • The optional battery grip...


