WVSF332 User Guide
Page 14
Otherwise, it is unavoidably mounted on a ceiling or a wall, use an optional ceiling mount bracket (WV-Q105). Prepare the screws according to the material, structure, strength and other factors of the mounting area and the total weight of objects to be tightened with an appropriate tightening ... used with this unit to be performed in accordance with EMC standards. * * PAL models only Before installation • The camera mount bracket described on page 19 shall be sufficiently reinforced or use the screws described on page 19. The screws to ensure compliance with...
Otherwise, it is unavoidably mounted on a ceiling or a wall, use an optional ceiling mount bracket (WV-Q105). Prepare the screws according to the material, structure, strength and other factors of the mounting area and the total weight of objects to be tightened with an appropriate tightening ... used with this unit to be performed in accordance with EMC standards. * * PAL models only Before installation • The camera mount bracket described on page 19 shall be sufficiently reinforced or use the screws described on page 19. The screws to ensure compliance with...
WVSF332 User Guide
Page 19
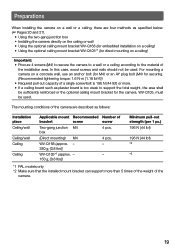
... total weight, the area shall be sufficiently reinforced or the optional ceiling mount bracket for direct mounting on a ceiling) Important: • Procure 4 screws (M4) to secure the camera to a wall or a ceiling according to the material of the installation area. For mounting a camera on a concrete wall, use an anchor bolt (for M4) or an AY plug bolt...
... total weight, the area shall be sufficiently reinforced or the optional ceiling mount bracket for direct mounting on a ceiling) Important: • Procure 4 screws (M4) to secure the camera to a wall or a ceiling according to the material of the installation area. For mounting a camera on a concrete wall, use an anchor bolt (for M4) or an AY plug bolt...
WVSF332 User Guide
Page 20
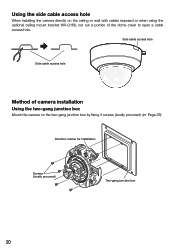
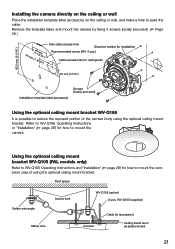
Side cable access hole Side cable access hole Method of camera installation Using the two-gang junction box Mount the camera on the ceiling or wall with cables exposed or when using the optional ceiling mount bracket WV-Q168, cut out a portion of the dome cover to open a cable access hole. Using the ...side cable access hole When installing the camera directly on the two-gang...
Side cable access hole Side cable access hole Method of camera installation Using the two-gang junction box Mount the camera on the ceiling or wall with cables exposed or when using the optional ceiling mount bracket WV-Q168, cut out a portion of the dome cover to open a cable access hole. Using the ...side cable access hole When installing the camera directly on the two-gang...
WVSF332 User Guide
Page 21
... marker for installation Recommended screw (M4: 4 pcs.) Cable access hole for how to mount the camera in case of the camera body using the optional ceiling mount bracket. Refer to WV-Q168 Operating Instructions or "Installation" (☞ page 28) for ceiling/wall MONITOOURT 4 EXT 3 FTROOPNT 1 I/O 2 83.5 mm {3-5/16"} N 20 mm {13/16"} AOUUDTIO MLIINCE IN...
... marker for installation Recommended screw (M4: 4 pcs.) Cable access hole for how to mount the camera in case of the camera body using the optional ceiling mount bracket. Refer to WV-Q168 Operating Instructions or "Installation" (☞ page 28) for ceiling/wall MONITOOURT 4 EXT 3 FTROOPNT 1 I/O 2 83.5 mm {3-5/16"} N 20 mm {13/16"} AOUUDTIO MLIINCE IN...
WVSF332 User Guide
Page 28
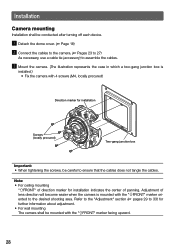
... direction marker for installation indicates the center of lens direction will become easier when the camera is installed.) • Fix the camera with 4 screws (M4, locally procured) Direction marker for further information about adjustment. • For wall mounting The camera shall be conducted after turning off each device. Refer to the "Adjustment" section (☞ pages...
... direction marker for installation indicates the center of lens direction will become easier when the camera is installed.) • Fix the camera with 4 screws (M4, locally procured) Direction marker for further information about adjustment. • For wall mounting The camera shall be conducted after turning off each device. Refer to the "Adjustment" section (☞ pages...