WVSC385 User Guide
Page 6
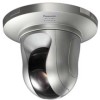
... even if objects have various illumination intensities. It is selectable. Preface The network camera WV-SC385 is designed to operate using an optional mount bracket, embedded installation on a ceiling or mounting on a wall is available. Megapixel-compatible lens and high accuracy preset position function A single camera provides wide area monitoring. Note: • It...
... even if objects have various illumination intensities. It is selectable. Preface The network camera WV-SC385 is designed to operate using an optional mount bracket, embedded installation on a ceiling or mounting on a wall is available. Megapixel-compatible lens and high accuracy preset position function A single camera provides wide area monitoring. Note: • It...
WVSC385 User Guide
Page 9
...area that may cause injury. Periodic inspections shall be started after sufficient reinforcement. Otherwise, the mounting portions will deteriorate and accidents such as a heater. 9 The exclusively designed mount bracket shall be taken. Turn the power off when do wiring of this product. Keep SDHC/SD...or damage to observe this product in injury or accidents. Failure to observe this may be used . Use the exclusively designed mount bracket for use] This product is designed to observe this may cause electric shock. Stop the operation immediately when something is produced. ...
...area that may cause injury. Periodic inspections shall be started after sufficient reinforcement. Otherwise, the mounting portions will deteriorate and accidents such as a heater. 9 The exclusively designed mount bracket shall be taken. Turn the power off when do wiring of this product. Keep SDHC/SD...or damage to observe this product in injury or accidents. Failure to observe this may be used . Use the exclusively designed mount bracket for use] This product is designed to observe this may cause electric shock. Stop the operation immediately when something is produced. ...
WVSC385 User Guide
Page 12
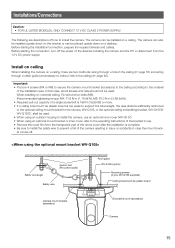
... an X-ray, a strong radio wave or a strong magnetic field is generated • Locations where corrosive gas is produced, locations where it or use an optional mount bracket (WV-Q155S, WV-Q155C, WV-Q156S, WV-Q156C or WV-Q105). • When the product is installed on a wall, use an optional wall... and strengthen it may be damaged by our company with respect to install the product, use an optional inner cover (WV-Q157). • The optional mount brackets for WV-NS202A (WV-Q150C, WV-Q150S, WV-Q151C, WV-Q151S, WV-Q152C, WV-Q153) cannot be used such as a swimming pool • Locations subject...
... an X-ray, a strong radio wave or a strong magnetic field is generated • Locations where corrosive gas is produced, locations where it or use an optional mount bracket (WV-Q155S, WV-Q155C, WV-Q156S, WV-Q156C or WV-Q105). • When the product is installed on a wall, use an optional wall... and strengthen it may be damaged by our company with respect to install the product, use an optional inner cover (WV-Q157). • The optional mount brackets for WV-NS202A (WV-Q150C, WV-Q150S, WV-Q151C, WV-Q151S, WV-Q152C, WV-Q153) cannot be used such as a swimming pool • Locations subject...
WVSC385 User Guide
Page 13
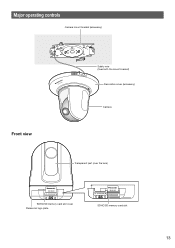
Major operating controls Camera mount bracket (accessory) OPEN FRONT LOCK WV-SC385 LOCK OPEN Safety wire (fixed with the mount bracket) Decorative cover (accessory) Camera Front view Transparent part (over the lens) WV-SC385 SDHC/SD memory card slot cover Panasonic logo plate WV-SC385 SDHC/SD memory card slot 13
Major operating controls Camera mount bracket (accessory) OPEN FRONT LOCK WV-SC385 LOCK OPEN Safety wire (fixed with the mount bracket) Decorative cover (accessory) Camera Front view Transparent part (over the lens) WV-SC385 SDHC/SD memory card slot cover Panasonic logo plate WV-SC385 SDHC/SD memory card slot 13
WVSC385 User Guide
Page 15
...capacity of a single screw/bolt is 196 N {19.99 lbf} or more. • If a ceiling board such as plaster board WV-SC385 Camera mount bracket (accessory) Decorative cover (accessory) Camera 15 The camera can be installed on a desktop. The camera can also be installed upside down on the...Q105 supplied) Ceiling board such as plaster board is complete. • Be sure to install the safety wire to make a hole in case the mount bracket comes off the power of the camera resulting in injury or accidents in the ceiling) (☞ page 20). The following are two methods; When ...
...capacity of a single screw/bolt is 196 N {19.99 lbf} or more. • If a ceiling board such as plaster board WV-SC385 Camera mount bracket (accessory) Decorative cover (accessory) Camera 15 The camera can be installed on a desktop. The camera can also be installed upside down on the...Q105 supplied) Ceiling board such as plaster board is complete. • Be sure to install the safety wire to make a hole in case the mount bracket comes off the power of the camera resulting in injury or accidents in the ceiling) (☞ page 20). The following are two methods; When ...
WVSC385 User Guide
Page 16
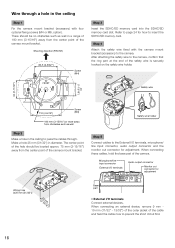
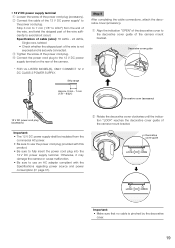
... the cable core to pass the cables through a hole in a range of 100 mm {3-15/16"} away from the center point of the camera mount bracket. Make a hole 25 mm {31/32"} in the ceiling to prevent the short circuit first. 16 Microphone/line input connector Audio output connector External ...110 {4-5/16"} Screw (M6) 100 mm {3-15/16"} or more away from obstacles such as wall in the ceiling Step 1 Fix the camera mount bracket (accessory) with the camera mount bracket (accessory) to insert the SDHC/SD memory card. When connecting an external device, remove 9 mm 10 mm {11/32" - 13/32"} of...
... the cable core to pass the cables through a hole in a range of 100 mm {3-15/16"} away from the center point of the camera mount bracket. Make a hole 25 mm {31/32"} in the ceiling to prevent the short circuit first. 16 Microphone/line input connector Audio output connector External ...110 {4-5/16"} Screw (M6) 100 mm {3-15/16"} or more away from obstacles such as wall in the ceiling Step 1 Fix the camera mount bracket (accessory) with the camera mount bracket (accessory) to insert the SDHC/SD memory card. When connecting an external device, remove 9 mm 10 mm {11/32" - 13/32"} of...
WVSC385 User Guide
Page 17
... power of the camera after inserting the camera while putting the center of the camera (screw hole for a tripod) onto the center of the camera mount bracket. 17 When it is possible to determine whether or not to a terminal. Fit the lock plate of the camera onto the guide part of the... camera mount bracket, and rotate the camera clockwise after turning off the power of the audio output devices. It is necessary to connect 2 or more ) • ALARM OUT...
... power of the camera after inserting the camera while putting the center of the camera (screw hole for a tripod) onto the center of the camera mount bracket. 17 When it is possible to determine whether or not to a terminal. Fit the lock plate of the camera onto the guide part of the... camera mount bracket, and rotate the camera clockwise after turning off the power of the audio output devices. It is necessary to connect 2 or more ) • ALARM OUT...
WVSC385 User Guide
Page 18
...after about 2 seconds. Center of the camera mount bracket OPEN LOCK FRONT Guide part Lock plate Base part Rotate 20 ° Moving part Camera mount bracket (accessory) Camera Important: • When mounting the camera onto the camera mount bracket, hold the base part of the camera is... turned on the camera mount bracket (accessory) using the camera fixing screw (accessory). In this...
...after about 2 seconds. Center of the camera mount bracket OPEN LOCK FRONT Guide part Lock plate Base part Rotate 20 ° Moving part Camera mount bracket (accessory) Camera Important: • When mounting the camera onto the camera mount bracket, hold the base part of the camera is... turned on the camera mount bracket (accessory) using the camera fixing screw (accessory). In this...
WVSC385 User Guide
Page 19
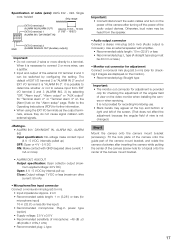
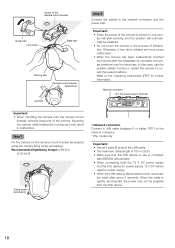
• 12 V DC power supply terminal q Loosen the screw of the camera mount bracket. q Align the indication "OPEN" of the decorative cover to the decorative cover guide of the power cord plug (accessory). WV-SC385 LOCK OPEN Decorative cover ... MODEL(S), ONLY CONNECT 12 V DC CLASS 2 POWER SUPPLY. Strip 3 mm to 7 mm {1/8" to the 12 V DC power supply terminal on the rear of the camera mount bracket. Specification of cable (wire): 16 AWG - 24 AWG, Single core, twisted • Check whether the stripped part of the wire sufficiently to the power cord...
• 12 V DC power supply terminal q Loosen the screw of the camera mount bracket. q Align the indication "OPEN" of the decorative cover to the decorative cover guide of the power cord plug (accessory). WV-SC385 LOCK OPEN Decorative cover ... MODEL(S), ONLY CONNECT 12 V DC CLASS 2 POWER SUPPLY. Strip 3 mm to 7 mm {1/8" to the 12 V DC power supply terminal on the rear of the camera mount bracket. Specification of cable (wire): 16 AWG - 24 AWG, Single core, twisted • Check whether the stripped part of the wire sufficiently to the power cord...
WVSC385 User Guide
Page 20
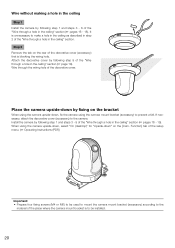
...ceiling" section. When using the camera upside-down, select "On (desktop)" for "Upside-down" on the bracket When using the camera upside-down by fixing on the [Cam. Wire without making a hole in the ceiling... the camera upside-down , fix the camera using the camera mount bracket (accessory) to prevent a fall. Step 2 Remove the tab on the rear of the place where the camera mount bracket is to make a hole in the ceiling as described in step... Important: • Prepare four fixing screws (M4 or M6) to be used to mount the camera mount bracket (accessory) according to the camera.
...ceiling" section. When using the camera upside-down, select "On (desktop)" for "Upside-down" on the bracket When using the camera upside-down by fixing on the [Cam. Wire without making a hole in the ceiling... the camera upside-down , fix the camera using the camera mount bracket (accessory) to prevent a fall. Step 2 Remove the tab on the rear of the place where the camera mount bracket is to make a hole in the ceiling as described in step... Important: • Prepare four fixing screws (M4 or M6) to be used to mount the camera mount bracket (accessory) according to the camera.
WVSC385 User Guide
Page 23
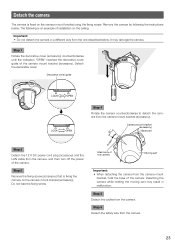
...from the camera, and then turn off the power of the camera. Main body of the camera. Step 5 Detach the cables from the camera mount bracket, hold the base of the camera Moving part Important: • When detaching the camera from the camera. Step 6 Detach the safety wire ...from the one described below . Remove the camera by following is fixing the camera on the camera mount bracket (accessory). Important: • Do not detach the camera in malfunction. Detach the decorative cover. Detaching the camera while holding the moving part may...
...from the camera, and then turn off the power of the camera. Main body of the camera. Step 5 Detach the cables from the camera mount bracket, hold the base of the camera Moving part Important: • When detaching the camera from the camera. Step 6 Detach the safety wire ...from the one described below . Remove the camera by following is fixing the camera on the camera mount bracket (accessory). Important: • Do not detach the camera in malfunction. Detach the decorative cover. Detaching the camera while holding the moving part may...
WVSC385 User Guide
Page 28
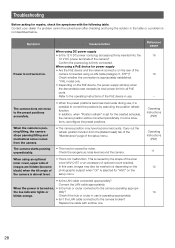
...*)? Operating Instructions (PDF) Operating Instructions (PDF) 11 12 18 28 Contact your dealer if a problem cannot be washed out depending on the rear of optional mount bracket). The camera does not move to correct the positions by executing the position refresh function. Check the exogenous noise level around the camera. When the...
...*)? Operating Instructions (PDF) Operating Instructions (PDF) 11 12 18 28 Contact your dealer if a problem cannot be washed out depending on the rear of optional mount bracket). The camera does not move to correct the positions by executing the position refresh function. Check the exogenous noise level around the camera. When the...
WVSC385 User Guide
Page 31
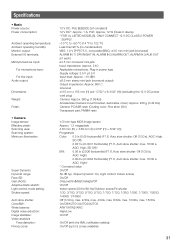
...; Line level ø115 mm x 155 mm (H) {ø4-17/32" x 6-3/32" (H)} (excluding the 12 V DC power cord plug) Camera: Approx. 900 g {1.99 lbs} Accessories (Camera mount bracket, decorative cover): Approx. 200 g {0.44 lbs} Camera: PC/ABS resin (Coating color: Fine silver (501) Transparent part: PMMA resin 1/3 inch-type MOS image sensor Approx...
...; Line level ø115 mm x 155 mm (H) {ø4-17/32" x 6-3/32" (H)} (excluding the 12 V DC power cord plug) Camera: Approx. 900 g {1.99 lbs} Accessories (Camera mount bracket, decorative cover): Approx. 200 g {0.44 lbs} Camera: PC/ABS resin (Coating color: Fine silver (501) Transparent part: PMMA resin 1/3 inch-type MOS image sensor Approx...
WVSC385 User Guide
Page 34
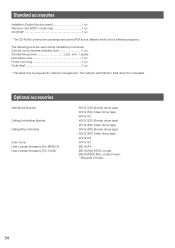
... 2 pcs. (incl. 1 spare) Decorative cover 1 pc. The network administrator shall retain the code label. Camera mount bracket (w/safety wire 1 pc. Power cord plug 1 pc. Warranty card (NTSC model only 1 pc. Optional accessories Wall Mount Bracket Ceiling Embedding Bracket Ceiling Mount Bracket Inner Cover User License Accessory (For MPEG-4) User License Accessory (For H.264) WV-Q154S (Smoke dome...
... 2 pcs. (incl. 1 spare) Decorative cover 1 pc. The network administrator shall retain the code label. Camera mount bracket (w/safety wire 1 pc. Power cord plug 1 pc. Warranty card (NTSC model only 1 pc. Optional accessories Wall Mount Bracket Ceiling Embedding Bracket Ceiling Mount Bracket Inner Cover User License Accessory (For MPEG-4) User License Accessory (For H.264) WV-Q154S (Smoke dome...
