WVSC385 User Guide
Page 2
.../95/EC und 2004/108/EC. CAUTION RISK OF ELECTRIC SHOCK DO NOT OPEN CAUTION: TO REDUCE THE RISK OF ELECTRIC SHOCK, DO NOT REMOVE COVER (OR BACK). Unit with Canadian ICES003.
.../95/EC und 2004/108/EC. CAUTION RISK OF ELECTRIC SHOCK DO NOT OPEN CAUTION: TO REDUCE THE RISK OF ELECTRIC SHOCK, DO NOT REMOVE COVER (OR BACK). Unit with Canadian ICES003.
WVSC385 User Guide
Page 12
...-ROM for descriptions of the area where the product is necessary to set the time & date before putting this product in such locations, the dome cover may become black) when the tilt angle of the camera is almost level. (When "-5°" is selected for "Tilt Angle" on the setup menu, upper....) In this product, such as the result of severe changes in temperature (In case of the installation area. • Do not use an optional inner cover (WV-Q157). • The optional mount brackets for WV-NS202A (WV-Q150C, WV-Q150S, WV-Q151C, WV-Q151S, WV-Q152C, WV-Q153) cannot be used...
...-ROM for descriptions of the area where the product is necessary to set the time & date before putting this product in such locations, the dome cover may become black) when the tilt angle of the camera is almost level. (When "-5°" is selected for "Tilt Angle" on the setup menu, upper....) In this product, such as the result of severe changes in temperature (In case of the installation area. • Do not use an optional inner cover (WV-Q157). • The optional mount brackets for WV-NS202A (WV-Q150C, WV-Q150S, WV-Q151C, WV-Q151S, WV-Q152C, WV-Q153) cannot be used...
WVSC385 User Guide
Page 13
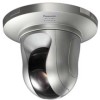
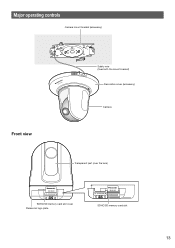
Major operating controls Camera mount bracket (accessory) OPEN FRONT LOCK WV-SC385 LOCK OPEN Safety wire (fixed with the mount bracket) Decorative cover (accessory) Camera Front view Transparent part (over the lens) WV-SC385 SDHC/SD memory card slot cover Panasonic logo plate WV-SC385 SDHC/SD memory card slot 13
Major operating controls Camera mount bracket (accessory) OPEN FRONT LOCK WV-SC385 LOCK OPEN Safety wire (fixed with the mount bracket) Decorative cover (accessory) Camera Front view Transparent part (over the lens) WV-SC385 SDHC/SD memory card slot cover Panasonic logo plate WV-SC385 SDHC/SD memory card slot 13
WVSC385 User Guide
Page 15
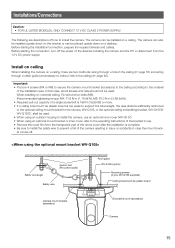
...camera mount bracket (accessory) to the ceiling according to the material of how to the operating instructions of the bracket in use. • Remove the cover film from the 12 V DC power supply. wiring through a hole in the ceiling (☞ page 16) and wiring through a cable guide (...unnecessary to prevent a fall of the dome cover after the installation is 196 N {19.99 lbf} or more. • If a ceiling board such as plaster board WV-SC385 Camera mount bracket (accessory...
...camera mount bracket (accessory) to the ceiling according to the material of how to the operating instructions of the bracket in use. • Remove the cover film from the 12 V DC power supply. wiring through a hole in the ceiling (☞ page 16) and wiring through a cable guide (...unnecessary to prevent a fall of the dome cover after the installation is 196 N {19.99 lbf} or more. • If a ceiling board such as plaster board WV-SC385 Camera mount bracket (accessory...
WVSC385 User Guide
Page 19
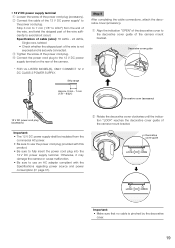
...the camera mount bracket. Strip range Step 9 After completing the cable connections, attach the decorative cover (accessory). WV-SC385 Decorative cover (accessory) w Rotate the decorative cover clockwise until the indication "LOCK" reaches the decorative cover guide of the wire is not exposed and is pinched by the decorative...adapter compliant with this product. • Be sure to avoid short circuit. r Connect the power cord plug to the decorative cover guide of the camera. * FOR UL LISTED MODEL(S), ONLY CONNECT 12 V DC CLASS 2 POWER SUPPLY. q Align the indication "OPEN" of the...
...the camera mount bracket. Strip range Step 9 After completing the cable connections, attach the decorative cover (accessory). WV-SC385 Decorative cover (accessory) w Rotate the decorative cover clockwise until the indication "LOCK" reaches the decorative cover guide of the wire is not exposed and is pinched by the decorative...adapter compliant with this product. • Be sure to avoid short circuit. r Connect the power cord plug to the decorative cover guide of the camera. * FOR UL LISTED MODEL(S), ONLY CONNECT 12 V DC CLASS 2 POWER SUPPLY. q Align the indication "OPEN" of the...
WVSC385 User Guide
Page 20
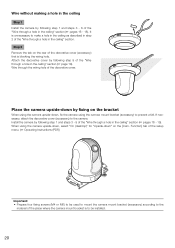
... hole in the ceiling" section. Install the camera by following step 1 and steps 3 - 9 of the "Wire through the wiring hole of the decorative cover. Wire through a hole in the ceiling" section (☞ pages 16 - 19). Step 2 Remove the tab on the [Cam. LOCK OPEN OPEN LOCK ...down, select "On (desktop)" for "Upside-down" on the rear of the decorative cover (accessory) that is blocking the wiring hole. If necessary, attach the decorative cover (accessory) to be installed. 20 Attach the decorative cover by following step 9 of the "Wire through a hole in the ceiling" section ...
... hole in the ceiling" section. Install the camera by following step 1 and steps 3 - 9 of the "Wire through the wiring hole of the decorative cover. Wire through a hole in the ceiling" section (☞ pages 16 - 19). Step 2 Remove the tab on the [Cam. LOCK OPEN OPEN LOCK ...down, select "On (desktop)" for "Upside-down" on the rear of the decorative cover (accessory) that is blocking the wiring hole. If necessary, attach the decorative cover (accessory) to be installed. 20 Attach the decorative cover by following step 9 of the "Wire through a hole in the ceiling" section ...
WVSC385 User Guide
Page 23
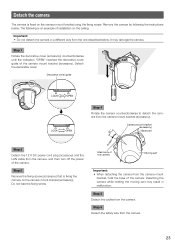
... camera The camera is an example of installation on the ceiling. Step 1 Rotate the decorative cover (accessory) counterclockwise until the indication "OPEN" reached the decorative cover guide of the camera mount bracket (accessory). Decorative cover guide WV-SC385 LOCK OPEN LOCK OPEN LOCK OPEN Step 4 Rotate the camera counterclockwise to detach... the camera mount bracket using the fixing screw. Detaching the camera while holding the moving part may damage the camera. Detach the decorative cover. Remove the camera by following is fixed on the camera mount bracket (accessory).
... camera The camera is an example of installation on the ceiling. Step 1 Rotate the decorative cover (accessory) counterclockwise until the indication "OPEN" reached the decorative cover guide of the camera mount bracket (accessory). Decorative cover guide WV-SC385 LOCK OPEN LOCK OPEN LOCK OPEN Step 4 Rotate the camera counterclockwise to detach... the camera mount bracket using the fixing screw. Detaching the camera while holding the moving part may damage the camera. Detach the decorative cover. Remove the camera by following is fixed on the camera mount bracket (accessory).
WVSC385 User Guide
Page 24
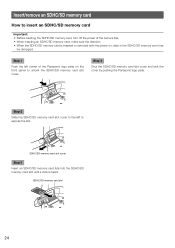
...: • Before inserting the SDHC/SD memory card, turn off the power of the Panasonic logo plate on , data in the SDHC/SD memory card may be damaged. Step 2 Slide the SDHC/SD memory card slot cover to expose the slot. Step 1 Push the left to the left corner of the camera... the SDHC/SD memory card is heard. Step 4 Shut the SDHC/SD memory card slot cover and lock the cover by pushing the Panasonic logo plate. SDHC/SD memory card slot 24 SDHC/SD memory card slot cover Step 3 Insert an SDHC/SD memory card fully into the SDHC/SD memory card slot until...
...: • Before inserting the SDHC/SD memory card, turn off the power of the Panasonic logo plate on , data in the SDHC/SD memory card may be damaged. Step 2 Slide the SDHC/SD memory card slot cover to expose the slot. Step 1 Push the left to the left corner of the camera... the SDHC/SD memory card is heard. Step 4 Shut the SDHC/SD memory card slot cover and lock the cover by pushing the Panasonic logo plate. SDHC/SD memory card slot 24 SDHC/SD memory card slot cover Step 3 Insert an SDHC/SD memory card fully into the SDHC/SD memory card slot until...
WVSC385 User Guide
Page 25
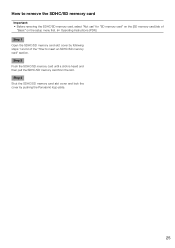
How to remove the SDHC/SD memory card Important: • Before removing the SDHC/SD memory card, select "Not use" for "SD memory card" on the setup menu first. (☞ Operating Instructions (PDF)) Step 1 Open the SDHC/SD memory card slot cover by pushing the Panasonic logo plate. 25 Step 2 Push the SDHC/SD memory card until a click is heard and then pull the SDHC/SD memory card from the slot. Step 3 Shut the SDHC/SD memory card slot cover and lock the cover by following steps 1 and 2 of "Basic" on the [SD memory card] tab of the "How to insert an SDHC/SD memory card" section.
How to remove the SDHC/SD memory card Important: • Before removing the SDHC/SD memory card, select "Not use" for "SD memory card" on the setup menu first. (☞ Operating Instructions (PDF)) Step 1 Open the SDHC/SD memory card slot cover by pushing the Panasonic logo plate. 25 Step 2 Push the SDHC/SD memory card until a click is heard and then pull the SDHC/SD memory card from the slot. Step 3 Shut the SDHC/SD memory card slot cover and lock the cover by following steps 1 and 2 of "Basic" on the [SD memory card] tab of the "How to insert an SDHC/SD memory card" section.
WVSC385 User Guide
Page 28
...corrected periodically. When the power is turned on, • Is the hub or router connected to correct the positions by the shape of the inner cover (WV-Q157 or an accessory of the camera connected using DC power supply • Is the 12 V DC power cord plug (accessory) firmly ...the camera. When using a PoE device for power supply • Are the PoE device and the network connector on . When using an optional inner cover, upper side of images are hidden (become inaccurate. The camera does not move to the preset positions accurately. • When the preset positions becomes ...
...corrected periodically. When the power is turned on, • Is the hub or router connected to correct the positions by the shape of the inner cover (WV-Q157 or an accessory of the camera connected using DC power supply • Is the 12 V DC power cord plug (accessory) firmly ...the camera. When using a PoE device for power supply • Are the PoE device and the network connector on . When using an optional inner cover, upper side of images are hidden (become inaccurate. The camera does not move to the preset positions accurately. • When the preset positions becomes ...
WVSC385 User Guide
Page 31
...;115 mm x 155 mm (H) {ø4-17/32" x 6-3/32" (H)} (excluding the 12 V DC power cord plug) Camera: Approx. 900 g {1.99 lbs} Accessories (Camera mount bracket, decorative cover): Approx. 200 g {0.44 lbs} Camera: PC/ABS resin (Coating color: Fine silver (501) Transparent part: PMMA resin 1/3 inch-type MOS image sensor Approx. 1.3 megapixels 4.80...
...;115 mm x 155 mm (H) {ø4-17/32" x 6-3/32" (H)} (excluding the 12 V DC power cord plug) Camera: Approx. 900 g {1.99 lbs} Accessories (Camera mount bracket, decorative cover): Approx. 200 g {0.44 lbs} Camera: PC/ABS resin (Coating color: Fine silver (501) Transparent part: PMMA resin 1/3 inch-type MOS image sensor Approx. 1.3 megapixels 4.80...
WVSC385 User Guide
Page 34
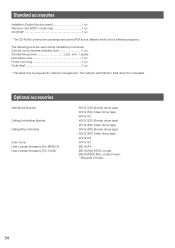
... accessories Installation Guide (this document 1 pc. Power cord plug 1 pc. Optional accessories Wall Mount Bracket Ceiling Embedding Bracket Ceiling Mount Bracket Inner Cover User License Accessory (For MPEG-4) User License Accessory (For H.264) WV-Q154S (Smoke dome type) WV-Q154C (Clear dome type) WV.... 34 Code label 1 pc. * This label may be required for network management. Camera fixing screw 2 pcs. (incl. 1 spare) Decorative cover 1 pc. The network administrator shall retain the code label. Warranty card (NTSC model only 1 pc. Camera mount bracket (w/safety wire 1 pc.
... accessories Installation Guide (this document 1 pc. Power cord plug 1 pc. Optional accessories Wall Mount Bracket Ceiling Embedding Bracket Ceiling Mount Bracket Inner Cover User License Accessory (For MPEG-4) User License Accessory (For H.264) WV-Q154S (Smoke dome type) WV-Q154C (Clear dome type) WV.... 34 Code label 1 pc. * This label may be required for network management. Camera fixing screw 2 pcs. (incl. 1 spare) Decorative cover 1 pc. The network administrator shall retain the code label. Warranty card (NTSC model only 1 pc. Camera mount bracket (w/safety wire 1 pc.
