WVSC385 User Guide
Page 1
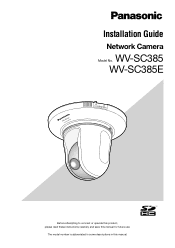
The model number is abbreviated in some descriptions in this manual for future use. WV-SC385 WV-SC385E WV-SC385 LOCK OPEN Before attempting to connect or operate this product, please read these instructions carefully and save this manual. Installation Guide Network Camera Model No.
The model number is abbreviated in some descriptions in this manual for future use. WV-SC385 WV-SC385E WV-SC385 LOCK OPEN Before attempting to connect or operate this product, please read these instructions carefully and save this manual. Installation Guide Network Camera Model No.
WVSC385 User Guide
Page 3
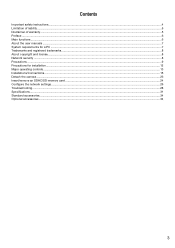
Contents Important safety instructions...4 Limitation of liability...5 Disclaimer of warranty...5 Preface ...6 Main functions...6 About the user manuals ...7 System requirements for a PC ...7 Trademarks and registered trademarks...8 About copyright and license...8 Network security ...8 Precautions ...9 Precautions for installation ...12 Major operating controls ...13 Installations/Connections ...15 Detach the camera ...23 Insert/remove an SDHC/SD memory card ...24 Configure the network settings ...26 Troubleshooting...28 Specifications...31 Standard accessories...34 Optional accessories...34 3
Contents Important safety instructions...4 Limitation of liability...5 Disclaimer of warranty...5 Preface ...6 Main functions...6 About the user manuals ...7 System requirements for a PC ...7 Trademarks and registered trademarks...8 About copyright and license...8 Network security ...8 Precautions ...9 Precautions for installation ...12 Major operating controls ...13 Installations/Connections ...15 Detach the camera ...23 Insert/remove an SDHC/SD memory card ...24 Configure the network settings ...26 Troubleshooting...28 Specifications...31 Standard accessories...34 Optional accessories...34 3
WVSC385 User Guide
Page 5
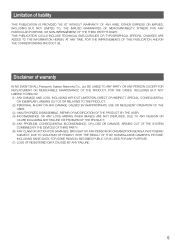
...OR ACTION FOR DAMAGES, BROUGHT BY ANY PERSON OR ORGANIZATION BEING A PHOTOGENIC SUBJECT, DUE TO VIOLATION OF PRIVACY WITH THE RESULT OF THAT SURVEILLANCE-CAMERA'S PICTURE, INCLUDING SAVED DATA, FOR SOME REASON, BECOMES PUBLIC OR IS USED FOR ANY PURPOSE; (7) LOSS OF REGISTERED DATA CAUSED BY ANY ... OF MERCHANTABILITY, FITNESS FOR ANY PARTICULAR PURPOSE, OR NON-INFRINGEMENT OF THE THIRD PARTY'S RIGHT. Limitation of warranty IN NO EVENT SHALL Panasonic System Networks Co., Ltd. CHANGES ARE ADDED TO THE INFORMATION HEREIN, AT ANY TIME, FOR THE IMPROVEMENTS OF THIS PUBLICATION AND/OR THE...
...OR ACTION FOR DAMAGES, BROUGHT BY ANY PERSON OR ORGANIZATION BEING A PHOTOGENIC SUBJECT, DUE TO VIOLATION OF PRIVACY WITH THE RESULT OF THAT SURVEILLANCE-CAMERA'S PICTURE, INCLUDING SAVED DATA, FOR SOME REASON, BECOMES PUBLIC OR IS USED FOR ANY PURPOSE; (7) LOSS OF REGISTERED DATA CAUSED BY ANY ... OF MERCHANTABILITY, FITNESS FOR ANY PARTICULAR PURPOSE, OR NON-INFRINGEMENT OF THE THIRD PARTY'S RIGHT. Limitation of warranty IN NO EVENT SHALL Panasonic System Networks Co., Ltd. CHANGES ARE ADDED TO THE INFORMATION HEREIN, AT ANY TIME, FOR THE IMPROVEMENTS OF THIS PUBLICATION AND/OR THE...
WVSC385 User Guide
Page 6
...compliant) Interactive communication with a PoE (Power over Ethernet) device, power will be monitored on a PC via a network. Preface The network camera WV-SC385 is designed to install a web browser on the PC. By connecting to save JPEG images at a network failure occurrence. (Download... is selectable. Power over Ethernet function When connecting with audio By using a PC on a PC and transmitting audio from the camera can be simultaneously provided. * Either H.264 or MPEG-4 is possible.) * Recommended SDHC/SD memory card (☞ page 33) 6 ...
...compliant) Interactive communication with a PoE (Power over Ethernet) device, power will be monitored on a PC via a network. Preface The network camera WV-SC385 is designed to install a web browser on the PC. By connecting to save JPEG images at a network failure occurrence. (Download... is selectable. Power over Ethernet function When connecting with audio By using a PC on a PC and transmitting audio from the camera can be simultaneously provided. * Either H.264 or MPEG-4 is possible.) * Recommended SDHC/SD memory card (☞ page 33) 6 ...
WVSC385 User Guide
Page 7
..., as well as how to connect and configure the network. • Operating Instructions (PDF): Explains how to perform the settings and how to operate this camera. Note: • Refer to read these operating instructions indicates the WV-SC385 and WV-SC385E. Adobe® Reader® is not installed on a PC. The...
..., as well as how to connect and configure the network. • Operating Instructions (PDF): Explains how to perform the settings and how to operate this camera. Note: • Refer to read these operating instructions indicates the WV-SC385 and WV-SC385E. Adobe® Reader® is not installed on a PC. The...
WVSC385 User Guide
Page 8
... other coun- About copyright and license Distributing, copying, disassembling, reverse compiling, reverse engineering, and also exporting in locations where the camera or the cables can be destroyed or damaged by the administrator, make sure that the system is not infected by computer viruses or... network that includes PCs, make sure to close the browser. • Change the administrator password periodically. • Do not install the camera in violation of export laws of the software provided with or stoppage of this unit connected to a network, your attention is a trademark ...
... other coun- About copyright and license Distributing, copying, disassembling, reverse compiling, reverse engineering, and also exporting in locations where the camera or the cables can be destroyed or damaged by the administrator, make sure that the system is not infected by computer viruses or... network that includes PCs, make sure to close the browser. • Change the administrator password periodically. • Do not install the camera in violation of export laws of the software provided with or stoppage of this unit connected to a network, your attention is a trademark ...
WVSC385 User Guide
Page 10
... operations, objects crossing the shooting area may cause injury. Otherwise, it is granted or shall be caused. Important: • The camera position may be implied for cleaning, read the caution provided with this product. About SDHC/SD memory card • Before inserting the... restart automatically. Failure to paste one of picture quality. When the dirt is recommended to observe this product. Restart the camera or refresh the camera position (position refresh) to lose these labels. Recorded data on the SDHC/SD memory card. The dirty part causes deterioration...
... operations, objects crossing the shooting area may cause injury. Otherwise, it is granted or shall be caused. Important: • The camera position may be implied for cleaning, read the caution provided with this product. About SDHC/SD memory card • Before inserting the... restart automatically. Failure to paste one of picture quality. When the dirt is recommended to observe this product. Restart the camera or refresh the camera position (position refresh) to lose these labels. Recorded data on the SDHC/SD memory card. The dirty part causes deterioration...
WVSC385 User Guide
Page 11
... motor, tilting motor, flat cable for panning, flat cable for a long period of auto panning speed. No license is just an indication when using the camera at +35 °C {95 °F}.) About the self-diagnosis function When this , perform lens operations periodically. 11
... motor, tilting motor, flat cable for panning, flat cable for a long period of auto panning speed. No license is just an indication when using the camera at +35 °C {95 °F}.) About the self-diagnosis function When this , perform lens operations periodically. 11
WVSC385 User Guide
Page 12
...not place this product in the following places: • Locations where it may get wet from the use, damage or both of the camera. Refer to be installed. Installing place Contact your particular environment. • Make sure that is compliant with IEEE802.3af standard. Prepare them... that the installation area is strong enough to hold this product, such as the result of severe changes in temperature (In case of installing the camera in a specific environment where a solvent or a flammable atmosphere exists • Locations where a radiation, an X-ray, a strong radio wave or a ...
...not place this product in the following places: • Locations where it may get wet from the use, damage or both of the camera. Refer to be installed. Installing place Contact your particular environment. • Make sure that is compliant with IEEE802.3af standard. Prepare them... that the installation area is strong enough to hold this product, such as the result of severe changes in temperature (In case of installing the camera in a specific environment where a solvent or a flammable atmosphere exists • Locations where a radiation, an X-ray, a strong radio wave or a ...
WVSC385 User Guide
Page 13
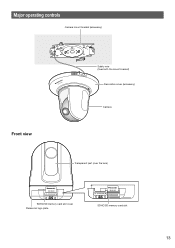
Major operating controls Camera mount bracket (accessory) OPEN FRONT LOCK WV-SC385 LOCK OPEN Safety wire (fixed with the mount bracket) Decorative cover (accessory) Camera Front view Transparent part (over the lens) WV-SC385 SDHC/SD memory card slot cover Panasonic logo plate WV-SC385 SDHC/SD memory card slot 13
Major operating controls Camera mount bracket (accessory) OPEN FRONT LOCK WV-SC385 LOCK OPEN Safety wire (fixed with the mount bracket) Decorative cover (accessory) Camera Front view Transparent part (over the lens) WV-SC385 SDHC/SD memory card slot cover Panasonic logo plate WV-SC385 SDHC/SD memory card slot 13
WVSC385 User Guide
Page 14
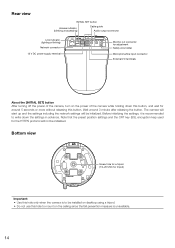
... adjustment Safety wire holder Microphone/line input connector External I/O terminals About the [INITIAL SET] button After turning off the power of the camera, turn on the ceiling since the fall prevention measure is recommended to write down this button. Before initializing the settings, it is unavailable... in advance. Wait around 5 seconds or more without releasing this button, and wait for the HTTPS protocol will be initialized. The camera will start up and the settings including the network settings will not be initialized. Note that the preset position settings and the CRT key...
... adjustment Safety wire holder Microphone/line input connector External I/O terminals About the [INITIAL SET] button After turning off the power of the camera, turn on the ceiling since the fall prevention measure is recommended to write down this button. Before initializing the settings, it is unavailable... in advance. Wait around 5 seconds or more without releasing this button, and wait for the HTTPS protocol will be initialized. The camera will start up and the settings including the network settings will not be initialized. Note that the preset position settings and the CRT key...
WVSC385 User Guide
Page 15
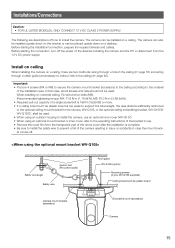
... Caution: • FOR UL LISTED MODEL(S), ONLY CONNECT 12 V DC CLASS 2 POWER SUPPLY. Before starting the connection, turn off the power of the camera resulting in injury or accidents in use. • Remove the cover film from the 12 V DC power supply. Important: • Procure 4 screws (...WV-Q155S/ WV-Q155C, shall be installed on a desktop. wiring through a hole in the ceiling) (☞ page 20). Install on ceiling When installing the camera on concrete ceiling: Fix with anchor bolts (M6). (Recommended tightening torque: M4: F1.6 N·m {1.18 lbf·ft}, M6: F5.0 N·m {3....
... Caution: • FOR UL LISTED MODEL(S), ONLY CONNECT 12 V DC CLASS 2 POWER SUPPLY. Before starting the connection, turn off the power of the camera resulting in injury or accidents in use. • Remove the cover film from the 12 V DC power supply. Important: • Procure 4 screws (...WV-Q155S/ WV-Q155C, shall be installed on a desktop. wiring through a hole in the ceiling) (☞ page 20). Install on ceiling When installing the camera on concrete ceiling: Fix with anchor bolts (M6). (Recommended tightening torque: M4: F1.6 N·m {1.18 lbf·ft}, M6: F5.0 N·m {3....
WVSC385 User Guide
Page 16
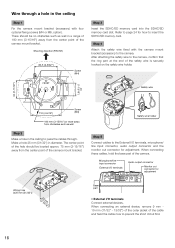
... Step 4 Attach the safety wire fixed with four optional fixing screws (M4 or M6, option). When connecting these cables, hold the base part of the camera. Safety wire 64 {2-17/32"} OPEN LOCK FRONT OPEN LOCK FRONT 46 {1-13/16"} 110 {4-5/16"} Screw (M6) 100 mm {3-15/16"} or more... I /O terminals Connect external devices. The center point of the hole should be located approx. 75 mm {2-15/16"} away from the center point of the camera mount bracket. Wire through . Make a hole 25 mm {31/32"} in diameter. Refer to page 24 for adjustment 12V IN 4 3 2 1 Base part • External I /O...
... Step 4 Attach the safety wire fixed with four optional fixing screws (M4 or M6, option). When connecting these cables, hold the base part of the camera. Safety wire 64 {2-17/32"} OPEN LOCK FRONT OPEN LOCK FRONT 46 {1-13/16"} 110 {4-5/16"} Screw (M6) 100 mm {3-15/16"} or more... I /O terminals Connect external devices. The center point of the hole should be located approx. 75 mm {2-15/16"} away from the center point of the camera mount bracket. Wire through . Make a hole 25 mm {31/32"} in diameter. Refer to page 24 for adjustment 12V IN 4 3 2 1 Base part • External I /O...
WVSC385 User Guide
Page 17
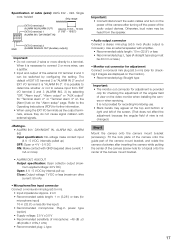
... plug (ø3.5 mm) (Audio output is possible to determine whether or not to the Operating Instructions (PDF) for a tripod) onto the center of the camera mount bracket. 17 Use an external speaker with GND (required drive current: 1 mA or more wires, use . • Black bands may be 40 mm... setup" page. When it is provided only for "Terminal alarm 2" or "Terminal alarm 3" on the [Alarm] tab on the video monitor when installing the camera or when servicing. It is monaural.). Otherwise, loud noise may appear at the top and bottom or right and left of the screen. (That does...
... plug (ø3.5 mm) (Audio output is possible to determine whether or not to the Operating Instructions (PDF) for a tripod) onto the center of the camera mount bracket. 17 Use an external speaker with GND (required drive current: 1 mA or more wires, use . • Black bands may be 40 mm... setup" page. When it is provided only for "Terminal alarm 2" or "Terminal alarm 3" on the [Alarm] tab on the video monitor when installing the camera or when servicing. It is monaural.). Otherwise, loud noise may appear at the top and bottom or right and left of the screen. (That does...
WVSC385 User Guide
Page 18
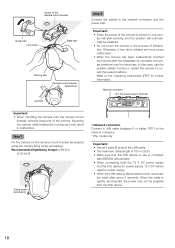
...Connect the cables to the Operating Instructions (PDF) for power supply. • When the LAN cable is turned on the camera mount bracket (accessory) using the camera fixing screw (accessory). Important: • When the power of initialization. When the cable is complete, the preset positions may ... bracket OPEN LOCK FRONT Guide part Lock plate Base part Rotate 20 ° Moving part Camera mount bracket (accessory) Camera Important: • When mounting the camera onto the camera mount bracket, hold the base part of the LAN cable. • The maximum cable length is 100 m {...
...Connect the cables to the Operating Instructions (PDF) for power supply. • When the LAN cable is turned on the camera mount bracket (accessory) using the camera fixing screw (accessory). Important: • When the power of initialization. When the cable is complete, the preset positions may ... bracket OPEN LOCK FRONT Guide part Lock plate Base part Rotate 20 ° Moving part Camera mount bracket (accessory) Camera Important: • When mounting the camera onto the camera mount bracket, hold the base part of the LAN cable. • The maximum cable length is 100 m {...
WVSC385 User Guide
Page 19
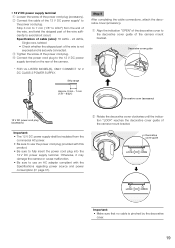
...supply terminal on the rear of the power cord plug (accessory). e Tighten the screw of the camera mount bracket. q Align the indication "OPEN" of the camera mount bracket. Otherwise, it may damage the camera or cause malfunction. • Be sure to the power cord plug. WV-SC385 Decorative cover (... the decorative cover guide of the decorative cover to avoid short circuit. • 12 V DC power supply terminal q Loosen the screw of the camera. * FOR UL LISTED MODEL(S), ONLY CONNECT 12 V DC CLASS 2 POWER SUPPLY. r Connect the power cord plug to fully insert the power...
...supply terminal on the rear of the power cord plug (accessory). e Tighten the screw of the camera mount bracket. q Align the indication "OPEN" of the camera mount bracket. Otherwise, it may damage the camera or cause malfunction. • Be sure to the power cord plug. WV-SC385 Decorative cover (... the decorative cover guide of the decorative cover to avoid short circuit. • 12 V DC power supply terminal q Loosen the screw of the camera. * FOR UL LISTED MODEL(S), ONLY CONNECT 12 V DC CLASS 2 POWER SUPPLY. r Connect the power cord plug to fully insert the power...
WVSC385 User Guide
Page 20
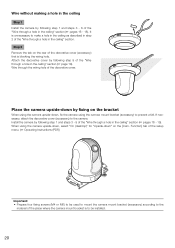
... screws (M4 or M6) to be installed. 20 Wire through the wiring hole of the decorative cover (accessory) that is to prevent a fall. Install the camera by following step 1 and steps 3 - 9 of the "Wire through a hole in the ceiling" section (☞ pages 16 - 19). Step 2 Remove the ...tab on the rear of the decorative cover. Wire without making a hole in the ceiling Step 1 Install the camera by fixing on the bracket When using the camera upside-down, fix the camera using the camera upside-down, select "On (desktop)" for "Upside-down by following step 1 and steps 3 - 8 of the "...
... screws (M4 or M6) to be installed. 20 Wire through the wiring hole of the decorative cover (accessory) that is to prevent a fall. Install the camera by following step 1 and steps 3 - 9 of the "Wire through a hole in the ceiling" section (☞ pages 16 - 19). Step 2 Remove the ...tab on the rear of the decorative cover. Wire without making a hole in the ceiling Step 1 Install the camera by fixing on the bracket When using the camera upside-down, fix the camera using the camera upside-down, select "On (desktop)" for "Upside-down by following step 1 and steps 3 - 8 of the "...
WVSC385 User Guide
Page 21
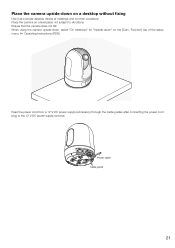
When using the camera upside-down, select "On (desktop)" for "Upside-down on a desktop without fixing Use it as a simple desktop device at meetings and on other occasions. Function] ... power supply (accessory) through the cable guides after connecting the power cord plug to vibrations. Place the camera on a level place not subject to the 12 V DC power supply terminal. Ensure that the camera does not fall. Place the camera upside-down " on the [Cam. Power cable Cable guide 21 4321 MONITOROUT EXT I/O
When using the camera upside-down, select "On (desktop)" for "Upside-down on a desktop without fixing Use it as a simple desktop device at meetings and on other occasions. Function] ... power supply (accessory) through the cable guides after connecting the power cord plug to vibrations. Place the camera on a level place not subject to the 12 V DC power supply terminal. Ensure that the camera does not fall. Place the camera upside-down " on the [Cam. Power cable Cable guide 21 4321 MONITOROUT EXT I/O
WVSC385 User Guide
Page 22
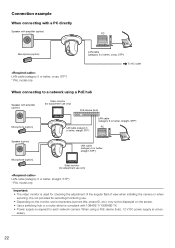
...a PoE device (hub), 12 V DC power supply is unnec- It is not provided for recording/monitoring use. • Depending on the monitor, some characters (camera title, preset ID, etc.) may not be displayed on the screen. • Use a switching hub or a router which is compliant with amplifier (option) Microphone ...*) * PAL model only Important: • The video monitor is required for checking the adjustment of the angular field of view when installing the camera or when servicing. When using a PoE hub Speaker with 10BASE-T/100BASE-TX. • Power supply is used for each network...
...a PoE device (hub), 12 V DC power supply is unnec- It is not provided for recording/monitoring use. • Depending on the monitor, some characters (camera title, preset ID, etc.) may not be displayed on the screen. • Use a switching hub or a router which is compliant with amplifier (option) Microphone ...*) * PAL model only Important: • The video monitor is required for checking the adjustment of the angular field of view when installing the camera or when servicing. When using a PoE hub Speaker with 10BASE-T/100BASE-TX. • Power supply is used for each network...
WVSC385 User Guide
Page 23
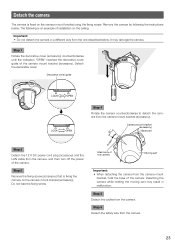
... bracket (accessory). Step 1 Rotate the decorative cover (accessory) counterclockwise until the indication "OPEN" reached the decorative cover guide of the camera. Detach the camera The camera is fixed on the camera mount bracket (accessory). Camera mount bracket (accessory) Base part 20 ° Rotate Step 2 Detach the 12 V DC power cord plug (accessory) and the LAN...
... bracket (accessory). Step 1 Rotate the decorative cover (accessory) counterclockwise until the indication "OPEN" reached the decorative cover guide of the camera. Detach the camera The camera is fixed on the camera mount bracket (accessory). Camera mount bracket (accessory) Base part 20 ° Rotate Step 2 Detach the 12 V DC power cord plug (accessory) and the LAN...


