
Network Camera
Page 1
ME CO VER No model number suffix is shown in this manual for future use. DO INSERT WV-NF284 DO Before attempting to connect or operate this product, please read these instructions carefully and save this manual. ME CO VEARDJUST LOCK Network Camera Network Operating Instructions WV-NF284 Model No.
ME CO VER No model number suffix is shown in this manual for future use. DO INSERT WV-NF284 DO Before attempting to connect or operate this product, please read these instructions carefully and save this manual. ME CO VEARDJUST LOCK Network Camera Network Operating Instructions WV-NF284 Model No.
Network Camera
Page 2
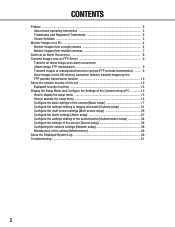
... card when failed to transmit images by the FTP periodic transmission function 10 About the network security of this unit 12 Equipped security functions 12 Display the Setup Menu and Configure the Settings of the Camera using a PC 13 How to display the setup menu 13 How to operate the ...[Alarm setup 27 Configure the settings relating to the authentication [Authentication setup 34 Configure the settings of the servers [Server setup 36 Configuring the network settings [Network setup 38 Maintenance of the camera [Maintenance 46 About the Displayed System Log 49 Troubleshooting ...51 2
... card when failed to transmit images by the FTP periodic transmission function 10 About the network security of this unit 12 Equipped security functions 12 Display the Setup Menu and Configure the Settings of the Camera using a PC 13 How to display the setup menu 13 How to operate the ...[Alarm setup 27 Configure the settings relating to the authentication [Authentication setup 34 Configure the settings of the servers [Server setup 36 Configuring the network settings [Network setup 38 Maintenance of the camera [Maintenance 46 About the Displayed System Log 49 Troubleshooting ...51 2
Network Camera
Page 3
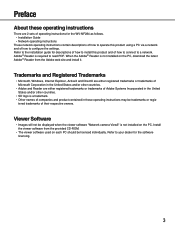
... the viewer software "Network camera View3" is a trademark. • Other names of their respective owners. Install the viewer software from the Adobe web site and install it. When the Adobe® Reader is required to your dealer for the WV-NF284 as follows. • Installation Guide • Network operating instructions These network operating instructions contain descriptions...
... the viewer software "Network camera View3" is a trademark. • Other names of their respective owners. Install the viewer software from the Adobe web site and install it. When the Adobe® Reader is required to your dealer for the WV-NF284 as follows. • Installation Guide • Network operating instructions These network operating instructions contain descriptions...

Network Camera
Page 4
...". It is recommended to change this case, the refresh interval will be displayed. Monitor images from the camera on a PC. The default user name and password are descriptions of how to change the password for ...Panasonic IP setup software in the following are as follows. When "OFF" is selected for "Transmission type" (☞ page 22) • When JPEG images are being transmitted from "80", enter "http://IP address of the camera...)" is selected, a JPEG image will be longer depending on a network environment, PC spec, photographic subject, access traffic, etc. 4
...". It is recommended to change this case, the refresh interval will be displayed. Monitor images from the camera on a PC. The default user name and password are descriptions of how to change the password for ...Panasonic IP setup software in the following are as follows. When "OFF" is selected for "Transmission type" (☞ page 22) • When JPEG images are being transmitted from "80", enter "http://IP address of the camera...)" is selected, a JPEG image will be longer depending on a network environment, PC spec, photographic subject, access traffic, etc. 4
Network Camera
Page 5
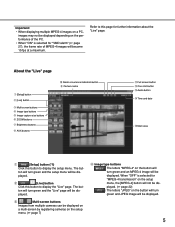
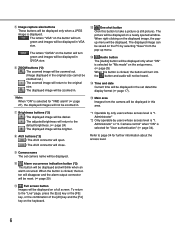
...button Click this button to this button to display the setup menu. e Multi-screen buttons Images from multiple cameras can be displayed on a multi-screen by registering cameras on the setup menu. (☞ page 7) r Image type buttons : The letters "MPEG-4" on the ... button e Multi-screen buttons r Image type buttons t Image capture size buttons y ZOOM buttons u Brightness buttons i AUX buttons !0 Alarm occurrence indication button o Camera name !1 Full screen button !2 One shot button !3 Audio button !4 Time and date !5 Main area q [Setup] button (*1) Click this page for further...
...button Click this button to this button to display the setup menu. e Multi-screen buttons Images from multiple cameras can be displayed on a multi-screen by registering cameras on the setup menu. (☞ page 7) r Image type buttons : The letters "MPEG-4" on the ... button e Multi-screen buttons r Image type buttons t Image capture size buttons y ZOOM buttons u Brightness buttons i AUX buttons !0 Alarm occurrence indication button o Camera name !1 Full screen button !2 One shot button !3 Audio button !4 Time and date !5 Main area q [Setup] button (*1) Click this page for further...
Network Camera
Page 6
... will return to the original size. : The displayed image will be displayed only when "ON" is selected for "User authentication" (☞ page 34). Camera control" when "ON" is selected for "VMD alarm" (☞ page 27), the displayed images will not be zoomed in. When the button is "1....button is "1. y ZOOM buttons (*2) : The zoomed image will be displayed in QVGA size. Administrator" *2 Only operable by selecting "Save" from the camera will be displayed in this area. *1 Operable by only users whose access level is clicked, the button will turn green and images will be displayed...
... will return to the original size. : The displayed image will be displayed only when "ON" is selected for "User authentication" (☞ page 34). Camera control" when "ON" is selected for "VMD alarm" (☞ page 27), the displayed images will not be zoomed in. When the button is "1....button is "1. y ZOOM buttons (*2) : The zoomed image will be displayed in QVGA size. Administrator" *2 Only operable by selecting "Save" from the camera will be displayed in this area. *1 Operable by only users whose access level is clicked, the button will turn green and images will be displayed...
Network Camera
Page 7
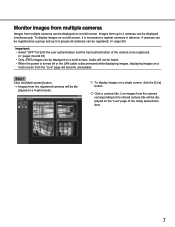
...on a 4-split screen. Audio will not be heard. • When the power is turned off or the LAN cable is necessary to register cameras in advance. 4 cameras can be registered as a group and up to be registered. (☞ pages 34 and 35) • Only JPEG images can be displayed... on the "Live" page of the camera to 4 cameras can be displayed simultaneously. Images from up to 2 groups (8 cameras) can be registered. (☞ page 26) Important: • Select "OFF" for both the user authentication and the host...
...on a 4-split screen. Audio will not be heard. • When the power is turned off or the LAN cable is necessary to register cameras in advance. 4 cameras can be registered as a group and up to be registered. (☞ pages 34 and 35) • Only JPEG images can be displayed... on the "Live" page of the camera to 4 cameras can be displayed simultaneously. Images from up to 2 groups (8 cameras) can be registered. (☞ page 26) Important: • Select "OFF" for both the user authentication and the host...
Network Camera
Page 8
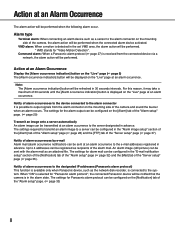
... "Alarm image setup" section of the [Alarm] tab of the "Alarm setup" page (☞ page 28) and the [FTP] tab of the camera and sound the buzzer when an alarm occurs. Note: The [Alarm occurrence indication] button will be sent with the alarm mail as an attached file...connector It is connected to output signals from the connected device via a network, the alarm action will be configured in the set VMD area, the alarm action will be performed. * VMD stands for "Panasonic alarm protocol", the connected Panasonic device will be performed when the following alarm occur. When "ON" ...
... "Alarm image setup" section of the [Alarm] tab of the "Alarm setup" page (☞ page 28) and the [FTP] tab of the camera and sound the buzzer when an alarm occurs. Note: The [Alarm occurrence indication] button will be sent with the alarm mail as an attached file...connector It is connected to output signals from the connected device via a network, the alarm action will be configured in the set VMD area, the alarm action will be performed. * VMD stands for "Panasonic alarm protocol", the connected Panasonic device will be performed when the following alarm occur. When "ON" ...
Network Camera
Page 10
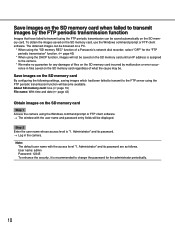
...saved automatically on the SD memory card. The obtained images can be browsed on a PC. * When using the "SD memory REC" function of a Panasonic's network disk recorder, select "OFF" for the "FTP periodic transmission" function. (☞ page 43) * When using the FTP periodic transmission can be displayed.... User name: admin Password: 12345 To enhance the security, it is assigned to the camera. * We make no guarantee for the administrator periodically. 10 Save images on the SD memory card when failed to transmit images by ...
...saved automatically on the SD memory card. The obtained images can be browsed on a PC. * When using the "SD memory REC" function of a Panasonic's network disk recorder, select "OFF" for the "FTP periodic transmission" function. (☞ page 43) * When using the FTP periodic transmission can be displayed.... User name: admin Password: 12345 To enhance the security, it is assigned to the camera. * We make no guarantee for the administrator periodically. 10 Save images on the SD memory card when failed to transmit images by ...
Network Camera
Page 11
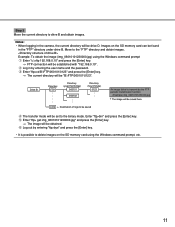
... B. t Enter "ftp> get img_06010101230000.jpg" and press the [Enter] key. → The image will be obtained. Move to drive B and obtain images. w Log in the camera, the current directory will be saved here. e Enter "ftp>cd B:\FTP\060101\0123" and press the [Enter] key. → The current directory will be established...
... B. t Enter "ftp> get img_06010101230000.jpg" and press the [Enter] key. → The image will be obtained. Move to drive B and obtain images. w Log in the camera, the current directory will be saved here. e Enter "ftp>cd B:\FTP\060101\0123" and press the [Enter] key. → The current directory will be established...
Network Camera
Page 12
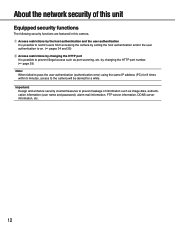
q Access restrictions by the host authentication and the user authentication It is possible to restrict users from accessing the camera by setting the host authentication and/or the user authentication to on. (☞ pages 34 and 35) w Access restrictions by ...user name and password), alarm mail information, FTP server information, DDNS server information, etc. 12 Important: Design and enhance security countermeasures to the camera will be denied for 8 times within 5 minutes, access to prevent leakage of this unit Equipped security functions The following security functions are featured...
q Access restrictions by the host authentication and the user authentication It is possible to restrict users from accessing the camera by setting the host authentication and/or the user authentication to on. (☞ pages 34 and 35) w Access restrictions by ...user name and password), alarm mail information, FTP server information, DDNS server information, etc. 12 Important: Design and enhance security countermeasures to the camera will be denied for 8 times within 5 minutes, access to prevent leakage of this unit Equipped security functions The following security functions are featured...
Network Camera
Page 13
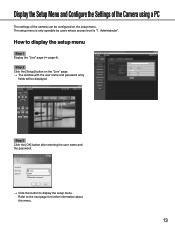
How to display the setup menu. Display the Setup Menu and Configure the Settings of the Camera using a PC The settings of the camera can be displayed. Step 2 Click the [Setup] button on the "Live" page. → The window with the user name and password entry fields will be ...
How to display the setup menu. Display the Setup Menu and Configure the Settings of the Camera using a PC The settings of the camera can be displayed. Step 2 Click the [Setup] button on the "Live" page. → The window with the user name and password entry fields will be ...
Network Camera
Page 15
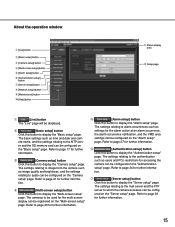
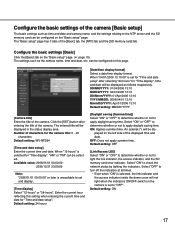
About the operation window q [Live] button w [Basic setup] button e [Camera setup] button r [Multi-screen setup] button t [Alarm setup] button y [Authentication setup] button u [Server setup] button i [Network setup] button o [Maintenance] button !0 [Help] button !1 Status display area !2 Setup page q [Live] button The "Live" page will ...[Server setup] button Click this button to display the "Server setup" page. Refer to audio can be configured on the "Camera setup" page. The basic settings such as image quality and brightness, and the settings relating to page 36 for the alarm ...
About the operation window q [Live] button w [Basic setup] button e [Camera setup] button r [Multi-screen setup] button t [Alarm setup] button y [Authentication setup] button u [Server setup] button i [Network setup] button o [Maintenance] button !0 [Help] button !1 Status display area !2 Setup page q [Live] button The "Live" page will ...[Server setup] button Click this button to display the "Server setup" page. Refer to audio can be configured on the "Camera setup" page. The basic settings such as image quality and brightness, and the settings relating to page 36 for the alarm ...
Network Camera
Page 16
... button Click this button to DDNS (Dynamic DNS), SNMP (Simple Network management Protocol) and FTP (File Transfer Protocol) can be performed on the "Network setup" page. There are tabs for further information. The network settings and the settings relating to display the "Maintenance" page. ...button Click this button to display the "Network setup" page. tion of each setup menu will be displayed. i [Network setup] button Click this button to display the "Help" page. !1 Status display area The name of the camera whose settings currently being configured, and date...
... button Click this button to DDNS (Dynamic DNS), SNMP (Simple Network management Protocol) and FTP (File Transfer Protocol) can be performed on the "Network setup" page. There are tabs for further information. The network settings and the settings relating to display the "Maintenance" page. ...button Click this button to display the "Network setup" page. tion of each setup menu will be displayed. i [Network setup] button Click this button to display the "Help" page. !1 Status display area The name of the camera whose settings currently being configured, and date...
Network Camera
Page 17
...to apply daylight saving time. Default setting: 24 hours [Daylight saving (Summertime)] Select "ON" or "OFF" to determine whether or not to check the network status by lighting the indicators. Number of characters for "Time display", "AM" or "PM" can be configured on the "Basic setup" page. (☞..."12-hours" is set to "OFF". Default setting: ON 17 When "04/01/2006 13:10:00" is selected for the camera title: 0 - 20 characters Default setting: WV-NF284 [Time and date setup] Enter the current time and date. Enter the current hour reflecting this page. [Date/time display format] ...
...to apply daylight saving time. Default setting: 24 hours [Daylight saving (Summertime)] Select "ON" or "OFF" to determine whether or not to check the network status by lighting the indicators. Number of characters for "Time display", "AM" or "PM" can be configured on the "Basic setup" page. (☞..."12-hours" is set to "OFF". Default setting: ON 17 When "04/01/2006 13:10:00" is selected for the camera title: 0 - 20 characters Default setting: WV-NF284 [Time and date setup] Enter the current time and date. Enter the current hour reflecting this page. [Date/time display format] ...
Network Camera
Page 18
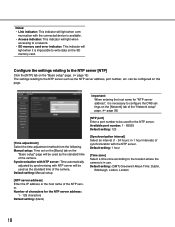
...will light when it is necessary to configure the DNS settings on the [Network] tab of the "Network setup" page. (☞ page 39) [NTP port] Enter a port number to be used as the standard time of the camera. munication with the connected device is available. • Access indicator: ...This indicator will light when accessing to the NTP server [NTP] Click the [NTP] tab on this page. Configure the settings relating to a network. • SD memory card error ...
...will light when it is necessary to configure the DNS settings on the [Network] tab of the "Network setup" page. (☞ page 39) [NTP port] Enter a port number to be used as the standard time of the camera. munication with the connected device is available. • Access indicator: ...This indicator will light when accessing to the NTP server [NTP] Click the [NTP] tab on this page. Configure the settings relating to a network. • SD memory card error ...
Network Camera
Page 19
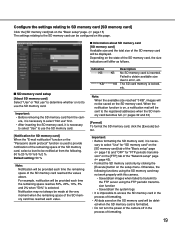
...9758; page 19) and "OFF" for SD memory card] When the "E-mail notification" function or the "Panasonic alarm protocol" function is neces- era, it is necessary to select "Not use the SD memory card. Failed...will be delet- Notification may not always be made at from the cam- Depending on the state of the "Network setup" page (☞ page 43). • Format the SD memory card only by clicking the [Execute] ...KB Description No SD memory card is formatted. • Do not turn the power of the camera off in the process of the SD memory card has reached each time the remaining space of...
...9758; page 19) and "OFF" for SD memory card] When the "E-mail notification" function or the "Panasonic alarm protocol" function is neces- era, it is necessary to select "Not use the SD memory card. Failed...will be delet- Notification may not always be made at from the cam- Depending on the state of the "Network setup" page (☞ page 43). • Format the SD memory card only by clicking the [Execute] ...KB Description No SD memory card is formatted. • Do not turn the power of the camera off in the process of the SD memory card has reached each time the remaining space of...
Network Camera
Page 21
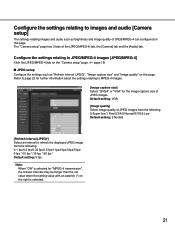
... on the right is selected. 21 Configure the settings relating to JPEG/MPEG-4 images [JPEG/MPEG-4] Click the [JPEG/MPEG-4] tab on the "Camera setup" page. (☞ page 15) ■ JPEG setup Configure the settings such as brightness and image quality of the [JPEG/MPEG-4] tab, the... [Camera] tab and the [Audio] tab. Configure the settings relating to images and audio [Camera setup] The settings relating images and audio such as "Refresh interval (JPEG)", "Image capture size" and "Image...
... on the right is selected. 21 Configure the settings relating to JPEG/MPEG-4 images [JPEG/MPEG-4] Click the [JPEG/MPEG-4] tab on the "Camera setup" page. (☞ page 15) ■ JPEG setup Configure the settings such as brightness and image quality of the [JPEG/MPEG-4] tab, the... [Camera] tab and the [Audio] tab. Configure the settings relating to images and audio [Camera setup] The settings relating images and audio such as "Refresh interval (JPEG)", "Image capture size" and "Image...
Network Camera
Page 22
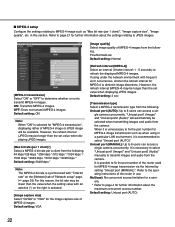
...rate (per a client from the following . ■ MPEG-4 setup Configure the settings relating to MPEG-4 image such as when using under the network environment with an asterisk (*) on the right is necessary to select "Unicast port1 (Image)" and "Unicast port2 (Audio)" manually to transmit images and...*/4096 kbps * Default setting: 2048 kbps * Note: The MPEG-4 bit rate is synchronized with "Total bit rate" on the [Network] tab of MPEG-4 images from the camera. in use. Default setting: ON Note: When "ON" is selected for "MPEG-4 transmission", displaying rather of the router used for...
...rate (per a client from the following . ■ MPEG-4 setup Configure the settings relating to MPEG-4 image such as when using under the network environment with an asterisk (*) on the right is necessary to select "Unicast port1 (Image)" and "Unicast port2 (Audio)" manually to transmit images and...*/4096 kbps * Default setting: 2048 kbps * Note: The MPEG-4 bit rate is synchronized with "Total bit rate" on the [Network] tab of MPEG-4 images from the camera. in use. Default setting: ON Note: When "ON" is selected for "MPEG-4 transmission", displaying rather of the router used for...
Network Camera
Page 23
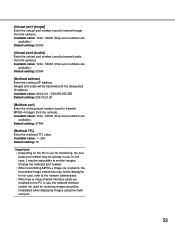
... setting: 32004 [Unicast port2 (Audio)] Enter the unicast port number (used to the network administrator. • When two or more network interface cards are installed on the PC in use, the network interface card(s) not used to transmit audio from the camera). Available value: 1 - 254 Default setting: 16 Important: • Depending on the PC...
... setting: 32004 [Unicast port2 (Audio)] Enter the unicast port number (used to the network administrator. • When two or more network interface cards are installed on the PC in use, the network interface card(s) not used to transmit audio from the camera). Available value: 1 - 254 Default setting: 16 Important: • Depending on the PC...


