
Assembly Instructions
Page 1
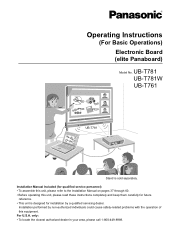
UB-T781 UB-T781W UB-T761 UB-T781 Stand is designed for future reference. • This unit is sold separately. Installation performed by a qualified servicing dealer. only: • To locate the closest authorized dealer in your area, please call 1-800-449-8989. Operating Instructions (For Basic Operations) Electronic Board (elite Panaboard) Model No. For U.S.A. Installation Manual Included (for...
UB-T781 UB-T781W UB-T761 UB-T781 Stand is designed for future reference. • This unit is sold separately. Installation performed by a qualified servicing dealer. only: • To locate the closest authorized dealer in your area, please call 1-800-449-8989. Operating Instructions (For Basic Operations) Electronic Board (elite Panaboard) Model No. For U.S.A. Installation Manual Included (for...
Assembly Instructions
Page 2
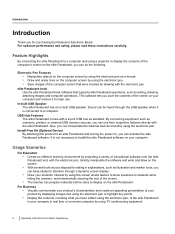
...the USB speaker when it for purchasing the Panasonic Electronic Board. Also, you can use . Usage Scenarios For Education • Create an effective learning environment by projecting a variety of educational software onto the elite Panaboard and, with the electronic pen, directly ... shade feature to show questions to a computer. USB Hub Features The elite Panaboard comes with a 2-port USB hub as writing, drawing, attaching images and computer operations. elite Panaboard book Use the elite Panaboard book software that were created by using the electronic pen as scanners,...
...the USB speaker when it for purchasing the Panasonic Electronic Board. Also, you can use . Usage Scenarios For Education • Create an effective learning environment by projecting a variety of educational software onto the elite Panaboard and, with the electronic pen, directly ... shade feature to show questions to a computer. USB Hub Features The elite Panaboard comes with a 2-port USB hub as writing, drawing, attaching images and computer operations. elite Panaboard book Use the elite Panaboard book software that were created by using the electronic pen as scanners,...
Assembly Instructions
Page 3
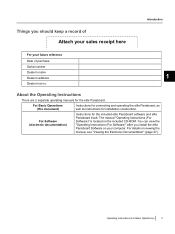
... (For Basic Operations) 3 About the Operating Instructions There are 2 separate operating manuals for the included elite Panaboard software and elite Panaboard book. For details on the included CD-ROM. The manual "Operating Instructions (For Software)" is located... Serial number Dealer's name Dealer's address 1 Dealer's tel no. For Software (electronic documentation) Instructions for the elite Panaboard. Things you install the elite Panaboard Software on your future reference Date of Attach your sales receipt here Introduction For your computer. For Basic Operations ...
... (For Basic Operations) 3 About the Operating Instructions There are 2 separate operating manuals for the included elite Panaboard software and elite Panaboard book. For details on the included CD-ROM. The manual "Operating Instructions (For Software)" is located... Serial number Dealer's name Dealer's address 1 Dealer's tel no. For Software (electronic documentation) Instructions for the elite Panaboard. Things you install the elite Panaboard Software on your future reference Date of Attach your sales receipt here Introduction For your computer. For Basic Operations ...

Assembly Instructions
Page 5
..., repair or inadvertently, the memory contents may be held accountable for saving files) Note • • • To run the elite Panaboard software, Microsoft .NET Framework 2.0 or later and DirectX 7.0 or later are required. Operating Instructions (For Basic Operations) 5 Introduction Warning about... The manufacturer hereby declares that all operating systems. You must have to use the handwriting recognition feature, you install the elite Panaboard software on the CD-ROM, .NET Framework 2.0 will have enough available hard disk space in order to install the Tablet...
..., repair or inadvertently, the memory contents may be held accountable for saving files) Note • • • To run the elite Panaboard software, Microsoft .NET Framework 2.0 or later and DirectX 7.0 or later are required. Operating Instructions (For Basic Operations) 5 Introduction Warning about... The manufacturer hereby declares that all operating systems. You must have to use the handwriting recognition feature, you install the elite Panaboard software on the CD-ROM, .NET Framework 2.0 will have enough available hard disk space in order to install the Tablet...
Assembly Instructions
Page 7
... Procedures 45 Stand Assembly (Sold Separately 47 Included Parts ...47 Assembly Instructions ...48 Assembly Instructions ...51 Preparing for Removing the elite Panaboard from Its Packaging 51 Assembling the elite Panaboard 52 Confirming the elite Panaboard Operation 57 Confirming the Interactive Features 57 Repackaging ...58 Attaching the Install-Free Kit (Sold Separately 59 Attaching the Install-Free...
... Procedures 45 Stand Assembly (Sold Separately 47 Included Parts ...47 Assembly Instructions ...48 Assembly Instructions ...51 Preparing for Removing the elite Panaboard from Its Packaging 51 Assembling the elite Panaboard 52 Confirming the elite Panaboard Operation 57 Confirming the Interactive Features 57 Repackaging ...58 Attaching the Install-Free Kit (Sold Separately 59 Attaching the Install-Free...

Assembly Instructions
Page 14
... illustration of the plug may not be included depending on country/area. Usage Usage Included Accessories Check that an item is missing, please contact your elite Panaboard. The warranty may vary depending on country/area.
... illustration of the plug may not be included depending on country/area. Usage Usage Included Accessories Check that an item is missing, please contact your elite Panaboard. The warranty may vary depending on country/area.

Assembly Instructions
Page 15
...). External Audio Input Port Connect the audio output port of the door to open the pen tray, which can connect external devices directly to the elite Panaboard using these ports. (Page 20) USB Port Directly connect a computer using a projector. 1 Power Switch Pen Tray Push the center of a VCR or... DVD player etc. Do not block the sensor while operating the elite Panaboard. Operating Instructions (For Basic Operations) 15 Status LEDs Left: Power LED (green) Lights green when the power is set in stereo.
...). External Audio Input Port Connect the audio output port of the door to open the pen tray, which can connect external devices directly to the elite Panaboard using these ports. (Page 20) USB Port Directly connect a computer using a projector. 1 Power Switch Pen Tray Push the center of a VCR or... DVD player etc. Do not block the sensor while operating the elite Panaboard. Operating Instructions (For Basic Operations) 15 Status LEDs Left: Power LED (green) Lights green when the power is set in stereo.

Assembly Instructions
Page 16
Electronic Pen Penpoint When you push down on the screen board with your fingers. Doing so will prevent the elite Panaboard from correctly detecting the electronic pen's position. For more information, please consult the relevant dealer. Ultrasonic Emitter Do not block... waves and infrared signals are transmitted, and equivalent of power, such as a right-click with your fingers. Doing so will prevent the elite Panaboard from correctly detecting the electronic pen's position. Battery Cover 16 Operating Instructions (For Basic Operations) Usage Rear View AC Inlet Power Cord Notice...
Electronic Pen Penpoint When you push down on the screen board with your fingers. Doing so will prevent the elite Panaboard from correctly detecting the electronic pen's position. For more information, please consult the relevant dealer. Ultrasonic Emitter Do not block... waves and infrared signals are transmitted, and equivalent of power, such as a right-click with your fingers. Doing so will prevent the elite Panaboard from correctly detecting the electronic pen's position. Battery Cover 16 Operating Instructions (For Basic Operations) Usage Rear View AC Inlet Power Cord Notice...

Assembly Instructions
Page 17
... the screen board. When operating the electronic pen, you will not cause electrical shocks. Inserting (Replacing) Batteries 1. It will hear a buzzing sound due to the elite Panaboard. Remove (replace) the battery cover. 2. This can result in reverse. • Make sure to power-save mode by holding the pen close to the pen...
... the screen board. When operating the electronic pen, you will not cause electrical shocks. Inserting (Replacing) Batteries 1. It will hear a buzzing sound due to the elite Panaboard. Remove (replace) the battery cover. 2. This can result in reverse. • Make sure to power-save mode by holding the pen close to the pen...
Assembly Instructions
Page 18
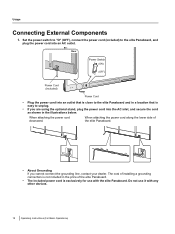
...use with any other devices. 18 Operating Instructions (For Basic Operations) Set the power switch to "O" (OFF), connect the power cord (included) to the elite Panaboard, and plug the power cord into the AC inlet, and secure the cord as shown in the illustrations below. The cost of the... elite Panaboard. • The included power cord is easy to the elite Panaboard and in the price of installing a grounding connection is not included in a location that is exclusively for use it ...
...use with any other devices. 18 Operating Instructions (For Basic Operations) Set the power switch to "O" (OFF), connect the power cord (included) to the elite Panaboard, and plug the power cord into the AC inlet, and secure the cord as shown in the illustrations below. The cost of the... elite Panaboard. • The included power cord is easy to the elite Panaboard and in the price of installing a grounding connection is not included in a location that is exclusively for use it ...

Assembly Instructions
Page 19
... Projector AC Video Cable AC 3. Operating Instructions (For Basic Operations) 19 Computer: Plug the A connector (larger connector) into the elite Panaboard's USB port. Connect the computer to a projector. • For instructions on connecting your computer and projector, refer to a computer ...using the USB cable (included). • elite Panaboard: Plug the B connector (smaller connector) into a USB port on the computer. • Do not connect the elite Panaboard via a USB hub. This could result in erroneous operation. Usage 2. Connect...
... Projector AC Video Cable AC 3. Operating Instructions (For Basic Operations) 19 Computer: Plug the A connector (larger connector) into the elite Panaboard's USB port. Connect the computer to a projector. • For instructions on connecting your computer and projector, refer to a computer ...using the USB cable (included). • elite Panaboard: Plug the B connector (smaller connector) into a USB port on the computer. • Do not connect the elite Panaboard via a USB hub. This could result in erroneous operation. Usage 2. Connect...

Assembly Instructions
Page 20
... To USB Port USB Cable (Sold Separately) Flatbed Scanner MFP To USB Port About the Usage Location • Do not place the elite Panaboard where it is directly exposed to sunlight, near a stove, near to a heating/ cooling vent or exposed to strong winds. • Do... not use the elite Panaboard in a location less than 10 °C (50 °F) or in a location subject to the elite Panaboard using a USB cable (sold separately). • elite Panaboard: Plug the A connector (larger connector) into a USB port on the external device...
... To USB Port USB Cable (Sold Separately) Flatbed Scanner MFP To USB Port About the Usage Location • Do not place the elite Panaboard where it is directly exposed to sunlight, near a stove, near to a heating/ cooling vent or exposed to strong winds. • Do... not use the elite Panaboard in a location less than 10 °C (50 °F) or in a location subject to the elite Panaboard using a USB cable (sold separately). • elite Panaboard: Plug the A connector (larger connector) into a USB port on the external device...

Assembly Instructions
Page 21
..., and the volume of the application. Release the locks on . Moving the elite Panaboard When Using the Stand (Sold Separately) 1 1. Operating Instructions (For Basic Operations) 21 Move the elite Panaboard, avoid banging or shaking the board. Power Switch • After turning the elite Panaboard off, wait more than 2 seconds before turning it back on the casters...
..., and the volume of the application. Release the locks on . Moving the elite Panaboard When Using the Stand (Sold Separately) 1 1. Operating Instructions (For Basic Operations) 21 Move the elite Panaboard, avoid banging or shaking the board. Power Switch • After turning the elite Panaboard off, wait more than 2 seconds before turning it back on the casters...

Assembly Instructions
Page 22
... operating system. • Log into the CD-ROM drive. • The setup screen will be created in the [Panasonic] group in the [elite Panaboard] group: - When the following items will appear in the program menu. • The following screen is displayed, confirm.... Follow the on-screen directions to the same computer. (Doing so can cause erroneous behavior on the computer.) 1. elite Panaboard software - elite Panaboard book - Click [Install elite Panaboard]. 6. Download the latest version 5. Notice • Do not connect the USB cable until the installation is completed. ...
... operating system. • Log into the CD-ROM drive. • The setup screen will be created in the [Panasonic] group in the [elite Panaboard] group: - When the following items will appear in the program menu. • The following screen is displayed, confirm.... Follow the on-screen directions to the same computer. (Doing so can cause erroneous behavior on the computer.) 1. elite Panaboard software - elite Panaboard book - Click [Install elite Panaboard]. 6. Download the latest version 5. Notice • Do not connect the USB cable until the installation is completed. ...
Assembly Instructions
Page 23
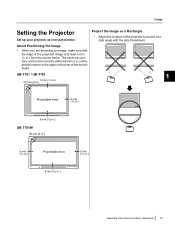
...Positioning the Image • When you are projecting an image, make sure that the edge of the screen board. UB-T781 / UB-T761 1 50 mm (2 in.) 5 mm (1/4 in.) Projectable Area 5 mm (1/4 in.) 5 mm (1/4 in.) UB-T781W 50 mm (2 in.) 5 mm (1/4 in.) Projectable Area 5 mm (1/4 in.) 5 mm (1/4 in .)... from the screen frame. The electronic pen may not function correctly within 50 mm (2 in.) of the position sensor in the upper-left corner of the projected image is at a right angle with the elite Panaboard....
...Positioning the Image • When you are projecting an image, make sure that the edge of the screen board. UB-T781 / UB-T761 1 50 mm (2 in.) 5 mm (1/4 in.) Projectable Area 5 mm (1/4 in.) 5 mm (1/4 in.) UB-T781W 50 mm (2 in.) 5 mm (1/4 in.) Projectable Area 5 mm (1/4 in.) 5 mm (1/4 in .)... from the screen frame. The electronic pen may not function correctly within 50 mm (2 in.) of the position sensor in the upper-left corner of the projected image is at a right angle with the elite Panaboard....

Assembly Instructions
Page 24
...The resolution of the projected image and the electronic pen's position. • Make sure to lock the stand's casters when using the elite Panaboard installed on the image projected onto the screen board. Set the Proper Resolution • Set your projector's documentation for information on your... displayed on a stand, be difficult to avoid looking directly into the projector lamp. Adjust the projector so that accidentally hitting the elite Panaboard or pushing too strongly with the electronic pen will become misaligned in the zoom, focus, etc. - Be sure to changes in...
...The resolution of the projected image and the electronic pen's position. • Make sure to lock the stand's casters when using the elite Panaboard installed on the image projected onto the screen board. Set the Proper Resolution • Set your projector's documentation for information on your... displayed on a stand, be difficult to avoid looking directly into the projector lamp. Adjust the projector so that accidentally hitting the elite Panaboard or pushing too strongly with the electronic pen will become misaligned in the zoom, focus, etc. - Be sure to changes in...

Assembly Instructions
Page 25
... a completion dialog box is displayed. • Restart your computer with the USB cable. • The elite Panaboard software starts automatically. • When you push down on the elite Panaboard. 2. Repeat in the order shown in the illustration below. • Hold and press the electronic pen ...1 been determined correctly, calibration automatically moves to your computer with the USB cable. 3. After the computer has restarted, connect the elite Panaboard to your computer if you are fixed so that they will not move (Wall mounted case), select the [Always use this calibration...
... a completion dialog box is displayed. • Restart your computer with the USB cable. • The elite Panaboard software starts automatically. • When you push down on the elite Panaboard. 2. Repeat in the order shown in the illustration below. • Hold and press the electronic pen ...1 been determined correctly, calibration automatically moves to your computer with the USB cable. 3. After the computer has restarted, connect the elite Panaboard to your computer if you are fixed so that they will not move (Wall mounted case), select the [Always use this calibration...
Assembly Instructions
Page 26
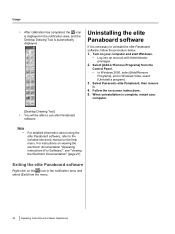
...from the menu. 26 Operating Instructions (For Basic Operations) Exiting the elite Panaboard software Right-click on your computer. [Desktop Drawing Tool] • You will be able to use elite Panaboard software. When uninstallation is necessary to the included electronic manual or ...and the Desktop Drawing Tool is automatically displayed. Turn on the icon in Windows Vista, select [Uninstall a program]. 3. Select Panasonic elite Panaboard, then remove it is complete, restart your computer and start Windows. • Log into an account with Administrator privileges. 2. ...
...from the menu. 26 Operating Instructions (For Basic Operations) Exiting the elite Panaboard software Right-click on your computer. [Desktop Drawing Tool] • You will be able to use elite Panaboard software. When uninstallation is necessary to the included electronic manual or ...and the Desktop Drawing Tool is automatically displayed. Turn on the icon in Windows Vista, select [Uninstall a program]. 3. Select Panasonic elite Panaboard, then remove it is complete, restart your computer and start Windows. • Log into an account with Administrator privileges. 2. ...

Assembly Instructions
Page 27
Download the Latest Software Follow the procedure below to [All Programs] ® [Panasonic] ® [elite Panaboard], and click [Download the latest version]. Turn on your computer. Usage 1 Operating Instructions (For Basic Operations) 27 ... your computer and start Windows. 2. Open "Operating Instructions (For Software)" from the Start menu. ([Start] ® [All Programs] ® [Panasonic] ® [elite Panaboard] ® [Operating Instructions for Software]) • The electronic documentation will be displayed. • For Windows 2000, [Programs] is connected to download...
Download the Latest Software Follow the procedure below to [All Programs] ® [Panasonic] ® [elite Panaboard], and click [Download the latest version]. Turn on your computer. Usage 1 Operating Instructions (For Basic Operations) 27 ... your computer and start Windows. 2. Open "Operating Instructions (For Software)" from the Start menu. ([Start] ® [All Programs] ® [Panasonic] ® [elite Panaboard] ® [Operating Instructions for Software]) • The electronic documentation will be displayed. • For Windows 2000, [Programs] is connected to download...

Assembly Instructions
Page 28
...battery. • Dispose of the electronic pen can result in discoloration.) Após o uso as possible. For Brazil Gently wipe the elite Panaboard with water. • Do not use of expired batteries quickly, by covering the terminals in tape and following the disposal regulations in ... use commercially available white-board cleaner or neutral household cleaner diluted with a soft, moist cloth. Replace the battery soon." Cleaning the elite Panaboard Replacing the Battery in the Electronic Pen When the charge in the battery in the electronic pen is low, the message, "The ...
...battery. • Dispose of the electronic pen can result in discoloration.) Após o uso as possible. For Brazil Gently wipe the elite Panaboard with water. • Do not use of expired batteries quickly, by covering the terminals in tape and following the disposal regulations in ... use commercially available white-board cleaner or neutral household cleaner diluted with a soft, moist cloth. Replace the battery soon." Cleaning the elite Panaboard Replacing the Battery in the Electronic Pen When the charge in the battery in the electronic pen is low, the message, "The ...


