
Panaboard
Page 1
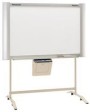
.... • This product is designed for qualified service personnel) Model No. Installation performed by a qualified servicing dealer. Electronic Board [Stand (option)] [Wall-mounting (option)] Stand and wall-mounting kit are optional. After reading them, preserve them carefully for future reference. • Because of the nature of this unit, please read these instructions completely. UB-7325 Operating Instructions Installation Manual • Before operating this equipment. • To locate the...
.... • This product is designed for qualified service personnel) Model No. Installation performed by a qualified servicing dealer. Electronic Board [Stand (option)] [Wall-mounting (option)] Stand and wall-mounting kit are optional. After reading them, preserve them carefully for future reference. • Because of the nature of this unit, please read these instructions completely. UB-7325 Operating Instructions Installation Manual • Before operating this equipment. • To locate the...

Panaboard
Page 2
... with the limits for purchasing the Panasonic Electronic Board. Accessories Q'ty • Thermal transfer film 1 • Markers (red, black, and blue 1 each • Operating Instructions 1 • Eraser 1 • Power cord 1 Q'ty • Letter size copy paper 20 • Software CD-ROM 1 • Software License Agreement 1 • Warranty card 1 * The stand and wall-mounting kit are property of this equipment...
... with the limits for purchasing the Panasonic Electronic Board. Accessories Q'ty • Thermal transfer film 1 • Markers (red, black, and blue 1 each • Operating Instructions 1 • Eraser 1 • Power cord 1 Q'ty • Letter size copy paper 20 • Software CD-ROM 1 • Software License Agreement 1 • Warranty card 1 * The stand and wall-mounting kit are property of this equipment...
Panaboard
Page 3
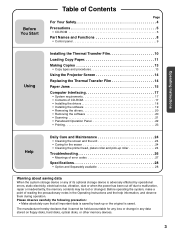
... types and procedures 13 Using the Projector Screen 14 Replacing the Thermal Transfer Film 14 Paper Jams 15 Computer Interfacing 17 • System requirements 17 • Contents of CD-ROM 17 • Installing the drivers 18 • Installing the software 19 • Removing the drivers 20 • Removing the software 20 • Scanning 21 • Panaboard Operation Panel 22 •...
... types and procedures 13 Using the Projector Screen 14 Replacing the Thermal Transfer Film 14 Paper Jams 15 Computer Interfacing 17 • System requirements 17 • Contents of CD-ROM 17 • Installing the drivers 18 • Installing the software 19 • Removing the drivers 20 • Removing the software 20 • Scanning 21 • Panaboard Operation Panel 22 •...
Panaboard
Page 5
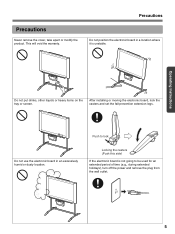
... this side) If the electronic board is not going to lock Do not use the electronic board in a location where it is unstable. This will void the warranty. Operating Instructions Do not put drinks, other liquids or heavy items on the tray or screen. After installing or moving the electronic board, lock the casters and set the fall-prevention extension legs...
... this side) If the electronic board is not going to lock Do not use the electronic board in a location where it is unstable. This will void the warranty. Operating Instructions Do not put drinks, other liquids or heavy items on the tray or screen. After installing or moving the electronic board, lock the casters and set the fall-prevention extension legs...

Panaboard
Page 7
... operating conditions. It may cause the computer operation to become harder to (1 3/8" ) erase. Operating Instructions Precautions Installation Screen Film Markers, Erasers and Thermal Transfer Film Power Cord Replacing the Thermal Transfer Film USB Cable Projector • Do not install the...used thermal transfer film with scissors or shredder before disposing of it.) • Use a shielded USB cable that is certified as logo by USB-IF. • If you connect the electronic board to a USB hub, it is not guaranteed to work. • Do not connect two or more Panasonic electronic boards...
... operating conditions. It may cause the computer operation to become harder to (1 3/8" ) erase. Operating Instructions Precautions Installation Screen Film Markers, Erasers and Thermal Transfer Film Power Cord Replacing the Thermal Transfer Film USB Cable Projector • Do not install the...used thermal transfer film with scissors or shredder before disposing of it.) • Use a shielded USB cable that is certified as logo by USB-IF. • If you connect the electronic board to a USB hub, it is not guaranteed to work. • Do not connect two or more Panasonic electronic boards...

Panaboard
Page 9
.../Remaining Film Indicator Part Names and Functions Reverse Key Advance Key Operating Instructions Panel Contrast Key Copy Key Multi-Copy/Stop Key Multi-Copy/Error Indicator Name Contrast/ Remaining Film Indicator Description This lamp indicator notifies the user when the time to replace the thermal transfer film...until the desired number of copies or " " is pressed. Multi-Copy/ Error Indicator Multi-Copy/ Stop Key Advance Key Reverse Key This indicator displays the number of the printing contrast used during copying. After reaching 0, the display will appear in this display to...
.../Remaining Film Indicator Part Names and Functions Reverse Key Advance Key Operating Instructions Panel Contrast Key Copy Key Multi-Copy/Stop Key Multi-Copy/Error Indicator Name Contrast/ Remaining Film Indicator Description This lamp indicator notifies the user when the time to replace the thermal transfer film...until the desired number of copies or " " is pressed. Multi-Copy/ Error Indicator Multi-Copy/ Stop Key Advance Key Reverse Key This indicator displays the number of the printing contrast used during copying. After reaching 0, the display will appear in this display to...
Panaboard
Page 11
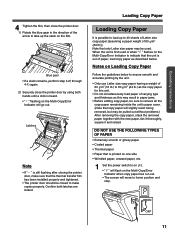
...used . Notes on the Multi-Copy/Error Indicator will go out. DO NOT USE THE FOLLOWING TYPES OF PAPER • Extremely smooth or glossy paper • Coated paper • Thermal paper • Paper that copy paper will move to take up to make sure that the thermal transfer film has been installed...sheets of Letter size copy paper [assuming a paper weight of the arrow to home position and stop. Operating Instructions 4 Tighten the film, then close the printer door by the unit. • Only use Letter size copy paper having a weight of 60 g/m2 (16 lb.) to remove all the copy paper...
...used . Notes on the Multi-Copy/Error Indicator will go out. DO NOT USE THE FOLLOWING TYPES OF PAPER • Extremely smooth or glossy paper • Coated paper • Thermal paper • Paper that copy paper will move to take up to make sure that the thermal transfer film has been installed...sheets of Letter size copy paper [assuming a paper weight of the arrow to home position and stop. Operating Instructions 4 Tighten the film, then close the printer door by the unit. • Only use Letter size copy paper having a weight of 60 g/m2 (16 lb.) to remove all the copy paper...

Panaboard
Page 17
... provided CD-ROM includes the following items. • USB driver • Printer driver • TWAIN driver • Panasonic-DMS software • Panasonic-DMS manual • Electronic board operating instructions • Adobe Acrobat Reader Acrobat® Reader® copyright © 1987-2002 Adobe Systems Incorporated. Operating Instructions Computer Interfacing • Panasonic Document Management System (hereafter Panasonic-DMS) uses the TWAIN driver to scan images drawn on page 18. •...
... provided CD-ROM includes the following items. • USB driver • Printer driver • TWAIN driver • Panasonic-DMS software • Panasonic-DMS manual • Electronic board operating instructions • Adobe Acrobat Reader Acrobat® Reader® copyright © 1987-2002 Adobe Systems Incorporated. Operating Instructions Computer Interfacing • Panasonic Document Management System (hereafter Panasonic-DMS) uses the TWAIN driver to scan images drawn on page 18. •...
Panaboard
Page 18
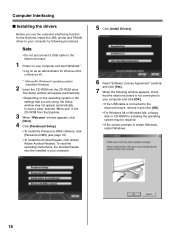
... software, click [Panasonic-DMS] (see page 19). • To install the Acrobat Reader, click [Install Adobe Acrobat Reader]. The Setup window will appear automatically. • Depending on your computer. 5 Click [Install Drivers]. 6 Read "Software License Agreement" carefully and click [Yes]. 7 When the following procedures. Note • Do not yet connect a USB cable to the electronic board. 1 Power on the operating system or the settings...
... software, click [Panasonic-DMS] (see page 19). • To install the Acrobat Reader, click [Install Adobe Acrobat Reader]. The Setup window will appear automatically. • Depending on your computer. 5 Click [Install Drivers]. 6 Read "Software License Agreement" carefully and click [Yes]. 7 When the following procedures. Note • Do not yet connect a USB cable to the electronic board. 1 Power on the operating system or the settings...
Panaboard
Page 19
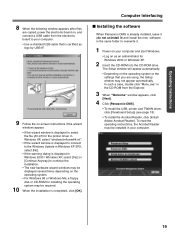
... read the operating instructions, the Acrobat Reader must be installed in Windows 2000 / Windows XP, select [Yes] or [Continue Anyway] to your computer. • Use a shielded USB cable that you are copied, power the electronic board on, and connect a USB cable from the Explorer. 3 When "Welcome" window appears, click [Next]. 4 Click [Panasonic-DMS]. • To install the USB, printer and TWAIN driver, click [Panaboard Setup] (see page...
... read the operating instructions, the Acrobat Reader must be installed in Windows 2000 / Windows XP, select [Yes] or [Continue Anyway] to your computer. • Use a shielded USB cable that you are copied, power the electronic board on, and connect a USB cable from the Explorer. 3 When "Welcome" window appears, click [Next]. 4 Click [Panasonic-DMS]. • To install the USB, printer and TWAIN driver, click [Panaboard Setup] (see page...
Panaboard
Page 20
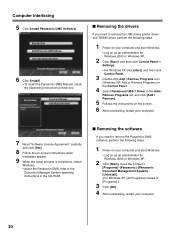
... [Install Panasonic-DMS Software]. 6 Click [Install]. • To install the Panasonic-DMS Manual, check the [Operating Instructions] check box. ■ Removing the drivers If you need to remove the USB driver, printer driver and TWAIN driver, perform the following steps. 1 Power on your computer and start Windows. • Log on as an administrator for Windows 2000 or Windows XP. 2 Click [Start], and then click Control Panel in Settings...
... [Install Panasonic-DMS Software]. 6 Click [Install]. • To install the Panasonic-DMS Manual, check the [Operating Instructions] check box. ■ Removing the drivers If you need to remove the USB driver, printer driver and TWAIN driver, perform the following steps. 1 Power on your computer and start Windows. • Log on as an administrator for Windows 2000 or Windows XP. 2 Click [Start], and then click Control Panel in Settings...

Panaboard
Page 21
... by operating Panasonic-DMS. 1 Click [Start], move the pointer to [Programs]-[Panasonic]-[Panasonic Document Management System]- [Document Manager]. (For Windows XP, [All Programs] instead of the computer. Computer Interfacing 6 Click [Close] on the Toolbar. • The Panaboard Operation Panel will appear. Note • Dragging the Panaboard Operation Panel using the Copy Key on the electronic board. 21 Operating Instructions Note • When the Panaboard Operation Panel...
... by operating Panasonic-DMS. 1 Click [Start], move the pointer to [Programs]-[Panasonic]-[Panasonic Document Management System]- [Document Manager]. (For Windows XP, [All Programs] instead of the computer. Computer Interfacing 6 Click [Close] on the Toolbar. • The Panaboard Operation Panel will appear. Note • Dragging the Panaboard Operation Panel using the Copy Key on the electronic board. 21 Operating Instructions Note • When the Panaboard Operation Panel...
Panaboard
Page 23
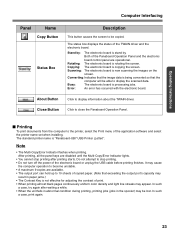
... driver and the electronic board. Rotating: The electronic board is stand by : The electronic board is rotating the screen. The status box displays the status of the electronic board or unplug the USB cable before printing finishes. Stand by . Error: An error has occurred with the electronic board. The standard printer name is copying the screen. After printing, all the panel keys are operational. Copying: The electronic board is "Panaboard...
... driver and the electronic board. Rotating: The electronic board is stand by : The electronic board is rotating the screen. The status box displays the status of the electronic board or unplug the USB cable before printing finishes. Stand by . Error: An error has occurred with the electronic board. The standard printer name is copying the screen. After printing, all the panel keys are operational. Copying: The electronic board is "Panaboard...
Panaboard
Page 26
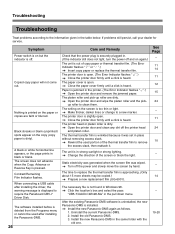
... is on the screen is in the table below. The software installed before is securely plugged in. (If the indicator still does not light, turn the power off . Rewind the used after installing the driver, the warning message is heard. When connecting a USB cable after installing the Panasonic-DMS. 26 Care and Remedy Check that the power plug...
... is on the screen is in the table below. The software installed before is securely plugged in. (If the indicator still does not light, turn the power off . Rewind the used after installing the driver, the warning message is heard. When connecting a USB cable after installing the Panasonic-DMS. 26 Care and Remedy Check that the power plug...
Panaboard
Page 27
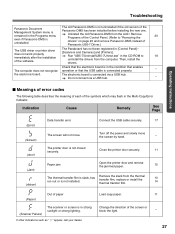
The Panaboard has not been registered in [Control Panel]- [Scanners and Cameras] and [Printers]. Then, install the drivers. 18 Check that the electronic board is in the condition that enables The computer does not recognize operation or that the USB cable is not closed securely. Operating Instructions ■ Meanings of error codes The following table describes the meaning of each of the...
The Panaboard has not been registered in [Control Panel]- [Scanners and Cameras] and [Printers]. Then, install the drivers. 18 Check that the electronic board is in the condition that enables The computer does not recognize operation or that the USB cable is not closed securely. Operating Instructions ■ Meanings of error codes The following table describes the meaning of each of the...
Panaboard
Page 28
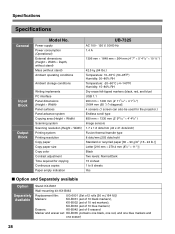
Specifications Specifications General Input Block Output Block Model No. Power supply Power consumption (Operational) External dimensions (Height × Width × Depth, without stand) Mass (without stand) Ambient operating... for copying Continuous copies Paper empty indication UB-7325 AC 100 - 120 V, 50/60 ...Stand: KX-B061 Wall-mounting kit: KX-B063 Replacement film: UG-6001 (Set of 2 rolls [50 m (164 ft.)]) Markers: KX-B031 (set of 10 black markers), KX-B032 (set of 10 red markers), KX-B033 (set of 10 blue markers) Erasers: KX-B042 (set of 6 erasers) Marker and eraser set...
Specifications Specifications General Input Block Output Block Model No. Power supply Power consumption (Operational) External dimensions (Height × Width × Depth, without stand) Mass (without stand) Ambient operating... for copying Continuous copies Paper empty indication UB-7325 AC 100 - 120 V, 50/60 ...Stand: KX-B061 Wall-mounting kit: KX-B063 Replacement film: UG-6001 (Set of 2 rolls [50 m (164 ft.)]) Markers: KX-B031 (set of 10 black markers), KX-B032 (set of 10 red markers), KX-B033 (set of 10 blue markers) Erasers: KX-B042 (set of 6 erasers) Marker and eraser set...

Panaboard
Page 29
... 31 Electronic Board Operations Check 34 Repacking 35 Assembling the Optional Stand (KX-B061 36 ●Accessories 36 ●Assembly 37 Optional Wall-mounting Kit (KX-B063 40 ●Accessories 40 ●Wall-mounting procedure 41 ●Attaching the wall-mounting fixtures 42 Before installing this set, please read this manual completely. CAUTION SAFETY CHECK MUST BE DONE BY QUALIFIED SERVICE...
... 31 Electronic Board Operations Check 34 Repacking 35 Assembling the Optional Stand (KX-B061 36 ●Accessories 36 ●Assembly 37 Optional Wall-mounting Kit (KX-B063 40 ●Accessories 40 ●Wall-mounting procedure 41 ●Attaching the wall-mounting fixtures 42 Before installing this set, please read this manual completely. CAUTION SAFETY CHECK MUST BE DONE BY QUALIFIED SERVICE...

Panaboard
Page 32
... wall-mounting kit (option). ■ Using the stand (option) 1) Hang the electronic board on the optional stand. ■ Using the wall-mounting kit (option) 1) Hang the electronic board on the optional wallmounting fixtures. Caution • When mounting the electronic board, avoid banging it . 32 Install the electronic board using the two wing-bolts [M5 x 12 mm (15/32")] provided with the stand (option). 2) Secure the wall-mounting fixture to support...
... wall-mounting kit (option). ■ Using the stand (option) 1) Hang the electronic board on the optional stand. ■ Using the wall-mounting kit (option) 1) Hang the electronic board on the optional wallmounting fixtures. Caution • When mounting the electronic board, avoid banging it . 32 Install the electronic board using the two wing-bolts [M5 x 12 mm (15/32")] provided with the stand (option). 2) Secure the wall-mounting fixture to support...
Panaboard
Page 40
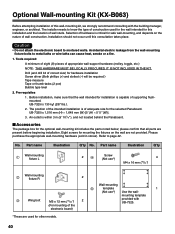
... installation is of supporting flushmounted. UB-7325 is within 3 m (9' 101/8" ), and not located behind the Panaboard. ■ Accessories The package box for this consultation takes place. Caution • Do not attach the electronic board to metal laths or wire laths can cause heat, smoke or a fire. 1. No. Tools required: A minimum of eight (8) pieces of the electronic board) *These are used...
... installation is of supporting flushmounted. UB-7325 is within 3 m (9' 101/8" ), and not located behind the Panaboard. ■ Accessories The package box for this consultation takes place. Caution • Do not attach the electronic board to metal laths or wire laths can cause heat, smoke or a fire. 1. No. Tools required: A minimum of eight (8) pieces of the electronic board) *These are used...
Panaboard
Page 41
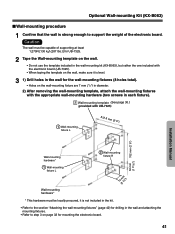
... that the wall is strong enough to support the weight of supporting at least 1,275N [130 kgf (287 lbs.)] for UB-7325. 2 Tape the Wall-mounting template on the wall. • Do not use the template included in the wall-mounting kit (KX-B063), but rather the one included with the electronic board (UB-7325). • When taping the template on...
... that the wall is strong enough to support the weight of supporting at least 1,275N [130 kgf (287 lbs.)] for UB-7325. 2 Tape the Wall-mounting template on the wall. • Do not use the template included in the wall-mounting kit (KX-B063), but rather the one included with the electronic board (UB-7325). • When taping the template on...


