Operating Instructions
Page 1
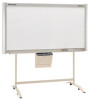
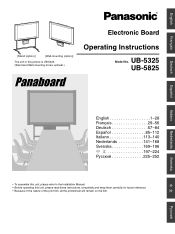
UB-5325 UB-5825 Deutsch Español Italiano Nederlands Svenska English 1-28 Français 29-56 Deutsch 57-84 Español 85-112 Italiano 113-140 ...-168 Svenska 169-196 197-224 225-252 • To assemble this unit, please refer to the Installation Manual. • Before operating this picture is UB-5325. (Stand and Wall-mounting kit are optional.) Operating Instructions Model No. English Français Electronic Board [Stand (option)] [Wall-mounting (option)] The unit...
UB-5325 UB-5825 Deutsch Español Italiano Nederlands Svenska English 1-28 Français 29-56 Deutsch 57-84 Español 85-112 Italiano 113-140 ...-168 Svenska 169-196 197-224 225-252 • To assemble this unit, please refer to the Installation Manual. • Before operating this picture is UB-5325. (Stand and Wall-mounting kit are optional.) Operating Instructions Model No. English Français Electronic Board [Stand (option)] [Wall-mounting (option)] The unit...
Operating Instructions
Page 2
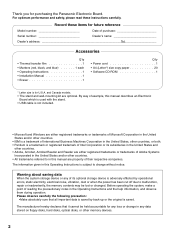
... disks, optical disks, or other countries. • All trademarks referred to malfunction, repair or inadvertently, the memory contents may be held accountable for purchasing the Panasonic Electronic Board. Warning about saving data When the system storage device or any of purchase Serial number Dealer's name Dealer's address T_e_l Accessories Q'ty •...
... disks, optical disks, or other countries. • All trademarks referred to malfunction, repair or inadvertently, the memory contents may be held accountable for purchasing the Panasonic Electronic Board. Warning about saving data When the system storage device or any of purchase Serial number Dealer's name Dealer's address T_e_l Accessories Q'ty •...

Operating Instructions
Page 3
English Before You Start Using Table of Contents Page For Your Safety 4 Precautions 5 • CD-ROM 6 Part Names and Functions 8 • Control panel 9 Installing the Thermal Transfer Film 10 Loading Copy Paper 11 Making Copies 13 • Copy types and procedures 13 Replacing the Thermal Transfer Film 14 Paper Jams 15 Computer Interfacing 17 • System requirements 17 • Contents of CD-ROM 17 • Installing the drivers 18 • Installing the software 19 • Removing the drivers 20 • Removing the software 20 • Scanning 21 • Panaboard...
English Before You Start Using Table of Contents Page For Your Safety 4 Precautions 5 • CD-ROM 6 Part Names and Functions 8 • Control panel 9 Installing the Thermal Transfer Film 10 Loading Copy Paper 11 Making Copies 13 • Copy types and procedures 13 Replacing the Thermal Transfer Film 14 Paper Jams 15 Computer Interfacing 17 • System requirements 17 • Contents of CD-ROM 17 • Installing the drivers 18 • Installing the software 19 • Removing the drivers 20 • Removing the software 20 • Scanning 21 • Panaboard...
Operating Instructions
Page 4
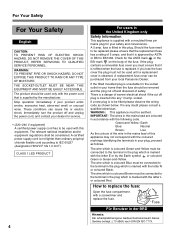
... coloured Brown must not be used with the letter E or by the Earth symbol or coloured Green or Green-and-Yellow. Check for your local Panasonic Dealer. socket. IMPORTANT: The wires in this equipment. The wire which is supplied by ASTA or BSI to the terminal in the plug which is...
... coloured Brown must not be used with the letter E or by the Earth symbol or coloured Green or Green-and-Yellow. Check for your local Panasonic Dealer. socket. IMPORTANT: The wires in this equipment. The wire which is supplied by ASTA or BSI to the terminal in the plug which is...

Operating Instructions
Page 5
This will void the warranty. Do not put drinks, other liquids or heavy items on the tray or screen. English Precautions Never remove the cover, take apart or modify the product. After installing or moving the electronic board, lock the casters and set the fall-prevention extension legs. Precautions Do not position the electronic board in a location where it is not going to lock Do not use the electronic board in an excessively humid or dusty location. Push to be used for an extended period of time (e.g., during extended holidays), turn off the power and remove the plug ...
This will void the warranty. Do not put drinks, other liquids or heavy items on the tray or screen. English Precautions Never remove the cover, take apart or modify the product. After installing or moving the electronic board, lock the casters and set the fall-prevention extension legs. Precautions Do not position the electronic board in a location where it is not going to lock Do not use the electronic board in an excessively humid or dusty location. Push to be used for an extended period of time (e.g., during extended holidays), turn off the power and remove the plug ...

Operating Instructions
Page 6
Please contact your local authority for further information. protective case. For proper treatment, recovery and recycling, please take these products to designated collection points, where they will help to save valuable resources and prevent any potential negative effects on human health and the environment which could otherwise arise from the center to your nearest designated collection point. Disposing of this product correctly will be mixed with general household waste. Penalties may be applicable for incorrect disposal of this product, please contact your dealer or ...
Please contact your local authority for further information. protective case. For proper treatment, recovery and recycling, please take these products to designated collection points, where they will help to save valuable resources and prevent any potential negative effects on human health and the environment which could otherwise arise from the center to your nearest designated collection point. Disposing of this product correctly will be mixed with general household waste. Penalties may be applicable for incorrect disposal of this product, please contact your dealer or ...

Operating Instructions
Page 7
... coil it for transportation as stepping on the power cord or having it is not guaranteed to work. • Do not connect two or more Panasonic electronic boards to a computer.
... coil it for transportation as stepping on the power cord or having it is not guaranteed to work. • Do not connect two or more Panasonic electronic boards to a computer.

Operating Instructions
Page 8
Paper Cover Open this door to load a thermal transfer film or to load copy paper. Control Panel (See page 9 for details.) Power Switch ON OFF AC Inlet Cord Holder Power Cord Printer Door Open this cover to remove jammed paper. (See pages 10, 15.) Part Names and Functions Part Names and Functions Scanner Printer Output Port This port holds up to open the printer door. USB Connector (See page 17.) 8 Screen Tray Stand The stand is optional. Printer Open Lever Push down this lever to 10 sheets of output paper.
Paper Cover Open this door to load a thermal transfer film or to load copy paper. Control Panel (See page 9 for details.) Power Switch ON OFF AC Inlet Cord Holder Power Cord Printer Door Open this cover to remove jammed paper. (See pages 10, 15.) Part Names and Functions Part Names and Functions Scanner Printer Output Port This port holds up to open the printer door. USB Connector (See page 17.) 8 Screen Tray Stand The stand is optional. Printer Open Lever Push down this lever to 10 sheets of output paper.

Operating Instructions
Page 9
Example: 5 → 4 → 3 → 2 → 1 → 0 → 1 (Number is pressed. Advance Key Pressing this key advances the screen from the dealer where you purchased your unit. * The flashing indicator will go out after the power is turned off : Normal printing contrast Indicator on the Multi-Copy/Error Indicator. This indicator displays the number of copies to be copied on a single sheet of the printing contrast used during copying. The display changes each time the screen is approaching (estimated) and of paper. Indicator off , or the printer has been ...
Example: 5 → 4 → 3 → 2 → 1 → 0 → 1 (Number is pressed. Advance Key Pressing this key advances the screen from the dealer where you purchased your unit. * The flashing indicator will go out after the power is turned off : Normal printing contrast Indicator on the Multi-Copy/Error Indicator. This indicator displays the number of copies to be copied on a single sheet of the printing contrast used during copying. The display changes each time the screen is approaching (estimated) and of paper. Indicator off , or the printer has been ...

Operating Instructions
Page 10
Installing the Thermal Transfer Film Installing the Thermal Transfer Film Install the thermal transfer film in front, on the right. 4) Place the white shaft on both sides of the back grooves. White shaft Blue gear 10 Blue gear Printer door 3 Install the thermal transfer film. 1) Set the thermal transfer film, with the blue gear in the printer. 1 Set the power switch to home position and stop. 2) Insert the blue shaft into the front left hole. Blue shaft ON OFF 2 Push down the printer open lever and open the printer door. 3) Place the blue gear on the Multi-Copy/Error Indicator ...
Installing the Thermal Transfer Film Installing the Thermal Transfer Film Install the thermal transfer film in front, on the right. 4) Place the white shaft on both sides of the back grooves. White shaft Blue gear 10 Blue gear Printer door 3 Install the thermal transfer film. 1) Set the thermal transfer film, with the blue gear in the printer. 1 Set the power switch to home position and stop. 2) Insert the blue shaft into the front left hole. Blue shaft ON OFF 2 Push down the printer open lever and open the printer door. 3) Place the blue gear on the Multi-Copy/Error Indicator ...

Operating Instructions
Page 11
Latches Note • If " " is possible to load up the slack on the film. and Canada models. Note that the unit is out of paper, load copy paper as described below. * Letter size is first used . Notes on the Multi-Copy/Error Indicator when copy paper has run out. • The screen will go out. DO NOT USE THE FOLLOWING TYPES OF PAPER • Extremely smooth or glossy paper • Coated paper • Thermal paper • Paper that is printed on one side • Wrinkled paper, creased paper, etc. 1 Set the power switch to on ( I ). • " " will slightly resist being ...
Latches Note • If " " is possible to load up the slack on the film. and Canada models. Note that the unit is out of paper, load copy paper as described below. * Letter size is first used . Notes on the Multi-Copy/Error Indicator when copy paper has run out. • The screen will go out. DO NOT USE THE FOLLOWING TYPES OF PAPER • Extremely smooth or glossy paper • Coated paper • Thermal paper • Paper that is printed on one side • Wrinkled paper, creased paper, etc. 1 Set the power switch to on ( I ). • " " will slightly resist being ...
Operating Instructions
Page 12
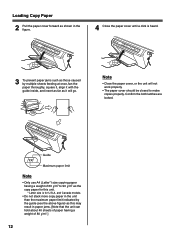
Guide Maximum paper limit Note • Only use A4 (Letter*) size copying paper having a weight of 80 g/m2.] 12 Note • Close the paper cover, or the unit will go. and Canada models. • Do not stack more copy paper in the unit than the maximum paper limit indicated by multiple sheets feeding at once, fan the paper thoroughly, square it, align it with the guide inside, and insert as far as it will not work properly. • The paper cover should be closed to 90 g/m2 as the copy paper for U.S.A. Loading Copy Paper 2 Pull the paper cover forward as shown in the figure. 4 ...
Guide Maximum paper limit Note • Only use A4 (Letter*) size copying paper having a weight of 80 g/m2.] 12 Note • Close the paper cover, or the unit will go. and Canada models. • Do not stack more copy paper in the unit than the maximum paper limit indicated by multiple sheets feeding at once, fan the paper thoroughly, square it, align it with the guide inside, and insert as far as it will not work properly. • The paper cover should be closed to 90 g/m2 as the copy paper for U.S.A. Loading Copy Paper 2 Pull the paper cover forward as shown in the figure. 4 ...

Operating Instructions
Page 13
English Making Copies This section describes how to copy text and illustrations drawn on the screen. 1 Set the power switch to on ( I ). • " " will light on the Multi-Copy/Error Indicator to indicate that the unit is ready to copy. • The screen will move the screen to be copied and copies emerge from this unit. ON OFF 2 Press the Copy Key . • Text and illustrations on a single sheet of paper 1) Press . 13 screen copies and so on, see "Copy types and procedures" on this may result in dirty rollers, degradation of printing quality, paper jams, and streaks ...
English Making Copies This section describes how to copy text and illustrations drawn on the screen. 1 Set the power switch to on ( I ). • " " will light on the Multi-Copy/Error Indicator to indicate that the unit is ready to copy. • The screen will move the screen to be copied and copies emerge from this unit. ON OFF 2 Press the Copy Key . • Text and illustrations on a single sheet of paper 1) Press . 13 screen copies and so on, see "Copy types and procedures" on this may result in dirty rollers, degradation of printing quality, paper jams, and streaks ...

Operating Instructions
Page 14
... film as the replacement film. (Note that the thermal transfer film has been installed properly and tightened. • The printer door should be purchased from Panasonic as "burnable" or "nonrecyclable" rubbish. • A negative of replacement film may be closed to the unit.) • Thermal transfer film is still flashing after closing...
... film as the replacement film. (Note that the thermal transfer film has been installed properly and tightened. • The printer door should be purchased from Panasonic as "burnable" or "nonrecyclable" rubbish. • A negative of replacement film may be closed to the unit.) • Thermal transfer film is still flashing after closing...

Operating Instructions
Page 15
Paper Jams 4 Install the thermal transfer film. • Refer to make sure that the paper feeder is still flashing after the foregoing procedure has been performed; this may be closed to steps 3 and 4 in the section of the output port or when " " flashes on the Multi-Copy/Error Indicator will go out after closing the printer door, make copies properly. Jammed paper Note • The copy paper will slightly resist being removed, but may indicate that the thermal transfer film has been installed properly and tightened. • The printer door should be pulled out without ...
Paper Jams 4 Install the thermal transfer film. • Refer to make sure that the paper feeder is still flashing after the foregoing procedure has been performed; this may be closed to steps 3 and 4 in the section of the output port or when " " flashes on the Multi-Copy/Error Indicator will go out after closing the printer door, make copies properly. Jammed paper Note • The copy paper will slightly resist being removed, but may indicate that the thermal transfer film has been installed properly and tightened. • The printer door should be pulled out without ...

Operating Instructions
Page 16
Note • Close the paper cover, or the unit will move to make copies properly. Paper Jams 3 To prevent paper jams such as those caused by the guide (see figure) as this may result in the unit than the maximum paper limit indicated by multiple sheets feeding at once, fan the paper thoroughly, square it, align it with the guide inside, and insert as far as it will go. 5 Turn the power on. • " " will light on the Multi-Copy/Error Indicator to indicate that the unit can hold about 40 sheets of paper having a weight of 80 g/m2.] 4 Close the paper cover until a click is ready to ...
Note • Close the paper cover, or the unit will move to make copies properly. Paper Jams 3 To prevent paper jams such as those caused by the guide (see figure) as this may result in the unit than the maximum paper limit indicated by multiple sheets feeding at once, fan the paper thoroughly, square it, align it with the guide inside, and insert as far as it will go. 5 Turn the power on. • " " will light on the Multi-Copy/Error Indicator to indicate that the unit can hold about 40 sheets of paper having a weight of 80 g/m2.] 4 Close the paper cover until a click is ready to ...
Operating Instructions
Page 17
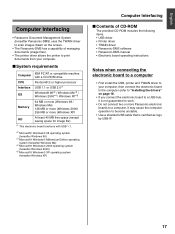
... of CD-ROM The provided CD-ROM includes the following items. • USB driver • Printer driver • TWAIN driver • Panasonic-DMS software • Panasonic-DMS manual • Electronic board operating instructions Notes when connecting the electronic board to a computer • First install the USB, printer and ...8226; If you connect the electronic board to a USB hub, it is not guaranteed to work. • Do not connect two or more Panasonic electronic boards to become unstable. • Use a shielded USB cable that is certified as logo by USB-IF. 17 It may cause the ...
... of CD-ROM The provided CD-ROM includes the following items. • USB driver • Printer driver • TWAIN driver • Panasonic-DMS software • Panasonic-DMS manual • Electronic board operating instructions Notes when connecting the electronic board to a computer • First install the USB, printer and ...8226; If you connect the electronic board to a USB hub, it is not guaranteed to work. • Do not connect two or more Panasonic electronic boards to become unstable. • Use a shielded USB cable that is certified as logo by USB-IF. 17 It may cause the ...
Operating Instructions
Page 18
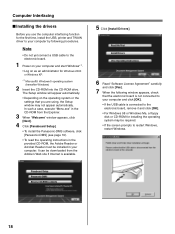
... not appear automatically. It can be downloaded from the Explorer. 3 When "Welcome" window appears, click [Next]. 4 Click [Panaboard Setup]. • To install the Panasonic-DMS software, click [Panasonic-DMS] (see page 19). • To read the operating instructions in the provided CD-ROM, the Adobe Reader or Acrobat Reader must be required...
... not appear automatically. It can be downloaded from the Explorer. 3 When "Welcome" window appears, click [Next]. 4 Click [Panaboard Setup]. • To install the Panasonic-DMS software, click [Panasonic-DMS] (see page 19). • To read the operating instructions in the provided CD-ROM, the Adobe Reader or Acrobat Reader must be required...
Operating Instructions
Page 19
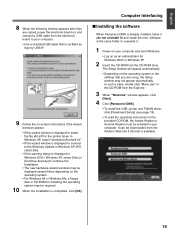
...the operating system may not appear automatically. It can be downloaded from the Explorer. 3 When "Welcome" window appears, click [Next]. 4 Click [Panasonic-DMS]. • To install the USB, printer and TWAIN driver, click [Panaboard Setup] (see page 18). • To read the operating ...instructions in the provided CD-ROM, the Adobe Reader or Acrobat Reader must be required. Computer Interfacing ■ Installing the software When Panasonic-DMS is completed, click [OK]. English 8 When the following window appears after files are copied, power the electronic board on, and...
...the operating system may not appear automatically. It can be downloaded from the Explorer. 3 When "Welcome" window appears, click [Next]. 4 Click [Panasonic-DMS]. • To install the USB, printer and TWAIN driver, click [Panaboard Setup] (see page 18). • To read the operating ...instructions in the provided CD-ROM, the Adobe Reader or Acrobat Reader must be required. Computer Interfacing ■ Installing the software When Panasonic-DMS is completed, click [OK]. English 8 When the following window appears after files are copied, power the electronic board on, and...
Operating Instructions
Page 20
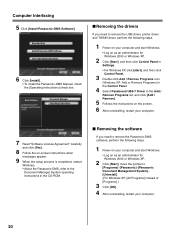
... click [Yes]. 8 Follow the on-screen instructions when messages appear. 9 When the setup process is completed, restart Windows. • About the Panasonic-DMS, refer to the Document Manager System operating instructions in the CD-ROM. ■ Removing the software If you need to remove the... Windows. • Log on as an administrator for Windows 2000 or Windows XP. 2 Click [Start], move the pointer to [Programs]-[Panasonic]-[Panasonic Document Management System]- [Uninstall]. (For Windows XP, [All Programs] instead of [Programs].) 3 Click [OK]. 4 After uninstalling, restart your computer. 20
... click [Yes]. 8 Follow the on-screen instructions when messages appear. 9 When the setup process is completed, restart Windows. • About the Panasonic-DMS, refer to the Document Manager System operating instructions in the CD-ROM. ■ Removing the software If you need to remove the... Windows. • Log on as an administrator for Windows 2000 or Windows XP. 2 Click [Start], move the pointer to [Programs]-[Panasonic]-[Panasonic Document Management System]- [Uninstall]. (For Windows XP, [All Programs] instead of [Programs].) 3 Click [OK]. 4 After uninstalling, restart your computer. 20