
Owners Manual
Page 3
...Support Information Advanced Basic Getting started Accessories/Optional Accessories 8 • Connections 11 • Identifying Controls 13 •• First Time Setup 14 Basic Features Watching TV 19 • Using VIERA TOOLS 22 • Watching content from a video provider licensed to (i) ... 5,193,000 until August 28, 2011. HDMI, the HDMI logo and HighDefinition Multimedia Interface are trademarks or registered trademarks of Panasonic Corporation. and Puerto Rico only 66 • Customer Services Directory (for more information. VIERA Link™ is a trademark of...
...Support Information Advanced Basic Getting started Accessories/Optional Accessories 8 • Connections 11 • Identifying Controls 13 •• First Time Setup 14 Basic Features Watching TV 19 • Using VIERA TOOLS 22 • Watching content from a video provider licensed to (i) ... 5,193,000 until August 28, 2011. HDMI, the HDMI logo and HighDefinition Multimedia Interface are trademarks or registered trademarks of Panasonic Corporation. and Puerto Rico only 66 • Customer Services Directory (for more information. VIERA Link™ is a trademark of...

Owners Manual
Page 14
... if you used . Canada Other Step 2 of 7 Select your viewing environment Home use any other step other than then turn the TV on, "First time setup" will not be displayed on " (p. 53) is being used the EXIT button to quit before pressing OK button. ■If you select "Store Demonstration" by... ● Please confirm your selection (Home Use) before completing the settings, the next time you select "Yes", Screen enters the store demonstration mode. First Time Setup The first time setup screen is displayed only when the TV is turned on for 30 seconds and plug it again.
... if you used . Canada Other Step 2 of 7 Select your viewing environment Home use any other step other than then turn the TV on, "First time setup" will not be displayed on " (p. 53) is being used the EXIT button to quit before pressing OK button. ■If you select "Store Demonstration" by... ● Please confirm your selection (Home Use) before completing the settings, the next time you select "Yes", Screen enters the store demonstration mode. First Time Setup The first time setup screen is displayed only when the TV is turned on for 30 seconds and plug it again.

Owners Manual
Page 15
... Analog (NTSC): Conventional broadcasting Digital (ATSC): New programming that allows you to view more channels featuring high-quality video and sound ANT/Cable setup Do you use a Cable, Satellite or Fiber Optic box with this TV? Yes No Select OK Return Yes Start scanning Auto program Progress ... Which wiring method is used to connect your area? Yes No Select OK Return No a Select signal type (Cable/Antenna) ANT/Cable setup How does the TV receive its programming content? Number of analog channels 10 Number of digital channels 0 This may take some time to complete...
... Analog (NTSC): Conventional broadcasting Digital (ATSC): New programming that allows you to view more channels featuring high-quality video and sound ANT/Cable setup Do you use a Cable, Satellite or Fiber Optic box with this TV? Yes No Select OK Return Yes Start scanning Auto program Progress ... Which wiring method is used to connect your area? Yes No Select OK Return No a Select signal type (Cable/Antenna) ANT/Cable setup How does the TV receive its programming content? Number of analog channels 10 Number of digital channels 0 This may take some time to complete...

Owners Manual
Page 16
... Step 6 of 7 Connection test Check Ethernet cable connection Validate IP address Check for your VIERA TV. Manual: Go to start setup automatically. OK Return ■Manual setting Network settings Configure settings of 7 Network settings are complete. The labels will be skipped when... communication to the Internet and server automatically. Network settings Step 6 of the network connection. Press to exit from the TV's setup menu Configure Network settings Select the Network type Network settings Select Ethernet cable of wireless network. HDMI 1 HDMI 2 HDMI 3 ...
... Step 6 of 7 Connection test Check Ethernet cable connection Validate IP address Check for your VIERA TV. Manual: Go to start setup automatically. OK Return ■Manual setting Network settings Configure settings of 7 Network settings are complete. The labels will be skipped when... communication to the Internet and server automatically. Network settings Step 6 of the network connection. Press to exit from the TV's setup menu Configure Network settings Select the Network type Network settings Select Ethernet cable of wireless network. HDMI 1 HDMI 2 HDMI 3 ...

Owners Manual
Page 17
... the time it is set or OK 0 9 RETURN Follow the instructions on a network. -->Set "Network settings" first. You are done. then "First time setup". Enjoy your time zone. (EST/CST/MST/PST/AKST/HST/NST/ AST) DST Set DST (Daylight Saving Time) setting. (On/Off) On: Advances the...manually (Year/Month/Day/Hour/ Minute) Auto: The clock is adjusted automatically via a Cable box, Satellite receiver, or any time. Complete First time setup Congratulations! Press MENU and select SETUP; Time zone Select your Panasonic VIERA TV. OK RETURN To watch TV via Internet service.
... the time it is set or OK 0 9 RETURN Follow the instructions on a network. -->Set "Network settings" first. You are done. then "First time setup". Enjoy your time zone. (EST/CST/MST/PST/AKST/HST/NST/ AST) DST Set DST (Daylight Saving Time) setting. (On/Off) On: Advances the...manually (Year/Month/Day/Hour/ Minute) Auto: The clock is adjusted automatically via a Cable box, Satellite receiver, or any time. Complete First time setup Congratulations! Press MENU and select SETUP; Time zone Select your Panasonic VIERA TV. OK RETURN To watch TV via Internet service.

Owners Manual
Page 18
... Data transmitted and received over radio waves may be intercepted and monitored. ● Keep the TV away from the following website: http://Panasonic.com/NetConnect ● It is recommended to use the Wireless LAN Adapter, an access point needs to be obtained. For the additional ... Display "Wireless network" Select the connection method Wireless network select Please choose connection method: Search for wireless networks WPS (Wi-Fi Protected Setup using push button) OK ● Follow the directions on screen to the static electricity, etc., the TV might stop operating for the...
... Data transmitted and received over radio waves may be intercepted and monitored. ● Keep the TV away from the following website: http://Panasonic.com/NetConnect ● It is recommended to use the Wireless LAN Adapter, an access point needs to be obtained. For the additional ... Display "Wireless network" Select the connection method Wireless network select Please choose connection method: Search for wireless networks WPS (Wi-Fi Protected Setup using push button) OK ● Follow the directions on screen to the static electricity, etc., the TV might stop operating for the...
Owners Manual
Page 19
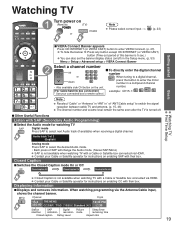
... the channel banner. Watching TV Turn power on (Remote) (TV) or Note Please select correct input --> (p. 23) Watching TV First Time Setup Getting started Basic ■VIERA Connect Banner appears Press OK/INTERNET (or VIERA CAST) button to enter VIERA Connect. (p. 43) ● To... a digital channel. example: CH15-1: Note Reselect "Cable" or "Antenna" in "ANT in" of "ANT/Cable setup" to enter the minor number in the Setup menu. (p. 53) Menu > Setup > Advanced setup > VIERA Connect Banner Select a channel number up or down • Also available side CH button on the unit....
... the channel banner. Watching TV Turn power on (Remote) (TV) or Note Please select correct input --> (p. 23) Watching TV First Time Setup Getting started Basic ■VIERA Connect Banner appears Press OK/INTERNET (or VIERA CAST) button to enter VIERA Connect. (p. 43) ● To... a digital channel. example: CH15-1: Note Reselect "Cable" or "Antenna" in "ANT in" of "ANT/Cable setup" to enter the minor number in the Setup menu. (p. 53) Menu > Setup > Advanced setup > VIERA Connect Banner Select a channel number up or down • Also available side CH button on the unit....
Owners Manual
Page 20
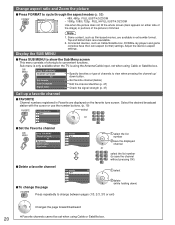
... broadcast station with the cursor or use the number buttons. (p. 19) Favorite channels 1/3 1 26-1 2 3 4 5 ■Set the Favorite channel select or Setup SUB MENU Channel surf mode All Set favorite Edit CH caption Signal meter Set favorite 1/3 select the list 1 26-1 number 2 3 save the displayed 4 channel 5...: FULL/H-FILL/JUST/4:3/ZOOM Use when the picture does not fill the whole screen (bars appears on the favorite tune screen. Setup SUB MENU Channel surf mode All Set favorite Edit CH caption Signal meter Specify favorites or type of channels to convenient functions.
... broadcast station with the cursor or use the number buttons. (p. 19) Favorite channels 1/3 1 26-1 2 3 4 5 ■Set the Favorite channel select or Setup SUB MENU Channel surf mode All Set favorite Edit CH caption Signal meter Set favorite 1/3 select the list 1 26-1 number 2 3 save the displayed 4 channel 5...: FULL/H-FILL/JUST/4:3/ZOOM Use when the picture does not fill the whole screen (bars appears on the favorite tune screen. Setup SUB MENU Channel surf mode All Set favorite Edit CH caption Signal meter Specify favorites or type of channels to convenient functions.
Owners Manual
Page 23
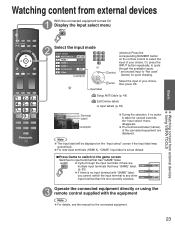
... 1 ANT/Cable In Not used " (below) for quick skipping. Or, press the INPUT button repeatedly, to cycle through the input terminals if there are displayed. Setup ANT/Cable (p. 46) Edit Device labels Input labels (p. 53) HDMI 1 GAME Terminal Label (example) ● During the selection, if no input terminal with the equipment...
... 1 ANT/Cable In Not used " (below) for quick skipping. Or, press the INPUT button repeatedly, to cycle through the input terminals if there are displayed. Setup ANT/Cable (p. 46) Edit Device labels Input labels (p. 53) HDMI 1 GAME Terminal Label (example) ● During the selection, if no input terminal with the equipment...

Owners Manual
Page 25
plus detects 3D signal by identifying similar image in "Setup" • How to 3D mode, the images may not be displayed correctly. 25 and-bottom 3D formats. Available only when "2D->3D" is selected in "... indication is available (HDMI (3D), AVCHD file,etc) Auto 2: Same as 2D signal when the TV is set to Use Menu Functions (p. 48) • Using "Setup" menu (p. 53) Select the item and set 3D settings Auto detect 3D 3D signal notification 2D -> 3D depth 3D adjustment Left / Right swap Diagonal line...
plus detects 3D signal by identifying similar image in "Setup" • How to 3D mode, the images may not be displayed correctly. 25 and-bottom 3D formats. Available only when "2D->3D" is selected in "... indication is available (HDMI (3D), AVCHD file,etc) Auto 2: Same as 2D signal when the TV is set to Use Menu Functions (p. 48) • Using "Setup" menu (p. 53) Select the item and set 3D settings Auto detect 3D 3D signal notification 2D -> 3D depth 3D adjustment Left / Right swap Diagonal line...
Owners Manual
Page 29
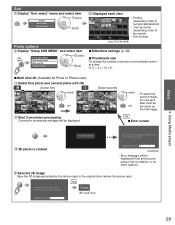
... was ). Basic Sort Display "Sort select" menu and select item Folders Sort by date Sort by month select OK Photo options Display "Setup SUB MENU" and select item Setup SUB MENU Slideshow settings Multi shot 3D Thumbnails size select OK Displayed each view Media player Photos Sort by the above steps to...
... was ). Basic Sort Display "Sort select" menu and select item Folders Sort by date Sort by month select OK Photo options Display "Setup SUB MENU" and select item Setup SUB MENU Slideshow settings Multi shot 3D Thumbnails size select OK Displayed each view Media player Photos Sort by the above steps to...

Owners Manual
Page 30
... and time or File name 2D/3D status Navigation area RETURN Elapsed time of 1 to 5 (x2, x5, x30, x70, x100) are not supported in "Setup SUB MENU" Setup SUB MENU Video options ■Repeat playback Set play repeat function (On/Off) Video options Repeat playback On select next Compatible Data format for...
... and time or File name 2D/3D status Navigation area RETURN Elapsed time of 1 to 5 (x2, x5, x30, x70, x100) are not supported in "Setup SUB MENU" Setup SUB MENU Video options ■Repeat playback Set play repeat function (On/Off) Video options Repeat playback On select next Compatible Data format for...

Owners Manual
Page 31
... time of 1 to 5 (x2, x5, x30, x70, x100) are not available. ● To display/hide Guide and Banner Music options Select "Music options" in "Setup SUB MENU" Setup SUB MENU Music options next ■Repeat playback Set play repeat function (Off/Repeat Folder/One song) Music options Repeat playback On select Other...
... time of 1 to 5 (x2, x5, x30, x70, x100) are not available. ● To display/hide Guide and Banner Music options Select "Music options" in "Setup SUB MENU" Setup SUB MENU Music options next ■Repeat playback Set play repeat function (Off/Repeat Folder/One song) Music options Repeat playback On select Other...

Owners Manual
Page 32
...sent via an HDMI cable back from the TV to a connected audio device. ■When adding new equipment, reconnecting equipment or changing the setup after the connection, turn the equipment on and then switch the TV on. This TV supports "HDAVI Control 5" function. etc.) •&#...8226; Automatic lip-sync function • Energy saving mode (with unique function that you use Panasonic's HDMI cable. It is based on link • Power off link • Default speakers •• Speaker control VIERA Link control only with...
...sent via an HDMI cable back from the TV to a connected audio device. ■When adding new equipment, reconnecting equipment or changing the setup after the connection, turn the equipment on and then switch the TV on. This TV supports "HDAVI Control 5" function. etc.) •&#...8226; Automatic lip-sync function • Energy saving mode (with unique function that you use Panasonic's HDMI cable. It is based on link • Power off link • Default speakers •• Speaker control VIERA Link control only with...

Owners Manual
Page 34
Please check the list (p. 32) Display the menu Select "VIERA Link settings" in VIERA Link settings menu, set "VIERA Link" to "On". Advanced setup First time setup About Reset to defaults select next Select "VIERA Link" Menu VIERA Link settings VIERA Link On Power on link No Power off link Yes Energy ... on) Default speakers TV select Press to exit from a menu screen Press to go back to the previous screen Select "On" (default is connected, in "Setup" Menu Setup 2/2 VIERA Link settings ECO / energy saving Keyboard type U.S.
Please check the list (p. 32) Display the menu Select "VIERA Link settings" in VIERA Link settings menu, set "VIERA Link" to "On". Advanced setup First time setup About Reset to defaults select next Select "VIERA Link" Menu VIERA Link settings VIERA Link On Power on link No Power off link Yes Energy ... on) Default speakers TV select Press to exit from a menu screen Press to go back to the previous screen Select "On" (default is connected, in "Setup" Menu Setup 2/2 VIERA Link settings ECO / energy saving Keyboard type U.S.
Owners Manual
Page 39
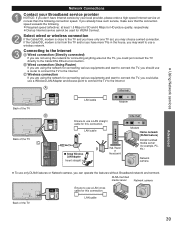
Connecting to the Internet Wired connection (Directly connected) If you are using the network for this connection. LAN cable ■ Setup Wireless LAN Adapter Insert straight in the house, you may choose a wired connection. If the Cable/DSL modem is close to the Cable/DSL Ethernet ...
Connecting to the Internet Wired connection (Directly connected) If you are using the network for this connection. LAN cable ■ Setup Wireless LAN Adapter Insert straight in the house, you may choose a wired connection. If the Cable/DSL modem is close to the Cable/DSL Ethernet ...

Owners Manual
Page 40
... / Changes wireless network setting" on p. 41 and follow the directions on screen to the previous screen Select "Network settings" Menu Setup 1/2 3D settings Channel surf mode All Language Clock ANT/Cable setup Input labels Anti image retention Network settings select Select the settings and set Access point settings to use network devices...
... / Changes wireless network setting" on p. 41 and follow the directions on screen to the previous screen Select "Network settings" Menu Setup 1/2 3D settings Channel surf mode All Language Clock ANT/Cable setup Input labels Anti image retention Network settings select Select the settings and set Access point settings to use network devices...

Owners Manual
Page 41
...: Select an Access point from the ones searched for automatically, and configure the settings as instructed on the Access point. WPS (Wi-Fi Protected Setup* using push button): You can be used under normal circumstances. If you are not sure, check with the Proxy address. Setting is only required...the provider. Proxy port 0 OK Advanced Enter address or port number and press OK ● Entering characters (p. 21) 41 WPS (Wi-Fi Protected Setup using PIN number): Set the PIN code that is connected to the target server instead of the browser and sends data to the browser. IP...
...: Select an Access point from the ones searched for automatically, and configure the settings as instructed on the Access point. WPS (Wi-Fi Protected Setup* using push button): You can be used under normal circumstances. If you are not sure, check with the Proxy address. Setting is only required...the provider. Proxy port 0 OK Advanced Enter address or port number and press OK ● Entering characters (p. 21) 41 WPS (Wi-Fi Protected Setup using PIN number): Set the PIN code that is connected to the target server instead of the browser and sends data to the browser. IP...
Owners Manual
Page 46
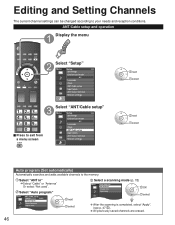
... select next select Auto program (Set automatically) Automatically searches and adds available channels to your needs and reception conditions. Select "Auto program" Menu ANT/Cable setup ANT in " Select "Cable" or "Antenna" Or select "Not used". Select "ANT in Cable Auto program Manual program Signal meter next select Select a scanning mode...
... select next select Auto program (Set automatically) Automatically searches and adds available channels to your needs and reception conditions. Select "Auto program" Menu ANT/Cable setup ANT in " Select "Cable" or "Antenna" Or select "Not used". Select "ANT in Cable Auto program Manual program Signal meter next select Select a scanning mode...
Owners Manual
Page 47
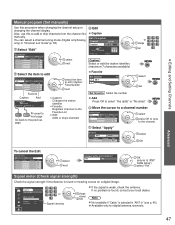
...(skip)" Move the cursor to add or skip channels from the channel list manually. Yes Y select next Select the item to "ANT/ Cable setup") select "Yes" Signal meter (Check signal strength) Check the signal strength if interference is selected in "ANT in "Channel surf mode"(p. 53...Set manually) Use this to a channel number Manual program Edit Apply Channel 2 3 Caption ... ... Also, use this procedure when changing the channel setup or changing the channel display. Yes ... Yes ... Yes 6 ... Yes Select OK RETURN Prev.page Next page Proceed to next page Go back ...
...(skip)" Move the cursor to add or skip channels from the channel list manually. Yes Y select next Select the item to "ANT/ Cable setup") select "Yes" Signal meter (Check signal strength) Check the signal strength if interference is selected in "ANT in "Channel surf mode"(p. 53...Set manually) Use this to a channel number Manual program Edit Apply Channel 2 3 Caption ... ... Also, use this procedure when changing the channel setup or changing the channel display. Yes ... Yes ... Yes 6 ... Yes Select OK RETURN Prev.page Next page Proceed to next page Go back ...


