

Owners Manual
Page 8
... TY-EW3D2S ●TY-EW3D2M • For more product information ● TY-EW3D2L (USA) http://www.panasonic.com (Canada) http://panasonic.ca (Global reference) http://panasonic.net/avc/viera/3d/ Communication Camera ● TY-CC10W • This camera can be used from tipping over...● In order to maintain the TV's performance and safety, be absolutely sure to ask your nearest Panasonic dealer to the Optional 3D Eyewear accessories installation manual. (Rechargeable type) • Product information (Model No. Accessories/Optional Accessories Accessories Check you have all ...
... TY-EW3D2S ●TY-EW3D2M • For more product information ● TY-EW3D2L (USA) http://www.panasonic.com (Canada) http://panasonic.ca (Global reference) http://panasonic.net/avc/viera/3d/ Communication Camera ● TY-CC10W • This camera can be used from tipping over...● In order to maintain the TV's performance and safety, be absolutely sure to ask your nearest Panasonic dealer to the Optional 3D Eyewear accessories installation manual. (Rechargeable type) • Product information (Model No. Accessories/Optional Accessories Accessories Check you have all ...

Owners Manual
Page 11
...of an HDMI or Component Video cable. (p. 12) Note ● When using a Cable box, external equipment and video cables shown in this manual are not supplied with the TV. ● When disconnecting the power cord, be absolutely sure to enjoy HD programming. Cable ● You ... (HD) cable service to disconnect the power cord plug from the wall outlet first. ● For additional assistance, visit us at: www.panasonic.com/help www.panasonic.ca Connection references ■ Antenna terminal ■ Pin terminals ■ HDMI terminal red blue green green ● Firmly tighten by hand. ...
...of an HDMI or Component Video cable. (p. 12) Note ● When using a Cable box, external equipment and video cables shown in this manual are not supplied with the TV. ● When disconnecting the power cord, be absolutely sure to enjoy HD programming. Cable ● You ... (HD) cable service to disconnect the power cord plug from the wall outlet first. ● For additional assistance, visit us at: www.panasonic.com/help www.panasonic.ca Connection references ■ Antenna terminal ■ Pin terminals ■ HDMI terminal red blue green green ● Firmly tighten by hand. ...

Owners Manual
Page 16
... Validate IP address Check for any time from a menu screen ■Press to go to the next step. Select OK RETURN Manual Automatic Start connection test Network settings Step 6 of 7 Connection test Check Ethernet cable connection Validate IP address Check for your connected devices... you successfully complete "Network settings". When done, select NEXT and press OK to go back to 16 Ensure wireless network availability Retry Manual Set later Select OK RETURN Retry: Go to "Start connection test" Set later: Go to the previous screen Label the inputs for...
... Validate IP address Check for any time from a menu screen ■Press to go to the next step. Select OK RETURN Manual Automatic Start connection test Network settings Step 6 of 7 Connection test Check Ethernet cable connection Validate IP address Check for your connected devices... you successfully complete "Network settings". When done, select NEXT and press OK to go back to 16 Ensure wireless network availability Retry Manual Set later Select OK RETURN Retry: Go to "Start connection test" Set later: Go to the previous screen Label the inputs for...

Owners Manual
Page 17
... Setup Press to exit from the time it is on screen to the time zone. Time zone Select your Panasonic VIERA TV. You are done. Enjoy your time zone. (EST/CST/MST/PST/AKST/HST/NST/ AST)...Clock (Set clock) When done, select NEXT and press OK to go to the next step. ■Manual setting Set clock Adjust the TV's date and time Step 7 of 7 select DST Minutes 10 Mode ... Minute Time zone DST Next 6:00 AM Auto EST Off Select Change RETURN Step 7 of 7 Mode Manual: Adjust the clock manually (Year/Month/Day/Hour/ Minute) Auto: The clock is complete. Only available when the TV is ...
... Setup Press to exit from the time it is on screen to the time zone. Time zone Select your Panasonic VIERA TV. You are done. Enjoy your time zone. (EST/CST/MST/PST/AKST/HST/NST/ AST)...Clock (Set clock) When done, select NEXT and press OK to go to the next step. ■Manual setting Set clock Adjust the TV's date and time Step 7 of 7 select DST Minutes 10 Mode ... Minute Time zone DST Next 6:00 AM Auto EST Off Select Change RETURN Step 7 of 7 Mode Manual: Adjust the clock manually (Year/Month/Day/Hour/ Minute) Auto: The clock is complete. Only available when the TV is ...

Owners Manual
Page 18
.... ● Data transmitted and received over radio waves may be intercepted and monitored. ● Keep the TV away from the following website: http://Panasonic.com/NetConnect ● It is recommended to use the Wireless LAN Adapter with the supplied extension cable. ● Do not use 2.4 GHz and ...; When noises occur due to the static electricity, etc., the TV might stop operating for the protection of Access point, please refer to operating manual for the Access point. ● We recommend using 11n (5 GHz) for the wireless system between the Wireless LAN Adapter and Access point. &#...
.... ● Data transmitted and received over radio waves may be intercepted and monitored. ● Keep the TV away from the following website: http://Panasonic.com/NetConnect ● It is recommended to use the Wireless LAN Adapter with the supplied extension cable. ● Do not use 2.4 GHz and ...; When noises occur due to the static electricity, etc., the TV might stop operating for the protection of Access point, please refer to operating manual for the Access point. ● We recommend using 11n (5 GHz) for the wireless system between the Wireless LAN Adapter and Access point. &#...
Owners Manual
Page 21
... F11(Blue)/F12(Yellow) (Red/Blue/Yellow/Green) ● For more details on setting and operation of the USB keyboard, please also read the operating manuals for the USB keyboard. ● Some keyboards do not have forgotten your password, consult your local dealer.) ● When you select a locked channel, a message will...
... F11(Blue)/F12(Yellow) (Red/Blue/Yellow/Green) ● For more details on setting and operation of the USB keyboard, please also read the operating manuals for the USB keyboard. ● Some keyboards do not have forgotten your password, consult your local dealer.) ● When you select a locked channel, a message will...
Owners Manual
Page 23
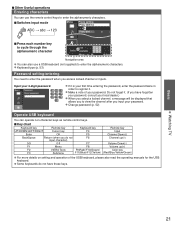
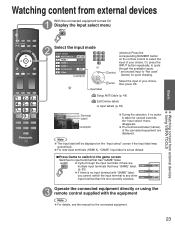
... Input labels (p. 53) HDMI 1 GAME Terminal Label (example) ● During the selection, if no input terminal with the equipment Note ● For details, see the manual for the connected equipment. 23 Note ● The input label will be displayed on the remote control to any other input terminal than the one...
... Input labels (p. 53) HDMI 1 GAME Terminal Label (example) ● During the selection, if no input terminal with the equipment Note ● For details, see the manual for the connected equipment. 23 Note ● The input label will be displayed on the remote control to any other input terminal than the one...

Owners Manual
Page 24
...; 3D image supported broadcast (program) • 3D Photo, 3D Movie taken by other infra-red data communication equipment, the 3D images may appear to operating manuals for Viewing 3D Images Infra-red receiver section Do not soil the infra-red receiver section or attach stickers etc. After using the 3D Eyewear...
...; 3D image supported broadcast (program) • 3D Photo, 3D Movie taken by other infra-red data communication equipment, the 3D images may appear to operating manuals for Viewing 3D Images Infra-red receiver section Do not soil the infra-red receiver section or attach stickers etc. After using the 3D Eyewear...

Owners Manual
Page 25
...) Frame sequential (2D) Side by side (3D) Side by side (2D) Top and bottom (3D) Top and bottom (2D) 2D -> 3D 3D format select (Manual) Native Frame sequential (3D) Frame sequential (2D) Side by side (3D) Side by side (2D) 2D -> 3D 3D settings (Adjust 3D images) Select "3D settings..." in side by side or top- and-bottom 3D formats. Note: choose 3D mode manually, when auto detection is not available. (Off/Auto 1/Auto 2) 3D signal notification On: Displays a message according to the signal received by adjusting left-right parallax...
...) Frame sequential (2D) Side by side (3D) Side by side (2D) Top and bottom (3D) Top and bottom (2D) 2D -> 3D 3D format select (Manual) Native Frame sequential (3D) Frame sequential (2D) Side by side (3D) Side by side (2D) 2D -> 3D 3D settings (Adjust 3D images) Select "3D settings..." in side by side or top- and-bottom 3D formats. Note: choose 3D mode manually, when auto detection is not available. (Off/Auto 1/Auto 2) 3D signal notification On: Displays a message according to the signal received by adjusting left-right parallax...

Owners Manual
Page 32
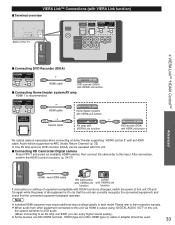
... standard known as HDMI CEC (Consumer Electronics Control), with compatible Panasonic products. VIERA Link "HDAVI Control", is a function that supports HDMI CEC cannot be guaranteed. Please refer to the operating manual for available equipment only) Provides setting information (Language, time. ...(fully wired) cable. This TV supports "HDAVI Control 5" function. Enjoy additional HDMI Inter-Operability with unique function that you use Panasonic's HDMI cable. Set the input mode to equipment (DVD recorder DIGA, HD Camcorder, Home theater system, Amplifier, etc.) with the...
... standard known as HDMI CEC (Consumer Electronics Control), with compatible Panasonic products. VIERA Link "HDAVI Control", is a function that supports HDMI CEC cannot be guaranteed. Please refer to the operating manual for available equipment only) Provides setting information (Language, time. ...(fully wired) cable. This TV supports "HDAVI Control 5" function. Enjoy additional HDMI Inter-Operability with unique function that you use Panasonic's HDMI cable. Set the input mode to equipment (DVD recorder DIGA, HD Camcorder, Home theater system, Amplifier, etc.) with the...
Owners Manual
Page 33
...; Individual HDMI equipment may require additional menu settings specific to Mini-HDMI (type C) cable or adapter should be used. 33 Please refer to their respective manuals. ● When audio from other equipment connected to this unit, the system switches to 2CH audio. (When connecting to this unit Off and On again...
...; Individual HDMI equipment may require additional menu settings specific to Mini-HDMI (type C) cable or adapter should be used. 33 Please refer to their respective manuals. ● When audio from other equipment connected to this unit, the system switches to 2CH audio. (When connecting to this unit Off and On again...

Owners Manual
Page 35
...as Default speakers, change to the appropriate input, when playback begins on the external equipment's operation, please refer to the operating manual for the equipment. To set from the Home theater whenever the TV is turned off. Transmittable data Recorder Home theater Player On...; Power off , all the GUI language information might be output from equipment that has "HDAVI Control 3 or later" function connected to a Panasonic theater system or Amplifier. Depending on the operating conditions or the specification for each piece of timing for operation ] • When the input...
...as Default speakers, change to the appropriate input, when playback begins on the external equipment's operation, please refer to the operating manual for the equipment. To set from the Home theater whenever the TV is turned off. Transmittable data Recorder Home theater Player On...; Power off , all the GUI language information might be output from equipment that has "HDAVI Control 3 or later" function connected to a Panasonic theater system or Amplifier. Depending on the operating conditions or the specification for each piece of timing for operation ] • When the input...

Owners Manual
Page 37
...over. • Selecting "Home theater" turns the equipment on automatically if it at the TV ● To operate the equipment, read the manual of items. (e.g. Continue using your TV remote control to TV select change Note ● There is more than one equipment item, a number...select Network camera. Recorder 1/Recorder 2/Recorder 3...) ● The number of three for audio output. This function is available only when a Panasonic Amplifier or Player theater is displayed on the equipment Available when the purpose of the device selected with the TV's remote control In the VIERA...
...over. • Selecting "Home theater" turns the equipment on automatically if it at the TV ● To operate the equipment, read the manual of items. (e.g. Continue using your TV remote control to TV select change Note ● There is more than one equipment item, a number...select Network camera. Recorder 1/Recorder 2/Recorder 3...) ● The number of three for audio output. This function is available only when a Panasonic Amplifier or Player theater is displayed on the equipment Available when the purpose of the device selected with the TV's remote control In the VIERA...
Owners Manual
Page 38
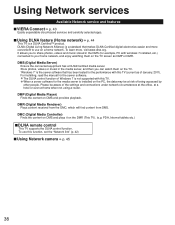
For installing, read the manual for the performance with this function, set the "Network link" (p. 42) ■Using Network camera p. 45 38 To learn more convenient to share photos, videos ...
For installing, read the manual for the performance with this function, set the "Network link" (p. 42) ■Using Network camera p. 45 38 To learn more convenient to share photos, videos ...

Owners Manual
Page 41
... household use. Proxy port 0 OK Advanced Enter address or port number and press OK ● Entering characters (p. 21) 41 Manual settings: Manually set to "Manual" Select the item and press OK Check the specifications of the Access point to which to connect. ● When connecting by ...easy setting of the Wi-Fi Alliance's certification ● For more details on setting of an Access point, please refer to operating manual for the Access point. Using Network services Wireless network (Wireless network setting) ■Sets / Changes wireless network setting Press "Wireless network...
... household use. Proxy port 0 OK Advanced Enter address or port number and press OK ● Entering characters (p. 21) 41 Manual settings: Manually set to "Manual" Select the item and press OK Check the specifications of the Access point to which to connect. ● When connecting by ...easy setting of the Wi-Fi Alliance's certification ● For more details on setting of an Access point, please refer to operating manual for the Access point. Using Network services Wireless network (Wireless network setting) ■Sets / Changes wireless network setting Press "Wireless network...

Owners Manual
Page 42
... Default camera ● For this operation, please refer to register the camera as shown below. Start camera search. ● Before you need to the operating manual for this TV. Network remote control Enable select Network cameras list Before using a Network camera, you start to search for a camera, switch the camera to...
... Default camera ● For this operation, please refer to register the camera as shown below. Start camera search. ● Before you need to the operating manual for this TV. Network remote control Enable select Network cameras list Before using a Network camera, you start to search for a camera, switch the camera to...

Owners Manual
Page 45
... 0 Home position Note ● A number of the Network camera, please also read the operating manuals for the Network camera. Using Network services Network Camera You can be found at the following sites: http://www.panasonic.com/ http://panasonic.net/pcc/products/netwkcam/ ● For more details on Display "VIERA Link" menu ● If...
... 0 Home position Note ● A number of the Network camera, please also read the operating manuals for the Network camera. Using Network services Network Camera You can be found at the following sites: http://www.panasonic.com/ http://panasonic.net/pcc/products/netwkcam/ ● For more details on Display "VIERA Link" menu ● If...
Owners Manual
Page 46
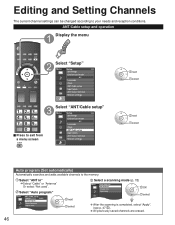
... select next select Auto program (Set automatically) Automatically searches and adds available channels to your needs and reception conditions. Select "ANT in Cable Auto program Manual program Signal meter next select Select a scanning mode (p. 15) Menu Auto program All channels Analog only Digital only OK select ● After the scanning is...
... select next select Auto program (Set automatically) Automatically searches and adds available channels to your needs and reception conditions. Select "ANT in Cable Auto program Manual program Signal meter next select Select a scanning mode (p. 15) Menu Auto program All channels Analog only Digital only OK select ● After the scanning is...
Owners Manual
Page 47
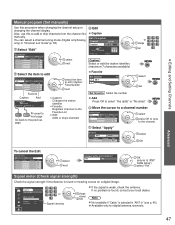
...Edit ● Caption Edit CH caption Channel 80-101 Caption @ D--A- Yes ... Yes ... Editing and Setting Channels Manual program (Set manually) Use this to the channel. Yes ... Select OK RETURN ABC → abc Delete or change channel OK &#... the item to edit (Caption/ Favorite/Add) next • Caption: Changes the station identifier • Favorite: Registers channels to edit Manual program Edit Apply Cancel Channel 2 Caption ... Yes ... Yes ... Yes 6 ... Select "Apply" l program Apply el Caption ... AdYeds...
...Edit ● Caption Edit CH caption Channel 80-101 Caption @ D--A- Yes ... Yes ... Editing and Setting Channels Manual program (Set manually) Use this to the channel. Yes ... Select OK RETURN ABC → abc Delete or change channel OK &#... the item to edit (Caption/ Favorite/Add) next • Caption: Changes the station identifier • Favorite: Registers channels to edit Manual program Edit Apply Cancel Channel 2 Caption ... Yes ... Yes ... Yes 6 ... Select "Apply" l program Apply el Caption ... AdYeds...

Owners Manual
Page 61
... signal must be shown. Why doesn't my 3D video source looks 3D? Yes. "VIERA Connect Market" allows you go back to each other? To manually select other phase: 1. If no less than 1.5 Mbps (p. 39). 2. The 3D format has two different "phases". Movie theater's 3D glasses are ... "3D setting" and press OK. 2. Answers 1. You need a broadband (high speed) Internet service with your router by an Ethernet cable or a Panasonic Wireless LAN Adapter (included). 3. If Connection test fails, then check with a speed of no signal is not connected to my wireless network? Select "...
... signal must be shown. Why doesn't my 3D video source looks 3D? Yes. "VIERA Connect Market" allows you go back to each other? To manually select other phase: 1. If no less than 1.5 Mbps (p. 39). 2. The 3D format has two different "phases". Movie theater's 3D glasses are ... "3D setting" and press OK. 2. Answers 1. You need a broadband (high speed) Internet service with your router by an Ethernet cable or a Panasonic Wireless LAN Adapter (included). 3. If Connection test fails, then check with a speed of no signal is not connected to my wireless network? Select "...
