

Owners Manual
Page 3
Each day the discovery of a truly emotive experience from an unencountered sound awaits. Music is borderless and timeless, touching people's hearts across cultures and generations. Let us take you on your journey to rediscover music. (03) 03
Each day the discovery of a truly emotive experience from an unencountered sound awaits. Music is borderless and timeless, touching people's hearts across cultures and generations. Let us take you on your journey to rediscover music. (03) 03
Owners Manual
Page 6
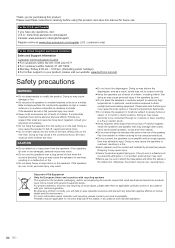
.... ≥ Keep magnetic items away from the product. Should you for purchasing this manual for incorrect disposal of time when the sound is distorted. Please read these instructions carefully before using this product, and save valuable resources and prevent any questions, visit: U.S.A.: www.shop.panasonic.com/support Canada: www.panasonic.ca/english/support Register online at least two people. If you will be...
.... ≥ Keep magnetic items away from the product. Should you for purchasing this manual for incorrect disposal of time when the sound is distorted. Please read these instructions carefully before using this product, and save valuable resources and prevent any questions, visit: U.S.A.: www.shop.panasonic.com/support Canada: www.panasonic.ca/english/support Register online at least two people. If you will be...
Owners Manual
Page 7
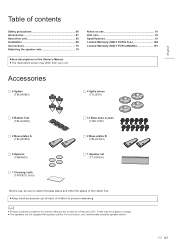
English Table of February 2017. These may differ from your unit. Notes on use 19 Unit care 19 Specifications 19 Limited Warranty (ONLY FOR U.S.A 160 Limited Warranty (ONLY FOR CANADA 161 Accessories ∏ 4 Spikes (...Product numbers provided in this Owner's Manual are correct as of contents Safety precautions 06 Accessories 07 About this unit 08 Installation 09 Connections 16 Attaching the speaker nets 18 About descriptions in this Owner's Manual ≥ The illustrations shown may be subject to change. ≥ The speakers are not supplied with speaker cables...
English Table of February 2017. These may differ from your unit. Notes on use 19 Unit care 19 Specifications 19 Limited Warranty (ONLY FOR U.S.A 160 Limited Warranty (ONLY FOR CANADA 161 Accessories ∏ 4 Spikes (...Product numbers provided in this Owner's Manual are correct as of contents Safety precautions 06 Accessories 07 About this unit 08 Installation 09 Connections 16 Attaching the speaker nets 18 About descriptions in this Owner's Manual ≥ The illustrations shown may be subject to change. ≥ The speakers are not supplied with speaker cables...
Owners Manual
Page 8
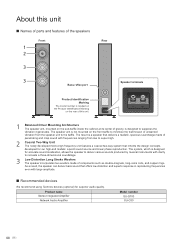
... is designed for accurate sound localization, allows the speaker to deliver various sounds produced by musical instruments with large amplitude. ∫ Recommended devices We recommend using Technics devices (optional) for our high-end models: a point sound source and linear phase reproduction. Product name Stereo Integrated Amplifier Network Audio Amplifier Model number SU-G700 SU-G30 08 (08) About this unit ∫ Names of parts and features of...
... is designed for accurate sound localization, allows the speaker to deliver various sounds produced by musical instruments with large amplitude. ∫ Recommended devices We recommend using Technics devices (optional) for our high-end models: a point sound source and linear phase reproduction. Product name Stereo Integrated Amplifier Network Audio Amplifier Model number SU-G700 SU-G30 08 (08) About this unit ∫ Names of parts and features of...
Owners Manual
Page 9
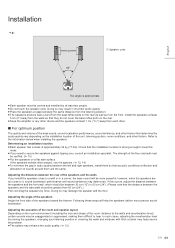
.... If this occurs, adjust the distance between the speakers and the front wall, which should be more precise sound localisation. In such cases, adjusting the reverberation level by moving the speakers, changing your listening position or covering the walls and windows with thick curtains may help the speakers deliver more powerful; however, when the speakers are the same. Adjusting the acoustics of the...
.... If this occurs, adjust the distance between the speakers and the front wall, which should be more precise sound localisation. In such cases, adjusting the reverberation level by moving the speakers, changing your listening position or covering the walls and windows with thick curtains may help the speakers deliver more powerful; however, when the speakers are the same. Adjusting the acoustics of the...

Owners Manual
Page 10
jHold the bottom so that your hands do not slip. 10 (10) Attaching the base plates 1 Remove the accessories. ≥ Remove the accessories from the styrofoam blocks, and place them in a location away from children. 2 Place the styrofoam blocks in an area suitable for work. 3 Remove the packaging box of the speaker net. ᶅ Leave the cardboard in place to protect the speaker unit. ᶄ ᶄ 4 Place the speaker on the styrofoam blocks removed in Step ② . ≥ Keep the following points in mind when lifting up the speaker.
jHold the bottom so that your hands do not slip. 10 (10) Attaching the base plates 1 Remove the accessories. ≥ Remove the accessories from the styrofoam blocks, and place them in a location away from children. 2 Place the styrofoam blocks in an area suitable for work. 3 Remove the packaging box of the speaker net. ᶅ Leave the cardboard in place to protect the speaker unit. ᶄ ᶄ 4 Place the speaker on the styrofoam blocks removed in Step ② . ≥ Keep the following points in mind when lifting up the speaker.

Owners Manual
Page 11
...will face the floor. ≥ After attaching the base plates, ensure that the side B will face the floor. Placing the speaker using the spikes (> 12) Placing the speaker using the rubber foot Attach the rubber feet (4 pcs) to the recesses on the base plates in advance. ≥ Peel off the... and push them firmly into the base plates without touching the adhesive surface of the speaker. 5 Roll up the protective bags (2 pcs) to the speaker securely with a screwdriver. Attach so that they do not wobble. English 6 Attach the base plates (4 pcs) to uncover the bottom of the rubber feet...
...will face the floor. ≥ After attaching the base plates, ensure that the side B will face the floor. Placing the speaker using the spikes (> 12) Placing the speaker using the rubber foot Attach the rubber feet (4 pcs) to the recesses on the base plates in advance. ≥ Peel off the... and push them firmly into the base plates without touching the adhesive surface of the speaker. 5 Roll up the protective bags (2 pcs) to the speaker securely with a screwdriver. Attach so that they do not wobble. English 6 Attach the base plates (4 pcs) to uncover the bottom of the rubber feet...
Owners Manual
Page 12
... speaker unit. 12 (12) Before changing the installation location, remove the spikes. Place them in the unpacking location and the installation location in this Owner's Manual. ≥ Each speaker has a mass of the floor where you spread a thick mat or similar item on the installation location. When tilting the speakers to the floor. ≥ Since each spike supports a mass of the product...
... speaker unit. 12 (12) Before changing the installation location, remove the spikes. Place them in the unpacking location and the installation location in this Owner's Manual. ≥ Each speaker has a mass of the floor where you spread a thick mat or similar item on the installation location. When tilting the speakers to the floor. ≥ Since each spike supports a mass of the product...

Owners Manual
Page 13
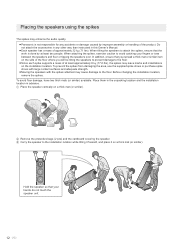
...as Step ④ , tilt the speaker backwards and remove the thick mat (or similar). 7 Screw the spikes into the two rear-side base plates. Screw the spikes firmly until they stop. Spacer (13) 13 Speaker (rear) Thick mat, etc. When using the spike shoes, place them under ...the spike shoes. When using the spike shoes, place them under the spikes. 8 If the speakers wobble, place the spacers under the spikes. English 4 Tilt the speaker forward, and screw...
...as Step ④ , tilt the speaker backwards and remove the thick mat (or similar). 7 Screw the spikes into the two rear-side base plates. Screw the spikes firmly until they stop. Spacer (13) 13 Speaker (rear) Thick mat, etc. When using the spike shoes, place them under ...the spike shoes. When using the spike shoes, place them under the spikes. 8 If the speakers wobble, place the spacers under the spikes. English 4 Tilt the speaker forward, and screw...
Owners Manual
Page 14
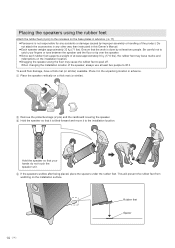
... it . Be careful not to catch your hands do not touch the speaker unit. 4 If the speakers wobble after being placed, place the spacers under the rubber feet. Hold the speaker so that the work is done by improper assembly or handling of at least two people to ... the speaker. ≥ Since each rubber foot supports a weight of the product. Placing the speakers using the rubber feet Attach the rubber feet (4 pcs) to the recesses on the base plates in advance. (> 11) ≥ Panasonic is not responsible for any other way than instructed in this Owner's Manual. ≥ Each speaker weighs ...
... it . Be careful not to catch your hands do not touch the speaker unit. 4 If the speakers wobble after being placed, place the spacers under the rubber feet. Hold the speaker so that the work is done by improper assembly or handling of at least two people to ... the speaker. ≥ Since each rubber foot supports a weight of the product. Placing the speakers using the rubber feet Attach the rubber feet (4 pcs) to the recesses on the base plates in advance. (> 11) ≥ Panasonic is not responsible for any other way than instructed in this Owner's Manual. ≥ Each speaker weighs ...
Owners Manual
Page 15
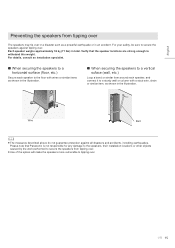
... similar item, as a powerful earthquake or in an accident. Please note that the speaker locations are strong enough to withstand this weight. English Preventing the speakers from tipping over. ≥ Use of the spikes will make the speakers more vulnerable to tipping over . Verify that Panasonic is not responsible for any damage to the speakers, their installation locations or other...
... similar item, as a powerful earthquake or in an accident. Please note that the speaker locations are strong enough to withstand this weight. English Preventing the speakers from tipping over. ≥ Use of the spikes will make the speakers more vulnerable to tipping over . Verify that Panasonic is not responsible for any damage to the speakers, their installation locations or other...

Owners Manual
Page 16
If it is difficult to cross (short-circuit) or reverse the polarity of the speaker wires as doing so may damage the amplifier. Speaker (rear) 1 Turn the knobs to loosen them . ≥ Be careful not to connect the speaker cables, remove the knobs before connecting them , and insert the core wires into the holes. 2 Tighten the knobs. - (Black) + (Red) Do not insert the vinyl insulation. DO NOT 16 (16) For connection, use commercially-available speaker cables. Connections Connecting the speaker cables The speakers are not supplied with speaker cables.
If it is difficult to cross (short-circuit) or reverse the polarity of the speaker wires as doing so may damage the amplifier. Speaker (rear) 1 Turn the knobs to loosen them . ≥ Be careful not to connect the speaker cables, remove the knobs before connecting them , and insert the core wires into the holes. 2 Tighten the knobs. - (Black) + (Red) Do not insert the vinyl insulation. DO NOT 16 (16) For connection, use commercially-available speaker cables. Connections Connecting the speaker cables The speakers are not supplied with speaker cables.
Owners Manual
Page 17
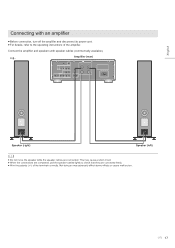
... affect stereo effects or cause malfunction. (17) 17 Connect the amplifier and speakers with an amplifier ≥ Before connection, turn off the amplifier and disconnect its power cord. ≥ For details, refer to check that they are connected. Connecting with speaker cables (commercially-available). Not doing so may cause a short circuit. ≥ When the connections are completed, pull the speaker cables lightly to the operating instructions of...
... affect stereo effects or cause malfunction. (17) 17 Connect the amplifier and speakers with an amplifier ≥ Before connection, turn off the amplifier and disconnect its power cord. ≥ For details, refer to check that they are connected. Connecting with speaker cables (commercially-available). Not doing so may cause a short circuit. ≥ When the connections are completed, pull the speaker cables lightly to the operating instructions of...

Owners Manual
Page 18
Speaker (front) Speaker net (rear) ≥ You can enjoy superior quality audio by removing the speaker nets before playback. 18 (18) Use the magnets to fix the speaker nets to the speaker units. Attaching the speaker nets The speakers are supplied with speaker nets, which protect the speaker units from dust.
Speaker (front) Speaker net (rear) ≥ You can enjoy superior quality audio by removing the speaker nets before playback. 18 (18) Use the magnets to fix the speaker nets to the speaker units. Attaching the speaker nets The speakers are supplied with speaker nets, which protect the speaker units from dust.
Owners Manual
Page 19
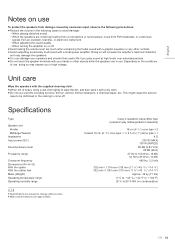
... turning the amplifier on or off . jWhen adjusting the sound quality. This might cause the exterior case to be deformed or the coating to change without notice. ≥ Mass and dimensions are receiving howling from a microphone or record player, noise from FM broadcasts, or continuous signals from damage caused by excessive input, observe the following precautions: ≥ Reduce the volume in use...
... turning the amplifier on or off . jWhen adjusting the sound quality. This might cause the exterior case to be deformed or the coating to change without notice. ≥ Mass and dimensions are receiving howling from a microphone or record player, noise from FM broadcasts, or continuous signals from damage caused by excessive input, observe the following precautions: ≥ Reduce the volume in use...
Owners Manual
Page 160
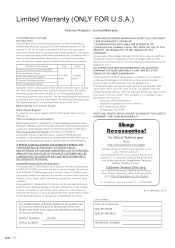
..., faulty installation, set-up to defects in the space provided below , which occurred in the United States. The model number and serial number of God. Include a letter detailing the complaint, a return address and provide a daytime phone number where you . Limited Warranty (ONLY FOR U.S.A.) Technics Products - Product or Part Name Technics Network Audio Amplifier Technics Music Server Technics CD Stereo System Technics Turntable System Technics Speaker System Parts Labor...
..., faulty installation, set-up to defects in the space provided below , which occurred in the United States. The model number and serial number of God. Include a letter detailing the complaint, a return address and provide a daytime phone number where you . Limited Warranty (ONLY FOR U.S.A.) Technics Products - Product or Part Name Technics Network Audio Amplifier Technics Music Server Technics CD Stereo System Technics Turntable System Technics Speaker System Parts Labor...
Owners Manual
Page 161
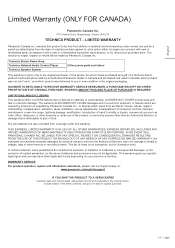
... warranty. Technics Stereo Power Amp Technics Network Audio Control Player Technics Speaker System 5 (five) years parts and labour This warranty is attributable to defects in shipment, or failures which are also excluded from the Authorized Servicer, loss of or damage to , at its option either (a) repair your province or territory. Dry cell batteries are caused by products not supplied by Panasonic Canada Inc...
... warranty. Technics Stereo Power Amp Technics Network Audio Control Player Technics Speaker System 5 (five) years parts and labour This warranty is attributable to defects in shipment, or failures which are also excluded from the Authorized Servicer, loss of or damage to , at its option either (a) repair your province or territory. Dry cell batteries are caused by products not supplied by Panasonic Canada Inc...
Owners Manual
Page 164
Headquarter Address/Adresse du siège social: Panasonic Corporation Kadoma, Osaka, Japan Importer for Europe/Importateur pour l'Europe: Panasonic Marketing Europe GmbH Panasonic Testing Centre Winsbergring 15, 22525 Hamburg, Germany Panasonic Corporation of North America Two Riverfront Plaza, Newark, NJ 07102-5490 www.shop.panasonic.com Panasonic Corporation Web Site: http://www.panasonic.com Panasonic Canada Inc. 5770 Ambler Drive, Mississauga, Ontario, L4W 2T3 www.panasonic.com C Panasonic Corporation 2017 Printed in China TQBM0081 F0217AY0
Headquarter Address/Adresse du siège social: Panasonic Corporation Kadoma, Osaka, Japan Importer for Europe/Importateur pour l'Europe: Panasonic Marketing Europe GmbH Panasonic Testing Centre Winsbergring 15, 22525 Hamburg, Germany Panasonic Corporation of North America Two Riverfront Plaza, Newark, NJ 07102-5490 www.shop.panasonic.com Panasonic Corporation Web Site: http://www.panasonic.com Panasonic Canada Inc. 5770 Ambler Drive, Mississauga, Ontario, L4W 2T3 www.panasonic.com C Panasonic Corporation 2017 Printed in China TQBM0081 F0217AY0


