
Operating Instructions
Page 2
... REFER SERVICING TO QUALIFIED SERVICE PERSONNEL This symbol warns the user that important literature concerning the operation and maintenance of this manual as your convenient Palmcorder information source. Therefore, it will bring you for use in the information on the market today. Safety Precautions WARNING: TO PREVENT FIRE OR SHOCK HAZARD... in Standard Play (SP) mode and Long Play (LP) mode It is recommended that only cassette tapes that have been tested and inspected for choosing Panasonic! Things You Should Know Thank you and your family years of enjoyment.
... REFER SERVICING TO QUALIFIED SERVICE PERSONNEL This symbol warns the user that important literature concerning the operation and maintenance of this manual as your convenient Palmcorder information source. Therefore, it will bring you for use in the information on the market today. Safety Precautions WARNING: TO PREVENT FIRE OR SHOCK HAZARD... in Standard Play (SP) mode and Long Play (LP) mode It is recommended that only cassette tapes that have been tested and inspected for choosing Panasonic! Things You Should Know Thank you and your family years of enjoyment.

Operating Instructions
Page 5
...with CANADIAN ICES-003. If the unit is suddenly moved from any chemical products, such as suntan lotion, as , in your Palmcorder. ≥AVOID SUDDEN CHANGES IN TEMPERATURE ... Do not touch the surface of your community due to recycle this unit. This ...contains lead in a manner that is not designed to sustain direct exposure to a heater, etc... CARE ≥TO CLEAN YOUR PALMCORDER ... Use a commercial Palmcorder lens solution and lens paper when cleaning the lens. Unplug your local authorities, or the Electronics Industries Alliance: U.S.A./CANADA CONSUMERS: ...
...with CANADIAN ICES-003. If the unit is suddenly moved from any chemical products, such as suntan lotion, as , in your Palmcorder. ≥AVOID SUDDEN CHANGES IN TEMPERATURE ... Do not touch the surface of your community due to recycle this unit. This ...contains lead in a manner that is not designed to sustain direct exposure to a heater, etc... CARE ≥TO CLEAN YOUR PALMCORDER ... Use a commercial Palmcorder lens solution and lens paper when cleaning the lens. Unplug your local authorities, or the Electronics Industries Alliance: U.S.A./CANADA CONSUMERS: ...

Operating Instructions
Page 8
... Time and Available Recording Time 18 Lens Cap and Easy-Grip Strap 19 Attaching the Shoulder Strap 20 Inserting a Cassette 20 Turning on/off the Palmcorder and Selecting Modes 20 Using the Viewfinder 21 Using the LCD Monitor 21 Using the Menu Screen 22 List of Menus 23 Setting Date and... Copying your DV Cassette to an S-VHS or VHS Cassette (Dubbing 66 Copying an S-VHS or VHS Cassette to your DV Cassette 66 Using your Palmcorder with Digital Video Equipment (Dubbing 67 Using the Software with a Computer 68 Using USB Driver 68 Installing USB Driver 69 Connecting Computer and...
... Time and Available Recording Time 18 Lens Cap and Easy-Grip Strap 19 Attaching the Shoulder Strap 20 Inserting a Cassette 20 Turning on/off the Palmcorder and Selecting Modes 20 Using the Viewfinder 21 Using the LCD Monitor 21 Using the Menu Screen 22 List of Menus 23 Setting Date and... Copying your DV Cassette to an S-VHS or VHS Cassette (Dubbing 66 Copying an S-VHS or VHS Cassette to your DV Cassette 66 Using your Palmcorder with Digital Video Equipment (Dubbing 67 Using the Software with a Computer 68 Using USB Driver 68 Installing USB Driver 69 Connecting Computer and...

Operating Instructions
Page 9
... Others Indications 80 Initializing the Modes 83 Warning/Alarm Indications 83 Notes & Precautions 84 Cautions for Use 92 Explanation of Terms 95 Specifications 97 Palmcorder Accessory System 98 Palmcorder Accessory Order Form (For USA Customers 99 Before Requesting Service (Problems and Solutions 100 Request for Service Notice (USA Only 103 Limited Warranty...
... Others Indications 80 Initializing the Modes 83 Warning/Alarm Indications 83 Notes & Precautions 84 Cautions for Use 92 Explanation of Terms 95 Specifications 97 Palmcorder Accessory System 98 Palmcorder Accessory Order Form (For USA Customers 99 Before Requesting Service (Problems and Solutions 100 Request for Service Notice (USA Only 103 Limited Warranty...

Operating Instructions
Page 10
...required for assistance in an area which has special AC outlets. 2) Battery Pack (l 18) ≥Supplies power to the Palmcorder. Please contact either a local or foreign electrical parts distributor for voltages other than 120 V AC. We recommend using the ...18) ≥Supplies power to the Palmcorder. 3) Remote Controller and Button-Type Battery (l 15, 16, 17) 4) MagicWire Remote Control with Narration Mic (l 16) 5) Lens Cap (l 19) 6) A/V Cable (l 49) 7) S-Video Cable (l 49) N2QCBD000030 5) VYF2887 6) K2KC4CB00009 7) K2KC4CB00008 10 1) PV-DAC13 2) CGA-DU07 3) CR2025 N2QAEC000003...
...required for assistance in an area which has special AC outlets. 2) Battery Pack (l 18) ≥Supplies power to the Palmcorder. Please contact either a local or foreign electrical parts distributor for voltages other than 120 V AC. We recommend using the ...18) ≥Supplies power to the Palmcorder. 3) Remote Controller and Button-Type Battery (l 15, 16, 17) 4) MagicWire Remote Control with Narration Mic (l 16) 5) Lens Cap (l 19) 6) A/V Cable (l 49) 7) S-Video Cable (l 49) N2QCBD000030 5) VYF2887 6) K2KC4CB00009 7) K2KC4CB00008 10 1) PV-DAC13 2) CGA-DU07 3) CR2025 N2QAEC000003...

Operating Instructions
Page 11
...USB Driver for the sake of example, other languages are supported as well. ≥In this Manual, the Panasonic make digital video camera with USB Terminal is referred to as Palmcorder. ≥These instructions do not cover the basic operations of the personal computer or define any terms. For this... contents of the screens used in these instructions may not necessarily match what you are using may differ from the names given in English for Panasonic DVC (l 68) DV STUDIO 3.1E-SE (l 73) G.726 Audio Decoder (l 74) ArcSoft Software (l 75) ≥Macintosh is employed to the Operating ...
...USB Driver for the sake of example, other languages are supported as well. ≥In this Manual, the Panasonic make digital video camera with USB Terminal is referred to as Palmcorder. ≥These instructions do not cover the basic operations of the personal computer or define any terms. For this... contents of the screens used in these instructions may not necessarily match what you are using may differ from the names given in English for Panasonic DVC (l 68) DV STUDIO 3.1E-SE (l 73) G.726 Audio Decoder (l 74) ArcSoft Software (l 75) ≥Macintosh is employed to the Operating ...
Operating Instructions
Page 12
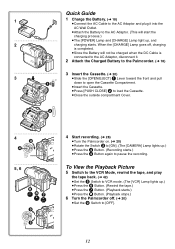
... the 6 Button. (Rewind the tape.) ≥Press the 7 Button. (Playback starts.) ≥Press the 8 Button. (Playback stops.) 6 Turn the Palmcorder off , charging is connected to the AC Adaptor, disconnect it into the AC Wall Outlet. ≥Attach the Battery to [OFF]. 12 Quick Guide 1...MODE CAMERA VCR CARD PB 5, 6 6 SEARCH 8 7 FADE BACK LIGHT 9 F ON MODE 5 CAMERA VCR CARD PB OF 4 Start recording. (l 28) ≥Turn the Palmcorder on. (l 20) ≥Rotate the Switch 3 to [ON]. (The [CAMERA] Lamp lights up.) ≥Press the 4 Button. (Recording starts.) ≥Press the 4 ...
... the 6 Button. (Rewind the tape.) ≥Press the 7 Button. (Playback starts.) ≥Press the 8 Button. (Playback stops.) 6 Turn the Palmcorder off , charging is connected to the AC Adaptor, disconnect it into the AC Wall Outlet. ≥Attach the Battery to [OFF]. 12 Quick Guide 1...MODE CAMERA VCR CARD PB 5, 6 6 SEARCH 8 7 FADE BACK LIGHT 9 F ON MODE 5 CAMERA VCR CARD PB OF 4 Start recording. (l 28) ≥Turn the Palmcorder on. (l 20) ≥Rotate the Switch 3 to [ON]. (The [CAMERA] Lamp lights up.) ≥Press the 4 Button. (Recording starts.) ≥Press the 4 ...
Operating Instructions
Page 14
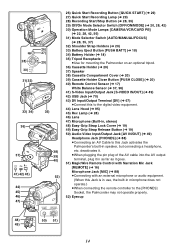
... Holders (l 20) 33) Battery Eject Button [PUSH BATT] (l 18) 34) Battery Holder (l 18) 35) Tripod Receptacle ≥Use for mounting the Palmcorder on an optional tripod. 36) Cassette Holder (l 20) 37) Speaker 38) Cassette Compartment Cover (l 20) 39) Cassette Holder Close Button [PUSH CLOSE] ...8805;Connecting with an external microphone or audio equipment. (When this Jack activates the Palmcorder's built-in microphone does not operate.) ≥When connecting the remote controller to the [PHONES] Socket, the Palmcorder may not operate properly. 52) Eyecup AV IN/OUT REMOTE/MIC PHONES (PLUG ...
... Holders (l 20) 33) Battery Eject Button [PUSH BATT] (l 18) 34) Battery Holder (l 18) 35) Tripod Receptacle ≥Use for mounting the Palmcorder on an optional tripod. 36) Cassette Holder (l 20) 37) Speaker 38) Cassette Compartment Cover (l 20) 39) Cassette Holder Close Button [PUSH CLOSE] ...8805;Connecting with an external microphone or audio equipment. (When this Jack activates the Palmcorder's built-in microphone does not operate.) ≥When connecting the remote controller to the [PHONES] Socket, the Palmcorder may not operate properly. 52) Eyecup AV IN/OUT REMOTE/MIC PHONES (PLUG ...

Operating Instructions
Page 15
...SET P.B.DIGITAL ITEM 25) 26) 27) 28) 29) 30) Remote Controller Using the wireless Remote Controller that is supplied with the Palmcorder, most of the Palmcorder functions can be operated from a distance. ZOOM] (l 45) 19) Speed Selection Button [π, ∫] (for Variable Speed ...49) 3) Counter Reset Button [RESET] (l 96) 4) Indication Shift Button [COUNTER] (l 83) 5) Multi-Picture/Picture-in the same manner as the corresponding buttons on the Palmcorder. 20) Fast-forward/Cue Button [5] (l 43) 21) Play Button [1] (l 42, 56) 22) Rewind/Review Button [6] (l 42, 43) 23) Pause Button [;]...
...SET P.B.DIGITAL ITEM 25) 26) 27) 28) 29) 30) Remote Controller Using the wireless Remote Controller that is supplied with the Palmcorder, most of the Palmcorder functions can be operated from a distance. ZOOM] (l 45) 19) Speed Selection Button [π, ∫] (for Variable Speed ...49) 3) Counter Reset Button [RESET] (l 96) 4) Indication Shift Button [COUNTER] (l 83) 5) Multi-Picture/Picture-in the same manner as the corresponding buttons on the Palmcorder. 20) Fast-forward/Cue Button [5] (l 43) 21) Play Button [1] (l 42, 56) 22) Rewind/Review Button [6] (l 42, 43) 23) Pause Button [;]...

Operating Instructions
Page 16
...to be used more conveniently by the equipment manufacturer. When the MagicWire Remote Control with Narration Mic is incorrectly replaced. Replace only with Panasonic PART NO. Risk of children. Do not recharge, disassemble or dispose of fire or explosion. CR2025 only. Caution: Battery may present... of in mouth. Keep away from children. Use of explosion if battery is not use, attach its connector into the [REMOTE], [MIC] Jack of the Palmcorder as far as it goes. 1 Narration Microphone [MIC] (l 29) 2 Recording Start/Stop Button [REC] 3 Zoom Lever [W/T] ≥Zoom speed changes in...
...to be used more conveniently by the equipment manufacturer. When the MagicWire Remote Control with Narration Mic is incorrectly replaced. Replace only with Panasonic PART NO. Risk of children. Do not recharge, disassemble or dispose of fire or explosion. CR2025 only. Caution: Battery may present... of in mouth. Keep away from children. Use of explosion if battery is not use, attach its connector into the [REMOTE], [MIC] Jack of the Palmcorder as far as it goes. 1 Narration Microphone [MIC] (l 29) 2 Recording Start/Stop Button [REC] 3 Zoom Lever [W/T] ≥Zoom speed changes in...

Operating Instructions
Page 17
...can be operated individually by selecting different Remote Controller Modes. ≥If the Remote Controller Mode on the Palmcorder and press the desired button. ≥Distance from the Palmcorder: Within approximately 15 feet (5 meters) ≥Angle: Approximately 15o in the Remote Controller is replaced, ... is displayed. D INDEX STOP INDEX K ∫ L SELECT VAR. SEARCH P.B. Setting on the Palmcorder: Set [REMOTE] on the side (the LCD Monitor side) of the Palmcorder. ZOOM STORE MENU OFF/ON SET P.B.DIGITAL ITEM ª Using the Remote Controller 1 Direct the ...
...can be operated individually by selecting different Remote Controller Modes. ≥If the Remote Controller Mode on the Palmcorder and press the desired button. ≥Distance from the Palmcorder: Within approximately 15 feet (5 meters) ≥Angle: Approximately 15o in the Remote Controller is replaced, ... is displayed. D INDEX STOP INDEX K ∫ L SELECT VAR. SEARCH P.B. Setting on the Palmcorder: Set [REMOTE] on the side (the LCD Monitor side) of the Palmcorder. ZOOM STORE MENU OFF/ON SET P.B.DIGITAL ITEM ª Using the Remote Controller 1 Direct the ...
Operating Instructions
Page 18
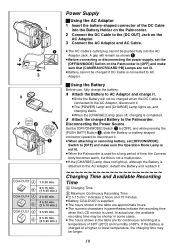
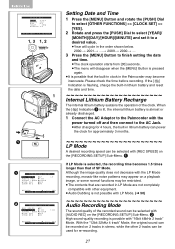
... be charged when the DC Cable is connected to [OFF] and make sure the Operation Mode Lamp is not lit. ≥When the Palmcorder is connected to the Palmcorder. 1 1 2 3 PUSH 2 BATT F ON MODE OF 1 CGA-DU07 A 1 h 30 min. indicates 2 hours and 15 minutes. ≥Battery CGA-DU07...continuous recording at a higher or lower temperature, the charging time may be pushed fully into the Battery Holder on the Palmcorder. 2 Connect the DC Cable to the [DC OUT] Jack on the Palmcorder to the AC Adaptor, disconnect it . A gap will not be charged if DC Cable is used . B 6 ...
... be charged when the DC Cable is connected to [OFF] and make sure the Operation Mode Lamp is not lit. ≥When the Palmcorder is connected to the Palmcorder. 1 1 2 3 PUSH 2 BATT F ON MODE OF 1 CGA-DU07 A 1 h 30 min. indicates 2 hours and 15 minutes. ≥Battery CGA-DU07...continuous recording at a higher or lower temperature, the charging time may be pushed fully into the Battery Holder on the Palmcorder. 2 Connect the DC Cable to the [DC OUT] Jack on the Palmcorder to the AC Adaptor, disconnect it . A gap will not be charged if DC Cable is used . B 6 ...

Operating Instructions
Page 19
... end through the loop made by holding tabs 3 on both sides. 2 Keep pressing on the Lock Button 4 and pull it off. ≥Hold the Palmcorder securely. ≥Close the Lock Cover 2 after pulling off. 3 Slide the pad of the Easy-Grip Strap. 4 Attach the Easy-Grip Strap around your... wrist. When re-attaching the Grip Belt Attachment to handle and carry the Palmcorder. 1 It is also convenient when used in conbination with the MagicWire Remote Control with a click. ≥To prevent from getting unlocked accidentally, press on ...
... end through the loop made by holding tabs 3 on both sides. 2 Keep pressing on the Lock Button 4 and pull it off. ≥Hold the Palmcorder securely. ≥Close the Lock Cover 2 after pulling off. 3 Slide the pad of the Easy-Grip Strap. 4 Attach the Easy-Grip Strap around your... wrist. When re-attaching the Grip Belt Attachment to handle and carry the Palmcorder. 1 It is also convenient when used in conbination with the MagicWire Remote Control with a click. ≥To prevent from getting unlocked accidentally, press on ...

Operating Instructions
Page 20
To enable recording, close the accidental erasure protection slider (by sliding it in the [REC] arrow direction.) Turning on/off the Palmcorder and Selecting Modes Turn on the power first and then select Modes. ª How to Turn on the Power 1 Set the [OFF/ON/MODE] Switch ... so that you attach the Shoulder Strap before going outdoors to record so as to avoid dropping the Palmcorder. 1 1 Pass the tip of the Shoulder Strap through the Shoulder Strap Holders on the Palmcorder and pull the Shoulder Strap. 2 Fold the tips of Camera Mode, VCR Mode, and Card Playback Mode. ≥...
To enable recording, close the accidental erasure protection slider (by sliding it in the [REC] arrow direction.) Turning on/off the Palmcorder and Selecting Modes Turn on the power first and then select Modes. ª How to Turn on the Power 1 Set the [OFF/ON/MODE] Switch ... so that you attach the Shoulder Strap before going outdoors to record so as to avoid dropping the Palmcorder. 1 1 Pass the tip of the Shoulder Strap through the Shoulder Strap Holders on the Palmcorder and pull the Shoulder Strap. 2 Fold the tips of Camera Mode, VCR Mode, and Card Playback Mode. ≥...

Operating Instructions
Page 21
... to read. 1 Pull the Viewfinder. 2 Adjust the Viewfinder by sliding the Eyepiece Corrector Knob 1. Forcefully rotating the LCD monitor beyond these ranges will damage the Palmcorder. Increasing the Brightness of the Entire LCD Monitor Set the [LCD MODE] on the underside of the LCD Monitor and pull the LCD Monitor out...
... to read. 1 Pull the Viewfinder. 2 Adjust the Viewfinder by sliding the Eyepiece Corrector Knob 1. Forcefully rotating the LCD monitor beyond these ranges will damage the Palmcorder. Increasing the Brightness of the Entire LCD Monitor Set the [LCD MODE] on the underside of the LCD Monitor and pull the LCD Monitor out...
Operating Instructions
Page 22
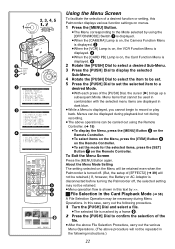
...selected items, press the [SET] Button 7 on the Menu will be retained even when the Palmcorder is turned off , the selected setting may not be retained. ≥Menu operation flow is shown in this Palmcorder displays various function settings on , the Card Function Menu is displayed. 4 2 Rotate the [... cannot be necessary during recording. ≥The above procedure will not be retained.) If, however, the Battery or AC Adaptor is disconnected before turning the Palmcorder off . (But, the setup of [EFFECT2] (l 39) will not be set. 5 Press the [PUSH] Dial to a desired Mode. ≥With ...
...selected items, press the [SET] Button 7 on the Menu will be retained even when the Palmcorder is turned off , the selected setting may not be retained. ≥Menu operation flow is shown in this Palmcorder displays various function settings on , the Card Function Menu is displayed. 4 2 Rotate the [... cannot be necessary during recording. ≥The above procedure will not be retained.) If, however, the Battery or AC Adaptor is disconnected before turning the Palmcorder off . (But, the setup of [EFFECT2] (l 39) will not be set. 5 Press the [PUSH] Dial to a desired Mode. ≥With ...

Operating Instructions
Page 24
... To terminate the Demonstration Mode, insert a Cassette or set to Demonstration Mode for approximately 10 minutes after the AC Adaptor was connected to the Palmcorder and the [OFF/ON/MODE] Switch was turned to [OFF]. 38) Initial Setting Mode [INITIAL SET] (l 83) 24 YES SELF REC... functions. If any button is pressed or operated, the Demonstration Mode is automatically set the [DEMO MODE] to [ON] without inserting a Cassette, the Palmcorder is cancelled. 24) 25) 26) 27) 28) 29) DISPLAY SETUP DATE/TIME OFF D/T DATE C.DISPLAY COUNTER MEMORY TIMECODE C.RESET ---- YES PUSH ...
... To terminate the Demonstration Mode, insert a Cassette or set to Demonstration Mode for approximately 10 minutes after the AC Adaptor was connected to the Palmcorder and the [OFF/ON/MODE] Switch was turned to [OFF]. 38) Initial Setting Mode [INITIAL SET] (l 83) 24 YES SELF REC... functions. If any button is pressed or operated, the Demonstration Mode is automatically set the [DEMO MODE] to [ON] without inserting a Cassette, the Palmcorder is cancelled. 24) 25) 26) 27) 28) 29) DISPLAY SETUP DATE/TIME OFF D/T DATE C.DISPLAY COUNTER MEMORY TIMECODE C.RESET ---- YES PUSH ...
Operating Instructions
Page 27
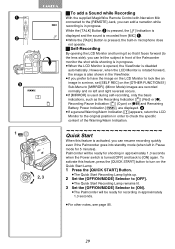
...stereo, while the other 2 tracks can be recorded on the [RECORDING SETUP] Sub-Menu. 1 If LP Mode is flashing, charge the built-in the Palmcorder may be restricted. ≥The contents that of SP Mode. When the [0] Indication 1 is lit, the internal lithium battery is possible that the built... [AUDIO REC] on the [RECORDING SETUP] Sub-Menu. 2 High sound-quality recording is possible with the power turned off and then connect to the Palmcorder with "16bit 48kHz 2 track" Mode. Although the image quality does not decrease with the LP Mode recording, mosaic-like noise patterns may appear on a...
...stereo, while the other 2 tracks can be recorded on the [RECORDING SETUP] Sub-Menu. 1 If LP Mode is flashing, charge the built-in the Palmcorder may be restricted. ≥The contents that of SP Mode. When the [0] Indication 1 is lit, the internal lithium battery is possible that the built... [AUDIO REC] on the [RECORDING SETUP] Sub-Menu. 2 High sound-quality recording is possible with the power turned off and then connect to the Palmcorder with "16bit 48kHz 2 track" Mode. Although the image quality does not decrease with the LP Mode recording, mosaic-like noise patterns may appear on a...

Operating Instructions
Page 28
...the Mode Selector Switch is turned off automatically for finding the starting point of the recorded scene. ≥[CHK] is set to [AUTO] 5, the Palmcorder automatically adjusts the focus and white balance. (In some cases, they cannot be viewed by holding down the [SEARCHj] Button 6 or [SEARCHi] ...Button 7 in the Recording Pause Mode. After checking, the Palmcorder resumes the Recording Pause Mode. ≥For other notes, see page 84. ª To View the recorded scene while the Recording is paused (Camera...
...the Mode Selector Switch is turned off automatically for finding the starting point of the recorded scene. ≥[CHK] is set to [AUTO] 5, the Palmcorder automatically adjusts the focus and white balance. (In some cases, they cannot be viewed by holding down the [SEARCHj] Button 6 or [SEARCHi] ...Button 7 in the Recording Pause Mode. After checking, the Palmcorder resumes the Recording Pause Mode. ≥For other notes, see page 84. ª To View the recorded scene while the Recording is paused (Camera...
Operating Instructions
Page 29
... general Warning/Alarm Indication [°] appears, return the LCD Monitor to the original position in order to check the specific content of the Palmcorder monitor the shot while shooting is in progress. ≥When the LCD Monitor is opened, the Viewfinder is disabled automatically. However, when the... [OFF/ON/MODE] Selector to [OFF]. ≥The Quick Start Recording Lamp remains lit. 3 Set the [OFF/ON/MODE] Selector to [ON]. ≥The Palmcorder will be ready for recording in approximately 1.3 seconds. ≥For other notes, see page 85. 29 CAMERA 1 REC 2 3 x ° 1 QUICK START OF...
... general Warning/Alarm Indication [°] appears, return the LCD Monitor to the original position in order to check the specific content of the Palmcorder monitor the shot while shooting is in progress. ≥When the LCD Monitor is opened, the Viewfinder is disabled automatically. However, when the... [OFF/ON/MODE] Selector to [OFF]. ≥The Quick Start Recording Lamp remains lit. 3 Set the [OFF/ON/MODE] Selector to [ON]. ≥The Palmcorder will be ready for recording in approximately 1.3 seconds. ≥For other notes, see page 85. 29 CAMERA 1 REC 2 3 x ° 1 QUICK START OF...


