
Operating Instructions
Page 4
... 28 Power cord 28 Power indicator 28 Switching on the projector 29 Switching off the power 30 Projecting an image 31 Selecting the input signal 31 Adjusting the image 31 Remote control operation 32 Managing the lens control settings 32 Selecting the picture mode 32 Adjusting the picture 32 Loading a saved setting 33 Displaying the [VIERA LINK] menu 33 Displaying the waveform monitor 33 Resetting to the default settings 33 Submenu 34 Switching the input signal 34 Using the button 34 Displaying the [3D SETTINGS] menu 34 Viewing 3D Images...
... 28 Power cord 28 Power indicator 28 Switching on the projector 29 Switching off the power 30 Projecting an image 31 Selecting the input signal 31 Adjusting the image 31 Remote control operation 32 Managing the lens control settings 32 Selecting the picture mode 32 Adjusting the picture 32 Loading a saved setting 33 Displaying the [VIERA LINK] menu 33 Displaying the waveform monitor 33 Resetting to the default settings 33 Submenu 34 Switching the input signal 34 Using the button 34 Displaying the [3D SETTINGS] menu 34 Viewing 3D Images...
Operating Instructions
Page 18
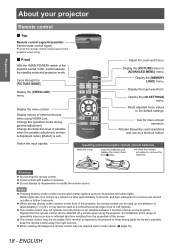
... the range of external devices when using . ■■Front With the switch of the screen. Point at the receiver on illuminates the button lights. Display menus of operability may also be used operations and use as is set ). Display the [MEMORY LOAD] menu. Preparation AAbbouotuyotuyr opruojrecptorrojector Remote control ■■Top Remote control signal transmitter Send remote control signal. Cycle through the [PICTURE MODE]. Display the [VIERA LINK] menu. Change the operation mode during gamma adjustment. Switch the input signals. Adjust the zoom...
... the range of external devices when using . ■■Front With the switch of the screen. Point at the receiver on illuminates the button lights. Display menus of operability may also be used operations and use as is set ). Display the [MEMORY LOAD] menu. Preparation AAbbouotuyotuyr opruojrecptorrojector Remote control ■■Top Remote control signal transmitter Send remote control signal. Cycle through the [PICTURE MODE]. Display the [VIERA LINK] menu. Change the operation mode during gamma adjustment. Switch the input signals. Adjust the zoom...
Operating Instructions
Page 19
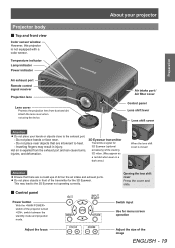
... for menu screen operation Adjust the size of the projector turned , switch between the standby mode and projection mode. Temperature indicator Lamp indicator Power indicator Air exhaust port Remote control signal receiver Projection lens Lens cover Protects the projection lens from the exhaust port and can cause burns, injuries, and deformation. 3D Eyewear transmitter Transmits a signal for 3D Eyewear (optional accessory) while viewing 3D video. (May appear as a red...
... for menu screen operation Adjust the size of the projector turned , switch between the standby mode and projection mode. Temperature indicator Lamp indicator Power indicator Air exhaust port Remote control signal receiver Projection lens Lens cover Protects the projection lens from the exhaust port and can cause burns, injuries, and deformation. 3D Eyewear transmitter Transmits a signal for 3D Eyewear (optional accessory) while viewing 3D video. (May appear as a red...
Operating Instructions
Page 31
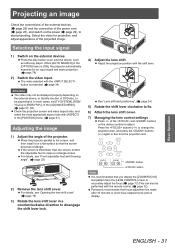
... the power cord ( page 28), and switch on the device controls to be played back. Projecting an image Projecting an image Check the connections of the external devices ( page 26) and the connection of the projector. In such cases, set [TV-SYSTEM], [RGB/ YCBCR] or [RGB/YPBPR] of the [ADVANCED MENU]. ( page 57, 58) zzCheck the projection screen and video aspect ratio, and select...
... the power cord ( page 28), and switch on the device controls to be played back. Projecting an image Projecting an image Check the connections of the external devices ( page 26) and the connection of the projector. In such cases, set [TV-SYSTEM], [RGB/ YCBCR] or [RGB/YPBPR] of the [ADVANCED MENU]. ( page 57, 58) zzCheck the projection screen and video aspect ratio, and select...
Operating Instructions
Page 35
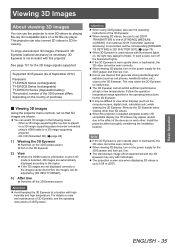
... is not included with fluorescent lights on a 3D Blu-ray player. Viewing 3D Images Viewing 3D Images About viewing 3D images You can use devices that 3D images are not displayed correctly or the images cause discomfort, the images can be adjusted by playing Blu-ray 3D compatible discs on , the light may appear to malfunction. This projector can also convert 2D videos to 3D for the 3D image signals supported.
... is not included with fluorescent lights on a 3D Blu-ray player. Viewing 3D Images Viewing 3D Images About viewing 3D images You can use devices that 3D images are not displayed correctly or the images cause discomfort, the images can be adjusted by playing Blu-ray 3D compatible discs on , the light may appear to malfunction. This projector can also convert 2D videos to 3D for the 3D image signals supported.
Operating Instructions
Page 37
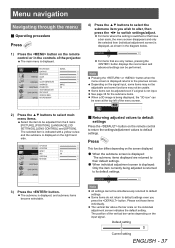
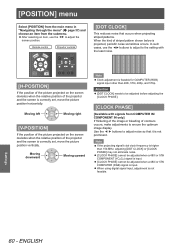
... input signal. The position of the vertical bar varies depending on the individual adjustment screen indicates the default setting. H-POSITION 0 PICTURE V-POSITION 0 ASPECT 16:9 POSITION WSS ON OVER SCAN 0 LANGUAGE KEYSTONE 0 3D SETTINGS LENS CONTROL OPTION 3) Press the button. Note zzPressing the or button when the menu screen is displayed, as shown in the controls of the menu screen. 3D 0 0 ■■Returning adjusted values to default 0 0 settings 0 Press the button on the remote control...
... input signal. The position of the vertical bar varies depending on the individual adjustment screen indicates the default setting. H-POSITION 0 PICTURE V-POSITION 0 ASPECT 16:9 POSITION WSS ON OVER SCAN 0 LANGUAGE KEYSTONE 0 3D SETTINGS LENS CONTROL OPTION 3) Press the button. Note zzPressing the or button when the menu screen is displayed, as shown in the controls of the menu screen. 3D 0 0 ■■Returning adjusted values to default 0 0 settings 0 Press the button on the remote control...
Operating Instructions
Page 40
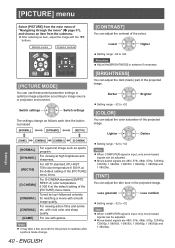
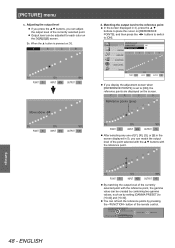
... or projection environment. zzAfter selecting an item, adjust the image with vivid color and sharp quality. Remote control Projector controls [PICTURE MODE] You can use with smooth image quality. For viewing at the default setting of the [PICTURE] menu items. Tuned by top Hollywood colorists for the picture to +32 Note zzWhen COMPUTER signal is input, only movie based signals can adjust the dark (black) part of the projected image. zzMovie based signals are 480i, 576i, 480p...
... or projection environment. zzAfter selecting an item, adjust the image with vivid color and sharp quality. Remote control Projector controls [PICTURE MODE] You can use with smooth image quality. For viewing at the default setting of the [PICTURE] menu items. Tuned by top Hollywood colorists for the picture to +32 Note zzWhen COMPUTER signal is input, only movie based signals can adjust the dark (black) part of the projected image. zzMovie based signals are 480i, 576i, 480p...
Operating Instructions
Page 41
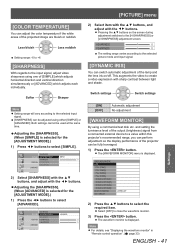
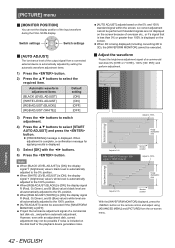
... [ADVANCED] is selected for the [ADJUSTMENT MODE].) 1) Press the ◄► buttons to close the waveform monitor. 3) Press the button. zz[SHARPNESS] can switch automatic adjustment of the output (brightness) signal from a connected external device to the selected picture mode and input signal. [DYNAMIC IRIS] You can be adjusted using either [SIMPLE] or [ADVANCED]. and setting the luminance level of the lamp and the lens iris on the screen during adjustment switches to select [SIMPLE...
... [ADVANCED] is selected for the [ADJUSTMENT MODE].) 1) Press the ◄► buttons to close the waveform monitor. 3) Press the button. zz[SHARPNESS] can switch automatic adjustment of the output (brightness) signal from a connected external device to the selected picture mode and input signal. [DYNAMIC IRIS] You can be adjusted using either [SIMPLE] or [ADVANCED]. and setting the luminance level of the lamp and the lens iris on the screen during adjustment switches to select [SIMPLE...
Operating Instructions
Page 42
... remote control and adjust using [ADVANCED MENU] and [PICTURE] from a connected external device is automatically adjusted to select the required item. zzWhen 3D is displayed on -screen menu. CHANGE WF MODE MOVE DISPLAY RETURN Adjust to 100% Signal (luminance) level Image displayable area Adjust to 0 % With COMPUTER (except 1 080 signal) or HDMI (Expand) Monitor position Adjust to 100% Signal (luminance) level Image displayable area Adjust to 3D), the [WAVEFORM MONITOR] cannot be performed if standard signals are all automatically adjusted to select [START AUTO ADJUST...
... remote control and adjust using [ADVANCED MENU] and [PICTURE] from a connected external device is automatically adjusted to select the required item. zzWhen 3D is displayed on -screen menu. CHANGE WF MODE MOVE DISPLAY RETURN Adjust to 100% Signal (luminance) level Image displayable area Adjust to 0 % With COMPUTER (except 1 080 signal) or HDMI (Expand) Monitor position Adjust to 100% Signal (luminance) level Image displayable area Adjust to 3D), the [WAVEFORM MONITOR] cannot be performed if standard signals are all automatically adjusted to select [START AUTO ADJUST...
Operating Instructions
Page 48
... ON POSITION Y R G B LANGUAGE 3D SETTINGS LENS CONTROL OPTION 0% PICTURE POSITION ADVANPCOEIDNTADJU8ST GAMMA PRESET REFERENCE POINTS 50% INPUT 40% 0.0 ON LANGUAGE 3D SETTINGS LENS CONTROL Move above 100% OUTPUT 0 LENS CONTROL OPTION 0% POINT 8 50% INPUT 40% 100% OUTPUT 0 ADVANCED ADJUST PICTUREzzIGf AyMoMuAdPiRsEpSlaETy the adjustm0e.0n0t screen when [RREEFEFREERNCEENPCOIENTSPOINTS] OisNset to [+0.40] and [+0.30]. CHANNEL CHANGE OPERATION MODE RESET (RESET ALL: 3 sec) RETURN SET AS NEW REF. ENGLISH INPUT ADJ. Y R G B LANGUAGE Reference points...
... ON POSITION Y R G B LANGUAGE 3D SETTINGS LENS CONTROL OPTION 0% PICTURE POSITION ADVANPCOEIDNTADJU8ST GAMMA PRESET REFERENCE POINTS 50% INPUT 40% 0.0 ON LANGUAGE 3D SETTINGS LENS CONTROL Move above 100% OUTPUT 0 LENS CONTROL OPTION 0% POINT 8 50% INPUT 40% 100% OUTPUT 0 ADVANCED ADJUST PICTUREzzIGf AyMoMuAdPiRsEpSlaETy the adjustm0e.0n0t screen when [RREEFEFREERNCEENPCOIENTSPOINTS] OisNset to [+0.40] and [+0.30]. CHANNEL CHANGE OPERATION MODE RESET (RESET ALL: 3 sec) RETURN SET AS NEW REF. ENGLISH INPUT ADJ. Y R G B LANGUAGE Reference points...

Operating Instructions
Page 58
... CHANGE 3D SETTINGS ■■[MEMORY SAVE] LENS CONTROL Values set either [RGB] or [YCBCR], [YPBPR] in the input box. Settings [PICTURE] menu ■■[RGB/YCBCR], [RGB/YPBPR] Set this is set to [AUTO], set (adjustment values) for signal details. ( page 100) zzIn some connected devices. zzWhen using a movie based signal input other than described above : Select from [AUTO], [RGB], [YPBPR]. ●●When using an HDMI 1/2/3 input zzWhen using COMPONENT input terminals. 58 - MEMORY NAME INPUT...
... CHANGE 3D SETTINGS ■■[MEMORY SAVE] LENS CONTROL Values set either [RGB] or [YCBCR], [YPBPR] in the input box. Settings [PICTURE] menu ■■[RGB/YCBCR], [RGB/YPBPR] Set this is set to [AUTO], set (adjustment values) for signal details. ( page 100) zzIn some connected devices. zzWhen using a movie based signal input other than described above : Select from [AUTO], [RGB], [YPBPR]. ●●When using an HDMI 1/2/3 input zzWhen using COMPONENT input terminals. 58 - MEMORY NAME INPUT...
Operating Instructions
Page 60
... clock frequency is correctly set , move the picture position horizontally. Remote control Projector controls [DOT CLOCK] This reduces noise that it is input. In such cases, use the to adjust the screen position. Use the ◄ ► buttons to adjust noise so that occurs when projecting striped patterns. zz[CLOCK PHASE] cannot be adjusted when a 480i or 576i COMPONENT (YCBCR) signal is not prominent. When...
... clock frequency is correctly set , move the picture position horizontally. Remote control Projector controls [DOT CLOCK] This reduces noise that it is input. In such cases, use the to adjust the screen position. Use the ◄ ► buttons to adjust noise so that occurs when projecting striped patterns. zz[CLOCK PHASE] cannot be adjusted when a 480i or 576i COMPONENT (YCBCR) signal is not prominent. When...

Operating Instructions
Page 61
....) are wider than for [S16:9], the aspect ratio set to the optimum aspect ratio when an aspect ratio identifier is input for 4:3 projection at a 16:9 aspect ratio, the edges may change. When a 3D signal is selected, the video will look different from the table shown. [POSITION] menu [ASPECT] You can switch the image aspect ratio manually when needed. zzWhen a signal is projected at that uses overseas broadcasting formats, the supported aspect ratio modes differ from the original. zzIf you...
....) are wider than for [S16:9], the aspect ratio set to the optimum aspect ratio when an aspect ratio identifier is input for 4:3 projection at a 16:9 aspect ratio, the edges may change. When a 3D signal is selected, the video will look different from the table shown. [POSITION] menu [ASPECT] You can switch the image aspect ratio manually when needed. zzWhen a signal is projected at that uses overseas broadcasting formats, the supported aspect ratio modes differ from the original. zzIf you...
Operating Instructions
Page 64
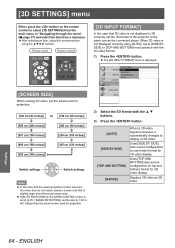
... cm (140 inches)] [152 cm (60 inches)] [203 cm (80 inches)] [254 cm (100 inches)] [305 cm (120 inches)] Switch settings Switch settings Note zzIn the case that the actual projection screen size and the menu size do not match, select a screen size that 3D video is slightly larger than the actual screen size. Remote control Projector controls [SCREEN SIZE] When viewing 3D video, set the screen size for 3D video display. zzThe [3D INPUT FORMAT] menu is received, it automatically changes to display of the...
... cm (140 inches)] [152 cm (60 inches)] [203 cm (80 inches)] [254 cm (100 inches)] [305 cm (120 inches)] Switch settings Switch settings Note zzIn the case that the actual projection screen size and the menu size do not match, select a screen size that 3D video is slightly larger than the actual screen size. Remote control Projector controls [SCREEN SIZE] When viewing 3D video, set the screen size for 3D video display. zzThe [3D INPUT FORMAT] menu is received, it automatically changes to display of the...
Operating Instructions
Page 67
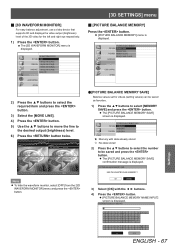
...; buttons to select the number to be saved as favorites. 1) Press the ▲▼ buttons to the desired output (brightness) level. 6) Press the button twice. 100% 50% 0% ENTER : CHANGE WF MODE : MOVE LINE LEFT RIGHT Note zzTo hide the waveform monitor, select [OFF] from the [3D WAVEFORM MONITOR] menu and press the button. [3D SETTINGS] menu ■■[PICTURE BALANCE MEMORY] Press the button. PICTURE BALANCE MEMORY NAME INPUT Settings...
...; buttons to select the number to be saved as favorites. 1) Press the ▲▼ buttons to the desired output (brightness) level. 6) Press the button twice. 100% 50% 0% ENTER : CHANGE WF MODE : MOVE LINE LEFT RIGHT Note zzTo hide the waveform monitor, select [OFF] from the [3D WAVEFORM MONITOR] menu and press the button. [3D SETTINGS] menu ■■[PICTURE BALANCE MEMORY] Press the button. PICTURE BALANCE MEMORY NAME INPUT Settings...
Operating Instructions
Page 77
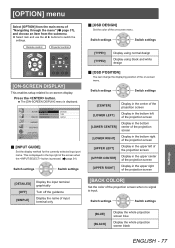
...] Set the color of the on-screen menu. [OPTION] menu Select [OPTION] from the submenu. Press the button. PICTURE POSITION ON-SCREEN DISPLAY INPUT GUIDE OSD DESIGN OSD POSITION LANGUAGE 3D SETTINGS LENS CONTROL OPTION DETAILED TYPE1 CENTER ■■[INPUT GUIDE] Set the display method for the currently selected input port name. zzThe [ON-SCREEN DISPLAY] menu is input. Switch settings Switch settings [TYPE1] [TYPE2] Display using normal design Display using black and white design ■■[OSD POSITION] You can change the displaying position...
...] Set the color of the on-screen menu. [OPTION] menu Select [OPTION] from the submenu. Press the button. PICTURE POSITION ON-SCREEN DISPLAY INPUT GUIDE OSD DESIGN OSD POSITION LANGUAGE 3D SETTINGS LENS CONTROL OPTION DETAILED TYPE1 CENTER ■■[INPUT GUIDE] Set the display method for the currently selected input port name. zzThe [ON-SCREEN DISPLAY] menu is input. Switch settings Switch settings [TYPE1] [TYPE2] Display using normal design Display using black and white design ■■[OSD POSITION] You can change the displaying position...
Operating Instructions
Page 83
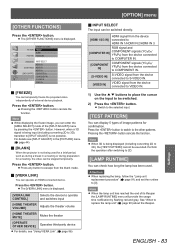
... device connected to COMPONENT IN. [S-VIDEO IN] S-VIDEO signal from the device connected to S-VIDEO IN. [VIDEO IN] VIDEO signal from the blank mode. ■■[VIERA LINK] You can be executed. See "When to the other patterns. Press the button. Press the button. ENGLISH - 83 Settings [OPTION] menu [OTHER FUNCTIONS] Press the button. For details see "Using VIERA Link". ( page 96) ■■INPUT SELECT The input can operate an HDMI-connected...
... device connected to COMPONENT IN. [S-VIDEO IN] S-VIDEO signal from the device connected to S-VIDEO IN. [VIDEO IN] VIDEO signal from the blank mode. ■■[VIERA LINK] You can be executed. See "When to the other patterns. Press the button. Press the button. ENGLISH - 83 Settings [OPTION] menu [OTHER FUNCTIONS] Press the button. For details see "Using VIERA Link". ( page 96) ■■INPUT SELECT The input can operate an HDMI-connected...

Operating Instructions
Page 100
... 1 280 × 800 1 280 × 1 024 1 400 × 1 050 1 440 × 900 1 920 × 1 080*2 1 920 × 1 080 1 920 × 1 200*2 Scanning frequency Dot clock H V frequency (kHz) (Hz) (MHz) Format Plug and play compatible HDMI 15.7 59.9 - - V/S 15.6 50.0 - - 15.7 59.9 13.5 - zzWhen interlaced signals are connected, flicker may occur on the projected image. 100 - ENGLISH Appendix A signal with the projectors.
... 1 280 × 800 1 280 × 1 024 1 400 × 1 050 1 440 × 900 1 920 × 1 080*2 1 920 × 1 080 1 920 × 1 200*2 Scanning frequency Dot clock H V frequency (kHz) (Hz) (MHz) Format Plug and play compatible HDMI 15.7 59.9 - - V/S 15.6 50.0 - - 15.7 59.9 13.5 - zzWhen interlaced signals are connected, flicker may occur on the projected image. 100 - ENGLISH Appendix A signal with the projectors.
Operating Instructions
Page 103
... 61) Switches the [PICTURE MODE]. ( page 40) Parameter NOR = NORMAL DYN = DYNAMIC 709 = REC709 DCN = D-CINEMA CN1 = CINEMA1 CN2 = CINEMA2 GM1 = GAME DPA PICTURE ADJUST Displays the individual adjustment screen of the remote control. OBK RETURN Returns to the previous menu or escaping from a computer are ignored. Aspect ratio is switched each time this operation. OVL VIERA LINK Displays the [VIERA LINK] menu. Sends the command to switch menu items...
... 61) Switches the [PICTURE MODE]. ( page 40) Parameter NOR = NORMAL DYN = DYNAMIC 709 = REC709 DCN = D-CINEMA CN1 = CINEMA1 CN2 = CINEMA2 GM1 = GAME DPA PICTURE ADJUST Displays the individual adjustment screen of the remote control. OBK RETURN Returns to the previous menu or escaping from a computer are ignored. Aspect ratio is switched each time this operation. OVL VIERA LINK Displays the [VIERA LINK] menu. Sends the command to switch menu items...
Operating Instructions
Page 109
... 17 Adjusting the picture 32 ADVANCED MENU 45 Air filter 89 Air filter unit 87 ASPECT 61 AUTO SEARCH 78 AUTO SETUP 63 AUTO SWITCHING 75 B BACK COLOR 77 BLANK 83 BRIGHTNESS 40, 51 C Cautions on use 16 Cautions when installing 14 CINEMA REALITY 57 Cleaning 87 CLOCK PHASE 60 COLOR 40 COLOR MANAGEMENT 52 COLOR TEMPERATURE 41 Compatible signals 100, 106 Connections 26 CONTRAST 40, 51 Control commands...
... 17 Adjusting the picture 32 ADVANCED MENU 45 Air filter 89 Air filter unit 87 ASPECT 61 AUTO SEARCH 78 AUTO SETUP 63 AUTO SWITCHING 75 B BACK COLOR 77 BLANK 83 BRIGHTNESS 40, 51 C Cautions on use 16 Cautions when installing 14 CINEMA REALITY 57 Cleaning 87 CLOCK PHASE 60 COLOR 40 COLOR MANAGEMENT 52 COLOR TEMPERATURE 41 Compatible signals 100, 106 Connections 26 CONTRAST 40, 51 Control commands...


