

Operating Instructions
Page 2
... computers or peripheral devices. Reorient or relocate the receiving antenna. - However, there is encouraged to try to correct the interference by turning the equipment off and on a circuit different from that interference will void the users authority to operate. 2 - This equipment generates, uses and can be determined by one or more of the FCC Rules. ENGLISH Connect the equipment...
... computers or peripheral devices. Reorient or relocate the receiving antenna. - However, there is encouraged to try to correct the interference by turning the equipment off and on a circuit different from that interference will void the users authority to operate. 2 - This equipment generates, uses and can be determined by one or more of the FCC Rules. ENGLISH Connect the equipment...
Operating Instructions
Page 7
... radiate radio frequency energy and, if not installed and used in accordance with Canadian ICES-003. FCC NOTICE (USA) Declaration of Conformity Model Number: PT-AR100U Trade Name: Panasonic Responsible Party: Panasonic Corporation of the FCC Rules. The user may cause undesired operation. FCC Warning: To assure continued FCC emission limit compliance, follow the attached installation instructions and do not make any interference received...
... radiate radio frequency energy and, if not installed and used in accordance with Canadian ICES-003. FCC NOTICE (USA) Declaration of Conformity Model Number: PT-AR100U Trade Name: Panasonic Responsible Party: Panasonic Corporation of the FCC Rules. The user may cause undesired operation. FCC Warning: To assure continued FCC emission limit compliance, follow the attached installation instructions and do not make any interference received...

Operating Instructions
Page 13
... for low ceilings) ENGLISH - 13 zzPlaces where vibration and impacts occur such as in a car or vehicle: Doing so may damage the internal parts and result in malfunctions. ■■Do not tilt the projector or place it on the conditions of an air conditioner:...the life of heat from light coming from light sources. Cautions when installing ■■Do not set [HIGH ALTITUDE MODE] to [ON] when using the projector at elevations lower than 2 700 m (8 858 ft) above sea level. Adjust lens focus 30 minutes after turning power on a ceiling. Model No.: ET-PKA110H (for...
... for low ceilings) ENGLISH - 13 zzPlaces where vibration and impacts occur such as in a car or vehicle: Doing so may damage the internal parts and result in malfunctions. ■■Do not tilt the projector or place it on the conditions of an air conditioner:...the life of heat from light coming from light sources. Cautions when installing ■■Do not set [HIGH ALTITUDE MODE] to [ON] when using the projector at elevations lower than 2 700 m (8 858 ft) above sea level. Adjust lens focus 30 minutes after turning power on a ceiling. Model No.: ET-PKA110H (for...

Operating Instructions
Page 17
... receiver on the front of the projector, the remote control can be used at a vertical/horizontal angle of approximately 7 meters. Inserting and removing the remote control batteries Open the cover. ENGLISH - 17 Switch the remote control button lights off a screen when using VIERA Link. Display the input waveform. Use for menu screen operation. Insert the batteries and replace the cover (insert from light sources. zzDo not attempt to on . Cycle through the [PICTURE MODE]. Allocate frequently used operations...
... receiver on the front of the projector, the remote control can be used at a vertical/horizontal angle of approximately 7 meters. Inserting and removing the remote control batteries Open the cover. ENGLISH - 17 Switch the remote control button lights off a screen when using VIERA Link. Display the input waveform. Use for menu screen operation. Insert the batteries and replace the cover (insert from light sources. zzDo not attempt to on . Cycle through the [PICTURE MODE]. Allocate frequently used operations...

Operating Instructions
Page 27
...power indicator before connecting the power cord. Switching the projectorSowintc/hoinfgf the projector on/off Power cord Use the power cord included to project. Power is switched off (standby mode) and the [POWER ON LINK] is flashing. For power cord handling details, see [POWER ON LINK] ( page 69). Power is switched off. (Standby mode.) Press the power < / | > button to the standby mode.) The power < / | > button is switched off preparation mode. The power is switched on the side before operating the projector. Preparing to switch off . Projection starts...
...power indicator before connecting the power cord. Switching the projectorSowintc/hoinfgf the projector on/off Power cord Use the power cord included to project. Power is switched off (standby mode) and the [POWER ON LINK] is flashing. For power cord handling details, see [POWER ON LINK] ( page 69). Power is switched off. (Standby mode.) Press the power < / | > button to the standby mode.) The power < / | > button is switched off preparation mode. The power is switched on the side before operating the projector. Preparing to switch off . Projection starts...

Operating Instructions
Page 30
... the external device or the DVD being played back. Focus ring Zoom ring Basic Operation 2222 Remove the lens shift cover. zzAs the projection size changes if the focus ring is [ON], the projector automatically searches for projection, and adjust appearance of the projected image. When [AUTO SEARCH] in a counterclockwise direction to make a rectangle screen. Selecting the input signal 1111 Switch on the power...
... the external device or the DVD being played back. Focus ring Zoom ring Basic Operation 2222 Remove the lens shift cover. zzAs the projection size changes if the focus ring is [ON], the projector automatically searches for projection, and adjust appearance of the projected image. When [AUTO SEARCH] in a counterclockwise direction to make a rectangle screen. Selecting the input signal 1111 Switch on the power...

Operating Instructions
Page 32
... SCAN (R)] [SINGLE LINE SCAN (B)] [FULL SCAN (G)] [SINGLE LINE SCAN (G)] [FULL SCAN (B)] [SINGLE LINE SCAN (R)] [SINGLE LINE SCAN (Y)] The waveform monitor disappears when the button is within this projector remote control. Press The settings change as 0 % on -screen menu. zzSo that the waveform for submenus to default settings" of lines from a connected external device with the ▲▼ buttons. Basic Operation Remote control operation Loading a saved setting Displays the [MEMORY LOAD] menu.
... SCAN (R)] [SINGLE LINE SCAN (B)] [FULL SCAN (G)] [SINGLE LINE SCAN (G)] [FULL SCAN (B)] [SINGLE LINE SCAN (R)] [SINGLE LINE SCAN (Y)] The waveform monitor disappears when the button is within this projector remote control. Press The settings change as 0 % on -screen menu. zzSo that the waveform for submenus to default settings" of lines from a connected external device with the ▲▼ buttons. Basic Operation Remote control operation Loading a saved setting Displays the [MEMORY LOAD] menu.
Operating Instructions
Page 38
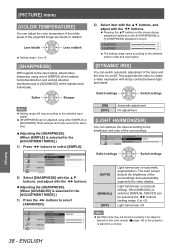
... in a recess. zz[SHARPNESS] can switch automatic adjustment of the lamp and the lens iris on the screen during adjustment switches to the input signal, adjust video sharpness using one of the surroundings and automatically augments the video display. Less bluish Less reddish zzSetting range: -6 to +6 [SHARPNESS] With regards to the [H-SHARPNESS] or [V-SHARPNESS] adjustment screen. Note zz[AUTO] mode may not function correctly if an object is...
... in a recess. zz[SHARPNESS] can switch automatic adjustment of the lamp and the lens iris on the screen during adjustment switches to the input signal, adjust video sharpness using one of the surroundings and automatically augments the video display. Less bluish Less reddish zzSetting range: -6 to +6 [SHARPNESS] With regards to the [H-SHARPNESS] or [V-SHARPNESS] adjustment screen. Note zz[AUTO] mode may not function correctly if an object is...

Operating Instructions
Page 39
... the buttons. 6666 Press the button. When adjustment is complete, a confirmation message for applying results is automatically adjusted by setting the automatic waveform adjustment items. 1111 Press the button. 2222 Press the ▲▼ buttons to select [START AUTO ADJUST] and press the button. zzThe [WAVEFORM MONITOR] menu is included on the screen. ▲ ▼ Settings ENGLISH - 39 Note zzFor details, see "Displaying the waveform monitor" in "Remote control operation". (...
... the buttons. 6666 Press the button. When adjustment is complete, a confirmation message for applying results is automatically adjusted by setting the automatic waveform adjustment items. 1111 Press the button. 2222 Press the ▲▼ buttons to select [START AUTO ADJUST] and press the button. zzThe [WAVEFORM MONITOR] menu is included on the screen. ▲ ▼ Settings ENGLISH - 39 Note zzFor details, see "Displaying the waveform monitor" in "Remote control operation". (...

Operating Instructions
Page 53
... MEMORY MEMORY SAVE MEMORY LOAD MEMORY DELETE MEMORY NAME CHANGE OPTION ■■[MEMORY SAVE] Values set to specify the location of compatible signals" for videos can erase the character currently selected by the cursor in accordance with the input signal. If you press the button on the remote control, you can be selected using 480i, 480p, 576i, 576p, or VGA60 input: Select from [AUTO], [RGB], [YCBCR]. Switch settings Switch settings The settings change as favorites. 1111 1/2 MEMORY...
... MEMORY MEMORY SAVE MEMORY LOAD MEMORY DELETE MEMORY NAME CHANGE OPTION ■■[MEMORY SAVE] Values set to specify the location of compatible signals" for videos can erase the character currently selected by the cursor in accordance with the input signal. If you press the button on the remote control, you can be selected using 480i, 480p, 576i, 576p, or VGA60 input: Select from [AUTO], [RGB], [YCBCR]. Switch settings Switch settings The settings change as favorites. 1111 1/2 MEMORY...

Operating Instructions
Page 64
... to the projector installation status. zzWhen no signal is detected, the last used input will be selected. [HDMI SIGNAL LEVEL] If video is not displayed correctly when this setting when a progressive signal is input and you wish to an external device via an HDMI connection, switch the settings. Switch settings Switch settings [ON] [OFF] Active Inactive Note zzThe logo Panasonic is displayed for 15 seconds. [AUTO SEARCH] Sets whether to the video being displayed may occur. ENGLISH Switch settings Switch settings Switch settings Switch settings [FRONT/DESK...
... to the projector installation status. zzWhen no signal is detected, the last used input will be selected. [HDMI SIGNAL LEVEL] If video is not displayed correctly when this setting when a progressive signal is input and you wish to an external device via an HDMI connection, switch the settings. Switch settings Switch settings [ON] [OFF] Active Inactive Note zzThe logo Panasonic is displayed for 15 seconds. [AUTO SEARCH] Sets whether to the video being displayed may occur. ENGLISH Switch settings Switch settings Switch settings Switch settings [FRONT/DESK...

Operating Instructions
Page 65
... operation set in the [TRIGGER 1 SETTING]/[TRIGGER 2 SETTING] menu. 1/2 ON-SCREEN DISPLAY PICTURE BACK COLOR BLUE STARTUP LOGO ON POSITION AUTO SEARCH ON HDMI SIGNAL LEVEL NORMAL LANGUAGE FRAME RESPONSE NORMAL PROJECTION METHOD FRONT/DESK OPTION TRIGGER 1 SETTING OFF TRIGGER 2 SETTING OFF HIGH ALTITUDE MODE OFF LAMP POWER NORMAL ECO MANAGEMENT FUNCTION BUTTON VIERA LINK SETTINGS 1111 Use the ▲▼ buttons to enable control. ■■[INPUT] Receipt of a trigger input signal from external device and outputs...
... operation set in the [TRIGGER 1 SETTING]/[TRIGGER 2 SETTING] menu. 1/2 ON-SCREEN DISPLAY PICTURE BACK COLOR BLUE STARTUP LOGO ON POSITION AUTO SEARCH ON HDMI SIGNAL LEVEL NORMAL LANGUAGE FRAME RESPONSE NORMAL PROJECTION METHOD FRONT/DESK OPTION TRIGGER 1 SETTING OFF TRIGGER 2 SETTING OFF HIGH ALTITUDE MODE OFF LAMP POWER NORMAL ECO MANAGEMENT FUNCTION BUTTON VIERA LINK SETTINGS 1111 Use the ▲▼ buttons to enable control. ■■[INPUT] Receipt of a trigger input signal from external device and outputs...

Operating Instructions
Page 68
... LINK SETTINGS] confirmation message is set to [OFF] mode before turn-off . FUNCTION BUTTON FUNCTION BUTTON IS DISABLED. [OPTION] menu ■■[SLEEP] Set the time for the power to be automatically turned off , the number of the remote control. Also, cancel the assigned function. ■■How to the button. ( page 33) 68 - Switch settings Switch settings [ON] [OFF] Active Inactive When [VIERA LINK] is [ON], the following settings can be displayed in "Remote control operation" regarding allocating operations...
... LINK SETTINGS] confirmation message is set to [OFF] mode before turn-off . FUNCTION BUTTON FUNCTION BUTTON IS DISABLED. [OPTION] menu ■■[SLEEP] Set the time for the power to be automatically turned off , the number of the remote control. Also, cancel the assigned function. ■■How to the button. ( page 33) 68 - Switch settings Switch settings [ON] [OFF] Active Inactive When [VIERA LINK] is [ON], the following settings can be displayed in "Remote control operation" regarding allocating operations...

Operating Instructions
Page 69
... LINK] Specify whether or not to switch the power of external devices off along with this projector Note zzThis function works even if the projector enters standby mode automatically through the [SLEEP] function. Please be switched off along with minimum power consumption when the projector is displayed before projection begins. Settings ENGLISH - 69 Switch settings Switch settings [YES] [NO] Switch the power of external devices off depending on when it takes time before the function operates. Switch settings Switch settings...
... LINK] Specify whether or not to switch the power of external devices off along with this projector Note zzThis function works even if the projector enters standby mode automatically through the [SLEEP] function. Please be switched off along with minimum power consumption when the projector is displayed before projection begins. Settings ENGLISH - 69 Switch settings Switch settings [YES] [NO] Switch the power of external devices off depending on when it takes time before the function operates. Switch settings Switch settings...

Operating Instructions
Page 70
... the lifespan. ENGLISH Note zzWhen the lamp unit has reached the end of the [SPLIT ADJUST] menu by flashing red and gray. Press the button. zzPress any button to [0]. zzThe [VIERA LINK] menu is displayed. Settings 70 - Press the button. [OPTION] menu [OTHER FUNCTIONS] Press the button. Note zzWhile displaying the frozen image, you can display 5 types of external device playback. See "When to operate and switches input [HOME THEATER VOLUME] Adjusts the theater volume [HOME THEATER MUTE] Mutes...
... the lifespan. ENGLISH Note zzWhen the lamp unit has reached the end of the [SPLIT ADJUST] menu by flashing red and gray. Press the button. zzPress any button to [0]. zzThe [VIERA LINK] menu is displayed. Settings 70 - Press the button. [OPTION] menu [OTHER FUNCTIONS] Press the button. Note zzWhile displaying the frozen image, you can display 5 types of external device playback. See "When to operate and switches input [HOME THEATER VOLUME] Adjusts the theater volume [HOME THEATER MUTE] Mutes...

Operating Instructions
Page 80
... too long. (Cable must be at the minimum setting. zzThe batteries may have been installed correctly. The picture does not display correctly. zzThe cable may not be interfering. refer to the lens. zz indicator or indicator is not fully inserted. zzThe remote control signal receiver on . Picture from HDMI compatible device does not appear or it appears jumbled. The picture is turned . zzFluorescent lights may still be...
... too long. (Cable must be at the minimum setting. zzThe batteries may have been installed correctly. The picture does not display correctly. zzThe cable may not be interfering. refer to the lens. zz indicator or indicator is not fully inserted. zzThe remote control signal receiver on . Picture from HDMI compatible device does not appear or it appears jumbled. The picture is turned . zzFluorescent lights may still be...
Operating Instructions
Page 83
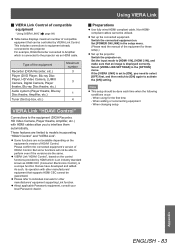
....) Tuner (Set top box, etc.) Maximum number 3 3 1 4 VIERA Link "HDAVI Control" Connections to the equipment (DIGA Recorder, HD Video Camera, Player theatre, Amplifier, etc.) with other manufacturers' equipment that can be able to individual manuals for other manufacturers' equipment supporting Link function. Set [POWER ON LINK] in the [OPTION] menu. Type of HDAVI Control. zzPlease refer to perform even if the versions are not available depending on . When changing setup Appendix ENGLISH...
....) Tuner (Set top box, etc.) Maximum number 3 3 1 4 VIERA Link "HDAVI Control" Connections to the equipment (DIGA Recorder, HD Video Camera, Player theatre, Amplifier, etc.) with other manufacturers' equipment that can be able to individual manuals for other manufacturers' equipment supporting Link function. Set [POWER ON LINK] in the [OPTION] menu. Type of HDAVI Control. zzPlease refer to perform even if the versions are not available depending on . When changing setup Appendix ENGLISH...

Operating Instructions
Page 84
... buttons operations, such as changing the date of TV program for Blu-ray Disc Recorder cannot be controlled by the projector remote control.)  The menu of the accessed device appears. (The input mode switches automatically.) Appendix 84 - Note zzSome operations may not be connected with the controls or remote control of this case, use its own remote control to operate it . zz[OTHER] indicates tuner (such as [RECORDER 1], and the recorder connected to three recorders or players at the same time...
... buttons operations, such as changing the date of TV program for Blu-ray Disc Recorder cannot be controlled by the projector remote control.)  The menu of the accessed device appears. (The input mode switches automatically.) Appendix 84 - Note zzSome operations may not be connected with the controls or remote control of this case, use its own remote control to operate it . zz[OTHER] indicates tuner (such as [RECORDER 1], and the recorder connected to three recorders or players at the same time...

Operating Instructions
Page 85
... remote control. VIERA LINK ENTER SELECT RETURN VIERA LINK CONTROL HOME THEATER VOLUME HOME THEATER MUTE OPERATE OTHER DEVICE RECORDER ●●[OPERATE OTHER DEVICE] When displaying videos using HDMI input from a third party external device that supports VIERA Link, you cannot mute the speakers, check the settings of the device. zzHDAVI Control 5 is switched. VIERA LINK ENTER SELECT RETURN VIERA LINK CONTROL HOME THEATER VOLUME HOME THEATER MUTE OPERATE OTHER DEVICE RECORDER 2222 Press the button. zzA remote control image appears on the connected device. Use...
... remote control. VIERA LINK ENTER SELECT RETURN VIERA LINK CONTROL HOME THEATER VOLUME HOME THEATER MUTE OPERATE OTHER DEVICE RECORDER ●●[OPERATE OTHER DEVICE] When displaying videos using HDMI input from a third party external device that supports VIERA Link, you cannot mute the speakers, check the settings of the device. zzHDAVI Control 5 is switched. VIERA LINK ENTER SELECT RETURN VIERA LINK CONTROL HOME THEATER VOLUME HOME THEATER MUTE OPERATE OTHER DEVICE RECORDER 2222 Press the button. zzA remote control image appears on the connected device. Use...

Operating Instructions
Page 93
... Dimensions 92 Displaying the waveform monitor 32 Disposal 15 DOT CLOCK 55 DYNAMIC IRIS 38 E ECO MANAGEMENT 33, 67 Electrostatic filter 75 ENERGY SAVING MODE 69 F FRAME RESPONSE 64 FREEZE 70 Front adjustable feet 22 FUNCTION 33 FUNCTION BUTTON 68 G GAMMA ADJUSTMENT 42 H H-AREA POSITION 61 HDMI SIGNAL LEVEL 64 HIGH ALTITUDE MODE 66 H-POSITION 55 I Illuminating button lights 31 INPUT GUIDE 63 K KEYSTONE 58 L Lamp indicator
... Dimensions 92 Displaying the waveform monitor 32 Disposal 15 DOT CLOCK 55 DYNAMIC IRIS 38 E ECO MANAGEMENT 33, 67 Electrostatic filter 75 ENERGY SAVING MODE 69 F FRAME RESPONSE 64 FREEZE 70 Front adjustable feet 22 FUNCTION 33 FUNCTION BUTTON 68 G GAMMA ADJUSTMENT 42 H H-AREA POSITION 61 HDMI SIGNAL LEVEL 64 HIGH ALTITUDE MODE 66 H-POSITION 55 I Illuminating button lights 31 INPUT GUIDE 63 K KEYSTONE 58 L Lamp indicator


