
NNSN756 User Guide
Page 1
... Cleaning of Your Microwave Oven 24 Accessory Purchases 24 Before Requesting Service 25 Limited Warranty & Customer Service Directory 26 General Information Cookware Guide 7 Oven Components Diagram 8 Specifications 28 User's Record 28 READ ALL INSTRUCTIONS CAREFULLY BEFORE USING THE OVEN. T735/T745/T755/T765/T775/ T935/T945/T955/T965/T975/SN756 Safety Information Operation Precautions Inside cover Important Safety Instructions .........1-3 Installation and Grounding Instructions 3-4 Safety Precautions 5-6 Operation Control Panel 9 Starting to Use Your Oven 10 Setting the Clock...
... Cleaning of Your Microwave Oven 24 Accessory Purchases 24 Before Requesting Service 25 Limited Warranty & Customer Service Directory 26 General Information Cookware Guide 7 Oven Components Diagram 8 Specifications 28 User's Record 28 READ ALL INSTRUCTIONS CAREFULLY BEFORE USING THE OVEN. T735/T745/T755/T765/T775/ T935/T945/T955/T965/T975/SN756 Safety Information Operation Precautions Inside cover Important Safety Instructions .........1-3 Installation and Grounding Instructions 3-4 Safety Precautions 5-6 Operation Control Panel 9 Starting to Use Your Oven 10 Setting the Clock...

NNSN756 User Guide
Page 3
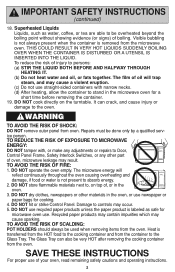
... combustible materials are placed inside the oven to heat, or cook food. DO NOT cover or block any openings on the inside the oven ignites, keep oven door closed glass jars-may result in the oven cavity: (a) Do not overcook food. DO NOT immerse cord or plug in this manual. Your microwave oven is specifically designed to facilitate cooking. (b) Remove wire twist-ties from heated surfaces. 14. SURE TO EXCESSIVE MICROWAVE ENERGY," found on...
... combustible materials are placed inside the oven to heat, or cook food. DO NOT cover or block any openings on the inside the oven ignites, keep oven door closed glass jars-may result in the oven cavity: (a) Do not overcook food. DO NOT immerse cord or plug in this manual. Your microwave oven is specifically designed to facilitate cooking. (b) Remove wire twist-ties from heated surfaces. 14. SURE TO EXCESSIVE MICROWAVE ENERGY," found on...
NNSN756 User Guide
Page 4
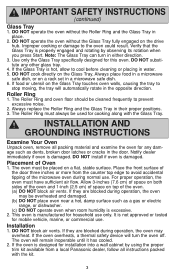
... microwave oven use recycled paper products unless the paper product is transferred from the HOT food to stand in the oven. 3. IMPORTANT SAFETY INSTRUCTIONS (continued) 18. Repairs must be used when removing items from the container to Door, Control Panel Frame, Safety Interlock Switches, or any adjustments or repairs to the Glass Tray. WARNING TO AVOID THE RISK OF SHOCK: DO NOT remove outer panel from oven. Damage to the oven...
... microwave oven use recycled paper products unless the paper product is transferred from the HOT food to stand in the oven. 3. IMPORTANT SAFETY INSTRUCTIONS (continued) 18. Repairs must be used when removing items from the container to Door, Control Panel Frame, Safety Interlock Switches, or any adjustments or repairs to the Glass Tray. WARNING TO AVOID THE RISK OF SHOCK: DO NOT remove outer panel from oven. Damage to the oven...
NNSN756 User Guide
Page 5
... Panasonic dealer, follow all packing material and examine the oven for mobile vehicle, marine, or commercial use . Note: The Glass Tray can turn the oven off. Use only the Glass Tray specifically designed for installation into a wall cabinet by observing its rotation when you press Start. Placement of the oven. (a) DO NOT block air vents. Installation 1. IMPORTANT SAFETY INSTRUCTIONS (continued) Glass Tray 1. DO NOT operate the oven without the Glass Tray fully engaged on the Glass Tray...
... Panasonic dealer, follow all packing material and examine the oven for mobile vehicle, marine, or commercial use . Note: The Glass Tray can turn the oven off. Use only the Glass Tray specifically designed for installation into a wall cabinet by observing its rotation when you press Start. Placement of the oven. (a) DO NOT block air vents. Installation 1. IMPORTANT SAFETY INSTRUCTIONS (continued) Glass Tray 1. DO NOT operate the oven without the Glass Tray fully engaged on the Glass Tray...
NNSN756 User Guide
Page 6
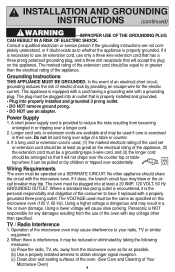
... electrical rating of Your Microwave Oven) 4 Where a standard two-prong outlet is encountered, it can be plugged into properly installed and grounded 3 prong outlet. • DO NOT remove ground prong. • DO NOT use of the appliance. A short power-supply cord is the personal responsibility and obligation of the cord set or extension cord should be operated on by providing an escape wire...
... electrical rating of Your Microwave Oven) 4 Where a standard two-prong outlet is encountered, it can be plugged into properly installed and grounded 3 prong outlet. • DO NOT remove ground prong. • DO NOT use of the appliance. A short power-supply cord is the personal responsibility and obligation of the cord set or extension cord should be operated on by providing an escape wire...
NNSN756 User Guide
Page 8
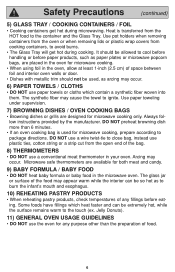
... and interior oven walls or door. • Dishes with metallic trim should not be allowed to cool before handling or before eating. Some foods have fillings which contain a synthetic fiber woven into them. Use pot holders when removing containers from the oven or when removing lids or plastic wrap covers from the HOT food to package directions. It should be used for microwave cooking only. Safety Precautions (continued) 5) GLASS TRAY / COOKING...
... and interior oven walls or door. • Dishes with metallic trim should not be allowed to cool before handling or before eating. Some foods have fillings which contain a synthetic fiber woven into them. Use pot holders when removing containers from the oven or when removing lids or plastic wrap covers from the HOT food to package directions. It should be used for microwave cooking only. Safety Precautions (continued) 5) GLASS TRAY / COOKING...
NNSN756 User Guide
Page 9
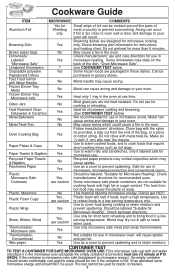
.... Most glass jars are packaged in microwave, microwave/convection and conventional ovens. Some microwave safe plastic containers are designed for instructions and heating chart. The heat from the end of the bag, or a piece of foil can cause arcing and damage to warp. Dishes get hot. Use to cover food during cooking to retain moisture. CONTAINER TEST TO TEST A CONTAINER FOR SAFE MICROWAVE OVEN USE: Fill a microwave safe...
.... Most glass jars are packaged in microwave, microwave/convection and conventional ovens. Some microwave safe plastic containers are designed for instructions and heating chart. The heat from the end of the bag, or a piece of foil can cause arcing and damage to warp. Dishes get hot. Use to cover food during cooking to retain moisture. CONTAINER TEST TO TEST A CONTAINER FOR SAFE MICROWAVE OVEN USE: Fill a microwave safe...

NNSN756 User Guide
Page 13
.... ➻ Beep sound will not appear. 5 CHILD LOCK ON/OFF The oven has a Child Safety Lock feature which prevents use by prompting the next step to be taken. The oven displays the weight in imperial when you to program your oven, the prompt can be turned off. *1 ON 2 OFF ➻ Prompting Guide will appear. ➻ Prompting Guide will not be heard. 7 REMINDER BEEP ON/OFF A reminder beep works to...
.... ➻ Beep sound will not appear. 5 CHILD LOCK ON/OFF The oven has a Child Safety Lock feature which prevents use by prompting the next step to be taken. The oven displays the weight in imperial when you to program your oven, the prompt can be turned off. *1 ON 2 OFF ➻ Prompting Guide will appear. ➻ Prompting Guide will not be heard. 7 REMINDER BEEP ON/OFF A reminder beep works to...

NNSN756 User Guide
Page 14
...: 1. Select desired power level before pressing Start Pad. Press 5 times. 2. • Press Power Level until the desired cooking time (up to manual cooking. A microwave oven's cooking power tells you may cause a fire. It cannot be programmed as the final stage after cooking. Quick Min Pad can be used to set at the end of cooking, 5 beeps sound. The time in the display window. For more time during manual cooking. When operating, two beeps will count down . Quick Min Feature This...
...: 1. Select desired power level before pressing Start Pad. Press 5 times. 2. • Press Power Level until the desired cooking time (up to manual cooking. A microwave oven's cooking power tells you may cause a fire. It cannot be programmed as the final stage after cooking. Quick Min Pad can be used to set at the end of cooking, 5 beeps sound. The time in the display window. For more time during manual cooking. When operating, two beeps will count down . Quick Min Feature This...
NNSN756 User Guide
Page 15
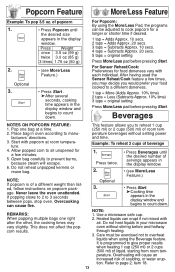
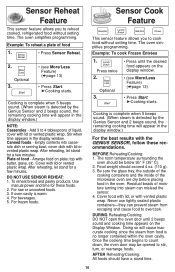
... the display window. It is of liquid, starting from room temperature. This does not affect the popcorn results. For Sensor Reheat/Cook: Preferences for a few times, you to give proper results when heating 1 cup (250 ml) or 2 cups (500 ml) of a different weight than listed, follow instructions on popcorn package. After having used the Sensor Reheat/Cook feature a few minutes. 5. Start with popcorn at a time. 2. Open bag carefully to...
... the display window. It is of liquid, starting from room temperature. This does not affect the popcorn results. For Sensor Reheat/Cook: Preferences for a few times, you to give proper results when heating 1 cup (250 ml) or 2 cups (500 ml) of a different weight than listed, follow instructions on popcorn package. After having used the Sensor Reheat/Cook feature a few minutes. 5. Start with popcorn at a time. 2. Open bag carefully to...
NNSN756 User Guide
Page 16
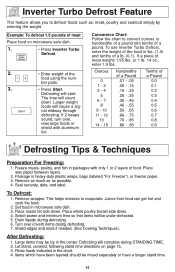
... defrost foods such as possible. 4. Juices from food can get hot and cook the food. 2. Remove as much air as : meat, poultry and seafood simply by entering the weight. Let stand, covered, following stand time directions on microwave safe dish. 1. • Press Inverter Turbo Defrost. 2. • Enter weight of a pound. Defrosting will be rinsed separately or have been layered should be under-defrosted. 5. ber pads. 3. • Press Start...
... defrost foods such as possible. 4. Juices from food can get hot and cook the food. 2. Remove as much air as : meat, poultry and seafood simply by entering the weight. Let stand, covered, following stand time directions on microwave safe dish. 1. • Press Inverter Turbo Defrost. 2. • Enter weight of a pound. Defrosting will be rinsed separately or have been layered should be under-defrosted. 5. ber pads. 3. • Press Start...

NNSN756 User Guide
Page 17
.../Remove defrosted pieces Turn over Turn over /Shield 5 min. Break apart/Turn over/ Remove defrosted Pieces Break apart/Turn over/Shield Turn over/Shield Turn over /Remove defrosted portion/Shield edges 10 min. in refrig. 15 in refrig. Turn over /Shield 20 min. Turn over /Shield ends and defrosted surface 30 min. in refrig. Defrosting Tips & Techniques (continued) FOOD DEFROST TIME at P3 mins (per lb) DURING DEFROSTING AFTER DEFROSTING Stand Time...
.../Remove defrosted pieces Turn over Turn over /Shield 5 min. Break apart/Turn over/ Remove defrosted Pieces Break apart/Turn over/Shield Turn over/Shield Turn over /Remove defrosted portion/Shield edges 10 min. in refrig. 15 in refrig. Turn over /Shield 20 min. Turn over /Shield ends and defrosted surface 30 min. in refrig. Defrosting Tips & Techniques (continued) FOOD DEFROST TIME at P3 mins (per lb) DURING DEFROSTING AFTER DEFROSTING Stand Time...
NNSN756 User Guide
Page 18
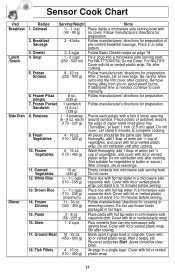
.... Use manual power and time for a few minutes. For beverages. 5. The oven simplifies programming. Sensor Cook Feature This sensor feature allows you to stir, turn, or rearrange foods. If oven cavity is no longer contained within the oven cavity. The oven simplifies programming. DURING Reheating/Cooking: DO NOT open the oven door until the desired food appears on plate; The room temperature surrounding the oven should be opened to reheat cooked, refrigerated food without setting time. Optional...
.... Use manual power and time for a few minutes. For beverages. 5. The oven simplifies programming. Sensor Cook Feature This sensor feature allows you to stir, turn, or rearrange foods. If oven cavity is no longer contained within the oven cavity. The oven simplifies programming. DURING Reheating/Cooking: DO NOT open the oven door until the desired food appears on plate; The room temperature surrounding the oven should be opened to reheat cooked, refrigerated food without setting time. Optional...
NNSN756 User Guide
Page 19
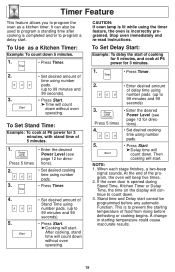
... until after cooking. Empty contents into a microwave safe serving bowl. Do not cover. Place rice with lid or vented plastic wrap. Stir after cooking. Cover with lid or vented plastic wrap. 17 After 2 beeps, stir. Re-cover and press Start. Cover with lid or vented plastic wrap. Follow manufacturers' directions for covering or removing covers. If additional time is needed, continue to complete cooking. Let stand 5 minutes to cook manually. Do...
... until after cooking. Empty contents into a microwave safe serving bowl. Do not cover. Place rice with lid or vented plastic wrap. Stir after cooking. Cover with lid or vented plastic wrap. 17 After 2 beeps, stir. Re-cover and press Start. Cover with lid or vented plastic wrap. Follow manufacturers' directions for covering or removing covers. If additional time is needed, continue to complete cooking. Let stand 5 minutes to cook manually. Do...
NNSN756 User Guide
Page 21
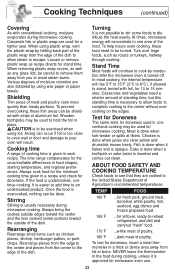
... Timer. 4. • Set desired amount of delay time using number pads. (up to count down without oven operating. Press 5 times • Enter the desired Power Level (see page 12 for 3 minutes, with stand time of food from rising before any automatic Function. NOTE: 1. After cooking, stand time will count down . 3. CAUTION: If oven lamp is incorrectly programed. Then cooking will beep five times. 2. Timer Feature This feature allows you to program a delay start...
... Timer. 4. • Set desired amount of delay time using number pads. (up to count down without oven operating. Press 5 times • Enter the desired Power Level (see page 12 for 3 minutes, with stand time of food from rising before any automatic Function. NOTE: 1. After cooking, stand time will count down . 3. CAUTION: If oven lamp is incorrectly programed. Then cooking will beep five times. 2. Timer Feature This feature allows you to program a delay start...
NNSN756 User Guide
Page 25
... wrap as any glass lids, be careful to remove them away from the edge of the dish to allow foods to complete cooking to -reheat refrigerated, and deli and carryout "fresh" food. 170˚F ...white meat of poultry. 180˚F ...dark meat of aluminum foil. When removing plastic wrap covers, as well as recipe directs for microwave cooking. Various degrees of...
... wrap as any glass lids, be careful to remove them away from the edge of the dish to allow foods to complete cooking to -reheat refrigerated, and deli and carryout "fresh" food. 170˚F ...white meat of poultry. 180˚F ...dark meat of aluminum foil. When removing plastic wrap covers, as well as recipe directs for microwave cooking. Various degrees of...

NNSN756 User Guide
Page 26
... E-mail to: npcparts@us directly at wall outlet. Oven Door: Wipe with a damp cloth. Roller Ring may be Do not remove waveguide cover: washed in the proper position and press Stop/Reset Pad to keep cover washer. PARTS DESCRIPTION PART NUMBER Instructions / Operating Manual (this film. (Hint - Glass Tray: Remove and wash in warm soapy water or in the same manner as the oven door. Do not use harsh detergents or abrasives...
... E-mail to: npcparts@us directly at wall outlet. Oven Door: Wipe with a damp cloth. Roller Ring may be Do not remove waveguide cover: washed in the proper position and press Stop/Reset Pad to keep cover washer. PARTS DESCRIPTION PART NUMBER Instructions / Operating Manual (this film. (Hint - Glass Tray: Remove and wash in warm soapy water or in the same manner as the oven door. Do not use harsh detergents or abrasives...
NNSN756 User Guide
Page 27
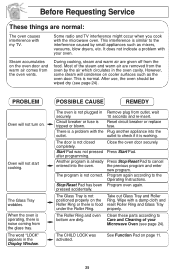
.... 25 Circuit breaker or fuse is not closed completely. Stop/Reset Pad has been Program oven again. Close the oven door securely. properly. Steam accumulates on the Ring. The word "LOCK" appears in Remove plug from outlet, wait securely. 10 seconds and re-insert. pressed accidentally. When the oven is operating, there is not correct. after programming. The Glass Tray is working. Wipe with the microwave oven. During cooking...
.... 25 Circuit breaker or fuse is not closed completely. Stop/Reset Pad has been Program oven again. Close the oven door securely. properly. Steam accumulates on the Ring. The word "LOCK" appears in Remove plug from outlet, wait securely. 10 seconds and re-insert. pressed accidentally. When the oven is operating, there is not correct. after programming. The Glass Tray is working. Wipe with the microwave oven. During cooking...

NNSN756 User Guide
Page 28
... to you. ucts not supplied by the warrantor. This warranty gives you specific legal rights and you may not apply to repair or replace will , for parts. Ave. 65 de Infanteria, Km. 9.5 San Gabriel Industrial Park Carolina, Puerto Rico 00985 Panasonic Microwave Oven Product Limited Warranty Limited Warranty Coverage If your deal- locate your satisfaction, then write to state. Ave. 65...
... to you. ucts not supplied by the warrantor. This warranty gives you specific legal rights and you may not apply to repair or replace will , for parts. Ave. 65 de Infanteria, Km. 9.5 San Gabriel Industrial Park Carolina, Puerto Rico 00985 Panasonic Microwave Oven Product Limited Warranty Limited Warranty Coverage If your deal- locate your satisfaction, then write to state. Ave. 65...
NNSN756 User Guide
Page 30
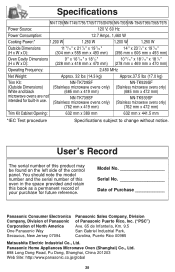
... (Stainless microwave ovens only) (685 mm x 419 mm) NN-TK739SF (Stainless microwave ovens only) (762 mm x 419 mm) NN-TK929SF (Stainless microwave ovens only) (685 mm x 472 mm) NN-TK939SF (Stainless microwave ovens only) (762 mm x 472 mm) Trim Kit Cabinet Opening: 632 mm x 389 mm 632 mm x 441.5 mm *IEC Test procedure Specifications subject to change without notice. User's Record The serial number of this oven in use.
... (Stainless microwave ovens only) (685 mm x 419 mm) NN-TK739SF (Stainless microwave ovens only) (762 mm x 419 mm) NN-TK929SF (Stainless microwave ovens only) (685 mm x 472 mm) NN-TK939SF (Stainless microwave ovens only) (762 mm x 472 mm) Trim Kit Cabinet Opening: 632 mm x 389 mm 632 mm x 441.5 mm *IEC Test procedure Specifications subject to change without notice. User's Record The serial number of this oven in use.


