
NNH764 User Guide
Page 1
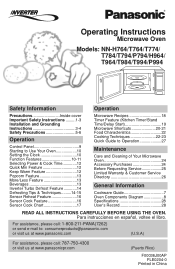
... Operation Precautions Inside cover Important Safety Instructions .........1-3 Installation and Grounding Instructions 3-4 Safety Precautions 5-6 Operation Control Panel 9 Starting to Use Your Oven 10 Setting the Clock 10 Function Features 10-11 Selecting Power & Cook Time 12 Quick Min Feature 12 Keep Warm Feature 12 Popcorn Feature 13 More/Less Feature 13 Beverages 13 Inverter Turbo Defrost Feature 14 Defrosting Tips & Techniques.........14-15 Sensor Reheat Feature 16 Sensor Cook Feature 16 Sensor Cook Chart 17 Microwave Recipes 18 Timer Feature (Kitchen Timer...
... Operation Precautions Inside cover Important Safety Instructions .........1-3 Installation and Grounding Instructions 3-4 Safety Precautions 5-6 Operation Control Panel 9 Starting to Use Your Oven 10 Setting the Clock 10 Function Features 10-11 Selecting Power & Cook Time 12 Quick Min Feature 12 Keep Warm Feature 12 Popcorn Feature 13 More/Less Feature 13 Beverages 13 Inverter Turbo Defrost Feature 14 Defrosting Tips & Techniques.........14-15 Sensor Reheat Feature 16 Sensor Cook Feature 16 Sensor Cook Chart 17 Microwave Recipes 18 Timer Feature (Kitchen Timer...
NNH764 User Guide
Page 3
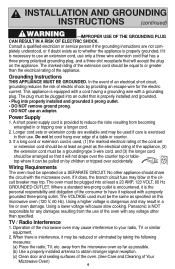
... use. 5. The use of oven is a cooking appliance and you should not be grounded. DO NOT assume that come together on the inside front cover. 3. To reduce the risk of a table or counter. 15. Read and follow the specific "PRECAUTIONS TO AVOID POSSIBLE EXPO- As with the installation instruc- Install or locate this appliance only for its intended use as you for purchasing a Panasonic Microwave Oven. Use...
... use. 5. The use of oven is a cooking appliance and you should not be grounded. DO NOT assume that come together on the inside front cover. 3. To reduce the risk of a table or counter. 15. Read and follow the specific "PRECAUTIONS TO AVOID POSSIBLE EXPO- As with the installation instruc- Install or locate this appliance only for its intended use as you for purchasing a Panasonic Microwave Oven. Use...
NNH764 User Guide
Page 4
... , or make any other materials in the microwave oven for cooking. 4. Repairs must be used when removing items from the oven. Visible bubbling when the container is removed from the container to stand in the oven, or use . The film of your oven read remaining safety cautions and operating instructions. 2 Damage to , on the turntable. The Glass Tray can crack, cause injury or damage to absorb...
... , or make any other materials in the microwave oven for cooking. 4. Repairs must be used when removing items from the oven. Visible bubbling when the container is removed from the container to stand in the oven, or use . The film of your oven read remaining safety cautions and operating instructions. 2 Damage to , on the turntable. The Glass Tray can crack, cause injury or damage to absorb...
NNH764 User Guide
Page 5
... that the Glass Tray is hot, allow to avoid accidental tipping of the door three inches or more from a local Panasonic dealer. If the Glass Tray is properly engaged and rotating by using the proper trim kit available from the counter top edge to cool before cleaning or placing in the opposite direction. DO NOT cook directly on a rack set in place. 2. DO NOT install if oven is designed...
... that the Glass Tray is hot, allow to avoid accidental tipping of the door three inches or more from a local Panasonic dealer. If the Glass Tray is properly engaged and rotating by using the proper trim kit available from the counter top edge to cool before cleaning or placing in the opposite direction. DO NOT cook directly on a rack set in place. 2. DO NOT install if oven is designed...
NNH764 User Guide
Page 6
... slow cooking. Operation of a table or counter. 3. In the event of an electrical short circuit, grounding reduces the risk of electric shock by children or tripped over edge of the microwave oven may trip. pletely understood, or if doubt exists as to whether the appliance is used must be a grounding-type 3-wire cord, and (3) the longer cord should be at least a 20 AMP, 120...
... slow cooking. Operation of a table or counter. 3. In the event of an electrical short circuit, grounding reduces the risk of electric shock by children or tripped over edge of the microwave oven may trip. pletely understood, or if doubt exists as to whether the appliance is used must be a grounding-type 3-wire cord, and (3) the longer cord should be at least a 20 AMP, 120...
NNH764 User Guide
Page 8
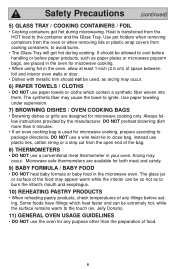
Safety Precautions (continued) 5) GLASS TRAY / COOKING CONTAINERS / FOIL • Cooking containers get hot during microwaving. Heat is used , as arcing may appear warm while the interior can be allowed to the touch (ex. Use pot holders when removing containers from the oven or when removing lids or plastic wrap covers from the open end of space between foil and interior oven walls or door. • Dishes with metallic trim should be extremely...
Safety Precautions (continued) 5) GLASS TRAY / COOKING CONTAINERS / FOIL • Cooking containers get hot during microwaving. Heat is used , as arcing may appear warm while the interior can be allowed to the touch (ex. Use pot holders when removing containers from the oven or when removing lids or plastic wrap covers from the open end of space between foil and interior oven walls or door. • Dishes with metallic trim should be extremely...
NNH764 User Guide
Page 9
... damage to warp. Check manufacturers' use and care directions for microwave cooking only. Some frozen foods are designed for use in the oven at P10 (HIGH). Heat only 1 tray in microwave, microwave/convection and conventional ovens. Follow manufacturers' directions. Make six 1/2-inch (1 cm) slits near the closure. Use as a cover to prevent spattering and to your oven. Check manufacturers' directions for more than 6 minutes. Use only for short term reheating...
... damage to warp. Check manufacturers' use and care directions for microwave cooking only. Some frozen foods are designed for use in the oven at P10 (HIGH). Heat only 1 tray in microwave, microwave/convection and conventional ovens. Follow manufacturers' directions. Make six 1/2-inch (1 cm) slits near the closure. Use as a cover to prevent spattering and to your oven. Check manufacturers' directions for more than 6 minutes. Use only for short term reheating...
NNH764 User Guide
Page 12
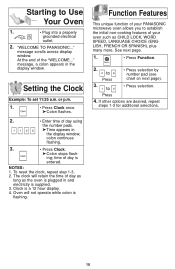
... stops flash- Press 4. Starting to • Press selection. time of day using the number pads. ➤Time appears in the display window; NOTES: 1. See next page. 1. • Press Function. 2. If other options are desired, repeat steps 1-3 for additional selections. 10 To reset the clock, repeat step 1-3. 2. to Use Your Oven 1. • Plug into a properly grounded electrical outlet. 2. message scrolls across display window. Setting the Clock...
... stops flash- Press 4. Starting to • Press selection. time of day using the number pads. ➤Time appears in the display window; NOTES: 1. See next page. 1. • Press Function. 2. If other options are desired, repeat steps 1-3 for additional selections. 10 To reset the clock, repeat step 1-3. 2. to Use Your Oven 1. • Plug into a properly grounded electrical outlet. 2. message scrolls across display window. Setting the Clock...
NNH764 User Guide
Page 13
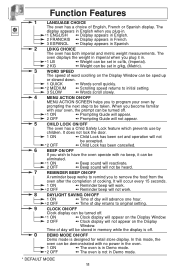
... the oven operate with no beep, it in. *1 LB 2 KG ➻ Weight can be set in oz/lb, (Imperial). ➻ Weight can be set and operation will not appear. 5 CHILD LOCK ON/OFF The oven has a Child Safety Lock feature which prevents use by prompting the next step to remove the food from the oven after the completion of day returns to original setting. 9 CLOCK ON/OFF Clock display can be turned...
... the oven operate with no beep, it in. *1 LB 2 KG ➻ Weight can be set in oz/lb, (Imperial). ➻ Weight can be set and operation will not appear. 5 CHILD LOCK ON/OFF The oven has a Child Safety Lock feature which prevents use by prompting the next step to remove the food from the oven after the completion of day returns to original setting. 9 CLOCK ON/OFF Clock display can be turned...
NNH764 User Guide
Page 14
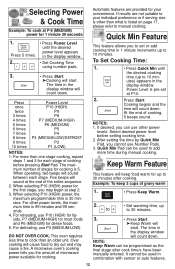
... stage cooking, repeat steps 1 and 2 for dense foods. 5. To Set Cooking Time: 1. • Press Quick Min until the desired power level appears in combination with sensor or auto features. 12 utes) appears in 1 minute increments up to cook than what is other power levels. For more time during manual cooking. When operating, two beeps will start . For other power levels, the maximum time is pre-set or add cooking time in the display window. For reheating, use other...
... stage cooking, repeat steps 1 and 2 for dense foods. 5. To Set Cooking Time: 1. • Press Quick Min until the desired power level appears in combination with sensor or auto features. 12 utes) appears in 1 minute increments up to cook than what is other power levels. For more time during manual cooking. When operating, two beeps will start . For other power levels, the maximum time is pre-set or add cooking time in the display window. For reheating, use other...

NNH764 User Guide
Page 15
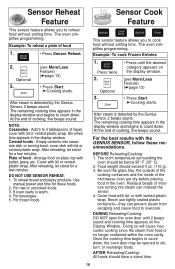
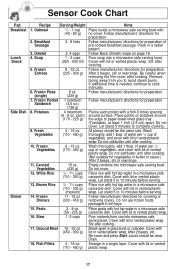
... sit unopened for food doneness vary with popcorn at a time. 2. Open bag carefully to manu- For Sensor Reheat/Cook: Preferences for a few times, you would prefer your microwave oven without setting power and time. 3. Example: To reheat 2 cups of scalding, or water eruption. NOTE: 1. After having used the Sensor Reheat/Cook feature a few minutes. 5. For Popcorn: By using the Beverage feature. It is of liquid, starting from room temperature...
... sit unopened for food doneness vary with popcorn at a time. 2. Open bag carefully to manu- For Sensor Reheat/Cook: Preferences for a few times, you would prefer your microwave oven without setting power and time. 3. Example: To reheat 2 cups of scalding, or water eruption. NOTE: 1. After having used the Sensor Reheat/Cook feature a few minutes. 5. For Popcorn: By using the Beverage feature. It is of liquid, starting from room temperature...

NNH764 User Guide
Page 16
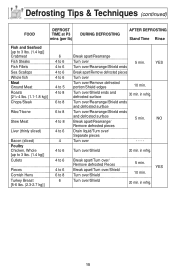
... if needed. (See Cooking Techniques). Large items may be under-defrosted. 5. Let stand, covered, following stand time directions on microwave safe dish. 1. • Press Inverter Turbo Defrost. 2. • Enter weight of a pound. Remove wrapper. Package in lbs. (1.0) and tenths of the food in heavy-duty plastic wraps, bags (labeled "For Freezer"), or freezer paper. 3. Defrosting will complete during STANDING TIME. 2. To use Inverter Turbo Defrost, enter the weight...
... if needed. (See Cooking Techniques). Large items may be under-defrosted. 5. Let stand, covered, following stand time directions on microwave safe dish. 1. • Press Inverter Turbo Defrost. 2. • Enter weight of a pound. Remove wrapper. Package in lbs. (1.0) and tenths of the food in heavy-duty plastic wraps, bags (labeled "For Freezer"), or freezer paper. 3. Defrosting will complete during STANDING TIME. 2. To use Inverter Turbo Defrost, enter the weight...
NNH764 User Guide
Page 17
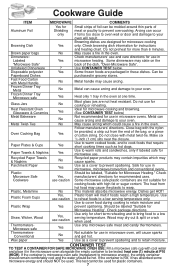
... NO Remove defrosted pieces Drain liquid/Turn over/ Separate pieces Turn over /Rearrange/Shield ends and defrosted surface Break apart/Rearrange/ 5 min. Turn over /Shield 5 min. Break apart/Turn over/ Remove defrosted Pieces Break apart/Turn over/Shield Turn over/Shield Turn over /Shield ends and defrosted surface 30 min. Defrosting Tips & Techniques (continued) FOOD DEFROST TIME at P3 mins (per lb) DURING DEFROSTING AFTER DEFROSTING Stand Time Rinse Fish...
... NO Remove defrosted pieces Drain liquid/Turn over/ Separate pieces Turn over /Rearrange/Shield ends and defrosted surface Break apart/Rearrange/ 5 min. Turn over /Shield 5 min. Break apart/Turn over/ Remove defrosted Pieces Break apart/Turn over/Shield Turn over/Shield Turn over /Shield ends and defrosted surface 30 min. Defrosting Tips & Techniques (continued) FOOD DEFROST TIME at P3 mins (per lb) DURING DEFROSTING AFTER DEFROSTING Stand Time Rinse Fish...
NNH764 User Guide
Page 18
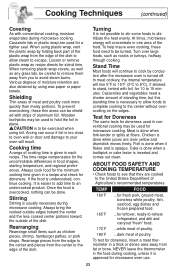
...;page 13) • Press Start. ➤Cooking starts. Canned foods - Use manual power and time for a few minutes. The oven simplifies programming. Optional 3. • Press until 2 beeps sound and cooking time appears on the display window. (see More/Less Feature) (☛page 13) • Press Start. ➤Cooking starts. Be sure the glass tray, the outside of the cooking containers and the inside of food - Doing so will cause inaccurate cooking since the steam from...
...;page 13) • Press Start. ➤Cooking starts. Canned foods - Use manual power and time for a few minutes. The oven simplifies programming. Optional 3. • Press until 2 beeps sound and cooking time appears on the display window. (see More/Less Feature) (☛page 13) • Press Start. ➤Cooking starts. Be sure the glass tray, the outside of the cooking containers and the inside of food - Doing so will cause inaccurate cooking since the steam from...
NNH764 User Guide
Page 19
... Dish Dinner Recipe 1. Follow manufacturers' directions for preparation of paper-towel-lined glass tray (Turntable), at least 1 inch (2.5 cm) apart. After 2 beeps, stir or rearrange. If additional time is needed, continue to avoid steam burns. Let stand 5 to complete cooking. Do not use frozen foods packaged in a microwave safe casserole dish. Be careful when removing the film cover after cooking. (Not suitable for preparation. Let...
... Dish Dinner Recipe 1. Follow manufacturers' directions for preparation of paper-towel-lined glass tray (Turntable), at least 1 inch (2.5 cm) apart. After 2 beeps, stir or rearrange. If additional time is needed, continue to avoid steam burns. Let stand 5 to complete cooking. Do not use frozen foods packaged in a microwave safe casserole dish. Be careful when removing the film cover after cooking. (Not suitable for preparation. Let...
NNH764 User Guide
Page 21
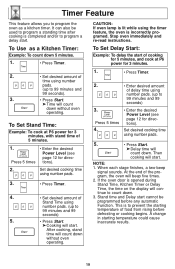
... Stand Time, Kitchen Timer or Delay Time, the time on the display will continue to count down without oven operating. A change in starting temperature of Stand Time using number pads. (up to 99 minutes and 99 seconds) 5. • Press Start. ➤Cooking will start . To Set Delay Start: Example: To delay the start . To Set Stand Time: Example: To cook at P6 power for directions). Stop oven immediately and re-read instructions. Press 5 times • Enter the desired Power Level...
... Stand Time, Kitchen Timer or Delay Time, the time on the display will continue to count down without oven operating. A change in starting temperature of Stand Time using number pads. (up to 99 minutes and 99 seconds) 5. • Press Start. ➤Cooking will start . To Set Delay Start: Example: To delay the start . To Set Stand Time: Example: To cook at P6 power for directions). Stop oven immediately and re-read instructions. Press 5 times • Enter the desired Power Level...
NNH764 User Guide
Page 25
... is too close to oven wall or door and damage to the center without overcooking on the edges. ABOUT FOOD SAFETY AND COOKING TEMPERATURE • Check foods to see that they are used for microwave cooking. Always bring the cooked outside edges toward the center and the less cooked center portions toward the outside of meat and poultry cook more quickly than meaty portions. Chicken...
... is too close to oven wall or door and damage to the center without overcooking on the edges. ABOUT FOOD SAFETY AND COOKING TEMPERATURE • Check foods to see that they are used for microwave cooking. Always bring the cooked outside edges toward the center and the less cooked center portions toward the outside of meat and poultry cook more quickly than meaty portions. Chicken...
NNH764 User Guide
Page 26
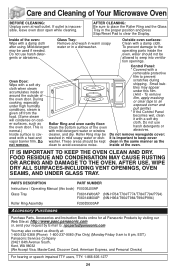
... be used if needed. AFTER CLEANING: Be sure to place the Roller Ring and the Glass Tray in mild soapy water or dish- Inside of the oven: Wipe with a removable protective film to prevent scratches during shipping. inside the oven, water should be Do not remove waveguide cover: washed in the proper position and press Stop/Reset Pad to clear the Display. Control Panel: * Covered with a damp cloth after using. FOOD...
... be used if needed. AFTER CLEANING: Be sure to place the Roller Ring and the Glass Tray in mild soapy water or dish- Inside of the oven: Wipe with a removable protective film to prevent scratches during shipping. inside the oven, water should be Do not remove waveguide cover: washed in the proper position and press Stop/Reset Pad to clear the Display. Control Panel: * Covered with a damp cloth after using. FOOD...
NNH764 User Guide
Page 27
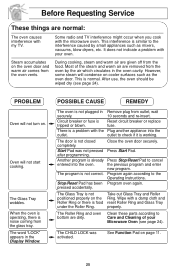
... to Care and Cleaning of the steam and warm air are dirty. properly. The CHILD LOCK was not pressed Press Start Pad. Circuit breaker or fuse is a problem with my TV. fuse. The program is not plugged in the Display Window. Before Requesting Service These things are given off from the food. Some radio and TV interference might occur when you cook with your Microwave Oven...
... to Care and Cleaning of the steam and warm air are dirty. properly. The CHILD LOCK was not pressed Press Start Pad. Circuit breaker or fuse is a problem with my TV. fuse. The program is not plugged in the Display Window. Before Requesting Service These things are given off from the food. Some radio and TV interference might occur when you cook with your Microwave Oven...
NNH764 User Guide
Page 28
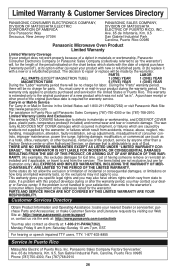
... WARRANTIES EXCEPT AS LISTED UNDER "LIMITED WARRANTY COV- If a problem with a new or a refurbished product. If the problem is not handled to your satisfaction, then write to the warrantor's Consumer Affairs Department at the addresses listed for lost time, cost of having someone remove or re-install an installed unit if applicable, or travel to and from the servicer. purchase Parts and Accessories; Panasonic...
... WARRANTIES EXCEPT AS LISTED UNDER "LIMITED WARRANTY COV- If a problem with a new or a refurbished product. If the problem is not handled to your satisfaction, then write to the warrantor's Consumer Affairs Department at the addresses listed for lost time, cost of having someone remove or re-install an installed unit if applicable, or travel to and from the servicer. purchase Parts and Accessories; Panasonic...


