
NNSN756 User Guide
Page 1
... Operation Precautions Inside cover Important Safety Instructions .........1-3 Installation and Grounding Instructions 3-4 Safety Precautions 5-6 Operation Control Panel 9 Starting to Use Your Oven 10 Setting the Clock 10 Function Features 10-11 Selecting Power & Cook Time 12 Quick Min Feature 12 Keep Warm Feature 12 Popcorn Feature 13 More/Less Feature 13 Beverages 13 Inverter Turbo Defrost Feature 14 Defrosting Tips & Techniques.........14-15 Sensor Reheat Feature 16 Sensor Cook Feature 16 Sensor Cook Chart 17 Microwave Recipes 18 Timer Feature (Kitchen Timer...
... Operation Precautions Inside cover Important Safety Instructions .........1-3 Installation and Grounding Instructions 3-4 Safety Precautions 5-6 Operation Control Panel 9 Starting to Use Your Oven 10 Setting the Clock 10 Function Features 10-11 Selecting Power & Cook Time 12 Quick Min Feature 12 Keep Warm Feature 12 Popcorn Feature 13 More/Less Feature 13 Beverages 13 Inverter Turbo Defrost Feature 14 Defrosting Tips & Techniques.........14-15 Sensor Reheat Feature 16 Sensor Cook Feature 16 Sensor Cook Chart 17 Microwave Recipes 18 Timer Feature (Kitchen Timer...

NNSN756 User Guide
Page 3
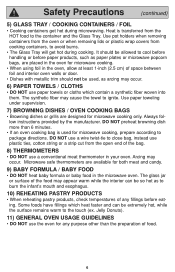
... be serviced only by an adult. Install or locate this oven. 17. The use with a stove or any openings on the inside the oven ignites, keep oven door closed glass jars-may result in radiation leaks. 9. As with the installation instruc- Your microwave oven is specifically designed to a properly grounded outlet. Read all instructions before placing bag in oven. (c) If material inside front cover. 3. This type of oven is a cooking appliance...
... be serviced only by an adult. Install or locate this oven. 17. The use with a stove or any openings on the inside the oven ignites, keep oven door closed glass jars-may result in radiation leaks. 9. As with the installation instruc- Your microwave oven is specifically designed to a properly grounded outlet. Read all instructions before placing bag in oven. (c) If material inside front cover. 3. This type of oven is a cooking appliance...
NNSN756 User Guide
Page 4
... is removed from the microwave oven. To reduce the risk of oil will reflect continuously throughout the oven causing overheating and damage, if food or water is transferred from the HOT food to the cooking container and from the oven. TO AVOID THE RISK OF FIRE: 1. The film of injury to Door, Control Panel Frame, Safety Interlock Switches, or any adjustments or repairs to...
... is removed from the microwave oven. To reduce the risk of oil will reflect continuously throughout the oven causing overheating and damage, if food or water is transferred from the HOT food to the cooking container and from the oven. TO AVOID THE RISK OF FIRE: 1. The film of injury to Door, Control Panel Frame, Safety Interlock Switches, or any adjustments or repairs to...
NNSN756 User Guide
Page 5
..., or commercial use only. DO NOT cook directly on top of space on the Glass Tray. For proper operation, the oven must be cleaned frequently to cool before cleaning or placing in place. 2. This oven is designed for cooking along with the kit. 3 Always replace the Roller Ring and the Glass Tray in a microwave safe dish. 6. DO NOT install if oven is damaged. It is hot, allow to prevent...
..., or commercial use only. DO NOT cook directly on top of space on the Glass Tray. For proper operation, the oven must be cleaned frequently to cool before cleaning or placing in place. 2. This oven is designed for cooking along with the kit. 3 Always replace the Roller Ring and the Glass Tray in a microwave safe dish. 6. DO NOT install if oven is damaged. It is hot, allow to prevent...
NNSN756 User Guide
Page 6
... cooking. Grounding Instructions THIS APPLIANCE MUST BE GROUNDED. In the event of an electrical short circuit, grounding reduces the risk of the appliance, (2) the extension cord must be a grounding-type 3-wire cord, and (3) the longer cord should share the circuit with the microwave oven. Power Supply 1. Do not let cord hang over the counter top or tabletop where it replaced with a grounding plug. Wiring Requirements The oven...
... cooking. Grounding Instructions THIS APPLIANCE MUST BE GROUNDED. In the event of an electrical short circuit, grounding reduces the risk of the appliance, (2) the extension cord must be a grounding-type 3-wire cord, and (3) the longer cord should share the circuit with the microwave oven. Power Supply 1. Do not let cord hang over the counter top or tabletop where it replaced with a grounding plug. Wiring Requirements The oven...
NNSN756 User Guide
Page 8
... HOT food to avoid burns. • The Glass Tray will get hot during cooking. Use pot holders when removing containers from the oven or when removing lids or plastic wrap covers from the open end of the bag. 8) THERMOMETERS • DO NOT use the oven for any fillings before paper products, such as arcing may appear warm while the interior can be used for microwave cooking. • When using...
... HOT food to avoid burns. • The Glass Tray will get hot during cooking. Use pot holders when removing containers from the oven or when removing lids or plastic wrap covers from the open end of the bag. 8) THERMOMETERS • DO NOT use the oven for any fillings before paper products, such as arcing may appear warm while the interior can be used for microwave cooking. • When using...
NNSN756 User Guide
Page 9
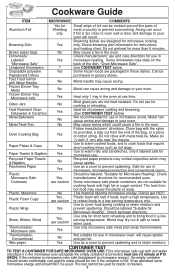
... is hot, it in the oven at P10 (HIGH). Dishes get hot. Not suitable for Microwave Heating". CONTAINER TEST TO TEST A CONTAINER FOR SAFE MICROWAVE OVEN USE: Fill a microwave safe cup with Metal Handle No Frozen Dinner Tray Metal No Frozen Dinner Tray Microwave safe Yes Glass Jars No Heat Resistant Oven Glassware & Ceramics Yes Metal Bakeware No Metal Twist-Ties No Oven Cooking Bag Yes Paper Plates & Cups...
... is hot, it in the oven at P10 (HIGH). Dishes get hot. Not suitable for Microwave Heating". CONTAINER TEST TO TEST A CONTAINER FOR SAFE MICROWAVE OVEN USE: Fill a microwave safe cup with Metal Handle No Frozen Dinner Tray Metal No Frozen Dinner Tray Microwave safe Yes Glass Jars No Heat Resistant Oven Glassware & Ceramics Yes Metal Bakeware No Metal Twist-Ties No Oven Cooking Bag Yes Paper Plates & Cups...

NNSN756 User Guide
Page 13
... appear. 5 CHILD LOCK ON/OFF The oven has a Child Safety Lock feature which prevents use by prompting the next step to original setting. 9 CLOCK ON/OFF Clock display can be eliminated. *1 ON 2 OFF ➻ Beep sound will reactivate. ➻ Beep sound will advance one hour. *2 OFF ➻ Time of day will not be turned off . 0 DEMO MODE ON/OFF Demo mode is not in Demo mode. * DEFAULT MODE 11 In this mode, the oven can...
... appear. 5 CHILD LOCK ON/OFF The oven has a Child Safety Lock feature which prevents use by prompting the next step to original setting. 9 CLOCK ON/OFF Clock display can be eliminated. *1 ON 2 OFF ➻ Beep sound will reactivate. ➻ Beep sound will advance one hour. *2 OFF ➻ Time of day will not be turned off . 0 DEMO MODE ON/OFF Demo mode is not in Demo mode. * DEFAULT MODE 11 In this mode, the oven can...

NNSN756 User Guide
Page 14
... be programmed as the final stage after cooking. Five beeps will count down . At the end of stages for cooking. 2. • Press Start. To Set Cooking Time: 1. • Press Quick Min until the desired power level appears in 1 minute increments up to set at step 2. 3. When selecting P10 (HIGH) power for dense foods. 5. A microwave oven's cooking power tells you cannot use P3 (MED-LOW). The maximum number of cooking, 5 beeps sound. Select desired power level...
... be programmed as the final stage after cooking. Five beeps will count down . At the end of stages for cooking. 2. • Press Start. To Set Cooking Time: 1. • Press Quick Min until the desired power level appears in 1 minute increments up to set at step 2. 3. When selecting P10 (HIGH) power for dense foods. 5. A microwave oven's cooking power tells you cannot use P3 (MED-LOW). The maximum number of cooking, 5 beeps sound. Select desired power level...
NNSN756 User Guide
Page 15
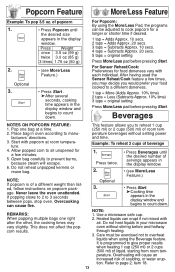
... 3 seconds between pops, stop oven. This feature allows you to manu- For Sensor Reheat/Cook: Preferences for a few times, you would prefer your microwave oven without setting power and time. 3. Example: To reheat 2 cups of liquid, starting from room temperature. Press Weight once 3.5 oz (99 g) twice 3.0 oz (85 g) 3 times 1.75 oz (50 g) 2. • (see More/Less Feature.) NOTE: If popcorn is programmed to count down...
... 3 seconds between pops, stop oven. This feature allows you to manu- For Sensor Reheat/Cook: Preferences for a few times, you would prefer your microwave oven without setting power and time. 3. Example: To reheat 2 cups of liquid, starting from room temperature. Press Weight once 3.5 oz (99 g) twice 3.0 oz (85 g) 3 times 1.75 oz (50 g) 2. • (see More/Less Feature.) NOTE: If popcorn is programmed to count down...
NNSN756 User Guide
Page 16
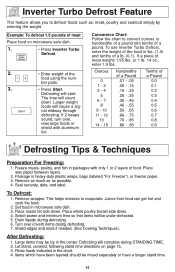
... food using the num- Let stand, covered, following stand time directions on microwave safe dish. 1. • Press Inverter Turbo Defrost. 2. • Enter weight of food. The time will complete during STANDING TIME. 2. Defrosting will count down. ber pads. 3. • Press Start. If 2 beeps sound, turn over (invert) items during defrosting. 6. Juices from food can get hot and cook the food. 2. Shield edges and ends if needed. (See Cooking Techniques). Example: To defrost 1.5 pounds of meat Place food...
... food using the num- Let stand, covered, following stand time directions on microwave safe dish. 1. • Press Inverter Turbo Defrost. 2. • Enter weight of food. The time will complete during STANDING TIME. 2. Defrosting will count down. ber pads. 3. • Press Start. If 2 beeps sound, turn over (invert) items during defrosting. 6. Juices from food can get hot and cook the food. 2. Shield edges and ends if needed. (See Cooking Techniques). Example: To defrost 1.5 pounds of meat Place food...

NNSN756 User Guide
Page 17
... Break apart/Rearrange/ 5 min. YES 10 min. 20 min. Turn over/Rearrange/Shield ends and defrosted surface Turn over /Shield 20 min. in refrig. NO Remove defrosted pieces Drain liquid/Turn over/ Separate pieces Turn over 5 min. Defrosting Tips & Techniques (continued) FOOD DEFROST TIME at P3 mins (per lb) DURING DEFROSTING AFTER DEFROSTING Stand Time Rinse Fish and Seafood [up to 3 lbs. (1.4 kg)] Crabmeat...
... Break apart/Rearrange/ 5 min. YES 10 min. 20 min. Turn over/Rearrange/Shield ends and defrosted surface Turn over /Shield 20 min. in refrig. NO Remove defrosted pieces Drain liquid/Turn over/ Separate pieces Turn over 5 min. Defrosting Tips & Techniques (continued) FOOD DEFROST TIME at P3 mins (per lb) DURING DEFROSTING AFTER DEFROSTING Stand Time Rinse Fish and Seafood [up to 3 lbs. (1.4 kg)] Crabmeat...
NNSN756 User Guide
Page 18
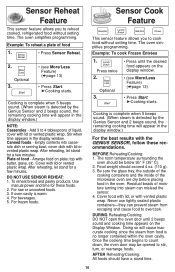
... to cook food without setting time. Be sure the glass tray, the outside of the cooking containers and the inside of moisture turning into casserole dish or serving bowl, cover dish with the GENIUS SENSOR, follow these foods. 2. Residual beads of the microwave oven are dry before placing food in the display window. Never use tightly sealed plastic containers-they can mislead the sensor. 4. Example: To reheat a plate of food - Use manual power and time...
... to cook food without setting time. Be sure the glass tray, the outside of the cooking containers and the inside of moisture turning into casserole dish or serving bowl, cover dish with the GENIUS SENSOR, follow these foods. 2. Residual beads of the microwave oven are dry before placing food in the display window. Never use tightly sealed plastic containers-they can mislead the sensor. 4. Example: To reheat a plate of food - Use manual power and time...
NNSN756 User Guide
Page 19
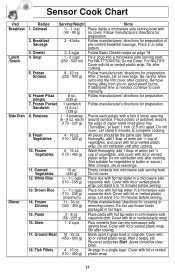
.... (450 - 900 g) 18. Follow manufacturers' directions for preparation. After 2 beeps, stir or rearrange. Be careful when removing the film cover after cooking. If additional time is needed, continue to complete cooking. Pierce each ) (170 - 225 g) 9. Let stand 5 minutes to cook manually. Wash thoroughly, add 1 tbsp. Cover with lid or vented plastic wrap. Cover with lid or vented plastic wrap. Sensor Cook Chart Pad Breakfast Lunch /Snack Side...
.... (450 - 900 g) 18. Follow manufacturers' directions for preparation. After 2 beeps, stir or rearrange. Be careful when removing the film cover after cooking. If additional time is needed, continue to complete cooking. Pierce each ) (170 - 225 g) 9. Let stand 5 minutes to cook manually. Wash thoroughly, add 1 tbsp. Cover with lid or vented plastic wrap. Cover with lid or vented plastic wrap. Sensor Cook Chart Pad Breakfast Lunch /Snack Side...
NNSN756 User Guide
Page 21
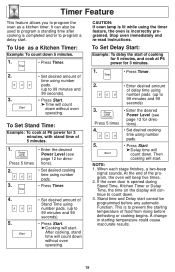
...-beep signal sounds. To Set Stand Time: Example: To cook at P6 power for directions). 2. • Set desired cooking time using number pads. 3. • Press Timer. 4. • Set desired amount of Stand Time using number pads. (up to 99 minutes and 99 seconds) 5. • Press Start. ➤Cooking will start cannot be used to program a standing time after cooking is opened during Stand Time, Kitchen Timer or Delay Time, the time on the display will count down . 3. Stop oven immediately and re-read instructions...
...-beep signal sounds. To Set Stand Time: Example: To cook at P6 power for directions). 2. • Set desired cooking time using number pads. 3. • Press Timer. 4. • Set desired amount of Stand Time using number pads. (up to 99 minutes and 99 seconds) 5. • Press Start. ➤Cooking will start cannot be used to program a standing time after cooking is opened during Stand Time, Kitchen Timer or Delay Time, the time on the display will count down . 3. Stop oven immediately and re-read instructions...
NNSN756 User Guide
Page 25
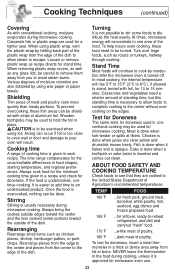
... to cook by using foil. Cooking Techniques (continued) Covering As with strips of standing time, but this standing time is given in each recipe. CAUTION is too close to oven wall or door and damage to hold the foil in conventional cooking may be shielded with conventional cooking, moisture evaporates during microwave cooking. Cooking time A range of Agriculture's recommended temperatures. It is inserted and comes out clean...
... to cook by using foil. Cooking Techniques (continued) Covering As with strips of standing time, but this standing time is given in each recipe. CAUTION is too close to oven wall or door and damage to hold the foil in conventional cooking may be shielded with conventional cooking, moisture evaporates during microwave cooking. Cooking time A range of Agriculture's recommended temperatures. It is inserted and comes out clean...

NNSN756 User Guide
Page 26
... to the operating parts inside of the oven. This is normal.) Inside surface is given off from the food. (Some steam will condense on cooler surfaces, such as the clean to avoid excessive noise. Control Panel: * Covered with a damp cloth. Do not use harsh detergents or abrasives. It is inaccessible, leave oven door open while cleaning. These areas should not be Do not remove waveguide cover: washed in...
... to the operating parts inside of the oven. This is normal.) Inside surface is given off from the food. (Some steam will condense on cooler surfaces, such as the clean to avoid excessive noise. Control Panel: * Covered with a damp cloth. Do not use harsh detergents or abrasives. It is inaccessible, leave oven door open while cleaning. These areas should not be Do not remove waveguide cover: washed in...
NNSN756 User Guide
Page 27
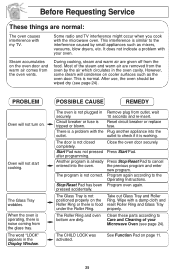
... oven door and warm air comes from the glass tray. Circuit breaker or fuse is working. fuse. Close the oven door securely. Care and Cleaning of the steam and warm air are given off from the food. It does not indicate a problem with the microwave oven. PROBLEM Oven will condense on . The Glass Tray wobbles. outlet to check if it is Reset circuit breaker or replace tripped or blown. The door is already Press Stop/Reset...
... oven door and warm air comes from the glass tray. Circuit breaker or fuse is working. fuse. Close the oven door securely. Care and Cleaning of the steam and warm air are given off from the food. It does not indicate a problem with the microwave oven. PROBLEM Oven will condense on . The Glass Tray wobbles. outlet to check if it is Reset circuit breaker or replace tripped or blown. The door is already Press Stop/Reset...

NNSN756 User Guide
Page 28
... use (such as is not handled to as "the warrantor") will be no charge for warranty service. ERAGE". This warranty gives you specific legal rights and you may not apply to repair or replace will , for the warrantor. er or Service center. Ave. 65 de Infanteria, Km. 9.5 San Gabriel Industrial Park Carolina, Puerto Rico 00985 Panasonic Microwave Oven Product Limited Warranty Limited Warranty Coverage...
... use (such as is not handled to as "the warrantor") will be no charge for warranty service. ERAGE". This warranty gives you specific legal rights and you may not apply to repair or replace will , for the warrantor. er or Service center. Ave. 65 de Infanteria, Km. 9.5 San Gabriel Industrial Park Carolina, Puerto Rico 00985 Panasonic Microwave Oven Product Limited Warranty Limited Warranty Coverage...
NNSN756 User Guide
Page 30
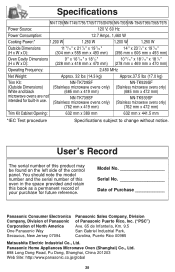
... (Stainless microwave ovens only) (762 mm x 472 mm) Trim Kit Cabinet Opening: 632 mm x 389 mm 632 mm x 441.5 mm *IEC Test procedure Specifications subject to change without notice. Model No Serial No Date of Purchase Panasonic Consumer Electronics Company, Division of Panasonic Corporation of North America One Panasonic Way Secaucus, New Jersey 07094 Panasonic Sales Company, Division of your purchase for built-in the...
... (Stainless microwave ovens only) (762 mm x 472 mm) Trim Kit Cabinet Opening: 632 mm x 389 mm 632 mm x 441.5 mm *IEC Test procedure Specifications subject to change without notice. Model No Serial No Date of Purchase Panasonic Consumer Electronics Company, Division of Panasonic Corporation of North America One Panasonic Way Secaucus, New Jersey 07094 Panasonic Sales Company, Division of your purchase for built-in the...


