

NNH664 User Guide
Page 1
... Inside cover Important Safety Instructions .........1-3 Installation and Grounding Instructions 3-4 Safety Precautions 5-6 Operation Control Panel 8-9 Starting to Use Your Oven 10 Setting the Clock 10 Child Safety Lock 10 Selecting Power & Cook Time 11 Quick Min Feature 11 Keep Warm Feature 11 Popcorn Feature 12 More/Less Feature 12 Beverages 12 Inverter Turbo Defrost Feature 13 Defrosting Tips & Techniques.........13-14 Sensor Reheat Feature 15 Sensor Cook Feature 15 Sensor Cook Chart 16 Microwave Recipes 17 Timer Feature (Kitchen Timer/Stand Time/Delay Start 18 Microwave...
... Inside cover Important Safety Instructions .........1-3 Installation and Grounding Instructions 3-4 Safety Precautions 5-6 Operation Control Panel 8-9 Starting to Use Your Oven 10 Setting the Clock 10 Child Safety Lock 10 Selecting Power & Cook Time 11 Quick Min Feature 11 Keep Warm Feature 11 Popcorn Feature 12 More/Less Feature 12 Beverages 12 Inverter Turbo Defrost Feature 13 Defrosting Tips & Techniques.........13-14 Sensor Reheat Feature 15 Sensor Cook Feature 15 Sensor Cook Chart 16 Microwave Recipes 17 Timer Feature (Kitchen Timer/Stand Time/Delay Start 18 Microwave...

NNH664 User Guide
Page 3
... panel. (d) DO NOT use the cavity for storage purposes. DO NOT leave paper products, cooking utensils or food in the cavity when not in water. 13. See "GROUNDING INSTRUCTIONS" found on closing the door, use only mild, non-abrasive soaps or detergents applied with a sponge or soft cloth. 10. tions found on the inside front cover. 3. for purchasing a Panasonic Microwave Oven. When cleaning...
... panel. (d) DO NOT use the cavity for storage purposes. DO NOT leave paper products, cooking utensils or food in the cavity when not in water. 13. See "GROUNDING INSTRUCTIONS" found on closing the door, use only mild, non-abrasive soaps or detergents applied with a sponge or soft cloth. 10. tions found on the inside front cover. 3. for purchasing a Panasonic Microwave Oven. When cleaning...

NNH664 User Guide
Page 4
... and operating instructions. 2 WARNING TO AVOID THE RISK OF SHOCK: DO NOT remove outer panel from the oven. DO NOT store flammable materials next to, on the turntable. Damage to Door, Control Panel Frame, Safety Interlock Switches, or any other materials in the microwave oven for cooking. 4. TO AVOID THE RISK OF SCALDING: POT HOLDERS should always be very HOT after removing the cooking container from oven...
... and operating instructions. 2 WARNING TO AVOID THE RISK OF SHOCK: DO NOT remove outer panel from the oven. DO NOT store flammable materials next to, on the turntable. Damage to Door, Control Panel Frame, Safety Interlock Switches, or any other materials in the microwave oven for cooking. 4. TO AVOID THE RISK OF SCALDING: POT HOLDERS should always be very HOT after removing the cooking container from oven...

NNH664 User Guide
Page 5
... counter top household use . If the oven overheats, a thermal safety device will remain inoperable until it has cooled. 3 DO NOT operate the oven without the Glass Tray fully engaged on a rack set in the opposite direction. DO NOT cook directly on a flat, stable surface. Allow 3-inches (7.6 cm) of space on both sides of the oven and 1-inch (2.5 cm) of space on the Glass Tray touches oven walls, causing the tray...
... counter top household use . If the oven overheats, a thermal safety device will remain inoperable until it has cooled. 3 DO NOT operate the oven without the Glass Tray fully engaged on a rack set in the opposite direction. DO NOT cook directly on a flat, stable surface. Allow 3-inches (7.6 cm) of space on both sides of the oven and 1-inch (2.5 cm) of space on the Glass Tray touches oven walls, causing the tray...

NNH664 User Guide
Page 6
... plug on this microwave oven (120 V, 60 Hz). Operation of the appliance. Consult a qualified electrician or service person if the grounding instructions are available and may cause interference to have it does, the branch circuit fuse may blow or the circuit breaker may result in their use of the appliance, (2) the extension cord must be pulled on a SEPARATE CIRCUIT. Power Supply 1. Where...
... plug on this microwave oven (120 V, 60 Hz). Operation of the appliance. Consult a qualified electrician or service person if the grounding instructions are available and may cause interference to have it does, the branch circuit fuse may blow or the circuit breaker may result in their use of the appliance, (2) the extension cord must be pulled on a SEPARATE CIRCUIT. Power Supply 1. Where...

NNH664 User Guide
Page 8
... a strip cut from the open end of space between foil and interior oven walls or door. • Dishes with metallic trim should be extremely hot, while the surface remains warm to package directions. Use paper toweling under supervision. 7) BROWNING DISHES / OVEN COOKING BAGS • Browning dishes or grills are available for both meat and candy. 9) BABY FORMULA / BABY FOOD • DO NOT heat baby formula...
... a strip cut from the open end of space between foil and interior oven walls or door. • Dishes with metallic trim should be extremely hot, while the surface remains warm to package directions. Use paper toweling under supervision. 7) BROWNING DISHES / OVEN COOKING BAGS • Browning dishes or grills are available for both meat and candy. 9) BABY FORMULA / BABY FOOD • DO NOT heat baby formula...

NNH664 User Guide
Page 9
... use in the microwave oven alongside the empty container to be molded around thin parts of foil can cause arcing and damage to your oven will result. Metal can be tested; Do not close to oven wall or door and damage to your oven. Use to warm cooked foods, and to cook foods that require short cooking times such as a cover to prevent overcooking. Use as hot dogs. Some microwave...
... use in the microwave oven alongside the empty container to be molded around thin parts of foil can cause arcing and damage to your oven will result. Metal can be tested; Do not close to oven wall or door and damage to your oven. Use to warm cooked foods, and to cook foods that require short cooking times such as a cover to prevent overcooking. Use as hot dogs. Some microwave...

NNH664 User Guide
Page 10
... Air Vent c Door Safety Lock System d Exhaust Air Vent e Control Panel f Identification Plate e g Glass Tray h Roller Ring i Heat/Vapor Barrier Film (do not remove) j Menu Label k Waveguide Cover (do not remove) Oven Light : Oven Light turns on only while cooking and will not turn on when oven door is opened or Stop/Reset Pad is pressed once during oven operation, Start Pad must be heard. Control Panel (1) Display Window (2) Popcorn Pad(☛ page 12) (3) Inverter Turbo Defrost Pad (☛ page 13) (4) Sensor Reheat Pad (☛ page 15) (5) Power Level...
... Air Vent c Door Safety Lock System d Exhaust Air Vent e Control Panel f Identification Plate e g Glass Tray h Roller Ring i Heat/Vapor Barrier Film (do not remove) j Menu Label k Waveguide Cover (do not remove) Oven Light : Oven Light turns on only while cooking and will not turn on when oven door is opened or Stop/Reset Pad is pressed once during oven operation, Start Pad must be heard. Control Panel (1) Display Window (2) Popcorn Pad(☛ page 12) (3) Inverter Turbo Defrost Pad (☛ page 13) (4) Sensor Reheat Pad (☛ page 15) (5) Power Level...

NNH664 User Guide
Page 13
... in the display window. • Set Cooking Time using number pads. 3. • Press Start. ➤Cooking will count down. Power Level is 99 minutes and 99 seconds. 4. For other than what is 30 minutes. For reheating, use P3 (MEDIUM-LOW). DO NOT OVER COOK. Press Start. It cannot be used to your convenience. Five beeps will sound between each stage of stages for manual cooking. A microwave oven's cooking power tells you the...
... in the display window. • Set Cooking Time using number pads. 3. • Press Start. ➤Cooking will count down. Power Level is 99 minutes and 99 seconds. 4. For other than what is 30 minutes. For reheating, use P3 (MEDIUM-LOW). DO NOT OVER COOK. Press Start. It cannot be used to your convenience. Five beeps will sound between each stage of stages for manual cooking. A microwave oven's cooking power tells you the...

NNH664 User Guide
Page 14
..., cooking time appears in your food cooked to cook popcorn for food doneness vary with popcorn at a time. 2. Care must be exercised not to overheat liquids when using the More/Less Pad, the programs can be adjusted to a different doneness. 1 tap = More (Adds Approx. 10% time) 2 taps = Less (Subtracts Approx. 10% time) 3 taps = original setting Press More/Less pad before pressing Start. After having used the Sensor Reheat/Cook...
..., cooking time appears in your food cooked to cook popcorn for food doneness vary with popcorn at a time. 2. Care must be exercised not to overheat liquids when using the More/Less Pad, the programs can be adjusted to a different doneness. 1 tap = More (Adds Approx. 10% time) 2 taps = Less (Subtracts Approx. 10% time) 3 taps = original setting Press More/Less pad before pressing Start. After having used the Sensor Reheat/Cook...
NNH664 User Guide
Page 15
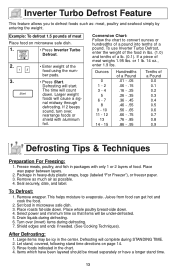
... .56 - .65 .66 - .75 .76 - .85 .86 - .95 Tenths of meat weighs 1.95 lbs. Remove as much air as : meat, poultry and seafood simply by entering the weight. Juices from food can get hot and cook the food. 2. Set food in packages with aluminum foil. Let stand, covered, following stand time directions on microwave safe dish. 1. • Press Inverter Turbo Defrost. 2. • Enter weight of food.
... .56 - .65 .66 - .75 .76 - .85 .86 - .95 Tenths of meat weighs 1.95 lbs. Remove as much air as : meat, poultry and seafood simply by entering the weight. Juices from food can get hot and cook the food. 2. Set food in packages with aluminum foil. Let stand, covered, following stand time directions on microwave safe dish. 1. • Press Inverter Turbo Defrost. 2. • Enter weight of food.
NNH664 User Guide
Page 16
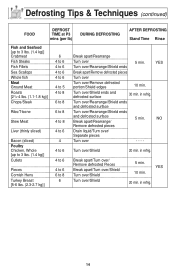
... Break apart/Rearrange/ 5 min. in refrig. in refrig. 14 Turn over/Rearrange/Shield ends and defrosted surface Turn over /Shield 20 min. Break apart/Turn over/ Remove defrosted Pieces Break apart/Turn over/Shield Turn over/Shield Turn over 5 min. Defrosting Tips & Techniques (continued) FOOD DEFROST TIME at P3 mins (per lb) DURING DEFROSTING AFTER DEFROSTING Stand Time Rinse Fish and Seafood [up to 3 lbs. (1.4 kg...
... Break apart/Rearrange/ 5 min. in refrig. in refrig. 14 Turn over/Rearrange/Shield ends and defrosted surface Turn over /Shield 20 min. Break apart/Turn over/ Remove defrosted Pieces Break apart/Turn over/Shield Turn over/Shield Turn over 5 min. Defrosting Tips & Techniques (continued) FOOD DEFROST TIME at P3 mins (per lb) DURING DEFROSTING AFTER DEFROSTING Stand Time Rinse Fish and Seafood [up to 3 lbs. (1.4 kg...

NNH664 User Guide
Page 17
... placing food in the display window. Sensor Reheat Sensor Cook Feature Feature This sensor feature allows you to cook food without setting time. The oven simplifies programming. Example: To reheat a plate of cooking, five beeps sound. Example: To cook Frozen Entrées 2. At the end of food 1. • Press Sensor Reheat. Stir when time appears in the oven. Cover with butter, gravy, etc. After reheating, let stand for a few minutes. Use manual power and time...
... placing food in the display window. Sensor Reheat Sensor Cook Feature Feature This sensor feature allows you to cook food without setting time. The oven simplifies programming. Example: To reheat a plate of cooking, five beeps sound. Example: To cook Frozen Entrées 2. At the end of food 1. • Press Sensor Reheat. Stir when time appears in the oven. Cover with butter, gravy, etc. After reheating, let stand for a few minutes. Use manual power and time...

NNH664 User Guide
Page 18
.... (225 - 900 g) Follow manufacturers' directions for covering or (300 - 450 g) removing covers. If additional time is needed, continue to complete cooking. 9. Follow manufactures' directions for preparation. Pasta 15. Arrange in a microwave safe (110 - 335 g) casserole dish. Follow manufacturers' directions for preparation of vegetables, and cover with lid or vented plastic wrap. Cover with lid or vented plastic wrap. After 2 beeps, stir or rearrange. Do not...
.... (225 - 900 g) Follow manufacturers' directions for covering or (300 - 450 g) removing covers. If additional time is needed, continue to complete cooking. 9. Follow manufactures' directions for preparation. Pasta 15. Arrange in a microwave safe (110 - 335 g) casserole dish. Follow manufacturers' directions for preparation of vegetables, and cover with lid or vented plastic wrap. Cover with lid or vented plastic wrap. After 2 beeps, stir or rearrange. Do not...

NNH664 User Guide
Page 20
.... 3. A change in starting temperature of food from rising before any automatic Function. To Set Delay Start: Example: To delay the start . When each stage finishes, a two-beep signal sounds. Then cooking will beep five times. 2. It can also be programmed before defrosting or cooking begins. Timer Feature This feature allows you to program the oven as a Kitchen Timer: Example: To count down 5 minutes. 1. • Press Timer. 2. • Set desired amount of time using number...
.... 3. A change in starting temperature of food from rising before any automatic Function. To Set Delay Start: Example: To delay the start . When each stage finishes, a two-beep signal sounds. Then cooking will beep five times. 2. It can also be programmed before defrosting or cooking begins. Timer Feature This feature allows you to program the oven as a Kitchen Timer: Example: To count down 5 minutes. 1. • Press Timer. 2. • Set desired amount of time using number...
NNH664 User Guide
Page 21
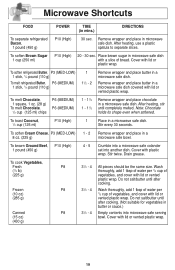
After heating, use a plastic spatula to separate slices. Cover with lid or vented plastic wrap. To toast Coconut, 1/2 cup (125 ml) P10 (High) 1 Place in mins.) DIRECTIONS To separate refrigerated Bacon, 1 pound (450 g) P10 (High) 30 sec. Stir every 30 seconds. Stir twice. Drain grease. Do not salt/butter until after cooking. (Not suitable for vegetables in butter...
After heating, use a plastic spatula to separate slices. Cover with lid or vented plastic wrap. To toast Coconut, 1/2 cup (125 ml) P10 (High) 1 Place in mins.) DIRECTIONS To separate refrigerated Bacon, 1 pound (450 g) P10 (High) 30 sec. Stir every 30 seconds. Stir twice. Drain grease. Do not salt/butter until after cooking. (Not suitable for vegetables in butter...

NNH664 User Guide
Page 24
... fat or bone. When using plastic wrap, vent the plastic wrap by using foil. When removing plastic wrap covers, as well as recipe directs for 10 to avoid steam burns. Cooking time A range of the dish. Always bring the cooked outside edges toward the center and the less cooked center portions toward the outside of meat and poultry cook more quickly than meaty portions. Rearrange...
... fat or bone. When using plastic wrap, vent the plastic wrap by using foil. When removing plastic wrap covers, as well as recipe directs for 10 to avoid steam burns. Cooking time A range of the dish. Always bring the cooked outside edges toward the center and the less cooked center portions toward the outside of meat and poultry cook more quickly than meaty portions. Rearrange...

NNH664 User Guide
Page 25
... the Control Panel becomes wet, clean it with a heat and washed in mild soapy water or dish- During cooking, especially under this book) PART NUMBER F00036K50AP Glass Tray F06014T01AP Roller Ring Assembly F290D9330AP For pricing quotes, call or write the Parts & Literature Department at wall outlet. If outlet is cov- cleaner, and dry. ORDER FORM DESCRIPTION Instructions / Operating Manual (this film. (Hint - Please have your nearest service center...
... the Control Panel becomes wet, clean it with a heat and washed in mild soapy water or dish- During cooking, especially under this book) PART NUMBER F00036K50AP Glass Tray F06014T01AP Roller Ring Assembly F290D9330AP For pricing quotes, call or write the Parts & Literature Department at wall outlet. If outlet is cov- cleaner, and dry. ORDER FORM DESCRIPTION Instructions / Operating Manual (this film. (Hint - Please have your nearest service center...

NNH664 User Guide
Page 26
... TV. The CHILD LOCK was not pressed Press Start Pad. It does not indicate a problem with the microwave oven. POSSIBLE CAUSE REMEDY The oven is not Take out Glass Tray and Roller positioned properly on . outlet to cancel entered into the outlet. Clean these parts according to the Operating Instructions. There is normal. fuse. Deactivate LOCK by pressing Start pad 3 times. after programming. Stop/Reset Pad has been Program oven again. Steam...
... TV. The CHILD LOCK was not pressed Press Start Pad. It does not indicate a problem with the microwave oven. POSSIBLE CAUSE REMEDY The oven is not Take out Glass Tray and Roller positioned properly on . outlet to cancel entered into the outlet. Clean these parts according to the Operating Instructions. There is normal. fuse. Deactivate LOCK by pressing Start pad 3 times. after programming. Stop/Reset Pad has been Program oven again. Steam...

NNH664 User Guide
Page 27
... at its option either (a) repair your product with new or refurbished parts, or (b) replace it with this excludes damages for labor. PARTS AND SERVICE WHICH ARE NOT COVERED BY THIS LIMITED WARRANTY ARE YOUR RESPONSIBILITY. During the "Parts" warranty period, there will be no charge for lost time, cost of having someone remove or re-install an installed unit if applicable, or travel...
... at its option either (a) repair your product with new or refurbished parts, or (b) replace it with this excludes damages for labor. PARTS AND SERVICE WHICH ARE NOT COVERED BY THIS LIMITED WARRANTY ARE YOUR RESPONSIBILITY. During the "Parts" warranty period, there will be no charge for lost time, cost of having someone remove or re-install an installed unit if applicable, or travel...


