

Installation Instructions
Page 2
... microwave operating instructions for other safety and electrical requirements. 5. Save these instructions may vary from the wall receptacle before attempting the installation of the cabinet opening must be as any part of the microwave oven. 7. Cabinet Diagram and Dimensions 6-9 4. Read and follow all instructions completely. 1. The microwave oven must be used with a properly grounded 3-prong receptacle in compliance with the Panasonic Microwave Oven listed in these instructions for reference. Refer also to 9. 3. Microwave Oven Preparation 11 6. Trim Kit...
... microwave operating instructions for other safety and electrical requirements. 5. Save these instructions may vary from the wall receptacle before attempting the installation of the cabinet opening must be as any part of the microwave oven. 7. Cabinet Diagram and Dimensions 6-9 4. Read and follow all instructions completely. 1. The microwave oven must be used with a properly grounded 3-prong receptacle in compliance with the Panasonic Microwave Oven listed in these instructions for reference. Refer also to 9. 3. Microwave Oven Preparation 11 6. Trim Kit...
Installation Instructions
Page 17
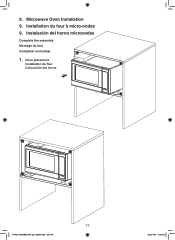
9. Microwave Oven Installation 9. Installation du four à micro-ondes 9. Oven placement Installation du four Colocación del horno IP4103_F0313BE01AP_28_120424.indd Sec1:16 16 2012-4-24 10:35:45 Instalación del horno microondas Complete the assembly Montage du four Completar el montaje 1.
9. Microwave Oven Installation 9. Installation du four à micro-ondes 9. Oven placement Installation du four Colocación del horno IP4103_F0313BE01AP_28_120424.indd Sec1:16 16 2012-4-24 10:35:45 Instalación del horno microondas Complete the assembly Montage du four Completar el montaje 1.
Installation Instructions
Page 18
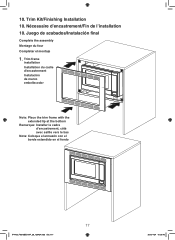
Nécessaire d'encastrement/Fin de l'installation 10. 10. Trim frame installation Installation du cadre d'encastrement Instalación de marco embellecedor Note: Place the trim frame with the extended lip at the bottom Remarque: Installer le cadre d'encastrement, côté avec saillie vers le bas Nota: Coloque el armazón con el borde extendido en el fondo IP4103_F0313BE01AP_28_120424.indd Sec1:17 17 2012-4-24 10:35:45 Trim Kit/Finishing Installation 10. Juego de acabados/Instalación final Complete the assembly Montage du four Completar el montaje 1.
Nécessaire d'encastrement/Fin de l'installation 10. 10. Trim frame installation Installation du cadre d'encastrement Instalación de marco embellecedor Note: Place the trim frame with the extended lip at the bottom Remarque: Installer le cadre d'encastrement, côté avec saillie vers le bas Nota: Coloque el armazón con el borde extendido en el fondo IP4103_F0313BE01AP_28_120424.indd Sec1:17 17 2012-4-24 10:35:45 Trim Kit/Finishing Installation 10. Juego de acabados/Instalación final Complete the assembly Montage du four Completar el montaje 1.


