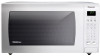
NN-TK722SS Owner's Manual (English, French, Spanish)
Page 2
...to 9. 3. Trim kit NN-TK932S NN-TK922S NN-TK732S NN-TK722S IP4103_F0313BE01AP_29_120515.indd Sec1:1 Panasonic Microwave Oven Models NN-SE9**S NN-SD9**S NN-SN9**S NN-ST9**S NN-SE7**S NN-SD7**S NN-SN7**S NN-ST7**S 1 2012-5-15 Lynn 2:20:21 This Trim Kit is not pinched during installation. 8. Use caution so...Cabinet Preparation ...14 8. Cabinet Diagram and Dimensions 6-9 4. Lower Duct Installation 12-13 7. The microwave oven must be used with a properly grounded 3-prong receptacle in compliance with the Panasonic Microwave Oven listed in Figure 1 on page 6 to the microwave ...
NN-TK722SS Owner's Manual (English, French, Spanish)
Page 17
Installation du four à micro-ondes 9. Instalación del horno microondas Complete the assembly Montage du four Completar el montaje 1. Oven placement Installation du four Colocación del horno IP4103_F0313BE01AP_29_120515.indd Sec1:16 16 2012-5-15 Lynn 2:20:23 9. Microwave Oven Installation 9.
NN-TK722SS Owner's Manual (English, French, Spanish)
Page 18
10. Trim Kit/Finishing Installation 10. Juego de acabados/Instalación final Complete the assembly Montage du four Completar el montaje 1. Nécessaire d'encastrement/Fin de l'installation 10. Trim frame installation Installation du cadre d'encastrement Instalación de marco embellecedor Note: Place the trim frame with the extended lip at the bottom Remarque: Installer le cadre d'encastrement, côté avec saillie vers le bas Nota: Coloque el armazón con el borde extendido en el fondo IP4103_F0313BE01AP_29_120515.indd Sec1:17 17 2012-5-15 Lynn 2:20:23