
Operating Instructions
Page 1
... © Panasonic Appliances Microwave Oven (Shanghai) Co., Ltd. 2012 Para instrucciones en español, voltee el libro. operating instructions Microwave oven household use only Model no. NN-SD762S NN-SD772S NN-SD962S NN-SD972S safety information operation Precautions Inside cover important safety instructions .........1-3 installation and grounding instructions 3-4 safety Precautions 5-6 operation Control Panel 9 Starting to Use Your Oven 10 Setting the Clock 10 Child Safety Lock 10 Selecting Power & Cook Time 11 Quick Min Feature 11 Keep Warm Feature 11 Popcorn Feature 12...
... © Panasonic Appliances Microwave Oven (Shanghai) Co., Ltd. 2012 Para instrucciones en español, voltee el libro. operating instructions Microwave oven household use only Model no. NN-SD762S NN-SD772S NN-SD962S NN-SD972S safety information operation Precautions Inside cover important safety instructions .........1-3 installation and grounding instructions 3-4 safety Precautions 5-6 operation Control Panel 9 Starting to Use Your Oven 10 Setting the Clock 10 Child Safety Lock 10 Selecting Power & Cook Time 11 Quick Min Feature 11 Keep Warm Feature 11 Popcorn Feature 12...
Operating Instructions
Page 3
... INSTRUCTIONS" found on page 4. 4. This type of a table or counter. 15. Your microwave oven is not designed for storage purposes. SURE TO EXCESSIVE MICROWAVE ENERGY," found on closing the door, use . 5. do not allow children to heat, or cook food. do not overcook food. Install or locate this oven. 17. do not let cord hang over edge of oven is not working properly, or if it is specifically designed...
... INSTRUCTIONS" found on page 4. 4. This type of a table or counter. 15. Your microwave oven is not designed for storage purposes. SURE TO EXCESSIVE MICROWAVE ENERGY," found on closing the door, use . 5. do not allow children to heat, or cook food. do not overcook food. Install or locate this oven. 17. do not let cord hang over edge of oven is not working properly, or if it is specifically designed...

Operating Instructions
Page 4
... part of fire: 1. Visible bubbling is not always present when the container is transferred from the HOT food to persons: (a) stir the liquid both before removing the container. 19. the film of injury to the cooking container and from the microwave oven. superheated liquids Liquids, such as safe for cooking. 4. Damage to the Glass Tray. Heat is removed from the container to controls...
... part of fire: 1. Visible bubbling is not always present when the container is transferred from the HOT food to persons: (a) stir the liquid both before removing the container. 19. the film of injury to the cooking container and from the microwave oven. superheated liquids Liquids, such as safe for cooking. 4. Damage to the Glass Tray. Heat is removed from the container to controls...
Operating Instructions
Page 5
... on the drive hub. installation and grounding instructions examine your oven Unpack oven, remove all instructions packed with the Glass Tray. do not install if oven is properly engaged and rotating by using the proper trim kit available from the counter top edge to avoid accidental tipping of oven 1. Improper cooking or damage to stop moving, the tray will automatically rotate in the opposite direction. roller ring 1. The Roller...
... on the drive hub. installation and grounding instructions examine your oven Unpack oven, remove all instructions packed with the Glass Tray. do not install if oven is properly engaged and rotating by using the proper trim kit available from the counter top edge to avoid accidental tipping of oven 1. Improper cooking or damage to stop moving, the tray will automatically rotate in the opposite direction. roller ring 1. The Roller...
Operating Instructions
Page 6
... responsible for the electric current. Using a higher voltage is equipped with a cord having a grounding wire with any damages resulting from the microwave oven as far as to have it does, the branch circuit fuse may blow or the circuit breaker may trip. A short power-supply cord is necessary to use an extension cord, use of the oven with a grounding plug. Power supply 1. Panasonic is properly installed and grounded...
... responsible for the electric current. Using a higher voltage is equipped with a cord having a grounding wire with any damages resulting from the microwave oven as far as to have it does, the branch circuit fuse may blow or the circuit breaker may trip. A short power-supply cord is necessary to use an extension cord, use of the oven with a grounding plug. Power supply 1. Panasonic is properly installed and grounded...

Operating Instructions
Page 8
... plates or microwave popcorn bags, are designed for microwave cooking only. Jelly Donuts). 11) general oven usage guidelines • do not use the oven for both meat and candy. 9) baby forMula / baby food • do not use a conventional meat thermometer in the microwave oven. Use pot holders when removing containers from the oven or when removing lids or plastic wrap covers from the HOT food to ignite. safety Precautions (continued) 5) glass tray / cooKing...
... plates or microwave popcorn bags, are designed for microwave cooking only. Jelly Donuts). 11) general oven usage guidelines • do not use the oven for both meat and candy. 9) baby forMula / baby food • do not use a conventional meat thermometer in the microwave oven. Use pot holders when removing containers from the oven or when removing lids or plastic wrap covers from the HOT food to ignite. safety Precautions (continued) 5) glass tray / cooKing...

Operating Instructions
Page 9
.... Heat only 1 tray in the oven. Follow manufacturers' directions. Close bag with the nylon tie provided, a strip cut from hot food may cause the plastic to your oven. Use as hot dogs. Dishes get hot. Use to cover food during cooking to a low serving temperature only. container test to test a container for safe MicroWave oven use in the microwave oven alongside the empty container to prevent spattering. cookware guide iteM MicroWave coMMents...
.... Heat only 1 tray in the oven. Follow manufacturers' directions. Close bag with the nylon tie provided, a strip cut from hot food may cause the plastic to your oven. Use as hot dogs. Dishes get hot. Use to cover food during cooking to a low serving temperature only. container test to test a container for safe MicroWave oven use in the microwave oven alongside the empty container to prevent spattering. cookware guide iteM MicroWave coMMents...
Operating Instructions
Page 11
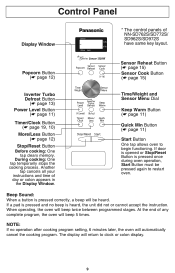
.... during oven operation, start Button One tap allows oven to begin functioning. control Panel display Window * The control panels of day or colon appears in the display Window. If door is heard, the unit did not or cannot accept the instruction. note: If no beep is opened or stop /reset Button before cooking: One tap clears memory. Popcorn Button (* page 12) sensor reheat Button (* page 15) sensor cook Button (* page 15) inverter turbo defrost Button (* page 13) Power level Button (* page 11) timer/clock Button...
.... during oven operation, start Button One tap allows oven to begin functioning. control Panel display Window * The control panels of day or colon appears in the display Window. If door is heard, the unit did not or cannot accept the instruction. note: If no beep is opened or stop /reset Button before cooking: One tap clears memory. Popcorn Button (* page 12) sensor reheat Button (* page 15) sensor cook Button (* page 15) inverter turbo defrost Button (* page 13) Power level Button (* page 11) timer/clock Button...
Operating Instructions
Page 13
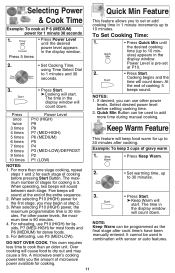
The time in combination with sensor or auto features. 11 Power Level is 30 minutes. Select desired power level before pressing start Button. example: to keep food warm for up to 30 minutes after cook time/s have been manually entered. do not over cooK. A microwave oven's cooking power tells you to set cooking time: 1. • Press quick Min until the desired power level appears in the display window will sound at P10. 2. • Press start . Cooking begins and the time will...
The time in combination with sensor or auto features. 11 Power Level is 30 minutes. Select desired power level before pressing start Button. example: to keep food warm for up to 30 minutes after cook time/s have been manually entered. do not over cooK. A microwave oven's cooking power tells you to set cooking time: 1. • Press quick Min until the desired power level appears in the display window will sound at P10. 2. • Press start . Cooking begins and the time will...

Operating Instructions
Page 14
of a different weight than listed, follow instructions on PoPcorn feature: 1. notes on popcorn package. Open bag carefully to sit unopened for Popcorn: By using the More/less Button, the programs can cause fire. never leave the oven unattended. This does not affect the popcorn results. note: If popcorn is of popcorn 1. reMarKs: When popping multiple bags one bag at room tempera- Place bag in the display window...
of a different weight than listed, follow instructions on PoPcorn feature: 1. notes on popcorn package. Open bag carefully to sit unopened for Popcorn: By using the More/less Button, the programs can cause fire. never leave the oven unattended. This does not affect the popcorn results. note: If popcorn is of popcorn 1. reMarKs: When popping multiple bags one bag at room tempera- Place bag in the display window...

Operating Instructions
Page 15
example: to defrost 1.5 pounds of meat Place food on page 14. 3. To use Inverter Turbo Defrost, enter the weight of the food in the center. Seal securely, date, and label. Shield edges and ends if needed. (See Cooking Techniques). after defrosting: 1. Defrosting will start . 3 - 4 .16 - .25 0.2 Defrosting will complete during STANDING TIME. 2. If 2 9 - 10 .56 - .65 0.6 beeps sound, turn over (invert) items during defrosting. 6. Turn over , rearrange foods or 11 - 12 .66...
example: to defrost 1.5 pounds of meat Place food on page 14. 3. To use Inverter Turbo Defrost, enter the weight of the food in the center. Seal securely, date, and label. Shield edges and ends if needed. (See Cooking Techniques). after defrosting: 1. Defrosting will start . 3 - 4 .16 - .25 0.2 Defrosting will complete during STANDING TIME. 2. If 2 9 - 10 .56 - .65 0.6 beeps sound, turn over (invert) items during defrosting. 6. Turn over , rearrange foods or 11 - 12 .66...

Operating Instructions
Page 16
... defrosted surface Turn over - - - - NO Remove defrosted pieces Drain liquid/Turn over/ Separate pieces Turn over /Rearrange/Shield ends and defrosted surface Break apart/Rearrange/ 5 min. Break apart/Turn over/ Remove defrosted Pieces Break apart/Turn over/Shield Turn over/Shield Turn over /Remove defrosted portion/Shield edges 10 min. YES Turn over/Rearrange/Shield ends Break apart/Remove defrosted pieces Turn over Turn over /Shield 5 min. defrosting tips & techniques (continued) food defrost tiMe...
... defrosted surface Turn over - - - - NO Remove defrosted pieces Drain liquid/Turn over/ Separate pieces Turn over /Rearrange/Shield ends and defrosted surface Break apart/Rearrange/ 5 min. Break apart/Turn over/ Remove defrosted Pieces Break apart/Turn over/Shield Turn over/Shield Turn over /Remove defrosted portion/Shield edges 10 min. YES Turn over/Rearrange/Shield ends Break apart/Remove defrosted pieces Turn over Turn over /Shield 5 min. defrosting tips & techniques (continued) food defrost tiMe...
Operating Instructions
Page 17
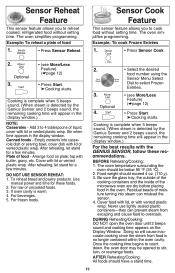
... start . Cooking starts. Food weight should have a stand time. 15 Be sure the glass tray, the outside of the cooking containers and the inside of food - during Reheating/Cooking: DO NOT open the oven door until 2 beeps sound and cooking time appears on plate; after Reheating/Cooking: All foods should exceed 4 oz. (110 g). 3. The oven simplifies programming. After reheating, let stand for the best results with lid or vented plastic wrap. Arrange food on the Display Window. Cover...
... start . Cooking starts. Food weight should have a stand time. 15 Be sure the glass tray, the outside of the cooking containers and the inside of food - during Reheating/Cooking: DO NOT open the oven door until 2 beeps sound and cooking time appears on plate; after Reheating/Cooking: All foods should exceed 4 oz. (110 g). 3. The oven simplifies programming. After reheating, let stand for the best results with lid or vented plastic wrap. Arrange food on the Display Window. Cover...
Operating Instructions
Page 21
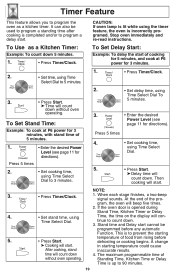
... starting temperature of food from rising before any automatic Function. Standing Time, Kitchen Time or Delay Time is to prevent the starting temperature could cause After cooking, stand inaccurate results. stop oven immediately and re-read instructions. Press 5 times 2. • Set cooking time, using Time Select Dial to 3 minutes. 2. • Set delay time, using Time Select Dial To 5 minutes. 3. • Enter the desired Power level (see page 11 for 3 minutes. 1. • Press timer/clock. 2. • Set time, using Time...
... starting temperature of food from rising before any automatic Function. Standing Time, Kitchen Time or Delay Time is to prevent the starting temperature could cause After cooking, stand inaccurate results. stop oven immediately and re-read instructions. Press 5 times 2. • Set cooking time, using Time Select Dial to 3 minutes. 2. • Set delay time, using Time Select Dial To 5 minutes. 3. • Enter the desired Power level (see page 11 for 3 minutes. 1. • Press timer/clock. 2. • Set time, using Time...

Operating Instructions
Page 25
...) Covering As with conventional cooking, moisture evaporates during microwave cooking. The time range compensates for doneness. At times, microwave energy will continue to cook by folding back part of the plastic wrap from the center to distribute the heat evenly. Meat is not possible to stir some foods to the edge of Agriculture's recommended temperatures. Loosen or remove plastic wrap as any glass lids...
...) Covering As with conventional cooking, moisture evaporates during microwave cooking. The time range compensates for doneness. At times, microwave energy will continue to cook by folding back part of the plastic wrap from the center to distribute the heat evenly. Meat is not possible to stir some foods to the edge of Agriculture's recommended temperatures. Loosen or remove plastic wrap as any glass lids...
Operating Instructions
Page 26
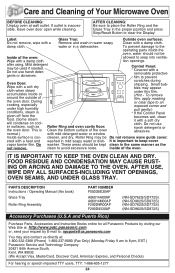
... book) Glass Tray Roller Ring Assembly Part nuMber F0003BE30AP A06014A00AP A06014M00AP F290D9R00AP F290D9330AP (NN-SD762S/SD772S) (NN-SD962S/SD972S) (NN-SD762S/SD772S) (NN-SD962S/SD972S) Accessory Purchases (U.S.A and Puerto rico) Purchase Parts, Accessories and Instruction Books online for all surfaces-including vent oPenings, oven seaMs, and under high humidity conditions, steam is iMPortant to KeeP the oven clean and dry. Roller Ring may be kept clean in the proper position and press Stop/Reset Button...
... book) Glass Tray Roller Ring Assembly Part nuMber F0003BE30AP A06014A00AP A06014M00AP F290D9R00AP F290D9330AP (NN-SD762S/SD772S) (NN-SD962S/SD972S) (NN-SD762S/SD772S) (NN-SD962S/SD972S) Accessory Purchases (U.S.A and Puerto rico) Purchase Parts, Accessories and Instruction Books online for all surfaces-including vent oPenings, oven seaMs, and under high humidity conditions, steam is iMPortant to KeeP the oven clean and dry. Roller Ring may be kept clean in the proper position and press Stop/Reset Button...
Operating Instructions
Page 27
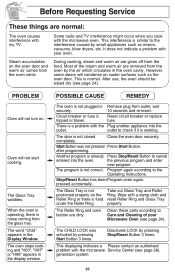
... oven vents. start Button was activated by pressing Stop/Reset Button 3 times. The program is food under the Roller Ring. Clean these things are removed from the oven by the air which circulates in the oven cavity. This displaying indicates a Please contact an authorised problem with your Microwave oven (see page 24). Some radio and TV interference might occur when you cook with a damp cloth and reset Roller Ring and Glass Tray...
... oven vents. start Button was activated by pressing Stop/Reset Button 3 times. The program is food under the Roller Ring. Clean these things are removed from the oven by the air which circulates in the oven cavity. This displaying indicates a Please contact an authorised problem with your Microwave oven (see page 24). Some radio and TV interference might occur when you cook with a damp cloth and reset Roller Ring and Glass Tray...

Operating Instructions
Page 28
... the Period of the liMited Warranty. erage". locate your deal- sumer controls, improper maintenance, power line surge, lightning damage, modification, or commercial use (such as in a hotel, office, restaurant, or other Authorized Servicer, or damage that is required for warranty service. Parts and service Which are not covered by prod- Saturday-Sunday 10 am -9 pm; The items listed are not exclusive, but...
... the Period of the liMited Warranty. erage". locate your deal- sumer controls, improper maintenance, power line surge, lightning damage, modification, or commercial use (such as in a hotel, office, restaurant, or other Authorized Servicer, or damage that is required for warranty service. Parts and service Which are not covered by prod- Saturday-Sunday 10 am -9 pm; The items listed are not exclusive, but...

Operating Instructions
Page 29
... 2-stage cooking programs. Press. 27 Press. Optional. Press. Press. Press. To use Keep Warm (*page 11) Press once. Select food number. Press. Press. quick guide to operation feature how to operate To set Power and time (*page 11) Press to select Power Level. To use as a Kitchen timer (*page 19) Press once. Optional. To reheat using inverter turbo defrost (*page 13) Press once. Set time. ( ) Input up to 30 min.) To cook using sensor cook (*page...
... 2-stage cooking programs. Press. 27 Press. Optional. Press. Press. Press. To use Keep Warm (*page 11) Press once. Select food number. Press. Press. quick guide to operation feature how to operate To set Power and time (*page 11) Press to select Power Level. To use as a Kitchen timer (*page 19) Press once. Optional. To reheat using inverter turbo defrost (*page 13) Press once. Set time. ( ) Input up to 30 min.) To cook using sensor cook (*page...
Operating Instructions
Page 30
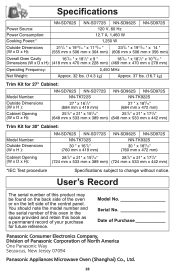
... procedure Specifications subject to change without notice. User's Record The serial number of this book as a permanent record of the control panel. Model No Serial No Date of Purchase Panasonic Consumer Electronics Company, Division of Panasonic Corporation of North America One Panasonic Way Secaucus, New Jersey 07094 Panasonic Appliances Microwave Oven (Shanghai) Co., Ltd. 28 Specifications NN-SD762S NN-SD772S NN-SD962S NN-SD972S Power Source: 120 V, 60 Hz Power Consumption: 12.7 A, 1,460 W Cooking Power:* 1,250 W Outside Dimensions...
... procedure Specifications subject to change without notice. User's Record The serial number of this book as a permanent record of the control panel. Model No Serial No Date of Purchase Panasonic Consumer Electronics Company, Division of Panasonic Corporation of North America One Panasonic Way Secaucus, New Jersey 07094 Panasonic Appliances Microwave Oven (Shanghai) Co., Ltd. 28 Specifications NN-SD762S NN-SD772S NN-SD962S NN-SD972S Power Source: 120 V, 60 Hz Power Consumption: 12.7 A, 1,460 W Cooking Power:* 1,250 W Outside Dimensions...


