

MCV7710 User Guide
Page 2
..., indoor area. Thank you to the possibility of damage to the Panasonic family of human life, and/or damage to prevent accidents such as tripping over power cord or machine. Your vacuum cleaner is required when vacuuming certain types of your vacuum cleaner are your responsibilities. TO AVOID ACCIDENTS Except for household use and...
..., indoor area. Thank you to the possibility of damage to the Panasonic family of human life, and/or damage to prevent accidents such as tripping over power cord or machine. Your vacuum cleaner is required when vacuuming certain types of your vacuum cleaner are your responsibilities. TO AVOID ACCIDENTS Except for household use and...
MCV7710 User Guide
Page 5
...precautions should , has been dropped, damaged, left outdoors, or dropped in water, return it to a Panasonic Service Center. 7. Disconnect electrical supply before connecting Air Turbine. 19. Do not leave vacuum cleaner when plugged in this manual before unplugging. 14. Do not pull or carry by or near children....Use only with wet hands. 10. Do not allow to do so could result in place. 18. Do not handle plug or vacuum cleaner with Panasonic recommended attachments. 2. Do not put any opening blocked; Failure to be used by cord, use with any objects into openings. 11...
...precautions should , has been dropped, damaged, left outdoors, or dropped in water, return it to a Panasonic Service Center. 7. Disconnect electrical supply before connecting Air Turbine. 19. Do not leave vacuum cleaner when plugged in this manual before unplugging. 14. Do not pull or carry by or near children....Use only with wet hands. 10. Do not allow to do so could result in place. 18. Do not handle plug or vacuum cleaner with Panasonic recommended attachments. 2. Do not put any opening blocked; Failure to be used by cord, use with any objects into openings. 11...

MCV7710 User Guide
Page 8
...12 FEATURES ...14 Adjustable Length Handle 14 Cord Hook ...14 Locking Notch ...14 Automatic Self Adjusting Nozzle 16 Edge Cleaning...16 TO OPERATE VACUUM CLEANER 18 Power Cord...18 OFF/HI/LOW Switch ...18 Using Adjustable Handle 18 Adjustable Handle ...20 Hose Removal from Handle 22 Using... ...28 Hose Ring and Hose Mount 30 Dust Bin Cleaning ...32 Filter Changing and Cleaning 34 Motor Protector...36 ROUTINE CARE OF VACUUM CLEANER 36 Cleaning Secondary Filter Screen 36 Replacing HEPA Exhaust Filter 38 Cleaning Agitator...40 Thermal Protector...40 Removing and Installing Lower Plate ...
...12 FEATURES ...14 Adjustable Length Handle 14 Cord Hook ...14 Locking Notch ...14 Automatic Self Adjusting Nozzle 16 Edge Cleaning...16 TO OPERATE VACUUM CLEANER 18 Power Cord...18 OFF/HI/LOW Switch ...18 Using Adjustable Handle 18 Adjustable Handle ...20 Hose Removal from Handle 22 Using... ...28 Hose Ring and Hose Mount 30 Dust Bin Cleaning ...32 Filter Changing and Cleaning 34 Motor Protector...36 ROUTINE CARE OF VACUUM CLEANER 36 Cleaning Secondary Filter Screen 36 Replacing HEPA Exhaust Filter 38 Cleaning Agitator...40 Thermal Protector...40 Removing and Installing Lower Plate ...
MCV7710 User Guide
Page 12
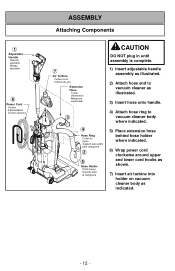
... expansible CAUTION DO NOT plug in until assembly is complete. 1) Insert adjustable handle assembly as illustrated. 2) Attach hose end to vacuum cleaner as illustrated. 3) Insert hose onto handle. 4) Attach hose ring to 3 vacuum cleaner body where indicated. 4 Hose Ring Collet du tuyau Support para anillo para manguera 2 5 Hose Holder Porte-tuyau Soporte... extension hose behind hose holder where indicated. 6) Wrap power cord clockwise around upper and lower cord hooks as shown. 7) Insert air turbine into holder on vacuum cleaner body as indicated. - 12 -
... expansible CAUTION DO NOT plug in until assembly is complete. 1) Insert adjustable handle assembly as illustrated. 2) Attach hose end to vacuum cleaner as illustrated. 3) Insert hose onto handle. 4) Attach hose ring to 3 vacuum cleaner body where indicated. 4 Hose Ring Collet du tuyau Support para anillo para manguera 2 5 Hose Holder Porte-tuyau Soporte... extension hose behind hose holder where indicated. 6) Wrap power cord clockwise around upper and lower cord hooks as shown. 7) Insert air turbine into holder on vacuum cleaner body as indicated. - 12 -

MCV7710 User Guide
Page 14
... cord hook down to release cord. ➢ Return the cord hook to the upright position before attempting to a comfortable operating position. Cord Hook ➢ Detach plug head from under the vacuum cleaner agitator. - 14 - CAUTION DO NOT carry the vacuum cleaner by the adjustable handle. Length Adjust Button Longueur ajustable Botón de... ajustable ➢ Press Handle Length Adjust button and raise handle to rewind the cord. Use ONLY the carrying handle located on the back of the vacuum cleaner.
... cord hook down to release cord. ➢ Return the cord hook to the upright position before attempting to a comfortable operating position. Cord Hook ➢ Detach plug head from under the vacuum cleaner agitator. - 14 - CAUTION DO NOT carry the vacuum cleaner by the adjustable handle. Length Adjust Button Longueur ajustable Botón de... ajustable ➢ Press Handle Length Adjust button and raise handle to rewind the cord. Use ONLY the carrying handle located on the back of the vacuum cleaner.
MCV7710 User Guide
Page 16
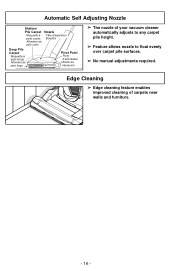
Edge Cleaning ➢ Edge cleaning feature enables improved cleaning of your vacuum cleaner automatically adjusts to any carpet pile height. ➢ Feature allows nozzle to float evenly over carpet pile surfaces. ➢ No manual adjustments required. Automatic ...
Edge Cleaning ➢ Edge cleaning feature enables improved cleaning of your vacuum cleaner automatically adjusts to any carpet pile height. ➢ Feature allows nozzle to float evenly over carpet pile surfaces. ➢ No manual adjustments required. Automatic ...

MCV7710 User Guide
Page 18
...fit fully in a polarized outlet only one blade is OFF. ➢ Plug the power cord into 120V outlet. ➢ HIGH position turns vacuum cleaner to the desired operating position. Only use outlets near the floor. DO NOT CHANGE THE PLUG IN ANY WAY. Using the Adjustable Handle Adjustable... Use HIGH power for cleaning delicate carpets or fabrics. Use LOW power for cleaning most carpet, rugs and floors. ➢ LOW position turns vacuum cleaner to install the proper outlet. If it still does not fit, contact a qualified electrician to LOW power. This plug will fit in the...
...fit fully in a polarized outlet only one blade is OFF. ➢ Plug the power cord into 120V outlet. ➢ HIGH position turns vacuum cleaner to the desired operating position. Only use outlets near the floor. DO NOT CHANGE THE PLUG IN ANY WAY. Using the Adjustable Handle Adjustable... Use HIGH power for cleaning delicate carpets or fabrics. Use LOW power for cleaning most carpet, rugs and floors. ➢ LOW position turns vacuum cleaner to install the proper outlet. If it still does not fit, contact a qualified electrician to LOW power. This plug will fit in the...
MCV7710 User Guide
Page 20
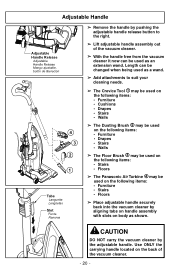
...; Stairs • Walls ➢ The Floor Brush ➂ may be used on the following items: • Stairs • Floors ➢ The Panasonic Air Turbine ➃ may be used on the following items: • Furniture • Stairs • Floors ➢ Place adjustable handle securely back into the... vacuum cleaner by aligning tabs on handle assembly with slots on body as an extension wand. Length can be used as shown. Adjustable Handle ...
...; Stairs • Walls ➢ The Floor Brush ➂ may be used on the following items: • Stairs • Floors ➢ The Panasonic Air Turbine ➃ may be used on the following items: • Furniture • Stairs • Floors ➢ Place adjustable handle securely back into the... vacuum cleaner by aligning tabs on handle assembly with slots on body as an extension wand. Length can be used as shown. Adjustable Handle ...

MCV7710 User Guide
Page 24
Body Release ➢ Your vacuum cleaner is equipped with three (3) position body release; • Upright position (locked) • Middle position (normal use) • Low position (getting under furniture) ➢ Release the body by pressing down on the body release pedal ...with your foot and pulling back and down on the handle with your hand. ➢ Move the vacuum cleaner to upright position for storage and tool use. ➢ Release the body by pressing the body release pedal. • Move the...
Body Release ➢ Your vacuum cleaner is equipped with three (3) position body release; • Upright position (locked) • Middle position (normal use) • Low position (getting under furniture) ➢ Release the body by pressing down on the body release pedal ...with your foot and pulling back and down on the handle with your hand. ➢ Move the vacuum cleaner to upright position for storage and tool use. ➢ Release the body by pressing the body release pedal. • Move the...

MCV7710 User Guide
Page 26
NOTE: For longer belt life, turn vacuum cleaner off before moving selector. ➢ Otherwise, take care when selecting either position to ensure selector is pushed as fully and quickly as possible to ... o usar los accessoires To Clean Carpet Position tapis Para aspirar sobre una alfombra ➢ Selector should be placed in BARE FLOOR (TOOLS) position when using vacuum cleaner on bare floors and when using vacuum cleaner on selector shaft and result in belt becoming hot and creating a burning rubber smell. - 26 -
NOTE: For longer belt life, turn vacuum cleaner off before moving selector. ➢ Otherwise, take care when selecting either position to ensure selector is pushed as fully and quickly as possible to ... o usar los accessoires To Clean Carpet Position tapis Para aspirar sobre una alfombra ➢ Selector should be placed in BARE FLOOR (TOOLS) position when using vacuum cleaner on bare floors and when using vacuum cleaner on selector shaft and result in belt becoming hot and creating a burning rubber smell. - 26 -

MCV7710 User Guide
Page 28
Note: The motor protector may open when using attachments make sure the vacuum cleaner is in the upright position and the Carpet/ Bare Floor selector is attached to the adjustable handle by new carpet lint filling the dust bin quickly. Place back in ... Identify each of the hose that is in its appropriate storage location. ➢ Reattach the extension hose to the the adjustable handle. ➢ Reinsert Panasonic Air Turbine into the vacuum cleaner as shown. - 28 - The attachments can now be added to the hose. ➢ Remove dusting brush from the side of the...
Note: The motor protector may open when using attachments make sure the vacuum cleaner is in the upright position and the Carpet/ Bare Floor selector is attached to the adjustable handle by new carpet lint filling the dust bin quickly. Place back in ... Identify each of the hose that is in its appropriate storage location. ➢ Reattach the extension hose to the the adjustable handle. ➢ Reinsert Panasonic Air Turbine into the vacuum cleaner as shown. - 28 - The attachments can now be added to the hose. ➢ Remove dusting brush from the side of the...

MCV7710 User Guide
Page 32
... bin is clean to maintain cleaning performance. CAUTION Be sure to hold the dust bin over a proper trash container prior to remove dust bin from vacuum cleaner. ➢ Remove any clogs that might be located in the filter screen. Lift up and out to releasing the door of the dust bin...
... bin is clean to maintain cleaning performance. CAUTION Be sure to hold the dust bin over a proper trash container prior to remove dust bin from vacuum cleaner. ➢ Remove any clogs that might be located in the filter screen. Lift up and out to releasing the door of the dust bin...
MCV7710 User Guide
Page 34
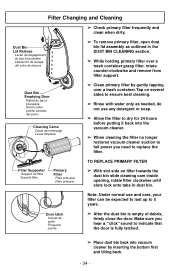
...de porte Picaporte puerta ➢ After the dust bin is fully latched. ➢ Place dust bin back into the vacuum cleaner. ➢ When cleaning the filter no longer restores vacuum cleaner suction to full power you need to replace the filter. Dust Bin Emptying Door Rabat du bac à poussi... needed, do not use and care, your filter can be expected to last up to dry for 24 hours before putting it back into vacuum cleaner by gently tapping over a trash container grasp filter, rotate counter-clockwise and remove from filter support. TO REPLACE PRIMARY FILTER Filter Supporter ...
...de porte Picaporte puerta ➢ After the dust bin is fully latched. ➢ Place dust bin back into the vacuum cleaner. ➢ When cleaning the filter no longer restores vacuum cleaner suction to full power you need to replace the filter. Dust Bin Emptying Door Rabat du bac à poussi... needed, do not use and care, your filter can be expected to last up to dry for 24 hours before putting it back into vacuum cleaner by gently tapping over a trash container grasp filter, rotate counter-clockwise and remove from filter support. TO REPLACE PRIMARY FILTER Filter Supporter ...
MCV7710 User Guide
Page 36
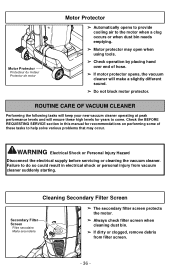
... screen when cleaning dust bin. ➢ If dirty or clogged, remove debris from vacuum cleaner suddenly starting. ROUTINE CARE OF VACUUM CLEANER Performing the following tasks will keep your new vacuum cleaner operating at peak performance levels and will make a slightly different sound. ➢... from filter screen. - 36 - WARNING Electrical Shock or Personal Injury Hazard Disconnect the electrical supply before servicing or cleaning the vacuum cleaner. Motor Protector Protecteur du moteur Protector de motor Motor Protector ➢ Automatically opens to provide cooling air to the motor...
... screen when cleaning dust bin. ➢ If dirty or clogged, remove debris from vacuum cleaner suddenly starting. ROUTINE CARE OF VACUUM CLEANER Performing the following tasks will keep your new vacuum cleaner operating at peak performance levels and will make a slightly different sound. ➢... from filter screen. - 36 - WARNING Electrical Shock or Personal Injury Hazard Disconnect the electrical supply before servicing or cleaning the vacuum cleaner. Motor Protector Protecteur du moteur Protector de motor Motor Protector ➢ Automatically opens to provide cooling air to the motor...

MCV7710 User Guide
Page 38
... Languette Lengüeta ➢ Grasp the exhaust filter and pull out to remove. ➢ Ensure foam edge of the filter is facing towards the vacuum cleaner when placing filter into place. * Filter cannot be cleaned and should be replaced at least once each year. Replace when dirty. ➢ To remove...
... Languette Lengüeta ➢ Grasp the exhaust filter and pull out to remove. ➢ Ensure foam edge of the filter is facing towards the vacuum cleaner when placing filter into place. * Filter cannot be cleaned and should be replaced at least once each year. Replace when dirty. ➢ To remove...

MCV7710 User Guide
Page 40
...see if thermal protector has reset. Cleaning Agitator ➢ Clean agitator after every five uses. ➢ Turn vacuum cleaner over, exposing the agitator. ➢ Cut off and unplug the vacuum cleaner, remove clogs and/or clean/replace filters. ➢ Empty dust bin if necessary. ➢ Wait... approximately thirty (30) minutes, plug vacuum cleaner in order to prevent possible damage to the vacuum cleaner. ➢ During this time the headlight remains on. ➢ To correct problem, turn on to cool in ...
...see if thermal protector has reset. Cleaning Agitator ➢ Clean agitator after every five uses. ➢ Turn vacuum cleaner over, exposing the agitator. ➢ Cut off and unplug the vacuum cleaner, remove clogs and/or clean/replace filters. ➢ Empty dust bin if necessary. ➢ Wait... approximately thirty (30) minutes, plug vacuum cleaner in order to prevent possible damage to the vacuum cleaner. ➢ During this time the headlight remains on. ➢ To correct problem, turn on to cool in ...
MCV7710 User Guide
Page 42
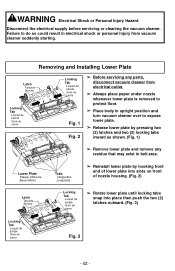
...Electrical Shock or Personal Injury Hazard Disconnect the electrical supply before servicing or cleaning the vacuum cleaner. Failure to expose lower plate. ➢ Release lower plate by hooking ...251;reté Guía de cierre Fig. 1 Fig. 2 ➢ Before servicing any parts, disconnect vacuum cleaner from vacuum cleaner suddenly starting. Lower Plate Plaque inféreure Base inferior Tabs Languettes Lengüetas ➢ Reinstall lower ... plate is removed to protect floor. ➢ Place body in upright position and turn vacuum cleaner over to do so could result in belt area.
...Electrical Shock or Personal Injury Hazard Disconnect the electrical supply before servicing or cleaning the vacuum cleaner. Failure to expose lower plate. ➢ Release lower plate by hooking ...251;reté Guía de cierre Fig. 1 Fig. 2 ➢ Before servicing any parts, disconnect vacuum cleaner from vacuum cleaner suddenly starting. Lower Plate Plaque inféreure Base inferior Tabs Languettes Lengüetas ➢ Reinstall lower ... plate is removed to protect floor. ➢ Place body in upright position and turn vacuum cleaner over to do so could result in belt area.
MCV7710 User Guide
Page 46
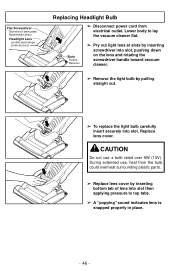
.... ➢ Replace lens cover by pulling straight out. ➢ To replace the light bulb carefully insert securely into slot then applying pressure to lay the vacuum cleaner flat. Slots Fentes Ranuras ➢ Pry out light lens at slots by inserting screwdriver into slot, pushing down on the lens and rotating the...
.... ➢ Replace lens cover by pulling straight out. ➢ To replace the light bulb carefully insert securely into slot then applying pressure to lay the vacuum cleaner flat. Slots Fentes Ranuras ➢ Pry out light lens at slots by inserting screwdriver into slot, pushing down on the lens and rotating the...

MCV7710 User Guide
Page 48
Cleaning Exterior and Tools ➢ Unplug cord from wall outlet. ➢ Clean exterior using a clean, soft cloth that has been dipped in a solution of mild liquid detergent and water and wrung dry. ➢ DO NOT drip water on the vacuum cleaner and wipe dry after cleaning. ➢ DO NOT clean tools in dishwasher or clothes washer. ➢ Wash tools in warm soapy water, rinse and air dry. ➢ DO NOT use tools if they are wet. - 48 -
Cleaning Exterior and Tools ➢ Unplug cord from wall outlet. ➢ Clean exterior using a clean, soft cloth that has been dipped in a solution of mild liquid detergent and water and wrung dry. ➢ DO NOT drip water on the vacuum cleaner and wipe dry after cleaning. ➢ DO NOT clean tools in dishwasher or clothes washer. ➢ Wash tools in warm soapy water, rinse and air dry. ➢ DO NOT use tools if they are wet. - 48 -

MCV7710 User Guide
Page 50
... is connected. ➢ Remove any visible clog. ➢ Re-connect the extension hose to the dust bin port assembly. ➢ Plug in the vacuum cleaner and turn it on. ➢ Stretch the hose to maximum length and then allow the hose to return to its storage length. ➢ Turn... off and unplug the vacuum cleaner. ➢ Remove dust bin and check secondary filter screen for clogs. ➢ If the dust bin and filter areas and the hose areas are free of clogs, check the nozzle area. ➢ Return the vacuum cleaner to the upright position before plugging into an electrical outlet. ...
... is connected. ➢ Remove any visible clog. ➢ Re-connect the extension hose to the dust bin port assembly. ➢ Plug in the vacuum cleaner and turn it on. ➢ Stretch the hose to maximum length and then allow the hose to return to its storage length. ➢ Turn... off and unplug the vacuum cleaner. ➢ Remove dust bin and check secondary filter screen for clogs. ➢ If the dust bin and filter areas and the hose areas are free of clogs, check the nozzle area. ➢ Return the vacuum cleaner to the upright position before plugging into an electrical outlet. ...


