

MCV413 User Guide
Page 2
... of America Division of Panasonic Corporation of damage to prevent accidents such as tripping over power cord or machine. Always check the carpet or floor covering manufacturer's recommended cleaning instructions before servicing. CAUTION statements are designed to alert you become one of carpet or floor covering. Replace worn or frayed power cord immediately. Unplug from outlet when not in use to the vacuum cleaner and/or personal...
... of America Division of Panasonic Corporation of damage to prevent accidents such as tripping over power cord or machine. Always check the carpet or floor covering manufacturer's recommended cleaning instructions before servicing. CAUTION statements are designed to alert you become one of carpet or floor covering. Replace worn or frayed power cord immediately. Unplug from outlet when not in use to the vacuum cleaner and/or personal...
MCV413 User Guide
Page 5
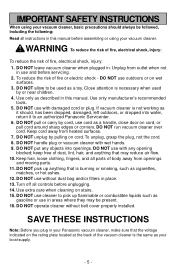
... use and before servicing. 2. If vacuum cleaner is the same as cigarettes, matches, or hot ashes. 12. Keep cord away from openings and moving parts. 11. DO NOT put any opening blocked; Turn off all controls before assembling or using your local supply. - 5 - DO NOT allow to an authorized Panasonic Servicenter. 6. DO NOT use outdoors or on cord. SAVE THESE INSTRUCTIONS Note: Before you plug in your Panasonic vacuum cleaner...
... use and before servicing. 2. If vacuum cleaner is the same as cigarettes, matches, or hot ashes. 12. Keep cord away from openings and moving parts. 11. DO NOT put any opening blocked; Turn off all controls before assembling or using your local supply. - 5 - DO NOT allow to an authorized Panasonic Servicenter. 6. DO NOT use outdoors or on cord. SAVE THESE INSTRUCTIONS Note: Before you plug in your Panasonic vacuum cleaner...
MCV413 User Guide
Page 8
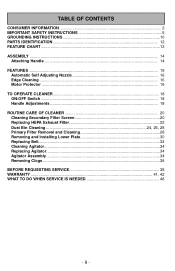
... PARTS IDENTIFICATION 12 FEATURE CHART ...13 ASSEMBLY ...14 Attaching Handle...14 FEATURES ...16 Automatic Self Adjusting Nozzle 16 Edge Cleaning ...16 Motor Protector ...16 TO OPERATE CLEANER 18 ON-OFF Switch ...18 Handle Adjustments 18 ROUTINE CARE OF CLEANER 20 Cleaning Secondary Filter Screen 20 Replacing HEPA Exhaust Filter 22 Dust Bin Cleaning 24, 26, 28 Primary Filter Removal and Cleaning 28 Removing and Installing Lower Plate 30 Replacing Belt...32 Cleaning Agitator...34 Replacing Agitator...34 Agitator Assembly...34 Removing Clogs ...36 BEFORE REQUESTING SERVICE 38 WARRANTY...
... PARTS IDENTIFICATION 12 FEATURE CHART ...13 ASSEMBLY ...14 Attaching Handle...14 FEATURES ...16 Automatic Self Adjusting Nozzle 16 Edge Cleaning ...16 Motor Protector ...16 TO OPERATE CLEANER 18 ON-OFF Switch ...18 Handle Adjustments 18 ROUTINE CARE OF CLEANER 20 Cleaning Secondary Filter Screen 20 Replacing HEPA Exhaust Filter 22 Dust Bin Cleaning 24, 26, 28 Primary Filter Removal and Cleaning 28 Removing and Installing Lower Plate 30 Replacing Belt...32 Cleaning Agitator...34 Replacing Agitator...34 Agitator Assembly...34 Removing Clogs ...36 BEFORE REQUESTING SERVICE 38 WARRANTY...
MCV413 User Guide
Page 10
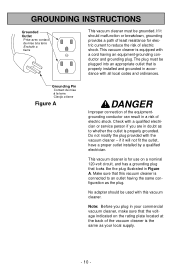
... INSTRUCTIONS Grounded Outlet Prise avec contact de mise à la terre Enchufe a tierra This vacuum cleaner must be used with this vacuum cleaner is connected to an outlet having an equipment-grounding conductor and grounding plug. Check with the vacuum cleaner - Do not modify the plug provided with a qualified electrician or service person if you plug in your commercial vacuum cleaner, make sure that is properly installed...
... INSTRUCTIONS Grounded Outlet Prise avec contact de mise à la terre Enchufe a tierra This vacuum cleaner must be used with this vacuum cleaner is connected to an outlet having an equipment-grounding conductor and grounding plug. Check with the vacuum cleaner - Do not modify the plug provided with a qualified electrician or service person if you plug in your commercial vacuum cleaner, make sure that is properly installed...

MCV413 User Guide
Page 14
Handle Manche Mango Handle Screw Vis du manche Tornillo del mango ASSEMBLY Attaching Handle 1) ➢ DO NOT plug in until assembly is complete. ➢ Remove handle screw. ➢ Insert handle. ➢ Insert screw. ➢ Tighten screw. 2) ➢ Push power cord into cord clip. Power Cord Cordon d'alimentation Cordón eléctrico Cord Wrap Attache-cordon Gancho del cordón Retainer (Plug Head) Agrafe de fixation de la fiche Enchufe 3) ➢ Wrap power cord around cord hook. ➢ Secure retainer (plug head) to power cord. - 14 -
Handle Manche Mango Handle Screw Vis du manche Tornillo del mango ASSEMBLY Attaching Handle 1) ➢ DO NOT plug in until assembly is complete. ➢ Remove handle screw. ➢ Insert handle. ➢ Insert screw. ➢ Tighten screw. 2) ➢ Push power cord into cord clip. Power Cord Cordon d'alimentation Cordón eléctrico Cord Wrap Attache-cordon Gancho del cordón Retainer (Plug Head) Agrafe de fixation de la fiche Enchufe 3) ➢ Wrap power cord around cord hook. ➢ Secure retainer (plug head) to power cord. - 14 -

MCV413 User Guide
Page 16
... Point d'articulation Botón de liberación ➢ The nozzle of carpets near walls and furniture. Edge Cleaning ➢ Edge cleaning feature enables improved cleaning of your upright vacuum cleaner automatically adjusts to any carpet pile height. ➢ Feature allows nozzle to the motor when a clog occurs or when dust bin needs emptying. ➢ Motor protector may open when using tools. ➢ If motor protector opens, the vacuum will make a slightly different sound.
... Point d'articulation Botón de liberación ➢ The nozzle of carpets near walls and furniture. Edge Cleaning ➢ Edge cleaning feature enables improved cleaning of your upright vacuum cleaner automatically adjusts to any carpet pile height. ➢ Feature allows nozzle to the motor when a clog occurs or when dust bin needs emptying. ➢ Motor protector may open when using tools. ➢ If motor protector opens, the vacuum will make a slightly different sound.
MCV413 User Guide
Page 18
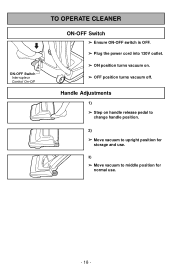
Handle Adjustments 1) ➢ Step on . ➢ OFF position turns vacuum off. ON-OFF Switch Interrupteur Control On-Off TO OPERATE CLEANER ON-OFF Switch ➢ Ensure ON-OFF switch is OFF. ➢ Plug the power cord into 120V outlet. ➢ ON position turns vacuum on handle release pedal to change handle position. 2) ➢ Move vacuum to upright position for storage and use. 3) ➢ Move vacuum to middle position for normal use. - 18 -
Handle Adjustments 1) ➢ Step on . ➢ OFF position turns vacuum off. ON-OFF Switch Interrupteur Control On-Off TO OPERATE CLEANER ON-OFF Switch ➢ Ensure ON-OFF switch is OFF. ➢ Plug the power cord into 120V outlet. ➢ ON position turns vacuum on handle release pedal to change handle position. 2) ➢ Move vacuum to upright position for storage and use. 3) ➢ Move vacuum to middle position for normal use. - 18 -

MCV413 User Guide
Page 20
...; Replace the dust bin as outlined in the DUST BIN CLEANING section. - 20 - Cleaning Secondary Filter Screen ➢ Check secondary filter screen frequently and clean when dirty. Secondary Filter Filtre secondaire Limpieza del filtro secundario ➢ Remove the dust bin as outined in the DUST BIN CLEANING section. ➢ To clean filter screen wipe screen with a dry cloth. ROUTINE CARE OF CLEANER Performing the following tasks will keep your new Panasonic vacuum cleaner operating...
...; Replace the dust bin as outlined in the DUST BIN CLEANING section. - 20 - Cleaning Secondary Filter Screen ➢ Check secondary filter screen frequently and clean when dirty. Secondary Filter Filtre secondaire Limpieza del filtro secundario ➢ Remove the dust bin as outined in the DUST BIN CLEANING section. ➢ To clean filter screen wipe screen with a dry cloth. ROUTINE CARE OF CLEANER Performing the following tasks will keep your new Panasonic vacuum cleaner operating...

MCV413 User Guide
Page 22
... filter cover. ➢ Grasp the exhaust filter and pull out to remove. ➢ Ensure foam edge of the filter is facing towards the vacuum cleaner when placing filter into place. * Filter cannot be cleaned and should be replaced at least once each year. - 22 - Replacing HEPA Exhaust Filter Exhaust Filter Filtre d'évacuation Filtre de salida ➢ The HEPA exhaust filter removes dirt from recirculated air. ➢ Check filter after emptying dust...
... filter cover. ➢ Grasp the exhaust filter and pull out to remove. ➢ Ensure foam edge of the filter is facing towards the vacuum cleaner when placing filter into place. * Filter cannot be cleaned and should be replaced at least once each year. - 22 - Replacing HEPA Exhaust Filter Exhaust Filter Filtre d'évacuation Filtre de salida ➢ The HEPA exhaust filter removes dirt from recirculated air. ➢ Check filter after emptying dust...
MCV413 User Guide
Page 24
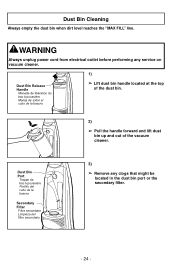
... basura ➢ Lift dust bin handle located at the top of the dust bin. 2) ➢ Pull the handle forward and lift dust bin up and out of the vacuum cleaner. Dust Bin Cleaning Always empty the dust bin when dirt level reaches the "MAX FILL" line. WARNING Always unplug power cord from electrical outlet before performing any clogs that might be located in the dust bin port or...
... basura ➢ Lift dust bin handle located at the top of the dust bin. 2) ➢ Pull the handle forward and lift dust bin up and out of the vacuum cleaner. Dust Bin Cleaning Always empty the dust bin when dirt level reaches the "MAX FILL" line. WARNING Always unplug power cord from electrical outlet before performing any clogs that might be located in the dust bin port or...

MCV413 User Guide
Page 26
... the lid and lift off. Turn This Direction To Open For Emptying Tourner dans ce sens pour vider le bac à poussière Torne en esta dirección para abrir y vaciar Dust Bin Cleaning Closed (For Use) Fermé (pour utiliser) Abierto (Para vaciar) 4) ➢ To empty dust bin rotate dust bin lid assembly counter-clockwise as shown in Closed...
... the lid and lift off. Turn This Direction To Open For Emptying Tourner dans ce sens pour vider le bac à poussière Torne en esta dirección para abrir y vaciar Dust Bin Cleaning Closed (For Use) Fermé (pour utiliser) Abierto (Para vaciar) 4) ➢ To empty dust bin rotate dust bin lid assembly counter-clockwise as shown in Closed...
MCV413 User Guide
Page 28
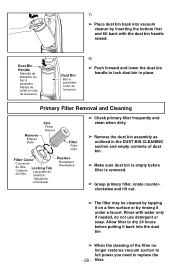
... restores vacuum suction to full power you need to replace the - 28 - Primary Filter Removal and Cleaning Remove Enlever Quite Slot Fente Ranura Filter Filtre Filtro Filter Cover Couvercle du filtre Cubierta del filtro Locking Tab Languette de rétention Tabulación el bloquear Replace Remplacer Reemplace ➢ Check primary filter frequently and clean when dirty. ➢ Remove the dust bin assembly as outlined in place. Allow filter to dry 24...
... restores vacuum suction to full power you need to replace the - 28 - Primary Filter Removal and Cleaning Remove Enlever Quite Slot Fente Ranura Filter Filtre Filtro Filter Cover Couvercle du filtre Cubierta del filtro Locking Tab Languette de rétention Tabulación el bloquear Replace Remplacer Reemplace ➢ Check primary filter frequently and clean when dirty. ➢ Remove the dust bin assembly as outlined in place. Allow filter to dry 24...

MCV413 User Guide
Page 30
... push two (2) latches outward. - 30 - Failure to expose lower plate. ➢ Release lower plate by pressing two (2) latches inward as shown. ➢ Remove lower plate and remove any residue that may exist in electrical shock or personal injury from cleaner suddenly starting. Removing and Installing Lower Plate Latches Taquets Lengüetas ➢ Always place paper under nozzle whenever lower plate is removed to protect floor.
... push two (2) latches outward. - 30 - Failure to expose lower plate. ➢ Release lower plate by pressing two (2) latches inward as shown. ➢ Remove lower plate and remove any residue that may exist in electrical shock or personal injury from cleaner suddenly starting. Removing and Installing Lower Plate Latches Taquets Lengüetas ➢ Always place paper under nozzle whenever lower plate is removed to protect floor.
MCV413 User Guide
Page 32
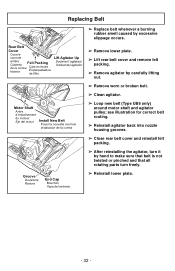
...; Replace belt whenever a burning rubber smell caused by excessive slippage occurs. ➢ Remove lower plate. ➢ Lift rear belt cover and remove felt packing. ➢ Remove agitator by hand to make sure that belt is not twisted or pinched and that all rotating parts turn it by carefully lifting out. ➢ Remove worn or broken belt. ➢ Clean agitator. ➢ Loop new belt (Type UB8 only) around motor shaft and agitator pulley...
...; Replace belt whenever a burning rubber smell caused by excessive slippage occurs. ➢ Remove lower plate. ➢ Lift rear belt cover and remove felt packing. ➢ Remove agitator by hand to make sure that belt is not twisted or pinched and that all rotating parts turn it by carefully lifting out. ➢ Remove worn or broken belt. ➢ Clean agitator. ➢ Loop new belt (Type UB8 only) around motor shaft and agitator pulley...
MCV413 User Guide
Page 34
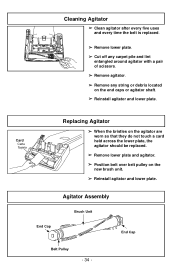
... the end caps or agitator shaft. ➢ Reinstall agitator and lower plate. Cleaning Agitator ➢ Clean agitator after every five uses and every time the belt is replaced. ➢ Remove lower plate. ➢ Cut off any carpet pile and lint entangled around agitator with a pair of scissors. ➢ Remove agitator. ➢ Remove any string or debris located on the new brush unit. ➢ Reinstall agitator and lower plate. Agitator Assembly Brush Unit End Cap End...
... the end caps or agitator shaft. ➢ Reinstall agitator and lower plate. Cleaning Agitator ➢ Clean agitator after every five uses and every time the belt is replaced. ➢ Remove lower plate. ➢ Cut off any carpet pile and lint entangled around agitator with a pair of scissors. ➢ Remove agitator. ➢ Remove any string or debris located on the new brush unit. ➢ Reinstall agitator and lower plate. Agitator Assembly Brush Unit End Cap End...
MCV413 User Guide
Page 36
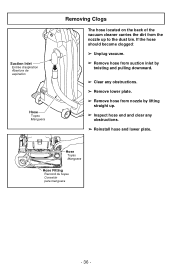
...;n para manguera - 36 - If the hose should become clogged: ➢ Unplug vacuum. ➢ Remove hose from suction inlet by lifting straight up to the dust bin. Suction Inlet Entrée d'aspiration Abertura de aspiration Hose Tuyau Manguera Removing Clogs The hose located on the back of the vacuum cleaner carries the dirt from nozzle by twisting and pulling downward. ➢ Clear any obstructions. ➢ Remove lower plate. ➢ Remove hose from the nozzle...
...;n para manguera - 36 - If the hose should become clogged: ➢ Unplug vacuum. ➢ Remove hose from suction inlet by lifting straight up to the dust bin. Suction Inlet Entrée d'aspiration Abertura de aspiration Hose Tuyau Manguera Removing Clogs The hose located on the back of the vacuum cleaner carries the dirt from nozzle by twisting and pulling downward. ➢ Clear any obstructions. ➢ Remove lower plate. ➢ Remove hose from the nozzle...

MCV413 User Guide
Page 38
... ON-OFF switch to ON. 3. Broken belt. 3. Clean dust bin. 2. POSSIBLE SOLUTION 1. Reset circuit breaker or replace fuse. Dirty filters. 1. Review this chart to do -it-yourself solutions for minor performance problems. Any service needed, other than those described in hose. 7. Clean hose or nozzle area. 4. Replace hose. 7. PROBLEM Cleaner will not run. Push ON-OFF switch to On. 2. Worn agitator. 6. Clean/Change filters. - 38 - Plug in electric shock or personal injury from cleaner suddenly starting. Poor job of dirt pickup. 1. POSSIBLE...
... ON-OFF switch to ON. 3. Broken belt. 3. Clean dust bin. 2. POSSIBLE SOLUTION 1. Reset circuit breaker or replace fuse. Dirty filters. 1. Review this chart to do -it-yourself solutions for minor performance problems. Any service needed, other than those described in hose. 7. Clean hose or nozzle area. 4. Replace hose. 7. PROBLEM Cleaner will not run. Push ON-OFF switch to On. 2. Worn agitator. 6. Clean/Change filters. - 38 - Plug in electric shock or personal injury from cleaner suddenly starting. Poor job of dirt pickup. 1. POSSIBLE...
MCV413 User Guide
Page 41
... the back cover. - 41 - If a problem with this product with new or refurbished parts free of charge, in the U.S.A. WARRANTY Panasonic Commercial Vacuum Cleaner Limited Warranty Panasonic Home and Commercial Products Company (referred to as listed above exclusions or limitations may also have other proof of date of original purchase will repair this product develops during the warranty period by anyone other than a Panasonic Authorized Servicenter, or damage that...
... the back cover. - 41 - If a problem with this product with new or refurbished parts free of charge, in the U.S.A. WARRANTY Panasonic Commercial Vacuum Cleaner Limited Warranty Panasonic Home and Commercial Products Company (referred to as listed above exclusions or limitations may also have other proof of date of original purchase will repair this product develops during the warranty period by anyone other than a Panasonic Authorized Servicenter, or damage that...
MCV413 User Guide
Page 42
... purchase. WARRANTY SERVICE FOR PRODUCT OPERATION ASSISTANCE, please contact: Our Customer Care Centre: Telephone #: (905) 624-5505 1-800 #: 1-800-561-5505 Fax #: (905) 238-2360 Email link: "Contact Us" on www.panasonic.ca FOR PRODUCT REPAIRS, please locate your nearest Authorized Servicentre at www.panasonic.ca : Link : "ServicentresTM locator" under this product to usage for a period as disposable dust bags, filters, belts, light bulbs and agitator brushes are...
... purchase. WARRANTY SERVICE FOR PRODUCT OPERATION ASSISTANCE, please contact: Our Customer Care Centre: Telephone #: (905) 624-5505 1-800 #: 1-800-561-5505 Fax #: (905) 238-2360 Email link: "Contact Us" on www.panasonic.ca FOR PRODUCT REPAIRS, please locate your nearest Authorized Servicentre at www.panasonic.ca : Link : "ServicentresTM locator" under this product to usage for a period as disposable dust bags, filters, belts, light bulbs and agitator brushes are...

MCV413 User Guide
Page 48
... OF PANASONIC CORPORATION OF NORTH AMERICA One Panasonic Way Secaucus, New Jersey 07094 World Wide Web Address http://www.panasonic.com What to make repairs. No están equipadas para arreglar estos productos. No mande el producto a las Executive o Regional Sales Offices. They are NOT equipped to do when service is needed Service après-vente (Canada) WARRANTY SERVICE For product operation and...
... OF PANASONIC CORPORATION OF NORTH AMERICA One Panasonic Way Secaucus, New Jersey 07094 World Wide Web Address http://www.panasonic.com What to make repairs. No están equipadas para arreglar estos productos. No mande el producto a las Executive o Regional Sales Offices. They are NOT equipped to do when service is needed Service après-vente (Canada) WARRANTY SERVICE For product operation and...


