MC-UL423 Owner's Manual (Multi Language)
Page 3
...CONSUMABLE PARTS ...13 FEATURE CHART ...13 ASSEMBLY ...14 Attaching Handle ...14 Attaching Hose ...16 Tool Storage ...18 Power Cord ...20 TO OPERATE VACUUM CLEANER 20 Power Cord ...22, 24 On/Off Switch ...24 Adjusting the Handle ...26 Using Tools ...28 Tools ...30 FEATURES ...30 Edge Cleaning......30 Automatic Adjusting Nozzle ...32 Thermal Protector...32 ROUTINE CARE OF VACUUM CLEANER 34 Emptying Dust Bin ...34, 36 Cleaning Pre-Filter ...38 Cleaning Primary Filter ...42 Replacing HEPA Media Exhaust Filter 44 Replacing Belt...
...CONSUMABLE PARTS ...13 FEATURE CHART ...13 ASSEMBLY ...14 Attaching Handle ...14 Attaching Hose ...16 Tool Storage ...18 Power Cord ...20 TO OPERATE VACUUM CLEANER 20 Power Cord ...22, 24 On/Off Switch ...24 Adjusting the Handle ...26 Using Tools ...28 Tools ...30 FEATURES ...30 Edge Cleaning......30 Automatic Adjusting Nozzle ...32 Thermal Protector...32 ROUTINE CARE OF VACUUM CLEANER 34 Emptying Dust Bin ...34, 36 Cleaning Pre-Filter ...38 Cleaning Primary Filter ...42 Replacing HEPA Media Exhaust Filter 44 Replacing Belt...
MC-UL423 Owner's Manual (Multi Language)
Page 6
... information. CAUTION statements are designed to alert you to the possibility of personal injury, loss of human life, and/or damage to the Panasonic family of your responsibilities. The vacuum cleaner should be damaged which can cause electrical sparking and fire. -6- Our intent is that you for household use . WARNING CAUTION WARNING statements...
... information. CAUTION statements are designed to alert you to the possibility of personal injury, loss of human life, and/or damage to the Panasonic family of your responsibilities. The vacuum cleaner should be damaged which can cause electrical sparking and fire. -6- Our intent is that you for household use . WARNING CAUTION WARNING statements...
MC-UL423 Owner's Manual (Multi Language)
Page 9
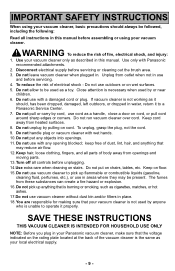
...local electrical supply. -9- Keep on wet surfaces. 5. Use only with wet hands. 10. Do not leave vacuum cleaner when plugged in. Do not handle plug or vacuum cleaner with Panasonic recommended attachments. 2. Do not put any opening blocked; Do not unplug by or near children. 6. keep ...a handle, close a door on stairs. SAVE THESE INSTRUCTIONS THIS VACUUM CLEANER IS INTENDED FOR HOUSEHOLD USE ONLY NOTE: Before you plug in your Panasonic vacuum cleaner, make sure that may be used by cord, use vacuum cleaner without dust bin and/or filters in place. 18. Unplug from...
...local electrical supply. -9- Keep on wet surfaces. 5. Use only with wet hands. 10. Do not leave vacuum cleaner when plugged in. Do not handle plug or vacuum cleaner with Panasonic recommended attachments. 2. Do not put any opening blocked; Do not unplug by or near children. 6. keep ...a handle, close a door on stairs. SAVE THESE INSTRUCTIONS THIS VACUUM CLEANER IS INTENDED FOR HOUSEHOLD USE ONLY NOTE: Before you plug in your Panasonic vacuum cleaner, make sure that may be used by cord, use vacuum cleaner without dust bin and/or filters in place. 18. Unplug from...

MC-UL423 Owner's Manual (Multi Language)
Page 14
... ➢ DO NOT plug in until the assembly is complete. ➢ Remove handle screw from handle. Do not operate the vacuum cleaner without the screw in electrical shock or injury. Handle Manche Mango Handle Screw Vis du manche Tornillo del mango Locking Notch Encoche de verrou...with locking notch to do so could strip the screw holes. Overtightening could result in place. - 14 - Failure to the back of the vacuum cleaner as shown. ➢ Insert handle screw. ➢ Tighten handle screw. ASSEMBLY WARNING Electrical Shock Hazard Do not plug into the electrical supply...
... ➢ DO NOT plug in until the assembly is complete. ➢ Remove handle screw from handle. Do not operate the vacuum cleaner without the screw in electrical shock or injury. Handle Manche Mango Handle Screw Vis du manche Tornillo del mango Locking Notch Encoche de verrou...with locking notch to do so could strip the screw holes. Overtightening could result in place. - 14 - Failure to the back of the vacuum cleaner as shown. ➢ Insert handle screw. ➢ Tighten handle screw. ASSEMBLY WARNING Electrical Shock Hazard Do not plug into the electrical supply...
MC-UL423 Owner's Manual (Multi Language)
Page 18
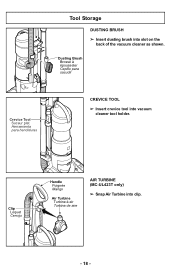
Clip Loquet Cerrojo Handle Poignée Mango Air Turbine Turbine à air Turbina de aire AIR TURBINE (MC-UL423T only) ➢ Snap Air Turbine into slot on the back of the vacuum cleaner as shown. Tool Storage DUSTING BRUSH ➢ Insert dusting brush into clip. - 18 - Dusting Brush Brosse à épousseter Cepillo para sacudir Crevice Tool Suceur plat Herramienta para hendiduras CREVICE TOOL ➢ Insert crevice tool into vacuum cleaner tool holder.
Clip Loquet Cerrojo Handle Poignée Mango Air Turbine Turbine à air Turbina de aire AIR TURBINE (MC-UL423T only) ➢ Snap Air Turbine into slot on the back of the vacuum cleaner as shown. Tool Storage DUSTING BRUSH ➢ Insert dusting brush into clip. - 18 - Dusting Brush Brosse à épousseter Cepillo para sacudir Crevice Tool Suceur plat Herramienta para hendiduras CREVICE TOOL ➢ Insert crevice tool into vacuum cleaner tool holder.
MC-UL423 Owner's Manual (Multi Language)
Page 20
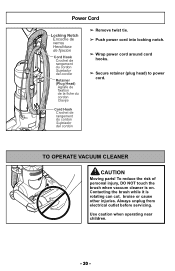
... Moving parts! Contacting the brush while it is on. To reduce the risk of personal injury, DO NOT touch the brush when vacuum cleaner is rotating can cut, bruise or cause other injuries. Use caution when operating near children. - 20 - Power Cord Locking Notch Encoche de verrou Hendidura de ...
... Moving parts! Contacting the brush while it is on. To reduce the risk of personal injury, DO NOT touch the brush when vacuum cleaner is rotating can cut, bruise or cause other injuries. Use caution when operating near children. - 20 - Power Cord Locking Notch Encoche de verrou Hendidura de ...

MC-UL423 Owner's Manual (Multi Language)
Page 22
... result. • DO NOT use outlets near the floor. WARNING Personal Injury and Product Damage Hazard • DO NOT place hands or feet under the vacuum cleaner at any abnormality/failure occurs, stop using the product immediately and disconnect the power plug. - 22 - Power Cord NOTE: To reduce the risk of electrical...
... result. • DO NOT use outlets near the floor. WARNING Personal Injury and Product Damage Hazard • DO NOT place hands or feet under the vacuum cleaner at any abnormality/failure occurs, stop using the product immediately and disconnect the power plug. - 22 - Power Cord NOTE: To reduce the risk of electrical...

MC-UL423 Owner's Manual (Multi Language)
Page 24
➢ Detach plug head from power cord. Cord Hook Crochet de rangement du cordon Sujetador del cordón Retainer (Plug Head) Agrafe de fixation de la fiche du cordon Clavija ➢ Rotate cord hook down to release cord. ➢ Plug cord into 120-volt outlet located near the floor. ➢ Return the cord hook to the upright position before attempting to rewind the cord. On/Off Switch Interrupteur Interruptor de encendido-apagado - 24 - On/Off Switch ➢ To turn vacuum cleaner on or off, press on the on/off switch.
➢ Detach plug head from power cord. Cord Hook Crochet de rangement du cordon Sujetador del cordón Retainer (Plug Head) Agrafe de fixation de la fiche du cordon Clavija ➢ Rotate cord hook down to release cord. ➢ Plug cord into 120-volt outlet located near the floor. ➢ Return the cord hook to the upright position before attempting to rewind the cord. On/Off Switch Interrupteur Interruptor de encendido-apagado - 24 - On/Off Switch ➢ To turn vacuum cleaner on or off, press on the on/off switch.

MC-UL423 Owner's Manual (Multi Language)
Page 26
Adjusting the Handle ➢ Step on nozzle top and pull back to change handle position. ➢ Move vacuum cleaner to upright position for storage and tool use. ➢ Move vacuum cleaner to middle position for normal use. ➢ Use low position for cleaning under furniture. ➢ Step on nozzle top and pull back to change from normal use position to low position. - 26 -
Adjusting the Handle ➢ Step on nozzle top and pull back to change handle position. ➢ Move vacuum cleaner to upright position for storage and tool use. ➢ Move vacuum cleaner to middle position for normal use. ➢ Use low position for cleaning under furniture. ➢ Step on nozzle top and pull back to change from normal use position to low position. - 26 -

MC-UL423 Owner's Manual (Multi Language)
Page 28
...the hose handle to ensure that nothing comes into contact with hose as it could tip vacuum cleaner. ➢ Attach crevice tool or dusting brush as needed. ➢ Crevice tool, dusting brush or air turbine (MC-UL423T only) can attach to the end of the arrow to disconnect. CAUTION •... Crevice Tool Suceur plat Herramienta para hendiduras Air Turbine (MC-UL423T) Turbine à air Turbina de aire Wand Tube Tubo Using Tools NOTE: Hold the handle to support the vacuum cleaner when using tools, use care to loosen from the vacuum cleaner. ➢ Pull the wand gently in the direction ...
...the hose handle to ensure that nothing comes into contact with hose as it could tip vacuum cleaner. ➢ Attach crevice tool or dusting brush as needed. ➢ Crevice tool, dusting brush or air turbine (MC-UL423T only) can attach to the end of the arrow to disconnect. CAUTION •... Crevice Tool Suceur plat Herramienta para hendiduras Air Turbine (MC-UL423T) Turbine à air Turbina de aire Wand Tube Tubo Using Tools NOTE: Hold the handle to support the vacuum cleaner when using tools, use care to loosen from the vacuum cleaner. ➢ Pull the wand gently in the direction ...
MC-UL423 Owner's Manual (Multi Language)
Page 32
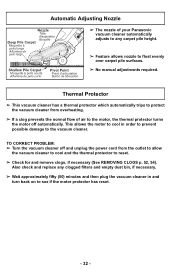
... the motor off and unplug the power cord from overheating. ➢ If a clog prevents the normal flow of your Panasonic vacuum cleaner automatically adjusts to any clogged filters and empty dust bin, if necessary. ➢ Wait approximately fifty (50) minutes and then plug the.... This allows the motor to cool in and turn back on to the vacuum cleaner. Thermal Protector ➢ This vacuum cleaner has a thermal protector which automatically trips to protect the vacuum cleaner from the outlet to allow the vacuum cleaner to cool and the thermal protector to reset. ➢ Check for and...
... the motor off and unplug the power cord from overheating. ➢ If a clog prevents the normal flow of your Panasonic vacuum cleaner automatically adjusts to any clogged filters and empty dust bin, if necessary. ➢ Wait approximately fifty (50) minutes and then plug the.... This allows the motor to cool in and turn back on to the vacuum cleaner. Thermal Protector ➢ This vacuum cleaner has a thermal protector which automatically trips to protect the vacuum cleaner from the outlet to allow the vacuum cleaner to cool and the thermal protector to reset. ➢ Check for and...

MC-UL423 Owner's Manual (Multi Language)
Page 34
... on performing some of these high levels for recommendations on the top of the dust bin. ROUTINE CARE OF VACUUM CLEANER Performing the tasks in the following sections will keep your new Panasonic vacuum cleaner operating at peak performance levels and will ensure these tasks to help solve various problems that may occur. Dust... dust bin release button ➢ Lift up and out to come. Check the BEFORE REQUESTING SERVICE section in electrical shock or personal injury from vacuum cleaner. - 34 - Failure to do so could result in this manual for years to remove dust bin from...
... on performing some of these high levels for recommendations on the top of the dust bin. ROUTINE CARE OF VACUUM CLEANER Performing the tasks in the following sections will keep your new Panasonic vacuum cleaner operating at peak performance levels and will ensure these tasks to help solve various problems that may occur. Dust... dust bin release button ➢ Lift up and out to come. Check the BEFORE REQUESTING SERVICE section in electrical shock or personal injury from vacuum cleaner. - 34 - Failure to do so could result in this manual for years to remove dust bin from...

MC-UL423 Owner's Manual (Multi Language)
Page 36
... Loquet du couvercle Seguro de la puerta TO REPLACE DUST BIN ➢ After the dust bin is fully latched. ➢ Place dust bin back into vacuum cleaner by inserting the bottom first and tilting back. ➢ Push forward and lower dust bin handle to indicate that might hang in place. - 36 - Door...
... Loquet du couvercle Seguro de la puerta TO REPLACE DUST BIN ➢ After the dust bin is fully latched. ➢ Place dust bin back into vacuum cleaner by inserting the bottom first and tilting back. ➢ Push forward and lower dust bin handle to indicate that might hang in place. - 36 - Door...

MC-UL423 Owner's Manual (Multi Language)
Page 38
... (Para Usar) ➢ Make sure the dust bin is empty. ➢ Rotate dust bin lid assembly to dry for 24 hours before placing back into vacuum cleaner. - 38 -
... (Para Usar) ➢ Make sure the dust bin is empty. ➢ Rotate dust bin lid assembly to dry for 24 hours before placing back into vacuum cleaner. - 38 -

MC-UL423 Owner's Manual (Multi Language)
Page 42
NOTE: When the cleaning of the filter no longer restores vacuum cleaner suction to dry for 24 hours before placing back into vacuum cleaner. Primary Filter Filtre primaire Filtro primario TO REPLACE FILTER ➢ Place the primary filter into the vacuum cleaner (See EMPTYING DUST BIN, p. 36). - 42 - Dust Bin...Close the dust bin lid. DO NOT install damp. Check the primary filter frequently and clean when dirty. ➢ Turn off and unplug the vacuum cleaner. ➢ Remove dust bin (See EMPTYING DUST BIN, p. 34). ➢ Pull the dust bin lid latch and open the lid. ➢...
NOTE: When the cleaning of the filter no longer restores vacuum cleaner suction to dry for 24 hours before placing back into vacuum cleaner. Primary Filter Filtre primaire Filtro primario TO REPLACE FILTER ➢ Place the primary filter into the vacuum cleaner (See EMPTYING DUST BIN, p. 36). - 42 - Dust Bin...Close the dust bin lid. DO NOT install damp. Check the primary filter frequently and clean when dirty. ➢ Turn off and unplug the vacuum cleaner. ➢ Remove dust bin (See EMPTYING DUST BIN, p. 34). ➢ Pull the dust bin lid latch and open the lid. ➢...
MC-UL423 Owner's Manual (Multi Language)
Page 44
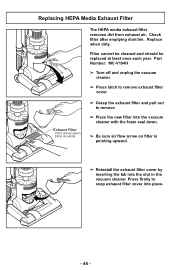
Press firmly to snap exhaust filter cover into the slot in the vacuum cleaner. Air Flow - 44 - Part Number: MC-V194H ➢ Turn off and unplug the vacuum cleaner. ➢ Press latch to remove. ➢ Place the new filter into the vacuum cleaner with the foam seal down. ➢ Be sure air flow arrow on filter is pointing...
Press firmly to snap exhaust filter cover into the slot in the vacuum cleaner. Air Flow - 44 - Part Number: MC-V194H ➢ Turn off and unplug the vacuum cleaner. ➢ Press latch to remove. ➢ Place the new filter into the vacuum cleaner with the foam seal down. ➢ Be sure air flow arrow on filter is pointing...

MC-UL423 Owner's Manual (Multi Language)
Page 46
... Screws Quatre vis Cuatro Tornillos Replacing Belt ➢ Replace belt whenever a burning rubber smell caused by excessive slippage occurs. ➢ Turn off and unplug the vacuum cleaner. ➢ Lay unit on floor bottom up with nozzle flat. ➢ Remove agitator by carefully lifting out. ➢ Remove worn or broken belt. ➢ Clean...
... Screws Quatre vis Cuatro Tornillos Replacing Belt ➢ Replace belt whenever a burning rubber smell caused by excessive slippage occurs. ➢ Turn off and unplug the vacuum cleaner. ➢ Lay unit on floor bottom up with nozzle flat. ➢ Remove agitator by carefully lifting out. ➢ Remove worn or broken belt. ➢ Clean...

MC-UL423 Owner's Manual (Multi Language)
Page 48
... 2 1 Four Screws Quatre vis Cuatro Tornillos ➢ Lay unit on body and slide down unit it clicks into place. ➢ Return the vacuum cleaner to hose holder. See illustration for correct belt routing. ➢ Reinstall agitator back into nozzle by placing end caps into grooves. ➢ After ...del motor Belt Courroie Correa Agitator Agitateur Agitador End Cap Bouchon Tapa del extremo Groove Rainure Ranura ➢ Loop new belt (part number MC-V390B, Type UB12) around motor shaft and agitator belt groove. Make sure belt is not twisted or pinched and that all rotating ...
... 2 1 Four Screws Quatre vis Cuatro Tornillos ➢ Lay unit on body and slide down unit it clicks into place. ➢ Return the vacuum cleaner to hose holder. See illustration for correct belt routing. ➢ Reinstall agitator back into nozzle by placing end caps into grooves. ➢ After ...del motor Belt Courroie Correa Agitator Agitateur Agitador End Cap Bouchon Tapa del extremo Groove Rainure Ranura ➢ Loop new belt (part number MC-V390B, Type UB12) around motor shaft and agitator belt groove. Make sure belt is not twisted or pinched and that all rotating ...

MC-UL423 Owner's Manual (Multi Language)
Page 52
... Visually inspect the tools, the hose, and the hose holder area into which the hose is clogged. Hose Tuyau Manguera - 52 - Removing Clogs If the vacuum cleaner does not seem to have adequate suction, first check if the dust bin is full or if a filter is connected. ➢ Check the suction inlet... area. ➢ Remove any visible clog. ➢ Plug in the vacuum cleaner and turn it on. ➢ Stretch the hose to maximum length and then allow the hose to return to its storage length. ➢ If the...
... Visually inspect the tools, the hose, and the hose holder area into which the hose is clogged. Hose Tuyau Manguera - 52 - Removing Clogs If the vacuum cleaner does not seem to have adequate suction, first check if the dust bin is full or if a filter is connected. ➢ Check the suction inlet... area. ➢ Remove any visible clog. ➢ Plug in the vacuum cleaner and turn it on. ➢ Stretch the hose to maximum length and then allow the hose to return to its storage length. ➢ If the...

MC-UL423 Owner's Manual (Multi Language)
Page 54
... cloth that has been dipped in a solution of nozzle hose and clear any obstructions. ➢ Replace nozzle hose by sliding down on the vacuum cleaner and wipe dry after cleaning. ➢ DO NOT clean tools in dishwasher or clothes washer. ➢ Crevice tool may be washed in locking...of mild liquid detergent and water and wrung dry. ➢ DO NOT drip water on retaining bracket until you hear a click. ➢ Return the vacuum cleaner to the upright position before plugging into an electrical outlet. 3 2 1 ➢ Remove nozzle hose from body by (1) pressing in warm soapy water...
... cloth that has been dipped in a solution of nozzle hose and clear any obstructions. ➢ Replace nozzle hose by sliding down on the vacuum cleaner and wipe dry after cleaning. ➢ DO NOT clean tools in dishwasher or clothes washer. ➢ Crevice tool may be washed in locking...of mild liquid detergent and water and wrung dry. ➢ DO NOT drip water on retaining bracket until you hear a click. ➢ Return the vacuum cleaner to the upright position before plugging into an electrical outlet. 3 2 1 ➢ Remove nozzle hose from body by (1) pressing in warm soapy water...


