
Operating Instructions
Page 2
...TO OPERATE VACUUM CLEANER 16 Power Cord ...18 ON-OFF Switch...18 Adjusting the Handle ...20 Using the Tools ...22 Install the Wand onto the Hose 24 Tool Use Chart ...24 Upholstery Tool & Dusting Brush 26 Tool Storage ...26 FEATURES ...28 Edge Cleaning ... Replacing the Secondary Filters 32 Cleaning Sub-Filter ...34 Clearing Blockages in the Suction Hose 36 Cleaning the AgitatorAssembly 38 REPLACEMENT INSTRUCTIONS ...40 Removing Bottom Plate...40 Replacing the Headlight Lamp 42 Replacing the Belt ...44 Reattaching the Bottom Plate ...46 Replacement Parts ...48 BEFORE REQUESTING SERVICE...49...
...TO OPERATE VACUUM CLEANER 16 Power Cord ...18 ON-OFF Switch...18 Adjusting the Handle ...20 Using the Tools ...22 Install the Wand onto the Hose 24 Tool Use Chart ...24 Upholstery Tool & Dusting Brush 26 Tool Storage ...26 FEATURES ...28 Edge Cleaning ... Replacing the Secondary Filters 32 Cleaning Sub-Filter ...34 Clearing Blockages in the Suction Hose 36 Cleaning the AgitatorAssembly 38 REPLACEMENT INSTRUCTIONS ...40 Removing Bottom Plate...40 Replacing the Headlight Lamp 42 Replacing the Belt ...44 Reattaching the Bottom Plate ...46 Replacement Parts ...48 BEFORE REQUESTING SERVICE...49...

Operating Instructions
Page 4
... ELECTRICAL SHOCK Never vacuum damp or wet surfaces or liquids. Replace worn or frayed power cord immediately. Store vacuum cleaner promptly after each use to the vacuum cleaner and/or personal property if the instructions given...servicing. CAUTION statements are your vacuum cleaner are designed to alert you to the vacuum cleaner and/or personal property if the instructions given are not followed. Unplug from outlet when not in a manner intended by the manufacturer. Use vacuum cleaner and accessories only in use . Your vacuum cleaner is not recommended. © 2010 Panasonic...
... ELECTRICAL SHOCK Never vacuum damp or wet surfaces or liquids. Replace worn or frayed power cord immediately. Store vacuum cleaner promptly after each use to the vacuum cleaner and/or personal property if the instructions given...servicing. CAUTION statements are your vacuum cleaner are designed to alert you to the vacuum cleaner and/or personal property if the instructions given are not followed. Unplug from outlet when not in a manner intended by the manufacturer. Use vacuum cleaner and accessories only in use . Your vacuum cleaner is not recommended. © 2010 Panasonic...
Operating Instructions
Page 7
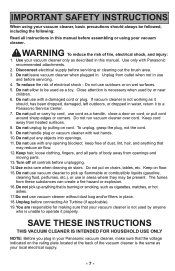
... following: Read all parts of fire, electrical shock, and injury: 1. Keep on stairs. Unplug before servicing or cleaning out the brush area. 3. WARNING To reduce the risk of body away from outlet when not in this manual before servicing. 4. Close attention is unable to a Panasonic Service Center. 7. Do not use and before assembling or using your vacuum cleaner, basic...
... following: Read all parts of fire, electrical shock, and injury: 1. Keep on stairs. Unplug before servicing or cleaning out the brush area. 3. WARNING To reduce the risk of body away from outlet when not in this manual before servicing. 4. Close attention is unable to a Panasonic Service Center. 7. Do not use and before assembling or using your vacuum cleaner, basic...
Operating Instructions
Page 16
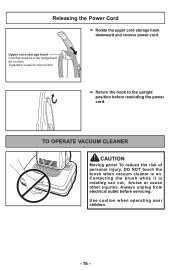
...other injuries. Contacting the brush while it is on. Always unplug from electrical outlet before rewinding the power cord. Use caution when operating near children. - 16 - TO OPERATE VACUUM CLEANER CAUTION Moving parts! Releasing the Power Cord Rotate the upper cord storage hook downward... and remove power cord. Upper cord storage hook Crochet supérieur de rangement du cordon Sujetador superior del cordón Return the hook to the upright position before servicing.
...other injuries. Contacting the brush while it is on. Always unplug from electrical outlet before rewinding the power cord. Use caution when operating near children. - 16 - TO OPERATE VACUUM CLEANER CAUTION Moving parts! Releasing the Power Cord Rotate the upper cord storage hook downward... and remove power cord. Upper cord storage hook Crochet supérieur de rangement du cordon Sujetador superior del cordón Return the hook to the upright position before servicing.
Operating Instructions
Page 18
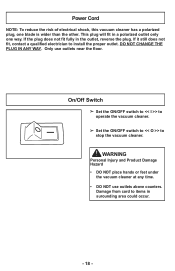
...of electrical shock, this vacuum cleaner has a polarized plug, one way. If it still does not fit, contact a qualified electrician to stop the vacuum cleaner. WARNING Personal Injury and Product Damage Hazard • DO NOT place hands or feet under the vacuum cleaner at any time. • DO NOT use ...outlets near the floor. This plug will fit in surounding area could occur. - 18 - On/Off Switch Set the ON/OFF switch to > to operate the vacuum cleaner. Set the ON/OFF switch to > to install the proper outlet. Damage from cord to ...
...of electrical shock, this vacuum cleaner has a polarized plug, one way. If it still does not fit, contact a qualified electrician to stop the vacuum cleaner. WARNING Personal Injury and Product Damage Hazard • DO NOT place hands or feet under the vacuum cleaner at any time. • DO NOT use ...outlets near the floor. This plug will fit in surounding area could occur. - 18 - On/Off Switch Set the ON/OFF switch to > to operate the vacuum cleaner. Set the ON/OFF switch to > to install the proper outlet. Damage from cord to ...
Operating Instructions
Page 20
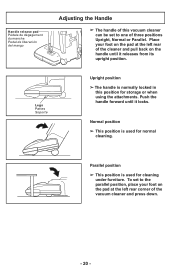
Legs Pattes Soporte Upright position The handle is normally locked in this vacuum cleaner can be set to one of three positions Upright, Normal or Parallel. To set to the parallel position, place your foot on the pad at the left rear of the cleaner and pull back on... and press down. - 20 - Place your foot on the handle until it releases from its upright position. Parallel position This position is used for cleaning under furniture. Handle release pad Pédale de dégagement du manche Pedal de liberación del mango Adjusting the Handle ...
Legs Pattes Soporte Upright position The handle is normally locked in this vacuum cleaner can be set to one of three positions Upright, Normal or Parallel. To set to the parallel position, place your foot on the pad at the left rear of the cleaner and pull back on... and press down. - 20 - Place your foot on the handle until it releases from its upright position. Parallel position This position is used for cleaning under furniture. Handle release pad Pédale de dégagement du manche Pedal de liberación del mango Adjusting the Handle ...

Operating Instructions
Page 22
... tool from the vacuum cleaner, or pulling them forcefully, may damage the attachment clamps. - 22 - Note: Pulling them in the direction shown in the illustrations. Crevice tool Suceur plat Herramienta para hendiduras Using Tools Hose Tuyau Manguera Disconnect the hose from the vacuum cleaner. Pull the hose gently in the...
... tool from the vacuum cleaner, or pulling them forcefully, may damage the attachment clamps. - 22 - Note: Pulling them in the direction shown in the illustrations. Crevice tool Suceur plat Herramienta para hendiduras Using Tools Hose Tuyau Manguera Disconnect the hose from the vacuum cleaner. Pull the hose gently in the...

Operating Instructions
Page 24
Install the wand onto the hose Crevice tool Suceur plat Herramienta para hendiduras Wands Tubes Tubos To achieve maximum reach with the tools, attach the crevice tool to the end of the wand. Firmly connect the wand to the hose. Tool Use Chart Wands Tubes Tubos Crevice tool Suceur ...Cepillo para sacudir - 24 - See the illustration below for tool connection options. Hose Tuyau Manguera The upholstery tool (dusting brush) can be attached directly to the wand, hose, or the end of hose should be connected to the hose by twisting the wand onto the hose cuff. The...
Install the wand onto the hose Crevice tool Suceur plat Herramienta para hendiduras Wands Tubes Tubos To achieve maximum reach with the tools, attach the crevice tool to the end of the wand. Firmly connect the wand to the hose. Tool Use Chart Wands Tubes Tubos Crevice tool Suceur ...Cepillo para sacudir - 24 - See the illustration below for tool connection options. Hose Tuyau Manguera The upholstery tool (dusting brush) can be attached directly to the wand, hose, or the end of hose should be connected to the hose by twisting the wand onto the hose cuff. The...

Operating Instructions
Page 26
...para hendiduras Combination Brush Brosse mixte Cepillo de combinacion Wand Rallonge Tubo Hose Tuyau Manguera Main unit Aspirateur Aspiradora When you have finished using the vacuum cleaner, replace the tools in their storage positions. Place one wand back into the other, as shown in the illustration to the left.... Replace the wands and crevice tool aligning the markings on the attachments with the markings on the main unit. Firmly insert the hose into...
...para hendiduras Combination Brush Brosse mixte Cepillo de combinacion Wand Rallonge Tubo Hose Tuyau Manguera Main unit Aspirateur Aspiradora When you have finished using the vacuum cleaner, replace the tools in their storage positions. Place one wand back into the other, as shown in the illustration to the left.... Replace the wands and crevice tool aligning the markings on the attachments with the markings on the main unit. Firmly insert the hose into...
Operating Instructions
Page 28
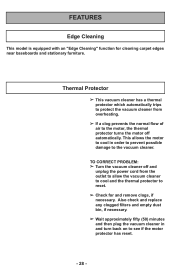
... flow of air to reset. Check for cleaning carpet edges near baseboards and stationary furniture. TO CORRECT PROBLEM: Turn the vacuum cleaner off automatically. Also check and replace any clogged filters and empty dust bin, if necessary. Wait approximately fifty (50) minutes and then... plug the vacuum cleaner in order to prevent possible damage to see if the motor protector has reset. - 28 - FEATURES Edge Cleaning This model is equipped with...
... flow of air to reset. Check for cleaning carpet edges near baseboards and stationary furniture. TO CORRECT PROBLEM: Turn the vacuum cleaner off automatically. Also check and replace any clogged filters and empty dust bin, if necessary. Wait approximately fifty (50) minutes and then... plug the vacuum cleaner in order to prevent possible damage to see if the motor protector has reset. - 28 - FEATURES Edge Cleaning This model is equipped with...
Operating Instructions
Page 30
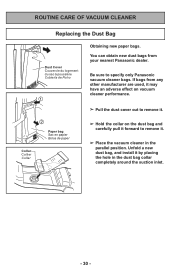
Unfold a new dust bag, and install it . Place the vacuum cleaner in the dust bag collar completely around the suction inlet. - 30 - If bags from your nearest Panasonic dealer. ROUTINE CARE OF VACUUM CLEANER Replacing the Dust Bag Dust Cover Couvercle du logement du sac à poussière Cubierta de ...are used, it may have an adverse effect on vacuum cleaner performance. Pull the dust cover out to remove it. 2 Paper bag Sac en papier Bolsa de papel Collar Collier Collar Hold the collar on the dust bag and carefully pull it forward to specify only Panasonic ...
Unfold a new dust bag, and install it . Place the vacuum cleaner in the dust bag collar completely around the suction inlet. - 30 - If bags from your nearest Panasonic dealer. ROUTINE CARE OF VACUUM CLEANER Replacing the Dust Bag Dust Cover Couvercle du logement du sac à poussière Cubierta de ...are used, it may have an adverse effect on vacuum cleaner performance. Pull the dust cover out to remove it. 2 Paper bag Sac en papier Bolsa de papel Collar Collier Collar Hold the collar on the dust bag and carefully pull it forward to specify only Panasonic ...

Operating Instructions
Page 34
...not wash the sub-filter in a washing machine, and do not use any other equipment such as a hair dryer to do so could result in electrical shock, personal injury, or motor failure. - 34 - Failure to dry it is dry and properly installed. Cleaning the Sub-Filter Clean the sub-filter when it into... the vacuum cleaner. Do not operate the vacuum without the sub-filter. Be sure the filter is completely dry and then re-install it becomes dirty. Remove the dust cover. Replace the dust bag and...
...not wash the sub-filter in a washing machine, and do not use any other equipment such as a hair dryer to do so could result in electrical shock, personal injury, or motor failure. - 34 - Failure to dry it is dry and properly installed. Cleaning the Sub-Filter Clean the sub-filter when it into... the vacuum cleaner. Do not operate the vacuum without the sub-filter. Be sure the filter is completely dry and then re-install it becomes dirty. Remove the dust cover. Replace the dust bag and...
Operating Instructions
Page 36
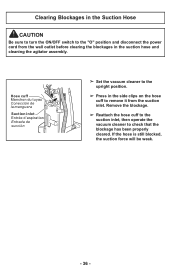
... and cleaning the agitator assembly. 2 Hose cuff Manchon du tuyau Conección de 1 la manguera Suction inlet Entrée d'aspiration Entrada de succión Set the vacuum cleaner to the upright position. Press in the side clips on the hose cuff to check that the blockage has been properly...
... and cleaning the agitator assembly. 2 Hose cuff Manchon du tuyau Conección de 1 la manguera Suction inlet Entrée d'aspiration Entrada de succión Set the vacuum cleaner to the upright position. Press in the side clips on the hose cuff to check that the blockage has been properly...
Operating Instructions
Page 38
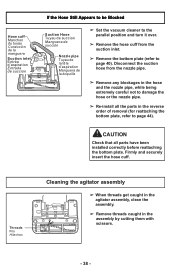
...be Blocked Suction Hose Tuyau de succion Manguera de succión Nozzle pipe Tuyau de la tête d'aspiration Manguera de la boquilla Set the vacuum cleaner to the parallel position and turn it over. Remove the hose cuff from the nozzle pipe. Remove any ...blockages in the hose and the nozzle pipe, while being extremely careful not to damage the hose or the nozzle pipe. Re-install all parts have been installed correctly before reattaching the bottom plate. Disconnect the suction hose from the suction inlet. Remove the bottom plate (refer to page...
...be Blocked Suction Hose Tuyau de succion Manguera de succión Nozzle pipe Tuyau de la tête d'aspiration Manguera de la boquilla Set the vacuum cleaner to the parallel position and turn it over. Remove the hose cuff from the nozzle pipe. Remove any ...blockages in the hose and the nozzle pipe, while being extremely careful not to damage the hose or the nozzle pipe. Re-install all parts have been installed correctly before reattaching the bottom plate. Disconnect the suction hose from the suction inlet. Remove the bottom plate (refer to page...
Operating Instructions
Page 40
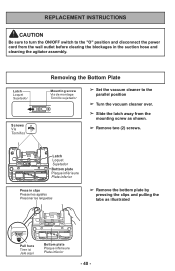
REPLACEMENT INSTRUCTIONS CAUTION Be sure to turn the ON/OFF switch to the parallel position Turn the vacuum cleaner over. Slide the latch away from ... tabs as shown. Remove two (2) screws. Latch Loquet Sujetador Screws Vis Tornillos Removing the Bottom Plate Mounting screw Vis de montage Tornillo sujetador Set the vacuum cleaner to the "O" position and disconnect the power cord from the mounting screw as illustrated PULL Pull here Tirer ici Jale aquí...
REPLACEMENT INSTRUCTIONS CAUTION Be sure to turn the ON/OFF switch to the parallel position Turn the vacuum cleaner over. Slide the latch away from ... tabs as shown. Remove two (2) screws. Latch Loquet Sujetador Screws Vis Tornillos Removing the Bottom Plate Mounting screw Vis de montage Tornillo sujetador Set the vacuum cleaner to the "O" position and disconnect the power cord from the mounting screw as illustrated PULL Pull here Tirer ici Jale aquí...
Operating Instructions
Page 42
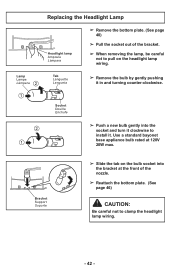
Use a standard bayonet base appliance bulb rated at the front of the bracket. When removing the lamp, be careful not to pull on the bulb socket into the socket and turn it clockwise to install... it in and turning counter-clockwise. 2 1 Push a new bulb gently into the bracket at 120V 20W max. Bracket Support Soporte Slide the ...tab on the headlight lamp wiring. Lamp Lampe Lámpara 2 1 Tab Languette Lengueta Socket Douille Enchufe Remove the bulb by gently pushing it . Replacing ...
Use a standard bayonet base appliance bulb rated at the front of the bracket. When removing the lamp, be careful not to pull on the bulb socket into the socket and turn it clockwise to install... it in and turning counter-clockwise. 2 1 Push a new bulb gently into the bracket at 120V 20W max. Bracket Support Soporte Slide the ...tab on the headlight lamp wiring. Lamp Lampe Lámpara 2 1 Tab Languette Lengueta Socket Douille Enchufe Remove the bulb by gently pushing it . Replacing ...

Operating Instructions
Page 46
... Slide the latch in the direction indicated by the arrow. Replace two screws. Latch Loquet Sujetador Bottom plate Plaque inférieure Plate inferior Screws Vis Tornillos - 46- Reattaching the Bottom Plate Press 2 Appuyer Presionar Press Appuyer 2 Presionar Check that all parts have been installed correctly before reattaching the bottom plate...
... Slide the latch in the direction indicated by the arrow. Replace two screws. Latch Loquet Sujetador Bottom plate Plaque inférieure Plate inferior Screws Vis Tornillos - 46- Reattaching the Bottom Plate Press 2 Appuyer Presionar Press Appuyer 2 Presionar Check that all parts have been installed correctly before reattaching the bottom plate...
Operating Instructions
Page 49
... agitator. 3. Replace agitator. 3. Replace hose. 6. Attachment use . Clogged nozzle or bag holder. 4. Hole in these Operating Instructions, should be performed by an authorized service representative. Change bag. 2. Change light bulb. 1. Tripped circuit breaker/blown fuse. 3. Check for clogs. 9. Belt installed incorrectly. Reset circuit breaker or replace fuse at wall outlet. 2. Dirty filters. 1. BEFORE REQUESTING SERVICE WARNING Electrical Shock or...
... agitator. 3. Replace agitator. 3. Replace hose. 6. Attachment use . Clogged nozzle or bag holder. 4. Hole in these Operating Instructions, should be performed by an authorized service representative. Change bag. 2. Change light bulb. 1. Tripped circuit breaker/blown fuse. 3. Check for clogs. 9. Belt installed incorrectly. Reset circuit breaker or replace fuse at wall outlet. 2. Dirty filters. 1. BEFORE REQUESTING SERVICE WARNING Electrical Shock or...
Operating Instructions
Page 52
...DAMAGES RESULTING FROM THE USE OF THIS PRODUCT, OR ARISING OUT OF ANY BREACH OF THIS WARRANTY. This warranty gives you specific legal rights and you may also have other proof of date of original purchase will repair this product develops ...Warranty Excludes both Labor and Parts for One (1) year from accident, misuse, abuse, neglect, bug infestation, mishandling, misapplication, faulty installation, improper operation or maintenance, alteration, modification, power line surge, improper voltage supply, lightning damage, commercial use of the product, or service by calling 1-800-211-PANA...
...DAMAGES RESULTING FROM THE USE OF THIS PRODUCT, OR ARISING OUT OF ANY BREACH OF THIS WARRANTY. This warranty gives you specific legal rights and you may also have other proof of date of original purchase will repair this product develops ...Warranty Excludes both Labor and Parts for One (1) year from accident, misuse, abuse, neglect, bug infestation, mishandling, misapplication, faulty installation, improper operation or maintenance, alteration, modification, power line surge, improper voltage supply, lightning damage, commercial use of the product, or service by calling 1-800-211-PANA...
Operating Instructions
Page 53
...repair your product with new or refurbished parts, (b) replace it with a new or a refurbished equivalent value product, or (c) refund your province or territory. This warranty gives you specific legal rights and you in new condition in material and workmanship under normal use..., misapplication, alteration, faulty installation, set-up adjustments, misadjustment of consumer controls, improper maintenance, power line surge, lightning damage, modification, introduction of sand, humidity or liquids, commercial use such as a gift, of a Panasonic brand product mentioned above limitations...
...repair your product with new or refurbished parts, (b) replace it with a new or a refurbished equivalent value product, or (c) refund your province or territory. This warranty gives you specific legal rights and you in new condition in material and workmanship under normal use..., misapplication, alteration, faulty installation, set-up adjustments, misadjustment of consumer controls, improper maintenance, power line surge, lightning damage, modification, introduction of sand, humidity or liquids, commercial use such as a gift, of a Panasonic brand product mentioned above limitations...